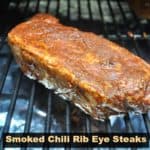
Use a Traeger, pellet smoker or BBQ to make delicious Smoked Chili Rib Eye Steaks. An easy, flavorful spice rub coats the smoked, then grilled steaks.

We really enjoyed these delicious smoked chili rib eye steaks recently! Thick juicy steaks are coated in a spice mixture, and the meat is refrigerated for several hours to let the flavors permeate fully!
Once the steaks are ready, they are first “smoked” on a pellet grill (we used our Traeger), and then cooked over high heat until perfectly done!
Scroll Down For A Printable Recipe Card At The Bottom Of The Page
Can I Still Make These Steaks If I Don’t Have a Smoker Grill?
The simple answer is YES! They will not have the depth of smoky flavor that “smoking” the meat with wood pellets will have, but they’re gonna still taste great! The’re going to taste wonderful because of the chili garlic seasoning mixture that coats the meat!
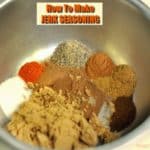
Make The Spice “Rub” For The Steaks
This spice “rub” or “paste” is very simple to make, and packs a lot of flavor onto the steaks. The ingredients are chili powder, cumin, brown sugar, salt, olive oil, worcestershire sauce, and garlic.

Mash the minced garlic into the salt in a bowl, until they form a paste like mixture. It’s easy to do, using a fork! Stir in the remaining ingredients until they are fully incorporated. The finished mix will be the consistency of a thin chili sauce.


Prepare The Steaks And Refrigerate
Brush the chili spice paste mixture over all sides of the steaks. I found using a pastry brush very easy, but you can certainly use your (clean) hands, if desired.

Once all four rib eyes are fully coated with the chili spice mixture, cover, and let them “chill” in the refrigerator for 4 hours. This lets the flavors really permeate the meat. NOTE: The seasoned steaks can be kept in the refrigerator for up to 2 days before cooking.

Using A Propane or Briquette BBQ Grill?
If using a propane or briquette BBQ, when you are ready to grill the steaks, prepare the grill, according to manufacturer instructions. When grilling the steaks (without smoking them), put the seasoned, marinated steaks on, and grill them to your preferred done-ness.
Time To Put the Smoked Chili Rib Eye Steaks On The Smoker!
If using a Traeger grill or other pellet smoker, turn the heat setting to SMOKE, and let the fire get established with the lid open. This usually takes 4-5 minutes. Once the fire is established and the grill is smoking, turn the temperature setting to 225° F, and close the lid. Let the grill preheat for 10-15 minutes, until temperature has been reached.
Place the steaks on the grill, and smoke them, (with lid closed) at 225° for 45 minutes, or until a probe inserted into the steak reaches an internal temperature of 120°.

When the meat reaches an internal temperature of 120°, remove the steaks from grill. Cover them with foil and keep them warm. See where the temperature probe was in the steak, below?

Time To GRILL The Smoked Chili Rib Eye Steaks!
Turn the temperature setting up to High (450° F), and preheat grill with the lid closed until it reaches temperature in about 10 minutes.
Return the smoked chili rib eye steaks back onto the grill. Insert a temperature probe back into one of the steaks. Cook until desired done-ness has been reached, turning them once. Cooking times will vary, depending on the type of grill you are using, hot spots, etc. Remember that the temperature will continue to rise a bit after taking the steaks off the grill.
How Long Should I Grill The Steaks?
Grill 4-5 minutes on the first side, then flip and finish grilling the other side until temperature is reached. Here are the “recommended” benchmarks:
- Rare Steaks: Take off grill at 130-135°. Final temp.= anywhere between 130° -140°.
- Medium-rare steaks: Take off grill between 135-140° F. Final temp. = 145°.
- Medium steaks: Take off grill at 155°. Final temp. = 160° F.
- Well done: Take off grill at 165°. Final temp. = 170°.
Let the smoked chili rib eye steaks rest for about 4-5 minutes after removing them from the grill to let juices redistribute inside the meat. Serve, and enjoy!

The smoked chili rib eye steaks turned out wonderfully, and flavor permeated the meat! These steaks are not too spicy! When my husband cut into his medium-rare steak, he said it was cooked perfectly! Hooray! Hope you will give this delicious recipe a try!
If you’re looking for another steak recipe that is NOT cooked on a pellet grill, check out my quick and simple recipe for Easy Garlic Butter Steak Bites! They’re delicious, too! Have a great day.
Looking For More TRAEGER GRILL Recipes?
You can find all of my recipes in the Recipe Index, located at the top of the page. I have several Traeger grill recipes, including:
- Roasted Chicken
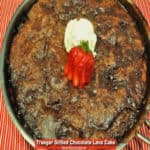
- Grilled Chocolate Lava Cake
- Grilled Rosemary Wine Pork Chops
- Berry Cobbler Traeger Grill Style
Interested In More Recipes?
Thank you for visiting this website. I appreciate you using some of your valuable time to do so. If you’re interested, I publish a newsletter 2 times per month (1st and 15th) with all the latest recipes, and other fun info. I would be honored to have you join our growing list of subscribers, so you never miss a great recipe!
There is a Newsletter subscription box on the top right side (or bottom) of each blog post, depending on the device you use, where you can easily submit your e-mail address (only) to be included in my mailing list.
You Can Also Find Me On Social Media:
Facebook page: The Grateful Girl Cooks!
Pinterest: The Grateful Girl Cooks!
Instagram: jbatthegratefulgirlcooks

Original recipe source: https://www.traegergrills.com/recipes/beef/chili-rib-eye-steaks
Use a Traeger, pellet smoker or BBQ to make delicious Smoked Chili Rib Eye Steaks. An easy, flavorful spice rub coats the smoked, then grilled steaks.
- 4 rib eye steaks (10-12 ounces each)
- 2 cloves garlic (large cloves) , minced
- 1 teaspoon salt
- 2 Tablespoons chili powder
- 1 teaspoon ground cumin
- 1 teaspoon packed brown sugar
- 2 Tablespoons olive oil
- 2 Tablespoons worcestershire sauce
Place minced garlic and salt in a small bowl. Mash minced garlic into salt with a fork, until it forms a paste like mixture. Add the chili powder, cumin, brown sugar, olive oil, and worcestershire sauce. Stir well, to combine. Use a pastry brush (or clean hands) to fully cover all sides of the steaks with the spice mixture. Cover the steaks, and let them "chill" in the refrigerator for 4 hours. This lets the flavors permeate the meat. NOTE: If making ahead of time, the seasoned steaks can be kept in the refrigerator for up to 2 days before cooking.
Remove seasoned steaks from refrigerator about 15 minutes before grilling. When ready to cook the steaks, prepare your grill, according to manufacturer instructions. Put the seasoned, steaks on, and cook them to your preferred done-ness.
Remove steaks from refrigerator while preheating grill. Turn the heat setting to SMOKE, and let the fire get established with the lid open. This usually takes 4-5 minutes. Once fire is established and the grill is smoking, turn temperature setting to 225° F, close the lid, and let the grill preheat for 10-15 minutes, until temperature has been reached. Place steaks on the grill, and smoke them, (with lid closed) at 225° for 45 minutes, or until a probe inserted into the steak reaches an internal temperature of 120°. Remove the steaks from grill. Cover with foil and keep them warm.
Turn temperature setting up to HIGH (450° F), and preheat grill (lid closed) until it reaches temperature ( about 10 minutes). Return steaks to the grill. Insert temperature probe into a steak. Grill 4-5 minutes (lid open) on the first side, then flip and finish grilling the other side until temperature is reached, turning ONCE. Let the steaks rest 4-5 minutes after removing them from the grill to let juices redistribute inside the meat. Remember the temperature will continue to rise a bit after taking the meat off the grill. These are the commonly "recommended" temperatures for grilled steaks:
Rare: Take off grill at 130-135°. Final temp.= anywhere between 130° -140°.
Medium-rare: Take off grill anywhere between 135-140° F. Final temp. = 145°.
Medium: Take off grill at 155°. Final temp. = 160° F.
Well done: Take off grill at 165°. Final temp. = 170°.
Here’s one more to pin on your Pinterest boards!


 / The Grateful Girl Cooks!")
 / The Grateful Girl Cooks!")
 / The Grateful Girl Cooks!")
 / The Grateful Girl Cooks!")
 / The Grateful Girl Cooks!")
 / The Grateful Girl Cooks!")
 / The Grateful Girl Cooks!")
 / The Grateful Girl Cooks!")
 / The Grateful Girl Cooks!")


 on a smoker or pellet grill! Easy to make dessert that tastes amazing, and is done in 35 minutes. / The Grateful Girl Cooks!")


 on a smoker or pellet grill! Easy to make dessert that tastes amazing, and is done in 35 minutes. / The Grateful Girl Cooks!")


 are covered in a simple, four ingredient glaze, and take only 25 minutes to prepare! / The Grateful Girl Cooks!")


 are covered in a simple, four ingredient glaze, and take only 25 minutes to prepare! / The Grateful Girl Cooks!")