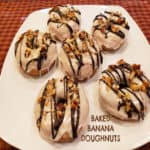
Whip up some Baked Banana Doughnuts, glazed, then topped with chocolate and toasted nuts! Easy to make, delicious, and ready in 25 minutes!

Good morning! Today I want to share a delicious recipe for baked banana doughnuts! Our family enjoyed them at our Easter brunch this past April, and they were a wonderful addition to our “feast”. Banana baked doughnuts have wonderful flavor, and look good, too!. I “prettied them up” a bit by adding chocolate drizzle and toasted nuts to each one, which gave them even better presentation and flavor! A family member was overheard saying they look like “REAL” doughnuts… ha ha!!
These breakfast treats (or snacks) are BAKED, and not FRIED, which makes them even easier to prepare! To make them, you will need to have a doughnut pan with a six doughnut well in it. I got mine years ago online, and it was fairly inexpensive. I’ve used mine many times over the years to make doughnuts, so it was a worthwhile purchase.
Scroll Down For A Printable Recipe Card At The Bottom Of The Page
Make The Batter For The Doughnuts
Before beginning, remember to preheat your oven to 325°F. It doesn’t take long at all to prepare the batter, so you will want that oven hot and ready to go, when you’re ready to bake the doughnuts. While the oven preheats, make the batter. Lightly spray or grease the doughnut pan, as well.
Whisk together all purpose flour, granulated sugar, cinnamon, baking powder and salt in a large bowl. Once you’ve combined these ingredients, make a “well” in the center of the mix, then set the bowl aside. In a separate bowl, combine mashed banana, buttermilk, a beaten egg, melted (cooled) butter and vanilla extract.


Pour the banana mixture into the well in the middle of the dry ingredients, and then stir until all ingredients are combined. Don’t overmix the batter… only stir until all ingredients have been incorporated into a thick batter.


Bake The Doughnuts
Evenly divide the doughnut batter into your lightly greased doughnut pan. I spoon the batter into each doughnut well, and it is not too messy at all. You will find that the batter will fill each well almost to the top.
Bake the doughnuts on the middle rack of the oven, at 325°F. for about 10-12 minutes. They will not be overly browned once done baking, but they should be set on top and cooked through. If you gently touch the top of the doughnut, it should spring back lightly.
Transfer the pan to a wire rack to cool slightly before removing the baked banana doughnuts from the pan. Once cooled slightly, place the doughnuts onto the wire rack, and put a sheet of wax paper or aluminum foil UNDER the rack. The foil or wax paper will catch any drips when you glaze the doughnuts later.


Glaze And Decorate The Doughnuts
While the baked banana doughnuts cool, make the simple glaze. Stir or whisk together powdered sugar, vanilla extract and milk until the glaze is smooth (no lumps!). Once the doughnuts have cooled to room temperature, dip the top of each doughnut (one at a time) into the glaze.
Dip doughnuts enough to cover the top of the doughnut, then quickly flip it over, allowing excess glaze to drip back into the bowl. Set the glazed doughnut back (frosting side UP) onto the wire rack, and repeat this process with the remaining doughnuts.


Once the glaze has been applied and has firmed up just a bit… drizzle melted chocolate over each donut, then add the toasted, chopped nuts on top of the chocolate. Lightly press the nuts into the chocolate so they will adhere to the doughnut. Let the toppings firm up before serving.

Serve The Baked Banana Doughnuts!
Once the glaze and chocolate toppings have firmed up, the baked banana doughnuts are ready to serve! We served them at our Easter brunch, and they were a hit! In the photo below you can see them (with the red arrow), along with our other choices.
We enjoyed them with a variety of dishes, including creamy deviled eggs, snickerdoodle bread, egg, cheese and veggie breakfast casserole, chocolate chip orange scones, and blueberry lemon muffins!


I hope you enjoy these yummy baked banana doughnuts! Thank you for stopping by my blog today, and I invite you to come back again for more family friendly recipes. Take care, and have a GREAT day!
Looking for More DOUGHNUT Recipes?
You can find ALL of my recipes in the Recipe Index, located at the top of the page. I have some absolutely delicious doughnut recipes for you to enjoy, including:
Interested In More Recipes?
Thank you for visiting this website. I appreciate you using some of your valuable time to do so. If you’re interested, I publish a newsletter 2 times per month (1st and 15th) with all the latest recipes, and other fun info. I would be honored to have you join our growing list of subscribers, so you never miss a great recipe!
There is a Newsletter subscription box on the top right side (or bottom) of each blog post, depending on the device you use, where you can easily submit your e-mail address (only) to be included in my mailing list.
You Can Also Find Me On Social Media:
Facebook page: The Grateful Girl Cooks!
Pinterest: The Grateful Girl Cooks!
Instagram: jbatthegratefulgirlcooks

Recipe adapted from: https://www.imbored-letsgo.com/baked-banana-donuts/
↓↓ PRINTABLE RECIPE BELOW ↓↓
Whip up some Baked Banana Doughnuts, glazed, then topped with chocolate and toasted nuts! Easy to make, delicious, and ready in 25 minutes!
- 1 cup all purpose flour
- ¼ cup granulated sugar
- 1 teaspoon baking powder
- ½ teaspoon salt
- ½ teaspoon cinnamon
- 1 banana very ripe, mashed
- 1 large egg beaten
- ¼ cup buttermilk
- 1 teaspoon vanilla extract
- 1 Tablespoon butter melted
- 1 cup powdered sugar
- 1 Tablespoon milk
- ½ teaspoon vanilla extract
- 10 walnuts or pecans lightly toasted, chopped
- ¼ cup semi-sweet chocolate melted
Preheat oven to 325°F. Lightly spray/grease doughnut pan.
Whisk flour, sugar, cinnamon, baking powder and salt in large bowl. Once combined, make a "well" in the center; set bowl aside.
In separate bowl, combine mashed banana, buttermilk, egg, melted butter (cooled) and vanilla. Add this to the flour mixture. Stir to combine ingredients only until incorporated into batter.
Evenly spoon batter into prepared pan, filling each well almost to the top. Bake at 325°F. for 10-12 minutes (on middle rack of oven). Finished doughnuts will be cooked through, and lightly sping back when gently touched on the top. Place pan on wire rack to cool 1-2 minutes, then transfer doughnuts out of pan to wire rack. Let cool completely. Place foil or wax paper UNDER the rack to prepare for glazing doughnuts.
While doughnuts cool, make glaze. In a small bowl, stir powdered sugar, vanilla and milk until smooth (no lumps!). Once the doughnuts have cooled to room temp., dip top of doughnuts (one at a time) into glaze, to cover top of doughnut. Allow excess glaze to drip back into bowl, then flip doughnut over. Set doughnut, glazed side UP on wire rack. Repeat with remaining doughnuts.
Once glaze has firmed up, drizzle melted chocolate over each donut, then quickly sprinkle with toasted, chopped nuts. Lightly press the nuts into the chocolate so they adhere. Let toppings firm up before serving.
NOTE: To toast walnuts/pecans, place them in a skillet and heat on medium heat for 2-3 minutes, stirring occasionally until lightly toasted and aromatic.
Here’s one more to pin on your Pinterest boards!