Category: Desserts

Blackberry Pie Bars

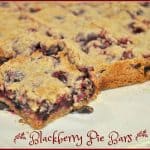
You’ll LOVE these delicious dessert Blackberry Pie Bars, made with fresh juicy blackberries baked on a shortbread crust, with a buttery streusel crumb topping.You'll LOVE these delicious dessert Blackberry Pie Bars, made with fresh juicy blackberries baked on a shortbread crust, with a buttery streusel crumb topping.
It’s THAT time of the summer when fresh berries are making their annual appearance all around the Pacific Northwest. The other day I picked 4 quarts of fresh blackberries that were growing wild in our neighborhood, and made these fantastic tasting Blackberry Pie Bars! It’s nice to pick wild blackberries (for FREE), and then use them to create a special “something” that my husband and I can enjoy AND I can give to others.

This recipe makes 24 bars, so I kept a few for us, then gave away 2 big plates of them to our sons and another friend. The Blackberry Pie Bars are delicious; they do taste like you’re eating a piece of pie!

Scroll Down For A Printable Recipe Card At The Bottom Of The Page

How To Make Blackberry Pie Bars

Place flour, 1 cup sugar, baking powder, cinnamon, salt and lemon zest into a food processor. Pulse these together a couple times to mix. *Don’t have a food processor? No problem… just use a hand held pastry blender.

Flour, lemon zest, cinnamon, etc. mixed in food processor for blackberry bar base

Add egg, butter, and vanilla extract to the mixture. Pulse again until the mixture is crumbly (and the butter is in small pieces).

Butter, egg, vanilla added to ingredients in food processor

Put half of the crumbly dough into a prepared 13×9 inch pan. (either sprayed with non-stick spray, OR in a 13×9 pan that is covered with parchment paper with paper hanging over the edges.

This is what I do, and it makes lifting the entire pan of bars out very easy, once cooled!)  Pack down the crumbs with your hands, until it forms a solid crust.

Crumbled ingredients (before baking) form base for bar cookies
In a large bowl, combine 1/2 cup sugar, cornstarch and lemon juice. Add the fresh blackberries, and stir gently until the berries are coated.

Blackberries, sugar and lemon juice in large bowl

Evenly spoon out the blackberry mixture over the crust.

Blackberry filling spread out over bar cookie base in baking pan

Sprinkle the remaining half of the crumb mixture over the top of the berries, to cover the surface of the bars.  

Crumb mixture spread over blackberry pie filling before baking

Bake The Blackberry Pie Bars

Bake in a preheated 375 degree oven for 45 minutes, or until the crumb topping is lightly browned. When done, remove the pan from the oven. Let the blackberry pie bars cool completely, while still in the pan.

Once cool, if using parchment paper, lift out the entire pan of bars. Pull paper away from the sides of the dessert. If not using parchment paper, let blackberry pie bars cool completely, then cut.

Blackberry pie bars are removed from pan after baking

The best way I have found to make even cuts is by using my pizza cutter! Make 4 cuts lengthwise, then make 6 cuts the other direction, for a total of 24 bars.

Blackberry bar cookies are cut into squares with pizza cutter

Piece of a blackberry pie bar cookie

Here… I saved one of the blackberry pie bars for YOU! Go ahead… you KNOW you want a bite, right?  You’re welcome! Sure hope you enjoy every bite of it!

Blackberry pie bar close up photo, resting on a serving spatula

Have a great day!  Think of ways you could bring joy or encouragement into someone’s life today… and be intentional about considering just how much you and I have to be grateful for.

Looking For Other Bar Cookie Recipes?

You can find all of my recipes in the Recipe Index, located at the top of the page. I have quite a few scrumptious bar cookie recipes on my blog, including:

Interested In More Recipes?

Thank you for visiting this website. I appreciate you using some of your valuable time to do soIf you’re interested, I publish a newsletter 2 times per month (1st and 15th) with all the latest recipes, and other fun info. I would be honored to have you join our growing list of subscribers, so you never miss a great recipe!
There is a Newsletter subscription box on the top right side (or bottom) of each blog post, depending on the device you use, where you can easily submit your e-mail address (only) to be included in my mailing list.

You Can Also Find Me On Social Media:

Facebook page: The Grateful Girl Cooks!
Pinterest:
The Grateful Girl Cooks!
Instagram:
jbatthegratefulgirlcooks

Author's signature

Recipe Source: http://www.thenovicechefblog.com/2013/07/blackberry-pie-bars/

0 from 0 votes
Blackberry Pie Bars
Prep Time
10 mins
Cook Time
45 mins
Total Time
55 mins
 

You'll LOVE these delicious dessert Blackberry Pie Bars, made with fresh juicy blackberries baked on a shortbread crust, with a buttery streusel crumb topping.

Category: Bar Cookies
Cuisine: American
Keyword: blackberry pie bars
Servings: 24 bars
Calories Per Serving: 188 kcal
Author: JB @ The Grateful Girl Cooks!
Ingredients
  • 3 cups all purpose flour
  • 1 1/2 cups granulated sugar (divided)
  • 1 teaspoon baking powder
  • 1 teaspoon cinnamon
  • 1/4 teaspoon salt
  • Zest and juice from 1 lemon (divided)
  • 1 cup (2 cubes) cold butter (cut into 1 inch slices)
  • 1 large egg
  • 2 teaspoons vanilla extract
  • 4 cups fresh blackberries
  • 4 teaspoons cornstarch
Instructions
  1. Before beginning, preheat your oven to 375 degrees. Line a 9x13 pan with parchment paper and spray the bottom. Make sure to leave parchment paper extended over the edges, so you can lift out the entire pan of bars once cooled. (If not using parchment paper, simply spray baking pan with non-stick spray).
  2. Place flour, 1 CUP of the sugar, baking powder, cinnamon, salt and lemon zest into a food processor. Pulse a couple times to mix. Add egg, butter, and vanilla extract. Pulse the mixture until dough gets crumbly (and butter is size of small peas).
  3. Put HALF of the dough mixture into the baking pan. Pat down with fingers to form a solid crust. Set aside the rest of the mixture to use for the crumb topping.
  4. In a large mixing bowl, combine the rest of the sugar, cornstarch and lemon juice. Add the blackberries, and stir gently to fully coat berries. Spoon the blackberries over the crust in the pan. Sprinkle the remaining crumb mixture over the top of the berries.
  5. Bake at 375 degrees for 45 minutes (or until the topping is golden brown). Remove to a wire rack. COOL COMPLETELY before lifting the bar cookies out of the pan (using the parchment paper).
  6. Cut into serving sizes. (It is easy to cut into bars if you use a pizza cutter!) Enjoy!
Recipe Notes

I cut the bars lengthwise into 4 sections, then cut 6 pieces in each section, for a total of 24 bars (each about 2 inches)

Nutrition Facts
Blackberry Pie Bars
Amount Per Serving (1 bar)
Calories 188 Calories from Fat 72
% Daily Value*
Fat 8g12%
Saturated Fat 4g25%
Cholesterol 27mg9%
Sodium 95mg4%
Potassium 77mg2%
Carbohydrates 27g9%
Fiber 1g4%
Sugar 13g14%
Protein 2g4%
Vitamin A 300IU6%
Vitamin C 5mg6%
Calcium 21mg2%
Iron 0.9mg5%
* Percent Daily Values are based on a 2000 calorie diet.

Here’s one more to pin on your Pinterest boards!You'll LOVE these delicious dessert Blackberry Pie Bars, made with fresh juicy blackberries baked on a shortbread crust, with a buttery streusel crumb topping.


Save

Save

Giant Sugar Cookies

Giant Sugar Cookies are fun to eat when you just NEED a cookie as big as your head! Six inches in diameter, these are delicious, classic, BIG yummy treats!

Some days are like that, right? You just need a cookie as big as your head to make it all right again. Something like a Giant Sugar Cookie, perhaps?  I made these jumbo cookies recently as my husband and I were still reeling from the loss of our furry family member, Bailey (our beloved dog), who we lost to cancer two weeks ago. Getting in the kitchen and baking is therapy for me, to be honest! My heart was sad, and I really just wanted to bake something yummy! So I did.

This recipe for giant sugar cookies only makes 6 cookies, but they each come out about 6 inches wide, so trust me when I say, you will only need one.  My husband and I each ate one, then I gave the others away to our 2 sons, one of their girlfriends and one of our friends.

I like to bake, but I LOVE to give goodies to my friends and family even more (I hope you LOVE the giant size… every now and then someone you know might just need a GIANT cookie to help make it all better)!

Scroll Down For A Printable Recipe Card At The Bottom Of The Page

Giant Sugar Cookies Are Easy To Make:

While your oven is preheating, cream together butter and sugar until smooth. Once smooth, add egg and mix well, then add other dry ingredients until a soft dough is formed.

Making batter for giant sugar cookies is EASY.

Measure out 1/3 cup of the dough for each cookie (6 total), then roll each one in between your clean hands to form a ball.

Each giant sugar cookie uses 1/3 cup of dough, rolled into ball.

Place the dough balls on two separate cookie sheets (on parchment paper), leaving plenty of space between each one (remember these will end up about 6 inches in diameter, so trust me… leave lots of room in between the cookie dough balls).

Giant Sugar Cookie dough is placed onto parchment paper before baking.

Lightly press down each cookie to flatten them out a bit. Lightly sprinkle tops of cookies with coarse sugar.

Giant sugar cookies are pressed down, then sprinkled with sugar before baking.

Time To Bake!

Bake cookies at 350 degrees for about 14-15 minutes. They should be just lightly brown around the edges when done. The cookies will firm up more as they cool.

Sugar cookies are baked into giant sized treats.

See? Each cookie is about 6 inches in diameter. THAT is one GIANT sugar cookie!

Each giant sugar cookie measures about 6 inches across!

Sure hope you enjoy these jumbo-sized cookies! They are fun to give to others when they least expect a surprise gift from your kitchen! Enjoy these big ol’ bites of deliciousness!

Looking For More COOKIE Recipes?

You can find all of my recipes in the Recipe Index, located at the top of the page. I have lots of yummy cookie recipes you might enjoy, including:

Interested In More Recipes?

Thank you for visiting this website. I appreciate you using some of your valuable time to do soIf you’re interested, I publish a newsletter 2 times per month (1st and 15th) with all the latest recipes, and other fun info. I would be honored to have you join our growing list of subscribers, so you never miss a great recipe!
There is a Newsletter subscription box on the top right side (or bottom) of each blog post, depending on the device you use, where you can easily submit your e-mail address (only) to be included in my mailing list.

You Can Also Find Me On Social Media:
Facebook page: The Grateful Girl Cooks!
Pinterest: The Grateful Girl Cooks!
Instagram: jbatthegratefulgirlcooks

Author's signature

Recipe Source:  http://www.centercutcook.com/jumbo-sugar-cookies/

0 from 0 votes
Giant Sugar Cookies
Prep Time
10 mins
Cook Time
15 mins
Total Time
25 mins
 
Giant Sugar Cookies are fun to eat when you just NEED a cookie as big as your head! Six inches in diameter, these are delicious, classic, BIG yummy treats!
Category: Dessert
Cuisine: American
Keyword: giant sugar cookies, sugar cookies
Servings: 6 huge cookies
Calories Per Serving: 399 kcal
Author: JB @ The Grateful Girl Cooks!
Ingredients
  • 1/2 cup butter
  • 1 cup granulated sugar
  • 1 egg
  • 1 ½ cups all purpose flour
  • 1 ½ teaspoons baking soda
  • 2 Tablespoons cornstarch
  • 1/2 teaspoon salt
  • Coarse sugar , for sprinkling on top of cookies (optional, but recommended)
Instructions
  1. Before beginning, line two large baking sheets with parchment paper. Heat oven to 350 degrees.
  2. Place the butter and sugar into a large mixing bowl. Mix until smooth; add egg and mix well.
  3. Add flour, baking soda, salt and cornstarch to the batter. Mix dough until it is thoroughly combined.
  4. Measure out 1/3 cup dough for each of the 6 cookies. Roll dough between your clean hands to form a ball. Place on cookie sheet (3 per sheet). Repeat with remaining dough. Remember to leave enough space between each dough ball as they will be approximately 6 inches in diameter when done. Lightly press down on each dough ball with your hands, to slightly flatten. Sprinkle tops of cookies with coarse sugar.
  5. Bake cookies at 350 degrees for 14-15 minutes or until cookies are light golden brown around the edges. Remove from oven. Let cookies cool on the parchment paper. They will firm up slightly as they cool. Enjoy!
Nutrition Facts
Giant Sugar Cookies
Amount Per Serving (1 huge cookie)
Calories 399 Calories from Fat 144
% Daily Value*
Fat 16g25%
Saturated Fat 9g56%
Cholesterol 67mg22%
Sodium 614mg27%
Potassium 43mg1%
Carbohydrates 59g20%
Sugar 33g37%
Protein 4g8%
Vitamin A 510IU10%
Calcium 13mg1%
Iron 1.6mg9%
* Percent Daily Values are based on a 2000 calorie diet.

Here’s one more to pin on your Pinterest boards!Giant Sugar Cookies are fun to eat when you just NEED a cookie as big as your head! Six inches in diameter, these are delicious, classic, BIG yummy treats!


Save

Save

JB’s Best Brownies

JB’s Best Brownies are amazing! These classic bar cookies are easy to make, chewy, moist, and fudgey, and taste fantastic – with or without frosting!JB's Best Brownies are amazing! These classic bar cookies are easy to make, chewy, moist, and fudgey, and taste fantastic - with or without frosting!

About 25 years ago, I started making this recipe for brownies. I truthfully have no recollection of how or where I stumbled upon this recipe. But two things I DO know… my nickname is JB… and these are my very best brownies!  There you have it… JB’s Best Brownies!

Truly these are amazingly good brownies! I’ve published the recipe before in a couple of school cookbooks and have received several notes from people telling me that JB’s Best Brownies are their favorite brownies! They are so very easy to make. **NOTE: I WAS MAKING A DOUBLE BATCH WHEN I TOOK THESE PHOTOS). Recipe as written below, is for single batch.

Scroll Down For A Printable Recipe Card At The Bottom Of The Page

How To Make JB’s Best Brownies

Blend the butter, sugar and vanilla in a large bowl (no need for a mixer, just use a wooden spoon). Add eggs. Mix well by hand until all ingredients are fully combined.

Eggs, sugar, vanilla in bowl to begin making batter for brownies.

In a separate bowl, whisk together flour, cocoa, baking powder and salt. Stir dry ingredients into the batter.

Flour, cocoa, and other dry ingredients are added to the batter.

Add the chopped nuts (pecans or walnuts), if using. Stir the batter well, to combine.

Chopped pecans (or walnuts) are added, and stirred into the batter.


A Helpful Tip For Making JB’s Best Brownies

Spread the batter for JB’s best brownies into a greased 9″ square pan (or if doubling recipe – use a 9×13 pan). It’s very helpful to line the baking pan with parchment paper. Make sure the parchment paper is extended over the edges of pan, and sprayed with non-stick spray. You can see this in the photo below.

Once brownies have cooled, you can lift out the entire tray of JB’s best brownies by using the parchment paper and lifting them out. They will be much easier to frost, cut and serve this way, but is not necessary. If you are NOT using parchment paper, you only need to spray your baking pan with non-stick spray, fill with batter, and bake.

The batter for JB's best brownies is added to a parchment paper lined baking pan.Time To Bake!

Bake the brownies at 350 degrees for 20-25 minutes. Start checking them around the 20 minute mark (times will vary depending on size of pan you are using). A toothpick inserted into middle of pan should come out clean when done. Once brownies are done, remove the pan from oven, to a wire rack, to cool.

Brownies are removed from oven after baking, to cool.

Make The Frosting

While JB’s best brownies are baking, you can make the creamy chocolate frosting. Cream together softened butter, cocoa, corn syrup and vanilla. You can mix this easily with a spoon, because no mixer is needed.

Frosting ingredients for JB's best brownies in a small blue bowl.

A thick chocolate frosting for the brownies is mixed together easily.
Add the powdered sugar to the frosting mixture. Mix the frosting very well, to combine. Add 1-2 Tablespoons milk (and a little more, if needed), to make a thick, spreadable frosting for the brownies.

Powdered sugar is added to frosting for JB's best brownies, until smooth and creamy.

Frost The Brownies

Once JB’s best brownies have completely cooled, they are ready to frost. If you used parchment paper in the baking pan, gently and carefully lift the entire pan of brownies out of the pan by holding the edges of parchment paper and lifting.

Evenly spread the frosting over the cooled brownies, then let them rest for 10-15 minutes (if you can wait!). Cut JB’s best brownies into desired serving sizes, and serve!

JB's best brownies are frosted, sliced, and ready to eat!

Make Them Frosted Or Unfrosted!

I love frosted brownies, but my husband doesn’t like frosting on his. Soooo… I make a double batch, then only frost HALF the brownies, so we are BOTH happy! Here’s an “up close and personal” view of an un-frosted brownie. This is my husband’s preferred way of eating them.

JB's Best Brownies can also be made and eaten, WITHOUT frosting.

Shown below is an “up close and personal” view of one of the brownies with frosting.  YAY! I’m being serious about the frosted kind, because they are my absolute favorite! These delicious bar cookies are chewy, very chocolatey, and have bits of nuts in them.. Oh my goodness. They are so good!

Enjoy JB’s best brownies with a good cold glass of milk. Yum.  Good thing I don’t make them too often, because I could eat the whole pan! No… really!

JB's Best Brownies, with frosting, on a clear platter.

I am thankful you chose to visit my website today.  Hope you enjoy JB’s Best Brownies, and have a great day! If you enjoy brownies, you might also want to try Irish Cream Layered Brownies-they’re yummy, too! Thanks for stopping by, and please come back again soon.

Looking For Additional Bar Cookie Recipes?

You can find ALL of my bar cookie recipes in the Recipe Index at the top of the page. A few of my favorites include:

Interested In More Recipes?

Thank you for visiting this website. I appreciate you using some of your valuable time to do soIf you’re interested, I publish a newsletter 2 times per month (1st and 15th) with all the latest recipes, and other fun info. I would be honored to have you join our growing list of subscribers, so you never miss a great recipe!
There is a Newsletter subscription box on the top right side (or bottom) of each blog post, depending on the device you use, where you can easily submit your e-mail address (only) to be included in my mailing list.

You Can Also Find Me On Social Media:

Facebook page: The Grateful Girl Cooks!
Pinterest:
The Grateful Girl Cooks!
Instagram:
jbatthegratefulgirlcooks

Author's signature

0 from 0 votes
JB's Best Brownies
Prep Time
10 mins
Cook Time
25 mins
Total Time
35 mins
 
JB's Best Brownies are amazing! These classic bar cookies are easy to make, chewy, moist, and fudgey, and taste fantastic - with or without frosting!
Category: Dessert
Cuisine: American
Keyword: JB's best brownies
Servings: 12 small brownies
Calories Per Serving: 273 kcal
Author: JB @ The Grateful Girl Cooks!
Ingredients
For brownies:
  • 1/2 cup butter , melted
  • 1 cup granulated sugar
  • 1 teaspoon vanilla extract
  • 2 eggs
  • 1/2 cup all purpose flour
  • 1/3 cup cocoa powder
  • 1/4 teaspoon baking powder
  • 1/4 teaspoon salt
  • 1/2 cup chopped pecans or walnuts (optional)
For Frosting:
  • 3 Tablespoons room temperature butter (do not melt)
  • 3 Tablespoons cocoa powder
  • 1 Tablespoons light corn syrup (or honey)
  • 1/2 teaspoon vanilla extract
  • 1 cup powdered sugar
  • 1-2 Tablespoons milk
Instructions
To prepare brownies:
  1. Blend butter, sugar and vanilla in a large bowl (no need for a mixer, just use a wooden spoon). Add eggs. Mix well by hand until all ingredients are fully combined.
  2. In separate bowl, whisk together flour, cocoa, baking powder and salt. Stir dry ingredients into the batter. Add chopped nuts, if using. Stir well, to combine.
  3. It's EASY to lift pan of brownies out of pan to frost and cut if you line the baking pan with parchment paper, leaving edges of paper hanging over the side of pan. Spray the parchment paper with non-stick spray. If not using parchment paper, just spray baking pan. Spread batter into prepared 9" square pan (or if doubling recipe - use a 9x13 pan). Bake at 350 degrees for 20-25 minutes. A toothpick inserted into middle of pan should come out clean when done.
Make frosting while brownies are cooking:
  1. Cream together softened butter, cocoa, corn syrup and vanilla (Just use a spoon-no mixer needed).
  2. Add powdered sugar. Mix well to combine. Add 1-2 Tablespoons milk (and a little more, if needed), to make a thick, spreadable frosting.
To frost brownies:
  1. When finished baking, remove cooked brownies from oven to a wire rack. Once brownies have cooled completely, you can lift out the entire tray of brownies by holding the parchment paper and carefully lifting them out. They will be much easier to frost, cut and serve this way, but is not necessary.
  2. Once brownies have COMPLETELY cooled, you can frost them, let them sit for a bit, then slice and serve!
Recipe Notes

9x9 pan yields 12 small brownies or 9 medium sized brownies.
If recipe is doubled, a 13x9 pan yields 24 small or 12 large brownies (large ones are in my photos). I double the recipe a lot (we love brownies!). If you double recipe, it will fill a 9x13 pan with no trouble. Continue to check for "done-ness" beginning around the 20 minute mark.

Nutrition Facts
JB's Best Brownies
Amount Per Serving (1 brownie w/ frosting)
Calories 273 Calories from Fat 126
% Daily Value*
Fat 14g22%
Saturated Fat 7g44%
Cholesterol 55mg18%
Sodium 154mg7%
Potassium 101mg3%
Carbohydrates 35g12%
Fiber 1g4%
Sugar 28g31%
Protein 3g6%
Vitamin A 365IU7%
Calcium 22mg2%
Iron 1mg6%
* Percent Daily Values are based on a 2000 calorie diet.

Here’s one more to pin on your Pinterest boards!JB's Best Brownies are amazing! These classic bar cookies are easy to make, chewy, moist, and fudgey, and taste fantastic - with or without frosting!

Save

Save

Save

Save

Chunky Monkey Ice Cream (copycat)

A copycat recipe for yummy chunky monkey ice cream – with bananas, chocolate chunks and toasted pecans helping to make this frozen treat amazing!A copycat recipe for yummy chunky monkey ice cream - with bananas, chocolate chunks and toasted pecans helping to make this frozen treat amazing!
Happy Fourth of July week! One of the ways we celebrate this holiday each year is by making homemade ice cream. One of our favorites is this copycat recipe for Chunky Monkey Ice Cream.

I am fortunate to have an indoor Cuisinart ice cream maker I was given for a birthday several years ago, and have loved trying LOTS of different recipes with my family. The first time I made this recipe (I was experimenting with flavors), we all crowded around the ol’ ice cream maker taking spoonfuls out when it was done.  Our reactions were priceless.

We were ALL amazed how delicious this chunky monkey ice cream was. This ice cream is ridiculously GOOD, and I’ve continued making it to this very day!

Scroll Down for A Printable Recipe Card At the Bottom Of The Pge

How Do You Make Chunky Monkey Ice Cream?

The ice cream is frozen, then during the last few minutes the banana puree, toasted pecans and chocolate chunks are added to mixture.

Pecans and chocolate chips will be added to the ice cream during the last 5 minutes of freezing.

Here is what it looked like, right when the chunky monkey ice cream was done. All I needed was for someone to hand me a BIG spoon at this point, and I was in my happy place!

The ice cream is semi-soft when it is first done freezing.

Ice Cream Is Best When “Ripened” In The Freezer

I placed the rest of the ice cream into a covered container (you know… what we didn’t devour), and put it into our kitchen freezer for a couple hours.

This extra time in the freezer is recommended, because it helps to  “ripen” or firm up the chunky monkey ice cream even further. That will result is some good scoops later.

A carton of this ice cream has frozen firm, and is now ready to scoop!

Time For A Scoop Of Chunky Monkey Ice Cream!

So there you have it… a perfectly scoopable and an incredibly delicious “copycat” version of chunky monkey ice cream! Now… where’s my spoon and a bib? (I’m drooling!)

Two scoops of chunky monkey ice cream in a glass dish.

Have a wonderful 4th of July celebration, friends. Hope you enjoy this yummy chunky monkey ice cream! I am truly grateful and blessed to be a proud citizen of this great country.

Looking For More Homemade ICE CREAM Recipes?

You can find all of my recipes in the Recipe Index, located at the top of the page. A few of my ice cream recipes include:

Interested In More Recipes?

Thank you for visiting this website. I appreciate you using some of your valuable time to do soIf you’re interested, I publish a newsletter 2 times per month (1st and 15th) with all the latest recipes, and other fun info. I would be honored to have you join our growing list of subscribers, so you never miss a great recipe!
There is a Newsletter subscription box on the top right side (or bottom) of each blog post, depending on the device you use, where you can easily submit your e-mail address (only) to be included in my mailing list.

You Can Also Find Me On Social Media:
Facebook page: The Grateful Girl Cooks!
Pinterest: The Grateful Girl Cooks!
Instagram: jbatthegratefulgirlcooks

Author's signature

Recipe Adapted From:  Cuisinart Automatic Frozen Yogurt-Ice Cream & Sorbet Maker Instruction And Recipe Booklet, published 2002 by Cuisinart.

0 from 0 votes
Chunky Monkey Ice Cream (copycat)
Prep Time
25 mins
Cook Time
0 mins
Total Time
25 mins
 
A copycat recipe for yummy chunky monkey ice cream - with bananas, chocolate chunks and toasted pecans helping to make this frozen treat amazing!
Category: Ice Cream
Cuisine: American
Keyword: chunky monkey ice cream
Servings: 10 ½ cup servings
Calories Per Serving: 372 kcal
Author: JB @ The Grateful Girl Cooks!
Ingredients
  • 2 cups heavy whipping cream
  • 1 cup milk (NOT skim!)
  • 3/4 cup granulated sugar
  • 2 teaspoons vanilla extract
  • 2-3 drops yellow food coloring (optional, but it does add a bit of color!)
  • 2 really ripe bananas
  • 1 ½ teaspoons fresh lemon juice
  • 3/4 cup semi-sweet chocolate chips (may substitute dark chocolate, if preferred), refrigerated
  • 1/2 cup toasted pecans (or walnuts), chopped
Instructions
  1. In a large bowl, whisk together the whipping cream, milk, granulated sugar, vanilla extract and yellow food coloring. Whisk this mixture for about a minute, until fully blended, and sugar has dissolved.
  2. Place this mixture into your cold ice cream maker canister; freeze ice cream according to manufacturer's directions.
  3. Refrigerate the chocolate chips while ice cream is freezing (this will help them from softening).
  4. Mash the bananas with lemon juice in a small bowl, until smooth. (I use a fork to mash).
  5. About 5 minutes before the ice cream is finished freezing, add the banana mixture, toasted pecans and chocolate chips to the ice cream. Continue freezing until done.
  6. Ice cream can be eaten right away (soft style), OR place it in a covered container in your freezer for a couple hours to let it "ripen" and firm up more. Enjoy!
Nutrition Facts
Chunky Monkey Ice Cream (copycat)
Amount Per Serving (1 (1/2 cup serving))
Calories 372 Calories from Fat 243
% Daily Value*
Fat 27g42%
Saturated Fat 14g88%
Cholesterol 68mg23%
Sodium 30mg1%
Potassium 249mg7%
Carbohydrates 30g10%
Fiber 2g8%
Sugar 24g27%
Protein 3g6%
Vitamin A 760IU15%
Vitamin C 2.6mg3%
Calcium 72mg7%
Iron 1mg6%
* Percent Daily Values are based on a 2000 calorie diet.

Here’s one more to pin on your Pinterest boards!A copycat recipe for yummy chunky monkey ice cream - with bananas, chocolate chunks and toasted pecans helping to make this frozen treat amazing!


Save

Save

Peach Shortbread Tart

Peach Shortbread Tart with fresh peach filling on a shortbread crust, and crumb topping, is a simple, delicious dessert that will be a favorite!Peach Shortbread Tart with fresh peach filling on a shortbread crust, and a crumb topping, is a simple delicious dessert tart that will be an absolute favorite!A couple years ago I decided to make my own birthday “cake” (really…who does that?).  But I really didn’t want a cake, so I made this delicious Peach Shortbread Tart for myself and my family.  And let me tell you I enjoyed every single bite of it! Happy Birthday to ME!

I had recently been out to a local orchard and had picked about 40 pounds of fresh, juicy peaches (my birthday is in July, the time for the ripest Northwest peaches!). The decision was made to use some of the peaches and “tweak” one of my favorite tart recipes that I received from a friend of mine years ago.

The original recipe is for an Apple Shortbread Tart, and I’ve also used the same basic recipe to make a Boysenberry Shortbread Tart. This time I made it a PEACH Shortbread Tart, and it tastes wonderful! Here’s how to make a peach shortbread tart:

Scroll Down For A Printable Recipe Card At The Bottom Of The Page

Making the Peach Shortbread Tart Crust

The basic recipe is simple. First, you make a shortbread crust, and then you make the filling. Top the filling with some of the reserved shortbread crust crumbs. Bake it, then eat it. You will totally LOVE it! End of story! The shortbread crust is extremely simple to make. It’s ready in a jiff.

Ingredients are processed for the tart crust.

Here’s the crust before putting all the goodies in it! The crust is firmly packed down into the tart pan before baking.

Shortbread crust is packed into a tart pan.

See these gorgeous peaches? Yep. I picked about 40 pounds of ’em at a local You-Pick farm. Fresh peaches are what I use to make this tart, because they are lip smacking good.

Fresh peaches to be picked and used for shortbread tart.

Can’t Wait To Eat The Peach Shortbread Tart

Here’s my finished birthday dessert, a peach shortbread tart, which will be served with vanilla ice cream. You can also see one of our family fixtures. We call him the “Boring Birthday Guy”. He makes an appearance at all of our family birthday celebrations. He’s really quite the party animal.

Peach Shortbread Tart ready to eat for my birthday dessert!

And this is me- the birthday girl, totally ready to dig into a scrumptious birthday dessert I made for myself. Go figure! I polished off that piece or peach shortbread tart and the mandatory scoop of ice cream in no time flat! HA HA! Some birthdays are like that!

Birthday girl with peach shortbread tart for dessert!
Anyways… if you like fresh peach pie, then you will LOVE this Peach Shortbread Tart, even if it’s NOT your birthday. It’s absolutely delicious! Here’s another photo of another time I made this dessert for a “Peach-themed” dinner party!  I made a Peach Coulis (sauce) to drizzle on top! YUM.

Peach Shortbread Tart served with peach coulis drizzle and ice cream.

Sure hope you will consider making this delicious peach shortbread tart.  Have a fantastic, “peachy” kind of day!

Looking For More Recipes For PEACH DESSERTS?

You can find ALL of my recipes in the Recipe Index, located at the top of the page. I have quite a few desserts featuring peaches, including:

Interested In More Recipes?

Thank you for visiting this website. I appreciate you using some of your valuable time to do soIf you’re interested, I publish a newsletter 2 times per month (1st and 15th) with all the latest recipes, and other fun info. I would be honored to have you join our growing list of subscribers, so you never miss a great recipe!
There is a Newsletter subscription box on the top right side (or bottom) of each blog post, depending on the device you use, where you can easily submit your e-mail address (only) to be included in my mailing list.

You Can Also Find Me On Social Media:
Facebook page: The Grateful Girl Cooks!
Pinterest: The Grateful Girl Cooks!
Instagram: jbatthegratefulgirlcooks

Author's signature

Recipe Adapted from my friend, Shari Altree’s recipe for Apple Shortbread Tart

5 from 1 vote
Peach Shortbread Tart
Prep Time
20 mins
Cook Time
45 mins
Total Time
1 hr 5 mins
 
Peach Shortbread Tart with fresh peach filling on a shortbread crust, and a crumb topping, is a simple delicious dessert tart that will be an absolute favorite!
Category: Dessert
Cuisine: American
Keyword: peach shortbread tart
Servings: 8 servings
Calories Per Serving: 387 kcal
Author: JB @ The Grateful Girl Cooks!
Ingredients
For the crust:
  • 2 cups all-purpose flour
  • 1/2 cup granulated sugar
  • 1/4 teaspoon salt
  • 3/4 cup butter
  • 2 egg yolks
For the filling:
  • 1 1/4 pounds fresh peaches (about 6-7 large peaches), peeled, and sliced thin
  • 1 Tablespoon lemon juice
  • 1/4 cup brown sugar , packed
  • 1 Tablespoon all-purpose flour
  • 1/2 teaspoon cinnamon
Instructions
  1. Preheat oven to 400 degrees.
  2. Blend all crust ingredients (except for egg yolks) until they are the texture of coarse meal. (You can use a fork, a pastry blender or a food processor). Add the 2 egg yolks and mix well to blend. **Set aside 1/4 of this mixture and save for later**. Using the remaining 3/4 of the crumbs, pat them down over the bottom and up the sides of a tart pan with removable bottom disk (this is what I use) or a pie pan. Make sure crust is firmly pressed down into the pan and the sides to form a solid crust.

  3. Peel and slice the peaches into thin slices. Place the sliced peaches in a large bowl and mix with lemon juice. Add 1/4 cup brown sugar, 1 TBSP flour and 1/2 tsp. cinnamon. Mix well to coat the peaches.
  4. Once peach slices and dry ingredients are mixed together, gently "pour" or spoon the peaches onto the crust. I use my (clean) fingers to place the slices and fill in the holes; position the slices so they mound in the center and fill in the crust.
  5. Sprinkle the reserved 1/4 of the crust mixture over the top. I find it helpful to hold one hand up around the edge of the pan to try and catch the crumbles before they fall off the tart. Just scoop up any crumbles that fall onto your work surface and put them back on that tart! Cover the entire top of the tart.
  6. Bake the tart at 400 degrees for 15 minutes, then reduce heat to 350 degrees and bake until the top begins to turn a golden brown (approx. 25-30 minutes, depending on your oven). Just keep an eye on it and remove tart when top is golden brown. Let cool just a bit. If using a tart pan, hold your hand on the bottom of the tart and gently press upward on the metal disk to release the tart from the pan. Place the tart (keeping disk on the bottom of tart) on serving dish, slice and serve.
  7. Serve warm, with a scoop of vanilla ice cream...and ENJOY!
Nutrition Facts
Peach Shortbread Tart
Amount Per Serving (1 slice)
Calories 387 Calories from Fat 162
% Daily Value*
Fat 18g28%
Saturated Fat 11g69%
Cholesterol 94mg31%
Sodium 229mg10%
Potassium 187mg5%
Carbohydrates 50g17%
Fiber 1g4%
Sugar 25g28%
Protein 4g8%
Vitamin A 830IU17%
Vitamin C 5.4mg7%
Calcium 26mg3%
Iron 1.8mg10%
* Percent Daily Values are based on a 2000 calorie diet.

Here’s one more to pin on your Pinterest boards!Peach Shortbread Tart with fresh peach filling on a shortbread crust, and a crumb topping, is a simple delicious dessert tart that will be an absolute favorite!


Save

Save

Raspberry Coulis

Raspberry coulis (Koo-LEE) is a 3-ingredient dessert sauce that’s easy to make, and perfect for topping cheesecake, ice cream, cakes, or pancakes.Raspberry coulis (Koo-LEE) is a 3-ingredient dessert sauce that's easy to make, and perfect for topping cheesecake, ice cream, cakes, or pancakes.
Have you ever made Raspberry Coulis before? Coulis is a puréed, sweetened fruit sauce that is really easy to make (only 3 ingredients), and tastes fantastic when served with cheesecake or other desserts! It not only makes a dessert LOOK great… it TASTES great, too!

A coulis (pronounced Koo-LEE) is a slightly thick sauce made from puréed and strained fruit or vegetables. Fruit coulis is typically used to enhance desserts, which is the case with this Raspberry Coulis. A fruit coulis is fantastic as a “garnish” or accompanying sauce on cheesecake, chocolate cake, ice cream, pound cake, or even on pancakes.

Raspberry coulis is made using only 3 ingredients (and one of them is water), so it is really easy to prepare, and makes about 2 cups. You can use frozen fruit, but I always prefer to use fresh fruit, when in season! Here’s how you make raspberry coulis in about 10 minutes:

Scroll Down For A Printable Recipe Card At The bottom Of The Page

How To Make Raspberry Coulis

Place the raspberries, granulated sugar and water into a medium saucepan. Bring this mixture to a boil.

Whole raspberries, water and sugar in a pan, ready to cook!

Continue to cook until the sugar is completely dissolved (about 7-8 minutes) and the raspberries have broken down.

Raspberries, sugar and water cook in pan for about 6-7 minutes.

Pour the raspberry mixture into a blender, and mix until the sauce is nice and smooth.

Strain The Cooked Fruit

Once the cooked fruit has been blended, you need to strain the seeds out!  Place a mesh colander over a bowl, then pour the blended fruit into the strainer.

Cooked coulis is poured into a strainer which sits on top of bowl.

Push the liquid through the strainer (the seeds and some solids will remain in the strainer). I like to use a wooden spoon to press down the sauce into the mesh strainer. Don’t forget to scrape down the underside of the mesh strainer for more raspberry coulis! Discard the seeds, once you have all the fruit coulis in the bowl.

The sauce is forced through a mesh strainer, leaving raspberry seeds behind.

Once all the liquid has been strained through strainer, what is left in the bowl underneath is the finished raspberry coulis. It will be a slightly thick sauce that tastes amazing!

After straining the seeds out, the raspberry coulis is ready to use!

How To Store Raspberry Coulis

I like to pour the coulis into a plastic decorating bottle with a cap on it. These bottles are fairly inexpensive. I got my set of plastic bottles at Michael’s craft store. Handy squeeze bottles make it easier to decoratively drizzle the sauce over the dessert (but is not necessary!).

The fruit sauce is ready to be used right away or can be refrigerated until ready to use. Unused raspberry coulis will keep for several days in the refrigerator.

A plastic bottle helps to decorate desserts with the raspberry coulis.

That’s it! See how easy that was? Raspberry coulis looks great and tastes great, and is a very quick way to “jazz up” a “plain” dessert and make it look fancy! If you enjoy this recipe, be sure to check out my recipe for Peach Coulis!

Have a wonderful day. I hope you will look for opportunities to be a blessing to someone! Don’t forget to check out ALL my recipes in the Recipe Index, located at the top of the page.

Interested In More Recipes?

Thank you for visiting this website. I appreciate you using some of your valuable time to do soIf you’re interested, I publish a newsletter 2 times per month (1st and 15th) with all the latest recipes, and other fun info. I would be honored to have you join our growing list of subscribers, so you never miss a great recipe!
There is a Newsletter subscription box on the top right side (or bottom) of each blog post, depending on the device you use, where you can easily submit your e-mail address (only) to be included in my mailing list.

You Can Also Find Me On Social Media:
Facebook page: The Grateful Girl Cooks!
Pinterest: The Grateful Girl Cooks!
Instagram: jbatthegratefulgirlcooks

Author's signature

Recipe Source: www.marthastewart.com/338850/raspberry-coulis

0 from 0 votes
Raspberry Coulis
Prep Time
5 mins
Cook Time
6 mins
Total Time
11 mins
 

Raspberry coulis (Koo-LEE) is a 3-ingredient dessert sauce that's easy to make, and perfect for topping cheesecake, ice cream, cakes, or pancakes.

Category: Dessert Sauce
Cuisine: American
Keyword: raspberry coulis
Servings: 32 Tablespoons (total=2 cups)
Calories Per Serving: 17 kcal
Author: JB @ The Grateful Girl Cooks!
Ingredients
  • 18 ounces raspberries - 1½ pints (fresh or frozen- I used fresh)
  • 3/4 cup granulated sugar
  • 1/2 cup water
Instructions
  1. Put the raspberries, sugar and water into a medium saucepan. Bring mixture to a boil on Medium-High heat. Once it boils, reduce your heat to Medium-Low, and continue cooking for about 6-7 minutes, until all sugar is dissolved and raspberries have broken down. Remove pan from heat and let cool.
  2. Place cooled mixture in blender and blend until smooth. Place a mesh strainer/colander (fine mesh) over a bowl. Pour blended fruit purée into strainer. Use a spoon or spatula to push the mixture down into the strainer. Continue pushing liquid through strainer (remember to scrape down the underside of strainer for additional sauce!), until all liquid has been pushed through. You will have seeds and some solids left in strainer. Discard these.

  3. The coulis will be in the bowl below the strainer. Place sauce (coulis) into a covered decorator bottle with a cap or another covered container. The sauce is ready to use immediately. Coulis will last for several days when stored in refrigerator. Enjoy!

Recipe Notes

If you use frozen berries, do not use the pre-sweetened (in syrup) kind. Your sauce will be TOO sweet!

Nutrition Facts
Raspberry Coulis
Amount Per Serving (1 Tablespoon)
Calories 17
% Daily Value*
Potassium 16mg0%
Carbohydrates 4g1%
Sugar 3g3%
Vitamin A 5IU0%
Vitamin C 2.8mg3%
Calcium 3mg0%
Iron 0.1mg1%
* Percent Daily Values are based on a 2000 calorie diet.

Here’s one more to pin on your Pinterest boards!Raspberry coulis (Koo-LEE) is a 3-ingredient dessert sauce that's easy to make, and perfect for topping cheesecake, ice cream, cakes, or pancakes.


Save

Save

Deep Dish Boysenberry Pie

Deep dish boysenberry pie is easy to prepare with fresh or frozen berries. The perfect summer dessert, especially with a scoop of vanilla ice cream!Deep dish boysenberry pie is easy to prepare with fresh or frozen berries, and is the perfect summer dessert, especially with a scoop of vanilla ice cream!One of my favorite fruit pies is Boysenberry Pie…so it stands to reason that one of my absolute favorite DEEP DISH pies is Deep Dish Boysenberry Pie! I figure it’s just MORE of a good thing, so how can that be anything but DELICIOUS? It just SCREAMS Summer to me!

Scroll Down For A Printable Recipe Card At The Bottom Of The Page

Deep dish boysenberry pie is easy to prepare with fresh or frozen berries, and is the perfect summer dessert, especially with a scoop of vanilla ice cream! I love to go berry picking each summer here in the fertile farmlands surrounding Portland. It’s fun to get out and pick boysenberries during their short growing season. YUM!!! See how big they are?

I have great memories of my Great Aunt Juanita in Southern California growing boysenberries and making us cobblers when we came to visit her in the summer.

Look at the size of that fresh picked boysenberry!

I usually end up making cobblers, jams, and “regular sized” pies when I pick my berries, but I also wanted to try my hand at making a DEEP DISH boysenberry pie…bursting with fresh sun-ripened boysenberries, and crowned with a large scoop of homemade vanilla ice cream. I made my deep dish pie in a Corningware baking dish, and not in a pie pan. It was easy. Here’s what you do:

Make The Filling For The Deep Dish Boysenberry Pie

Preheat your oven to 425 degrees.  Rinse and completely drain the boysenberries.

Fresh boysenberries are rinsed then drained.

Gently mix the boysenberries with sugar, flour (or cornstarch), and cinnamon.

Boysenberries are tossed with flour, sugar and cinnamon.

Roll out and place one of the pie crusts into the baking dish. Make sure it comes up to the rim of the dish. Prick the dough with the tines of a fork all over the sides and bottom of crust. Gently pour in the berry mixture.

Boysenberry pie filling is placed into pastry lined deep dish

Dot the top of the pie with chunks of butter.

Butter chunks are placed on top of boysenberry pie filling.

Making the Lattice Crust

Roll out the remaining pie crust (I always use my Mom’s recipe for all my pie crusts). Cut strips for a lattice crust (I like using a pizza cutter for easy cutting- a sharp knife will also work well).

Pie dough is cut into strips for lattice top for deep dish pie.

Weave the top crust onto top of pie, and pinch edges together with the bottom crust to seal crust.  Flute the edges to form crust. Lightly brush the top weaved crust with a little milk (or water), then sprinkle with sugar (lightly). This will give the top crust a little shine and a sugary top.

Top lattice crust is arranged on deep dish boysenberry pie.

Bake The Deep Dish Boysenberry Pie

Bake in preheated 425 degree oven for 45-50 minutes (or longer), until crust is light golden brown and juices are bubbling up in the center and around the sides of the pie.  Let pie cool down a bit on a wire rack before attempting to serve. This will give the juices time to coagulate a bit.

Here’s a peek at the inside of the pie, once that first piece was dished up!

Inside look at the boysenberry pie after a piece was removed.

Here it is on the plate with a large scoop of homemade vanilla ice cream. You can’t really tell in this picture, but the heighth of the pie was about 2 ½ inches high. Well… at least it was BEFORE I dumped a large scoop of ice cream on it.. ha ha! Smashed that pie right down…

Deep dish boysenberry pie with a scoop of vanilla ice cream

Here’s another shot from the other side of this yummy pie!

A side view of the deep dish boysenberry pie.

I hope you will consider making this delicious deep dish boysenberry pie! If you are interested in my recipe for a “regular sized” boysenberry pie (not deep dish) , you can find it here.

Looking For More PIE Recipes?

You can find all of my recipes in the Recipe Index, located at the top of the page. I have quite a few delicious pie recipes, including:

Interested In More Recipes?

Thank you for visiting this website. I appreciate you using some of your valuable time to do soIf you’re interested, I publish a newsletter 2 times per month (1st and 15th) with all the latest recipes, and other fun info. I would be honored to have you join our growing list of subscribers, so you never miss a great recipe!
There is a Newsletter subscription box on the top right side (or bottom) of each blog post, depending on the device you use, where you can easily submit your e-mail address (only) to be included in my mailing list.

You Can Also Find Me On Social Media:
Facebook page: The Grateful Girl Cooks!
Pinterest: The Grateful Girl Cooks!
Instagram: jbatthegratefulgirlcooks

Have a blessed day!

Author's signatureRecipe Adapted From:  The New Pillsbury Family Cookbook, Published by the Pillsbury Company, 1973, page 149

0 from 0 votes
Deep Dish Boysenberry Pie
Prep Time
15 mins
Cook Time
45 mins
Total Time
1 hr
 
Deep dish boysenberry pie is easy to prepare with fresh or frozen berries, and is the perfect summer dessert, especially with a scoop of vanilla ice cream!
Category: Desserts
Cuisine: American
Keyword: deep dish boysenberry pie
Servings: 8 servings
Calories Per Serving: 420 kcal
Author: JB @ The Grateful Girl Cooks!
Ingredients
  • 6 cups fresh boysenberries (rinsed and drained)
  • 1 1/4 cup granulated sugar
  • 1/2 cup flour OR 1/4 cup plus 2 Tablespoons corn starch
  • 1/2 teaspoon cinnamon
  • 2 Tablespoons cold butter (cut into chunks)
  • 2 Pastry Pie Dough Crusts (homemade or store bought)
  • A little bit of granulated sugar to sprinkle on top of crust
Instructions
  1. Preheat oven to 425 degrees F.
  2. Place boysenberries, sugar, flour (or cornstarch), and cinnamon in a large mixing bowl. Gently toss to combine fully.
  3. Roll out pie dough so you have 2 .Place 1 crust into 2 quart baking dish. Press it into dish so that it covers bottom and comes all the way up to rim of dish. Prick bottom and sides of crust with tines of fork.
  4. Gently pour the berry mixture into prepared pie crust. Dot the top of pie with chunks of butter. Cover the pie filling with the other pie crust. Seal edges. Flute edges. Cut vents to let out steam. IF MAKING LATTICE TOP CRUST: Roll out dough. Cut into approx. 1/2 inch wide strips. Lay half of strips in parallel rows on top of pie filling (about 1 inch apart). To weave, place another row of strips parallel to first rows, but lift every other strip as new strips are added. (up, under, up, under). Seal edges of crusts together. Form standing edge/rim. Flute edges.
  5. Brush top crust lightly with milk or water. Immediately sprinkle wet crust lightly with granulated sugar.
  6. Bake at 425 degrees for 45-50 minutes, or until crust is golden brown, and juices are bubbling. Remove to a wire rack and let cool down slightly, before serving. Serve with ice cream...enjoy!
Recipe Notes

NOTE: Unsweetened frozen boysenberries may be used if fresh berries are unavailable. Mix frozen fruit in with the sugar and flour, etc. Do not use sweetened frozen fruit, as that would mess up the recipe (and be WAY TOO SWEET and the syrup consistency would change!)

Nutrition Facts
Deep Dish Boysenberry Pie
Amount Per Serving (1 slice)
Calories 420 Calories from Fat 126
% Daily Value*
Fat 14g22%
Saturated Fat 5g31%
Cholesterol 7mg2%
Sodium 200mg9%
Potassium 187mg5%
Carbohydrates 70g23%
Fiber 6g25%
Sugar 38g42%
Protein 4g8%
Vitamin A 155IU3%
Vitamin C 3.1mg4%
Calcium 35mg4%
Iron 2.3mg13%
* Percent Daily Values are based on a 2000 calorie diet.

Here’s one more to pin on your Pinterest boards!Deep dish boysenberry pie is easy to prepare with fresh or frozen berries, and is the perfect summer dessert, especially with a scoop of vanilla ice cream!


Save

Save

Mint Chocolate Chip Ice Cream

Nothing quite beats the taste of homemade Mint Chocolate Chip Ice Cream! Enjoy this cool, creamy treat any time of the year!Nothing quite beats the taste of homemade Mint Chocolate Chip Ice Cream! Enjoy this cool, creamy treat any time of the year!
“I Scream, You Scream… We ALL Scream For Ice Cream!” It seems like just about everyone loves a good scoop of ice cream. I know I sure do!  Here’s a quick and easy recipe for one of my favorites… Mint Chocolate Chip Ice Cream, just in time for good ol’ Summertime!

Scroll Down For A Printable Recipe Card At The Bottom Of The Page

Memories Of Homemade Ice Cream

Growing up in sunny Southern California, I have such fond memories of my Mom and Dad making many varieties of homemade ice cream for our family and friends, as an extra special cold and creamy treat in the HEAT of summertime. Back in those days, my Dad would be the one to hand crank the old wooden ice cream maker, then carefully wrap the finished ice cream and canister in lots of towels, etc. to keep it frozen while it firmed up a bit.

We would stand around, giddy with excitement, licking our lips in eager anticipation of the frozen treat we would soon be served. It was (and still is) one of my favorite summertime treats! Lucky for me, my husband has the same memories with his family, so we can enjoy this together! Nowadays, there are all kinds of electric homemade ice cream makers, which have taken some of the hard work out of it (all that hand-cranking!), but with the same delicious results.

I don’t know about you, but I find the prospect of having some freshly frozen ice cream hard to resist… especially Mint Chocolate Chip… I love it!  And it’s so easy to make (with or without an electric ice cream maker).  I’ve included directions for both in the printable recipe.

The Cuisinart ice cream maker I used to make mint chocolate chip ice cream.

Perhaps you will consider trying this easy recipe… the mint flavor shines, and the flecks and pieces of chocolate…well, you know… it’s so delicious!

Homemade mint chocolate chip ice cream is a treat year round!

I sincerely hope you enjoy this ice cream.  I’ve posted at least 14 flavors, including this Mint Chocolate Chip Ice Cream (so far), from the summer I had my “Great Ice Cream Experiment” to try many different recipes! Have a great day, treat yourself and enjoy a big old scoop (or two) of ice cream!

Looking For More ICE CREAM Recipes?

You can find ALL my recipes in the Recipe Index, located at the top of the page. I have lots of homemade ice cream recipes, including:

Interested In More Recipes?

Thank you for visiting this website. I appreciate you using some of your valuable time to do soIf you’re interested, I publish a newsletter 2 times per month (1st and 15th) with all the latest recipes, and other fun info. I would be honored to have you join our growing list of subscribers, so you never miss a great recipe!
There is a Newsletter subscription box on the top right side (or bottom) of each blog post, depending on the device you use, where you can easily submit your e-mail address (only) to be included in my mailing list.

You Can Also Find Me On Social Media:

Facebook page: The Grateful Girl Cooks!
Pinterest:
The Grateful Girl Cooks!
Instagram:
jbatthegratefulgirlcooks

Author's signatureRecipe Source:  Cuisinart Instruction and Recipe Booklet for Automatic Frozen Yogurt-Ice Cream & Sorbet Maker, copyright 2002, Cuisinart, page 4.

0 from 0 votes
Mint Chocolate Chip Ice Cream
Prep Time
25 mins
Cook Time
0 mins
Total Time
25 mins
 
Nothing quite beats the taste of homemade Mint Chocolate Chip Ice Cream! Enjoy this cool, creamy treat any time of the year!
Category: Desserts- Ice Cream
Cuisine: American
Keyword: mint chocolate chip ice cream
Servings: 10 (1/2 cup servings)
Calories Per Serving: 303 kcal
Author: JB @ The Grateful Girl Cooks!
Ingredients
  • 1 cup whole milk (well chilled)
  • 3/4 cup granulated sugar
  • 2 cups heavy whipping cream (well chilled)
  • 1 to 1½ teaspoons pure peppermint extract (to taste)
  • 3 drops green food coloring
  • 4 ounces semi-sweet chocolate (chopped into tiny, uneven pieces)
Instructions
  1. Mix milk and sugar in a medium bowl until sugar has dissolved (about 1-2 minutes on low speed).
  2. STIR in the heavy whipping cream, peppermint extract, and 3 drops green food coloring, until fully combined.
  3. Turn ice cream machine on, and pour the mixture through the spout into the machine. Freeze ice cream, according to manufacturer's instructions, until thick and creamy (approx. 20-25 minutes). During the last 5 minutes of mixing, add the chopped chocolate pieces and all the leftover chocolate flakes to the ice cream.
  4. Store ice cream in a covered container in the freezer for a couple hours to let it firm up more. Scoop, serve... and enjoy!

Recipe Notes

No ice cream maker? In a large bowl, whip the heavy cream on high for about 10 minutes until stiff peaks begin to form. In separate bowl, stir together milk, peppermint extract, food coloring and chocolate bits and flakes. Fold the whipping cream gently into milk mixture until combined. Pour mixture into a 2-3 quart container; cover. Put the covered container into the freezer; let it freeze for a minimum of 6 -7 hours. Serve, and enjoy!

Nutrition Facts
Mint Chocolate Chip Ice Cream
Amount Per Serving (1 (1/2 cup serving))
Calories 303 Calories from Fat 198
% Daily Value*
Fat 22g34%
Saturated Fat 13g81%
Cholesterol 68mg23%
Sodium 29mg1%
Potassium 132mg4%
Carbohydrates 23g8%
Sugar 20g22%
Protein 2g4%
Vitamin A 745IU15%
Vitamin C 0.2mg0%
Calcium 66mg7%
Iron 0.7mg4%
* Percent Daily Values are based on a 2000 calorie diet.

Here’s one more to pin on your Pinterest boards!Nothing quite beats the taste of homemade Mint Chocolate Chip Ice Cream! Enjoy this cool, creamy treat any time of the year!


Save

Save

“21 Day Fix” Oatmeal Chocolate Chip Cookies

Yummy “21 Day Fix” Oatmeal Chocolate Chip Cookies will satisfy that sweet tooth, with only 5 ingredients, and they’re ready in under 20 minutes!"21 Day Fix" Oatmeal Chocolate Chip Cookies will satisfy that sweet tooth, with only 5 ingredients, and they're ready in under 20 minutes!

Who says you can’t have a couple of cookies while eating healthy foods and controlling portion size on “The 21 Day Fix Plan”?  Here’s a fun little recipe for HEALTHY “21 Day Fix” Oatmeal Chocolate Chip Cookies to satisfy that ever present sweet tooth!

I made these cookies recently while giving the 21 Day Fix program a test run. The cookies get their sweetness from bananas, and are filled with rolled oats, cinnamon, salt, and chocolate chips! Two cookies equal one serving, and come in under 100 calories per serving.

This recipe, as written, makes 8 cookies, but would be totally easy to double. The cookies helped curb my sweet tooth… and kept me rolling along on the plan. It was nice to have cookies as a treat!

Scroll Down For A Printable Recipe Card At The Bottom Of The Page

How to Make 21 Day Fix Oatmeal Chocolate Chip Cookies

Here’s how simple they are to make:  Preheat your oven to 350 degrees.  Mix the old-fashioned rolled oats (not quick cooking) with cinnamon and sea salt in a medium sized bowl.

Rolled oats, cinnamon, and salt in bowl, for 21 day fix oatmeal chocolate chip cookies.

Mash up two bananas with a fork, in a small bowl.

Mashed bananas in dish, ready to add to batter for oatmeal chocolate chip cookies.

Add the mashed bananas and chocolate chips to the rolled oats, in a medium sized mixing bowl.

Oats, banana and chocolate chips in dish, ready to make batter for oatmeal chocolate chip cookies!

Stir all the ingredients very well, so they are totally combined.

Batter for 21 Day Fix oatmeal chocolate chip cookies.

Shaping The 21 Day Fix Oatmeal Chocolate Chip Cookies

Drop the “dough” by heaping Tablespoons onto an ungreased cookie sheet, being careful to leave a bit of space between each cookie. Lightly wet your hands so the batter won’t stick, then shape the “dough” into circles and flatten the tops down a bit.

Baking The Oatmeal Chocolate Chip Cookies

Place the cookies into a preheated 350°F oven, and let them bake for approximately 15 minutes (or until firm).

Dough for oatmeal chocolate chip cookies, on baking sheet.

Once the oatmeal chocolate chip cookies are finished baking, let them cool slightly on the pan. Transfer the cookies to a wire rack to finish cooling.

Baked 21 day fix oatmeal chocolate chip oatmeal cookies, cooling on wire rack.

Once completely cooled off, these yummy diet-friendly cookies are ready to eat! The oatmeal chocolate chip cookies hold together very well, and are slightly soft to the bite. They have a good taste, too!

Three baked 21 day fix oatmeal chocolate chip cookies on white plate.

Hope you will consider making these cookies if you are looking for a healthy, but not sugar packed oatmeal chocolate chip cookie. If you are following the “21 Day Fix” plan, the container counts are 1 yellow, and 1 purple for a serving of 2 cookies.

Don’t get me wrong… I can normally stuff my face with REAL oatmeal chocolate chip cookies till the cows come home, but while “eating clean” on this 21 day program, these were a tasty substitute!  Have a great day.

Looking For More COOKIE Recipes?

You can find all of my cookie recipes in the Recipe Index, which is located at the top of the page. I have quite a few delicious recipes, including:

Interested In More Recipes?

Thank you for visiting this website. I appreciate you using some of your valuable time to do soIf you’re interested, I publish a newsletter 2 times per month (1st and 15th) with all the latest recipes, and other fun info. I would be honored to have you join our growing list of subscribers, so you never miss a great recipe!
There is a Newsletter subscription box on the top right side (or bottom) of each blog post, depending on the device you use, where you can easily submit your e-mail address (only) to be included in my mailing list.

You Can Also Find Me On Social Media:

Facebook page: The Grateful Girl Cooks!
Pinterest:
The Grateful Girl Cooks!
Instagram:
jbatthegratefulgirlcooks

Author's signature

Recipe Source:  http://www.adventuresofashrinkingprincess.com/recipes/21-day-fix-oatmeal-chocolate-chip-cookies/

0 from 0 votes
"21 Day Fix" Oatmeal Chocolate Chip Cookies
Prep Time
5 mins
Cook Time
15 mins
Total Time
20 mins
 

Yummy "21 Day Fix" Oatmeal Chocolate Chip Cookies will satisfy a sweet tooth, with only 5 ingredients, and they're ready in under 20 minutes!

Category: Dessert
Cuisine: American
Keyword: oatmeal chocolate chip cookies
Servings: 8 cookies (2 per serving)
Calories Per Serving: 98 kcal
Author: JB @ The Grateful Girl Cooks!
Ingredients
  • 1 cup old-fashioned oats
  • 2 teaspoons cinnamon
  • 1/4 teaspoon sea salt
  • 2 medium ripe bananas , mashed
  • 1/4 cup semi-sweet chocolate chips
Instructions
  1. Preheat oven to 350 degrees. Lightly spray a baking sheet with non-stick spray.
  2. In a medium sized bowl, add the rolled oats, cinnamon and sea salt.
  3. In a separate bowl, mash the bananas together, using a fork. Add the mashed bananas and chocolate chips into the rolled oats mixture. Mix these ingredients very well.

  4. Drop the cookie "dough" by heaping Tablespoons (8 total) onto your baking sheet. Lightly wet your fingers with water and gently press down on the tops of each cooking to flatten a bit.
  5. Bake cookies at 350 degrees for 14-15 minutes, or until the cookies are firm to the touch. Remove cookies from oven. Let them cool down, then transfer to a wire rack, to finish cooling. Serve at room temp, and enjoy!

Recipe Notes

On 21 Day Fix plan? One serving = 2 cookies.
Container count is 1 yellow, 1 purple.

Nutrition Facts
"21 Day Fix" Oatmeal Chocolate Chip Cookies
Amount Per Serving (2 cookies)
Calories 98 Calories from Fat 18
% Daily Value*
Fat 2g3%
Saturated Fat 1g6%
Sodium 74mg3%
Potassium 174mg5%
Carbohydrates 16g5%
Fiber 2g8%
Sugar 5g6%
Protein 2g4%
Vitamin A 20IU0%
Vitamin C 2.6mg3%
Calcium 15mg2%
Iron 0.9mg5%
* Percent Daily Values are based on a 2000 calorie diet.

Here’s one more to pin on your Pinterest boards!Yummy "21 Day Fix" Oatmeal Chocolate Chip Cookies will satisfy a sweet tooth, with only 5 ingredients, and they're ready in under 20 minutes!


Save

Save

Save

Save

Strawberry-Rhubarb Dream Bars

Strawberry-Rhubarb Dream Bars are creamy dessert bars with fresh strawberries and rhubarb filling on a rich, buttery crust. Recipe makes 16 treats.Strawberry-Rhubarb Dream Bars are creamy dessert bars with fresh strawberries and rhubarb filling on a rich, buttery crust. Recipe makes 16 treats.
I love Spring, when it seems like everything is blooming and growing! From flowers to garden vegetables AND our lawns (which constantly seem to need mowing)…I love it all! Spring is also time for delicious fresh strawberries, rhubarb… and Strawberry-Rhubarb Dream Bars!

I grow rhubarb and strawberries in our garden, so I’m always on the prowl for new recipes to use them in. I found the recipe for these sweet/tangy dessert bars on Pinterest and decided to make them. YUM! They are really quite good. The bars have a creamy strawberry-rhubarb filling on a shortbread-style crust, and are absolutely delicious!

Scroll Down For A Printable Recipe Card At the Bottom Of The Page

How To Make Strawberry-Rhubarb Dream Bars

Preheat your oven to 350 degrees. The crust ingredients are placed in a food processor (or can be mixed with a pastry blender) and mixed until the butter has become fine crumbs.

The crumbs are then placed into an 8×8 (or an 8×10) baking pan that is lined with parchment paper. Let the parchment paper extend over the edges of pan, so you can easily lift out the bars when cool. Press the crumbs into the bottom of the pan, forming a packed down crust. Bake the crust at 350 degrees for 15 minutes, then remove the pan from the oven.

Crust ingredients, including butter, are mixed in a food processor.The processed crust mixture is placed in a parchment paper-lined baking dish.The crumbles are patted down into the baking dish, to form a bottom crust.

Time To Make The Filling!

While the crust is baking, make the filling. Make the filling by mixing together the eggs, granulated sugar, flour and salt. There is no mixer required… just whisk or stir this mixture with a spoon until blended.

Eggs, flour, sugar and salt are combined to start making the filling.
Gently stir the diced strawberries and rhubarb into the filling, until well combined.

Chopped rhubarb and strawberries are added to the filling ingredients.Filling for the Strawberry-Rhubarb Dream Bars is now fully blended together.

Once you remove the crust from oven, pour the strawberry-rhubarb mixture on top of the hot crust. Spread the filling evenly across the baked crust.

The filling is poured onto the top of the hot, baked crust.The strawberry and rhubarb filling is spread over the crust before baking.

Bake The Strawberry-Rhubarb Dream Bars

Put the pan back into the oven and continue to bake the dream bars for an additional 40-45 minutes. When the strawberry-rhubarb dream bars are done, remove pan from oven, and let them cool completely.

Once cool, transfer the bars out of the pan by lifting up the parchment paper.  Top the dessert bars with sifted powdered sugar.

Powdered sugar is sifted over the baked dream bars.

Slice And SERVE!

Once you’ve covered the bars with sifted powdered sugar, slice into 16 individual portions. I like using a pizza cutter to do this, but a really sharp knife will work just as well!

Strawberry-Rhubarb Dream Bars are sliced into 16 portions for serving.

That’s it! Now you’ve just made 16 creamy and delicious, Strawberry-Rhubarb Dream Bars. I love the flavor combo of strawberries and rhubarb (have you tried Strawberry-Rhubarb Pie?). The combo of strawberries and rhubarb pair very well in this easy dessert! Now all that’s left is to grab one, take a big bite, and ENJOY!

An inside look at the dream bars, once cut. YUM!

I sincerely hope you have a wonderful day, and enjoy each moment you are gifted with. I am so very thankful for this season of Spring, and new life springing up from what once was dormant… in nature, and in my own heart (through faith in Jesus). Be blessed!

Looking For More BAR COOKIE Recipes?

You can find all of my recipes in the Recipe Index, located at the top of the page. I have some great bar cookie recipes there, including:

Interested In More Recipes?

Thank you for visiting this website. I appreciate you using some of your valuable time to do soIf you’re interested, I publish a newsletter 2 times per month (1st and 15th) with all the latest recipes, and other fun info. I would be honored to have you join our growing list of subscribers, so you never miss a great recipe!
There is a Newsletter subscription box on the top right side (or bottom) of each blog post, depending on the device you use, where you can easily submit your e-mail address (only) to be included in my mailing list.

You Can Also Find Me On Social Media:
Facebook page: The Grateful Girl Cooks!
Pinterest: The Grateful Girl Cooks!
Instagram: jbatthegratefulgirlcooks

Author's signature

Recipe Adapted From: http://noshingwiththenolands.com/rhubarb-dream-bars/

0 from 0 votes
Strawberry-Rhubarb Dream Bars
Prep Time
15 mins
Cook Time
45 mins
Total Time
1 hr
 

Strawberry-Rhubarb Dream Bars are creamy dessert bars with fresh strawberries and rhubarb filling on a rich, buttery crust. Recipe makes 16 treats.

Category: Bar Cookies, Dessert
Cuisine: American
Keyword: strawberry-rhubarb dream bars
Servings: 16 bars
Calories Per Serving: 178 kcal
Author: JB @ The Grateful Girl Cooks!
Ingredients
For The Crust:
  • 1 cup flour
  • 1/2 cup granulated sugar
  • 1/2 cup butter (chilled)
For The Filling:
  • 2 large eggs
  • 1 cup granulated sugar
  • 1/4 cup flour
  • 1/4 teaspoon salt
  • 1 1/4 cups diced fresh rhubarb
  • 3/4 cup diced fresh strawberries
For garnish:
  • Powdered sugar (sifted)
Instructions
  1. Preheat your oven to 350 degrees. Using parchment paper, line the bottom of an 8x8 or a 8x10 inch baking pan. Let the parchment paper overlap (extend over) the sides of pan, so you will be able to lift out the entire dessert later.
Make the crust:
  1. Place the flour, granulated sugar and butter into a food processor. Pulse until butter has been reduced to small crumbs throughout. (If you want to do this by hand, use a pastry blender and cut in the butter until small crumbs). Pour the crumbs into prepared baking sheet. Press the crumbs down firmly and evenly to form a crust. Bake at 350 degrees for 15 minutes. Remove from oven.
Make filling:
  1. While crust is baking, prepare the filling by mixing the eggs, granulated sugar, flour and salt together in a medium bowl. Once creamy, gently stir in diced strawberries and rhubarb until blended. Once crust comes out of the oven, pour filling on top of hot crust. Distribute filling evenly. Place back into the oven and cook for another 40-45 minutes (mine took entire 45 minutes). When done, remove pan from oven. Let cool completely (in pan). Once cool, lift the entire dessert out of baking pan using the parchment paper overhangs. Remove parchment paper from sides.
  2. Sift powdered sugar over the top of the dessert. Slice into 16 bars; Serve and enjoy!
Nutrition Facts
Strawberry-Rhubarb Dream Bars
Amount Per Serving (1 bar)
Calories 178 Calories from Fat 54
% Daily Value*
Fat 6g9%
Saturated Fat 3g19%
Cholesterol 35mg12%
Sodium 95mg4%
Potassium 53mg2%
Carbohydrates 29g10%
Sugar 21g23%
Protein 1g2%
Vitamin A 215IU4%
Vitamin C 4.7mg6%
Calcium 15mg2%
Iron 0.6mg3%
* Percent Daily Values are based on a 2000 calorie diet.

Here’s one more to pin on your Pinterest boards!Strawberry-Rhubarb Dream Bars are creamy dessert bars with fresh strawberries and rhubarb filling on a rich, buttery crust. Recipe makes 16 treats.


Save

Save