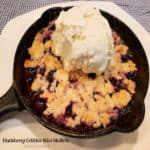
Share a yummy Blackberry Cobbler Mini Skillet with a loved one! Recipe makes 2 skillets (4 servings) and cooks on a pellet grill or in oven.

Do you enjoy fruit cobblers? We sure do! Today I want to share a recipe for blackberry cobbler mini skillets that I adapted from another of my recipes I posted on my blog a few years ago.
The beauty of this recipe is you can use fresh OR frozen blackberries to make this decadent dessert, so it can be made year round!
They’re incredibly simple to make in cute little 6″ cast iron skillets, and you can bake them in the oven OR cook them on a Traeger or other pellet grill. I ordered my mini skillets several years ago online, and have gotten LOTS of use out of them!
It’s a fun dessert, because each little skillet hold two servings, so you can split one with a family member or good friend! If you don’t have the skillet, this dessert can be made in a greased 8″ x 8″ baking dish. This cobbler is YUMMY! Here’s how to make it.
Scroll Down For A Printable Recipe Card At The Bottom Of The Page
Prepare The Blackberry Filling
For this recipe you can use FRESH or FROZEN blackberries. We are fortunate to have wild blackberries growing over our back fence each summer, from a forested park behind our home!
I picked these juicy blackberries in the morning and made cobbler skillets later that same day, which was really quite awesome!
To make the filling, place fresh or frozen (do not thaw) blackberries in a medium bowl. Add brown sugar, salt, lemon juice & zest, ground cinnamon and vanilla.


Stir gently to combine. Evenly divide the blackberry filling between two, 6″ cast iron mini skillets. Set the skillets aside.
NOTE: If using FROZEN berries in the filling, let them thaw in their skillets as you prepare the crumbly topping. Keep any juices that accrue with the filling while they thaw.


Prepare The Cobbler Crumb Topping
Stir together flour, sugar, baking powder and salt in a medium bowl until combined. Cut in small chunks of very cold butter, using a pastry blender (as shown) or two forks.
Cut in the butter until it becomes the size of peas. Stir in sour cream until it is incorporated into the dough.


The topping dough will be very soft and slightly crumbly once combined, which is exactly how you want it to be!
Pinch the dough into small pieces with your fingers and distribute and divide them evenly over the blackberry filling, to cover the surface.
Sprinkle one Tablespoon of granulated sugar over the topping, dividing it evenly between the two skillets. Now they are ready to be cooked!


Cook The Blackberry Cobbler Mini Skillets
If Cooking In An Oven: Preheat oven to 350°F. (or 176.6°C.). Place a piece of foil under the skillets to catch any potential drips (and for easier cleanup). Bake at 350°F. for 30-35 minutes or until cobblers are bubbling around the edges and the crumb topping is golden brown.
If Cooking On A Traeger Or Pellet Grill: Start smoker according to the manufacturer instructions, then preheat the smoker to 350°F. When at temperature, add the cobbler skillets. Cook at 350°F. for 30-35 minutes or until cobblers are bubbling around the edges and the crumb topping is golden brown. NOTE: Use your favorite pellets (it won’t really make a big difference which kind)!


Serve The Blackberry Cobbler Mini Skillets
Once done, remove the skillets from the heat source and let them cool for 5-10 minutes, because they will be very hot!
Serve the warm blackberry cobbler mini skillets with a big scoop of vanilla ice cream (or two small scoops-one for each person sharing the skillet).
Pass out the spoons to everyone… and go for it! The cobblers are absolutely wonderful, and I’m confident you’re going to love them!


I really hope you have the chance to make these cute and delicious blackberry cobbler mini skillets. They’re so GOOD!
Thanks for stopping by today, and I invite you to come back soon for more family-friendly recipes! Take care, may God bless you, and have a GREAT day!
Looking For More COBBLER Recipes?
You can find ALL my recipes in the Recipe Index, which is located at the top of the page. I have some wonderful cobbler recipes to choose from, including:
Want More Recipes? Get My FREE Newsletter!
I publish a newsletter 2 times per month (1st and 15th) with lots of recipes, tips, etc..
Would you like to join our growing list of subscribers?
There is a Newsletter subscription box on the top right (or bottom) of each blog post, depending on the device you use.
You can submit your e-mail address there, to be added to my mailing list.
Find Me On Social Media:
Facebook page: The Grateful Girl Cooks!
Pinterest: The Grateful Girl Cooks!
Instagram: jbatthegratefulgirlcooks

↓↓ PRINTABLE RECIPE BELOW ↓↓
Share a yummy Blackberry Cobbler Mini Skillet with a loved one! Recipe makes 2 skillets (4 servings) and cooks on a pellet grill or in oven.
- 1¾ cups blackberries fresh or frozen (do not thaw)
- ½ cup brown sugar light or dark
- ½ teaspoon fresh lemon juice
- ½ teaspoon lemon zest yellow peel, finely grated
- ½ teaspoon vanilla extract
- ¼ teaspoon ground cinnamon
- 1 pinch salt a tiny pinch!
- ¾ cup all purpose flour
- 2 Tablespoons granulated sugar
- ¾ teaspoon baking powder
- ¼ teaspoon salt
- 4 Tablespoons COLD Butter = ½ stick
- ¼ cup sour cream
- 1 Tablespoon granulated sugar (to sprinkle on top of cobbler)
Preheat oven or pellet grill to 350℉. If using pellet grill preheat according to manufacturer instructions.
Make Fruit Filling- place fresh or frozen (un-thawed) blackberries in a medium bowl. Add brown sugar, salt, lemon juice, lemon zest, cinnamon and vanilla. Stir gently to combine. Evenly divide filling into two, 6" cast iron skillets. Set aside. NOTE: If using FROZEN berries in the filling, let them thaw in the skillets as you prepare the topping. Keep juices that accrue in skillets while they thaw.
Make crumb topping- Stir flour, 2 T. sugar, baking powder and salt in a medium bowl until combined. Cut in chunks of COLD butter, using a pastry blender or 2 forks until it is the size of peas. Stir in sour cream until incorporated. Pinch dough into small pieces with your fingers; distribute evenly over blackberry filling. Sprinkle remaining 1 T. sugar over topping, dividing evenly between skillets.
Cooking In Oven: Preheat oven to 350°F. (or 176.6°C.). Place a piece of foil under skillets to catch any drips (and for easier cleanup). Bake at 350°F. for 30-35 minutes or until cobblers are bubbling around edges and topping is light brown.
Cooking On A Traeger/Pellet Grill: Start smoker according to manufacturer instructions. Preheat to 350°F. When at temp., add cobbler skillets. Cook at 350°F. for 30-35 minutes or until cobblers are bubbling around edges and topping is light brown. NOTE: Use favorite pellets (it doesn't make a difference which kind)!
When done, let cobblers cool for 5-10 minutes, before serving. Serve with a big scoop of vanilla ice cream (or 2 small scoops-1 for each person sharing skillet).
NOTE: Caloric calculation is for one serving of HALF of a skillet cobbler, without the ice cream (optional).
Here’s one more to pin on your Pinterest boards!
. / The Grateful Girl Cooks!")


. / The Grateful Girl Cooks!")


 is a simple, delicious Summer dessert, served with vanilla ice cream! / The Grateful Girl Cooks!")


 is a simple, delicious Summer dessert, served with vanilla ice cream!/ The Grateful Girl Cooks!")


! / The Grateful Girl Cooks!")


! / The Grateful Girl Cooks!")