Classic Pot Roast is comfort food at it’s very best! Make this delicious, tender beef dish for those you love, using only a few ingredients!

When I was growing up I looked forward to my Mom’s pot roast. She would put the meat, along with carrots, onions AND potatoes in the pot and while it cooked, our little house would smell so good!
These days, I love cooking roast with carrots and onions only, and prefer to make mashed potatoes (and gravy) separately to serve on the side. YUM! Same great taste, and our home still smells amazing while it cooks!
To me, a tender pot roast is comfort food, and when I make it nowadays, it brings back warm memories from my childhood. I don’t make it as often now, because I’m only cooking for two. When I do make it, I buy a small roast which is enough for several servings and leftovers!
There are so many ways to season and prepare pot roast. I found the original recipe for this pot roast online a while ago, made some very minor changes, and this is how I make classic pot roast now.
Scroll Down For A Printable Recipe At The Bottom Of The Page
Pan-Sear The Veggies
The first thing to do is pan-sear the onions and carrots separately in a large Dutch oven. NOTE: You will use this pot for the roast as well, so it must be oven-safe.
Heat a couple Tablespoons of vegetable oil in a Dutch oven over Medium-High heat. When the oil is hot and shimmering, add the prepared onions. Each one of the onions should be peeled, ends trimmed, and then cut into 8 wedges (from top to bottom).
Cook the onions about 2-3 minutes, stirring occasionally until slightly browned and translucent. Carefully remove and transfer the onions to a plate.
Now add the carrots (2″ slices) to the hot pot and cook for 2-3 minutes, stirring occasionally until they’re slightly browned. Remove them and transfer to the plate, as well.


Now you should have a large plate with the pan-seared onions and carrots on it. Set these veggies aside while you brown the beef.

Season And Pan-Sear The Pot Roast
Season the pot roast generously on all sides with salt and pepper. Add a bit more oil to the pan (if necessary), and heat it on Medium-High.

When the oil is very hot (but not smoking), add the seasoned pot roast. Pan-sear the meat for about 2 minutes without moving it, then turn to the other side and repeat, to ensure all sides of the meat are browned.
You will not cook the beef all the way through, but simply want all sides of the roast to be browned. When done, remove and transfer the browned roast to a plate.


De-Glaze The Pan
After browning the onions, carrots and beef, there will be little bits of them stuck to the bottom of the pot. They have lots of flavor, so it is time to de-glaze the pot!
To do this, add 1 cup of beef broth and minced garlic to the pot, and cook on Medium-High, for 1-2 minutes. Use a spoon to scrape those browned bits off the bottom of the pot as it cooks.
The browned bits add a LOT of flavor to the broth the roast will cook in, so don’t skip this step! Remove the pot from the heat.

Bake The Classic Pot Roast
Place the roast back into the pot, then add the remaining 2 cups of beef broth. The broth should come about ½ way up the sides of the roast.
Surround and cover the roast with the carrots and onions. Add a couple sprigs of fresh rosemary and several sprigs of fresh thyme to the top.
Put a lid on the pot and bake the pot roast at 275° F. for 3 hours (low and slow!). Cooking the meat low and slow will produce a very tender roast!
NOTE: If you are using a larger roast (4-5 pounds), you will need to let it bake for about 4 hours at the same temperature.


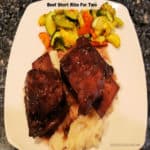
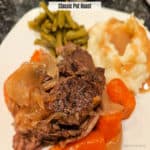
Serve And Enjoy Classic Pot Roast
When the classic pot roast is finished baking, carefully transfer it to a serving platter. Be careful, the meat is usually falling-apart tender!
Arrange the carrots and onions on the platter, and spoon a bit of the broth from the pot over the top, if desired. Slice the pot roast into individual portions, transfer to plates and add the onions and carrots. Serve with your favorite side dishes, and enjoy!
Our favorite way to enjoy this meal is with green beans from our garden, and mashed potatoes and gravy (made from the beef broth remaining in the pot). It’s such a comforting and delicious meal!


The pot roast, carrots and onions all have wonderful flavor, and are VERY tender! I hope you have the opportunity to make this dish for those you love, and trust you’ll enjoy it, too.
Thank you for taking time out of your day to stop by. I invite you to come back again soon for more family-friendly recipes. Take care, may God bless you, and have a GREAT day!
Looking For More BEEF Recipes?
You can find ALL of my recipes in the Recipe Index, which is located at the top of the page. I have quite a few delicious recipes featuring beef, including:
- Beef Tips And Gravy
- Classic Beef Stew
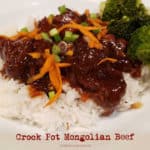
- Crock Pot Mongolian Beef
- Mom’s Swedish Meatballs and Rice
- Really GOOD Meatloaf
Want More Recipes? Get My FREE Newsletter!
I publish a newsletter 2 times per month (1st and 15th) with lots of recipes, tips, etc..
Would you like to join our growing list of subscribers?
There is a Newsletter subscription box on the top right (or bottom) of each blog post, depending on the device you use.
You can submit your e-mail address there, to be added to my mailing list.
Find Me On Social Media:
Facebook page: The Grateful Girl Cooks!
Pinterest: The Grateful Girl Cooks!
Instagram: jbatthegratefulgirlcooks

Recipe adapted from: https://www.foodnetwork.com/recipes/ree-drummond/perfect-pot-roast-recipe-2118771
↓↓ PRINTABLE RECIPE BELOW ↓↓
Classic Pot Roast is comfort food at it's very best! Make this delicious, tender beef dish for those you love, using only a few ingredients!
- 3 pound pot roast (chuck roast)
- salt and black pepper to season beef generously
- 2 Tablespoons vegetable oil
- 6 medium carrots peeled, cut in 2" round pieces
- 2 medium yellow onions peeled, each cut in 8 wedges, top to bottom
- 1½ teaspoons minced garlic
- 3 cups beef broth
- 4-6 sprigs fresh thyme
- 2 sprigs fresh rosemary
Preheat oven to 275℉. (or 135℃.)
Heat vegetable oil in a Dutch oven (oven-safe) over Medium-High heat. When oil is shimmering, add onion wedges. Cook 2-3 minutes, stirring occasionally until slightly browned and translucent. Remove/Transfer onions to a plate. Add carrots to the hot pot; cook 2-3 minutes on Medium-High until slightly browned. Remove/Transfer carrots to the plate, as well.
Generously season roast with salt and pepper on all sides. Add more oil to the pot (if necessary); heat on Medium-High. When oil is hot, add roast. Cook meat for 1-2 minutes without moving it, then turn to the other side; repeat to ensure all sides are browned (but not cooked through). When done, remove/ transfer roast out of the pot to a plate.
Add 1 cup beef broth and minced garlic to the pot; cook on Medium-High for 1-2 minutes. Use a spoon to scrape the browned bits off the bottom as it cooks. Remove pot from the heat.
Place roast back into the pot; add remaining 2 cups beef broth. Broth should come about ½ way up the sides of the roast. Add carrots and onions. Place sprigs of fresh rosemary and fresh thyme on top. Put a lid on the pot and bake roast at 275° F. for 3 hours (low and slow!). NOTE: If using a larger roast (4-5 pounds), you will need to let it bake for about 4 hours.
When finished baking, carefully transfer roast to a serving platter. Be careful, the meat is usually fall-apart tender! Discard thyme and rosemary. Arrange carrots and onions on platter; spoon a bit of broth over the top, if desired. Slice pot roast into portions, transfer to plates; add onions and carrots. Serve, and enjoy!
Here’s one more to pin on your Pinterest boards!