What’s more Irish than Corned Beef and Cabbage? Baked with cabbage, red potatoes, carrots and onions, this St. Patrick’s Day meal is yummy!
Top of the morning to ya! (said in my most perfect Irish brogue-ha ha!). Today I want to share the recipe for a simple, classic meal of corned beef and cabbage. With a few red potatoes, carrots and onions tossed in for good measure, this really is an all in one holiday meal. It’s also very easy to prepare.
Over the years I have used the directions on the package of corned beef to prepare this dish, and have made only a couple very minor changes to this traditional Irish dinner.
The best part? You don’t even have to be Irish to enjoy it! You can “pretend” for the day with this simple meal. My husband really enjoys this meal and asked me to make it again last year, so I grabbed my camera and took some photos as I cooked it!
The trick is to cook it low and slow, for tender corned beef. Here’s how to make this simple recipe for corned beef and cabbage:
Scroll Down For A Printable Recipe Card At The Bottom Of The Page
Prepare The Corned Beef
This recipe calls for a “standard-sized 3 pound piece of corned beef. Most packages of corned beef come with a cute little spice packet. If yours does not, you can use a Tablespoon of pickling spice (found in spice section at grocery store).
Place the meat on a large sheet of heavy duty foil inside of a large baking dish (9″ x13” works well).
Sprinkle the meat with the spices. NOTE: The meat will be cooked with the fatty side up. It is fairly common to sprinkle the spices on the fat side, however I have found I prefer it sprinkled on the meat side, with only a tiny bit sprinkled on the fat side. It is your choice.


Baking The Corned Beef And Cabbage
Once the meat has been seasoned, place it fat side UP in the foil, and seal the foil packet tightly. Place the baking dish with the foil-wrapped corned beef on the middle rack of a preheated 300°F. oven.

Bake the corned beef for 1½ hours, then remove the pan from the oven. Carefully open the foil pouch, and place carrots, onion wedges and whole, unpeeled red potatoes around the edges of the corned beef. Seal the pouch back up, and cook for 30 more minutes.

Remove the pouch from the oven again, and add the 4 quartered pieces of cabbage around the edges of the corned beef. Re-seal the foil pouch, and place it back in the oven. Bake for another 1½ hours, or until the corned beef has an internal temperature of of 145°F.
Remove the corned beef and cabbage from the oven, carefully turn the corned beef over so the meat side is UP, and then let it rest for 5 minutes before slicing.


Serving The Corned Beef And Cabbage
After the meat has rested 5 minutes, slice the meat (fat side down), and serve with the carrots, potatoes, and onions on the side. You can cut the cabbage wedges in half (for 6+ servings), if desired, or serve the whole quarter piece (for 4 servings).
Spoon some of the accumulated juices over the meat and vegetables, for extra flavor. Season the veggies to taste with salt and pepper.
And there you have it… a simple meal in honor of St. Patrick’s Day… corned beef and cabbage. Hope you enjoy it!


I hope you have the opportunity to make corned beef and cabbage some day. It’s fun to celebrate the St. Patrick’s Day holiday with traditional Irish foods.
Why not start the meal of with a delicious appetizer? Guinness Baked Cheese Dip is a great place to start! Next, serve the corned beef and cabbage with delicious Irish Colcannon With Bacon and slices of warm Irish Soda Bread on the side.
While you’re at it, what would a good feast be without dessert? Finish off your Irish dinner with easy, decadent Irish Chocolate Pots de Creme for a delectable, sweet treat!
Thanks for stopping by. I hope you enjoy this recipe, and trust you will come back soon for more family recipes. Have a GREAT day!
Want More Recipes? Get My FREE Newsletter!
I publish a newsletter 2 times per month (1st and 15th) with lots of recipes, tips, etc..
Would you like to join our growing list of subscribers?
There is a Newsletter subscription box on the top right (or bottom) of each blog post, depending on the device you use.
You can submit your e-mail address there, to be added to my mailing list.
Find Me On Social Media:
Facebook page: The Grateful Girl Cooks!
Pinterest: The Grateful Girl Cooks!
Instagram: jbatthegratefulgirlcooks

Recipe adapted from: a store-bought bag of corned beef
↓↓ PRINTABLE RECIPE BELOW ↓↓
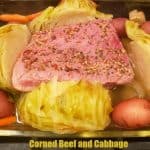
What's more Irish than Corned Beef and Cabbage? Baked with cabbage, red potatoes, carrots and onions, this St. Patrick's Day meal is yummy!
- 3 pounds packaged corned beef (+ spice packet) (see note below)
- 6 medium red potatoes , do not peel
- 20 baby carrots , or 3 large peeled carrots-cut into 2" chunks
- 1 large yellow onion
- 1 medium green cabbage , cut into quarters
Preheat oven to 300°F.
Place corned beef on aluminum foil inside of a large baking dish (9" x13" works well). Sprinkle meat with contents of spice packet (or substitute 1 T. pickling spice). NOTE: meat is cooked fat side up. It is fairly common to sprinkle spices on the fat side, however I prefer it sprinkled on the meat side. It's your choice. Place seasoned meat on foil, fat side UP; seal foil packet tightly. Place baking dish on middle rack of oven.
Bake for 1½ hours, then remove from oven. Carefully open foil pouch; place carrots, onions and potatoes around the outer edges of the corned beef. Seal the pouch, and cook for 30 more minutes. Remove baking dish again; add cabbage wedges around the corned beef. Re-seal foil; place dish back in oven. Bake for 1½ hours, or until corned beef has reached an internal temperature of 145°F. Remove dish from oven; turn corned beef over so meat side is UP; let meat rest 5 minutes before slicing.
Slice corned beef (fat side down); serve with carrots, potatoes, onions, and cabbage on the side. *Cut cabbage wedges in half (for 6+ servings), or serve the whole quarter piece (for 4 servings). Spoon accumulated juices in foil packet over the meat and vegetables, for extra flavor. Season veggies to taste with salt and pepper. Enjoy!
NOTE: If corned beef did not come with a spice packet, use 1 Tablespoon of pickling spice as a substitute.
Here’s one more to pin on your Pinterest boards!