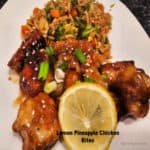
Lemon Pineapple Chicken Bites is a delicious dish with chunks of fried chicken and pineapple coated in a sweet Asian lemon pineapple sauce.

Do you enjoy lemon chicken? I sure do! Today I want to share a recipe for lemon pineapple chicken bites that is really, really good!
I found the original recipe online, and added a couple ingredients (pineapple being one of them). Then I changed the measurements of a few ingredients, and slightly tweaked the cooking process for the sauce.
All that said, these lemon pineapple chicken bites ended up being absolutely delicious! My husband, son and I enjoyed it very much.
This dish is best when eaten the same day it’s made, but we did have enough leftovers for 2 more meals (easily reheated in our microwave). Here’s how to make lemon pineapple chicken bites.
Scroll Down For A Printable Recipe Card At The Bottom Of The Page
Make The Lemon Pineapple Sauce
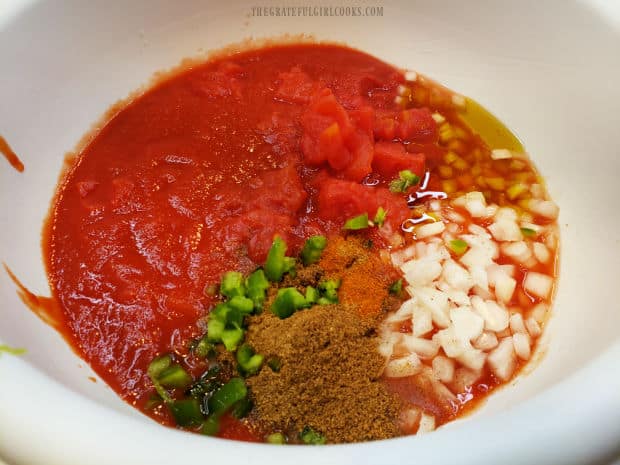
The first thing to do is make the lemon pineapple sauce. It’s really easy! Simply combine the sauce ingredients in a bowl, and stir it very well, until combined and brown sugar has dissolved.
The sauce ingredients are: sesame oil, ginger, garlic, soy sauce, chicken broth, honey, pineapple juice, brown sugar, pepper, white vinegar, lemon juice, and lemon zest.
Later, this Asian-inspired sauce will be cooked and thickened using cornstarch before adding the cooked chicken and pineapple. Set it aside for now.

Prepare The Chicken
Pat the boneless, skinless chicken breasts dry and then cut them into bite-sized pieces (in approximately 2″ cubes). Season the chicken lightly with salt and pepper.

The next step is battering the chicken pieces before they are fried. Here’s how to do that (and yes, it’s a bit messy).
- In one bowl, combine flour, salt and pepper. In a separate bowl, place an egg and milk, and whisk to combine.
- Fully cover the pieces of chicken in the flour mixture (coat several at a time)
- Place the flour covered chicken pieces into the milk mixture and turn to coat (coat several at a time). Let excess egg drip back into the bowl.
- Coat the pieces of chicken again in the flour mixture. Now they are ready to be cooked.

Cook The Chicken Bites
Heat oil on Medium heat in large skillet until very hot, but not smoking. Fry the coated chicken pieces in hot oil until all sides are browned and the chicken is cooked through. You may need to do this in batches, so you don’t overcrowd the pan.
Once fully cooked through, transfer the chicken pieces to paper towels to absorb excess oil. Repeat this process until all the chicken pieces are cooked.


Cook The Lemon Pineapple Sauce
Measure 3 Tablespoons of the reserved lemon pineapple sauce into a small bowl. Add 2½ Tablespoons of cornstarch and whisk or stir until this mixture is blended and lump-free.
Pour the remaining lemon pineapple sauce into a large skillet (big enough to hold all the chicken). Bring this mixture to a boil, stirring constantly. Cook for 1 minute, stirring often.
Add the cornstarch mixture, and whisk or stir it well to incorporate it fully into the sauce. The sauce will thicken very quickly!


Add Remaining Ingredients To The Sauce
Once the sauce thickens, immediately add the chicken pieces and the pineapple chunks. Stir well, to fully coat the chicken and pineapple with sauce.
Cook on MEDIUM-LOW, stirring constantly, only until everything is heated through, then remove the skillet from the heat. Now you’re ready to serve this dish!

Serve The Lemon Pineapple Chicken Bites
Garnish the lemon pineapple chicken bites with sliced green onions, sesame seeds, and a lemon slice, if desired. These are optional, of course, but add a pop of color and flavor to an already yummy main dish!
Serve immediately while the chicken is hot! I highly recommend serving this dish with rice or noodles on the side.
This time (while photographing the recipe steps) I served it with a twist on fried rice called Asian Orzo Veggie Skillet. It was a wonderful accompaniment to this meal.


Lemon Pineapple Chicken Bites taste wonderful, and I really believe you’ll enjoy them, too! The chicken is tender and has fantastic flavor, thanks to that delicious, lip-smackin’ Asian sauce!
Thanks for stopping by, and I invite you to come back soon for more family-friendly recipes. Take care, may God bless you, and I hope you have a GREAT day!
Looking For More ASIAN CHICKEN Recipes?
You can find ALL of my recipes in the Recipe Index, which is located at the top of the page. I have quite a few Asian-Inspired Chicken Recipes to choose from, including:
Want More Recipes? Get My FREE Newsletter!
I publish a newsletter 2 times per month (1st and 15th) with lots of recipes, tips, etc..
Would you like to join our growing list of subscribers?
There is a Newsletter subscription box on the top right (or bottom) of each blog post, depending on the device you use.
You can submit your e-mail address there, to be added to my mailing list.
Find Me On Social Media:
Facebook page: The Grateful Girl Cooks!
Pinterest: The Grateful Girl Cooks!
Instagram: jbatthegratefulgirlcooks

Recipe adapted from: Abeer Rizvi, at http://cakewhiz.com/chinese-lemon-chicken-recipe/
↓↓ PRINTABLE RECIPE BELOW ↓↓
Lemon Pineapple Chicken Bites is a delicious dish with chunks of fried chicken and pineapple coated in a sweet Asian lemon pineapple sauce.
- 1½ pounds boneless, skinless chicken breast cut in 2" cubes
- 1¼ cups all purpose flour
- salt and pepper, to season chicken
- 1 cup low-fat milk (1%)
- 1 large egg
- 1 cup vegetable oil (for frying chicken)
- 1 Tablespoon sesame oil
- ¼ teaspoon minced ginger
- 1½ teaspoons minced garlic
- ¼ cup low sodium soy sauce
- ¼ cup chicken broth (or water)
- ¼ cup honey
- ⅓ cup brown sugar dark or light
- ⅓ cup pineapple juice
- ½ teaspoon black pepper
- 1 Tablespoon white vinegar
- 2 large lemons (juice of) remove lemon zest before juicing
- 1½ teaspoons lemon zest
- 2½ Tablespoons cornstarch added at end of cooking
- 1 cup pineapple chunks about ½ a 20 oz. can, drained
- green onions (OPTIONAL GARNISH) thinly sliced
- sesame seeds (OPTIONAL GARNISH) sprinkle as desired
Combine sauce ingredients (except cornstarch) in a bowl; stir well, until combined.
Pat chicken dry. Cut into about 2" cubes. Season lightly with salt and pepper.
Batter the chicken: In one bowl, combine flour, salt and pepper. In separate bowl, whisk egg and milk to combine. Roll chicken in flour mixture until covered (several at a time), then roll and cover them in milk/egg mixture, letting excess drip back into bowl. Coat chicken again in flour mixture. Repeat with remaining chicken.
Heat oil on Medium heat in large skillet until very hot, but not smoking. Fry battered chicken pieces (in small batches) in the hot oil until all sides have browned and chicken is cooked through. Once fully cooked, transfer chicken onto paper towels to absorb excess oil. Repeat process until all chicken is cooked.
Measure 3 Tablespoons of the reserved sauce into a small bowl. Add cornstarch; mix well, until combined/lump-free. Pour remaining sauce into a large skillet. Bring sauce to a boil, stirring often; cook for 1 minute. Add cornstarch mixture. Whisk to incorporate it into the sauce, which will thicken quickly!
Once sauce thickens, immediately add chicken and pineapple. Stir to fully coat them with sauce. Cook on MEDIUM-LOW, stirring constantly, only until everything is heated through; remove skillet from the heat.
Serve immediately. Garnish with sliced green onions, sesame seeds, and a lemon slice, if desired. Enjoy!
Here’s one more to pin on your Pinterest boards!