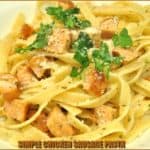
Simple chicken sausage pasta is an easy, quick and delicious meal to prepare. Pasta is tossed with Italian spices, olive oil, butter, Parmesan cheese and chicken sausage, then served in this flavor-filled, simple dish!

We love pasta at our house… do you? Years ago, I started experimenting with simple pasta dishes that were not drenched in Italian tomato sauce or alfredo sauce, and came up with this EASY, yet great tasting chicken sausage pasta!
We love those traditional sauces I mentioned above, but I was trying to create SIMPLE and QUICK new pasta dishes without using heavy sauces! This one is our favorite! I make this dish when I don’t want to mess with making a sauce, and just want something for dinner that is filling, tasty, and EASY to fix after a busy day. Sometimes we have it without meat of any kind added, but other times we add it in.
We had two leftover grilled chicken sausages in our refrigerator, so when my husband asked if we could have pasta for dinner, it was so easy to pull this meal together in a matter of minutes!
Scroll Down For A Printable Recipe Card At The Bottom Of The Page
How To Make Simple Chicken Sausage Pasta
This recipe uses two links of Italian flavored chicken sausage, and gives it a little extra protein and flavor! Here’s how to make this chicken sausage pasta:
Two COOKED chicken sausages are sliced, then each slice is cut into quarters. If you want, you can pan cook the sausages while the pasta is cooking (to save time). Set aside the chicken sausages until ready to add to pasta.

Prepare pasta according to package instructions. My preferred pasta is fettucine noodles, but regular spaghetti noodles work just as well for this simple meal (I speak from experience!). Once pasta is done cooking, drain noodles in a colander (but do not rinse), then put hot noodles immediately back into the pot you cooked them in (minus the water, of course).


Season The Cooked Pasta
Quickly stir in butter while the pasta is hot so it can melt. Add olive oil and Italian spices, and toss to coat the pasta with the ingredients. Tongs work wonderfully for this! Taste test the pasta. If desired, add additional salt and pepper, to suit your taste buds.

Add warm chicken sausage to the pasta, and toss well, to combine. If necessary, turn heat on LOW while tossing pasta, just to keep pasta hot. Once mixed, divide pasta and sausage among serving bowls or plates.

Serve The Chicken Sausage Pasta
That’s it! See how simple it is to make this chicken sausage pasta? To serve, grate additional fresh Parmesan cheese over the top of the hot pasta. Garnish with some chopped flat leaf Italian parsley. I was able to use some parsley that is growing in our little garden-yay!).

You don’t have to have a thick sauce to serve up a flavor-filled pasta dish! This is one of our favorite ways to have pasta… and it takes hardly any time at all to whip this up for dinner!

If you enjoy pasta, you might also want to try Florentine Manicotti, Pasta Carbonara, or Chicken Broccoli Fettucine Alfredo. I heartily recommend any of those recipes. You can find other yummy pasta recipes in my Recipe Index shown at the top of each blog post.
Sure do hope you will give this simple chicken sausage pasta a try! It tastes wonderful using regular (pork) Italian sausages, too. Next time you grill, throw a couple sausages on, then save them in your refrigerator or freezer until you make this dish. It’s a great timesaver!
Interested In More Recipes?
Thank you for visiting this website. I appreciate you using some of your valuable time to do so. If you’re interested, I publish a newsletter 2 times per month (1st and 15th) with all the latest recipes, and other fun info. I would be honored to have you join our growing list of subscribers, so you never miss a great recipe!
There is a Newsletter subscription box on the top right side (or bottom) of each blog post, depending on the device you use, where you can easily submit your e-mail address (only) to be included in my mailing list.
You Can Also Find Me On Social Media:
Facebook page: The Grateful Girl Cooks!
Pinterest: The Grateful Girl Cooks!
Instagram: jbatthegratefulgirlcooks
Have a wonderful day, and may God bless you in all you do!

- 2 links Italian chicken sausage , cooked
- 8 ounces fettucine pasta (1/2 pound)
- 2 Tablespoons butter
- 2 Tablespoons extra virgin olive oil
- 1/4 teaspoon garlic powder
- 1/4 teaspoon Italian seasoning
- 1/8 teaspoon dried oregano
- 1/4 cup Parmesan cheese , grated
- 1-2 pinches salt/pepper ,to taste
- 4 teaspoons Parmesan cheese , for garnish (optional)
- 2 Tablespoons Flat leaf Italian parsley (fresh) , for garnish (optional)
Slice two COOKED chicken sausages into 1/2 inch slices, then cut each slice into quarters. You can pan cook the sausages while the pasta is cooking (to save time). Set aside cooked chicken sausage pieces until ready to add to cooked pasta.
Prepare pasta according to package directions. When pasta is done, drain noodles in a colander (do not rinse), then put them back into pot you cooked them in (minus the water, of course).
Quickly stir in butter while the pasta is hot so it can melt. Add olive oil and Italian spices, and toss to coat the pasta with the butter, oil and spices. Taste test pasta. If desired, add additional salt and pepper, to suit your taste buds. Add chicken sausage to pasta and toss, to combine. If necessary, turn heat on LOW while tossing pasta, just to keep pasta hot.
To serve, divide pasta and sausage among serving bowls, grate additional fresh Parmesan cheese over the top of the hot pasta, then garnish with chopped flat leaf Italian parsley. Enjoy!
Caloric calculation does not include optional garnish of additional Parmesan cheese and parsley.
Here’s one more to pin on your Pinterest boards!


! / The Grateful Girl Cooks!")


! / The Grateful Girl Cooks!")
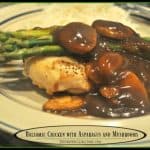
, then you'll absolutely want to try Chicken Fried CHICKEN with creamy Country Gravy for a tasty dinner! / The Grateful Girl Cooks!")


, then you'll absolutely want to try Chicken Fried CHICKEN with creamy Country Gravy for a tasty dinner! / The Grateful Girl Cooks!")