Category: Seafood

Traeger Grill Smoked Trout

Traeger Grill Smoked Trout is a great recipe for cooking smoked, fresh trout! Butterflied trout are soaked in a brine before smoking, for peak flavor!

We sure have been having fun trying recipes on our Traeger grill! Our most recent adventure involved brining and smoking trout that we received from a very nice, generous neighbor!

I found the original recipe on the Traeger app, and thought it sounded wonderful, so off I went into the kitchen to check this recipe out! WOW! This was some good tasting smoked trout! My husband (a trout-lovin’ guy) said it was some of the best trout he has ever had!

With very minimal prep work, and a “hands off” smoking time on the grill, this recipe was also SUPER EASY! Brine the fish, then smoke it on the pellet grill. BOOM! Yummy smoked trout! Here’s how to make Traeger smoked trout:

Scroll Down For A Printable Recipe Card At The Bottom Of The Page

Prepare The BRINE Mixture

Salting meats as a way to preserve food has been around for many, many years. Throughout history voyagers, travelers or armies used to preserve their meats in salt so they could survive on long voyages or trips, even with a lack of refrigeration.

Nowadays brining is a “thing”. When you brine meats, it’s typically done using a salt, water, and seasoning combination, but using far less salt than our ancestors. Brining infuses meats with lots of flavor, and can also help tenderize the meat, in a fairly short amount of time.

To make THIS brine for Traeger smoked trout, place water, salt, brown sugar, black pepper and soy sauce in a LARGE covered container. Whisk the ingredients together until sugar has dissolved. THIS will be your brine!

Ingredients for the brine are whisked together before adding trout.

Prepare The Trout

The trout will need to be cleaned and gutted, with the head removed. Butterfly cut each trout almost all the way down to the tail, and then spread it out. You want the trout to be able to lie flat while being smoked on the grill.

NOTE: The recipe as written (in the printable recipe card at the bottom of this post) is for 4 trout. Since it was only my husband and I eating, I smoked only TWO trout, but used the regular amount of brine.

Trout are cleaned, gutted, and butterflied before brining and smoking.

Place the butterflied trout into the brine, and position in the brine so that it is covered. You might find it easy to weigh the fish down with a heavy plate, to keep it under the brine. Cover the container, and then let the trout brine in the liquid for 60 minutes in the refrigerator. Turn the trout over, halfway through the brining time.

The butterflied trout are soaked in brine for one hour before smoking on the grill.

Dry The Brined Trout And Then Get Them On The Traeger

Once the fish has brined for 1 hour, remove each fish from the brine and pat dry with a paper towel. Get both sides as dry as possible before you put them onto the grill.

Each trout is patted dry before putting it on the grill for smoking.

Preparing Traeger Smoked Trout Is EASY!

Fill your pellet hopper with fresh pellets (we used mesquite). Start your Traeger by turning it on and waiting 4-5 minutes (with the lid open) until it is smoking, and a fire has been fully established. Turn the temperature gauge to 225°F., and let the grill preheat (with the lid closed). This might take anywhere from 10-15 minutes.

Once pre-heated, quickly brush vegetable oil over the grill grates with a pastry brush. This helps to help prevent the fish skin from sticking to the grill. Place the patted dry trout directly onto the oiled grill grate, with the skin side down. Close the lid on the grill.

Traeger grill smoked trout is cooked skin side down on the grill.

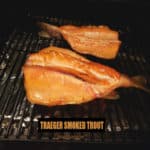
Smoke the trout for 1½ – 2 hours until the fish starts to flake and the fish turns slightly opaque in color. You don’t even need to mess with them once they are on the grill. NOTE: Cooking times can vary a bit, due to ambient temps of each smoker, and the thickness of the trout. The length of time will obviously depend on the thickness of the trout you are using. Ours were done in 1½ hours! See how beautiful they looked? Oooh…

When done, Traeger smoked trout is beginning to flake and is opaque in color.

Time To EAT Some Traeger Grill Smoked Trout!

Remove the trout from the Traeger once they are fully cooked, and transfer them to a baking sheet and bring them indoors! They smell really good about this time. De-bone each fish, and then serve this tasty Traeger grill smoked trout. You can serve this smoked fish hot or cold, however you prefer it. It has GREAT flavor!

Here is one Traeger grill smoked trout, fully cooked, and ready to de-bone and eat!

Thanks for reading. I sure do sincerely hope you enjoy this recipe for Traeger grill smoked trout. My husband is already asking for me to make it again… ha ha! Lucky for us, our sweet neighbor just gave us even MORE frozen trout this week. Yippee!

Looking For More TRAEGER Recipes?

You can find all of my recipes in the Recipe Index, located at the top of the page. A few of my Traeger recipes you might enjoy checking out include:

Interested In More Recipes?

Thank you for visiting this website. I appreciate you using some of your valuable time to do soIf you’re interested, I publish a newsletter 2 times per month (1st and 15th) with all the latest recipes, and other fun info. I would be honored to have you join our growing list of subscribers, so you never miss a great recipe!
There is a Newsletter subscription box on the top right side (or bottom) of each blog post, depending on the device you use, where you can easily submit your e-mail address (only) to be included in my mailing list.

You Can Also Find Me On Social Media:
Facebook page: The Grateful Girl Cooks!
Pinterest: The Grateful Girl Cooks!
Instagram: jbatthegratefulgirlcooks

Author's signature

Recipe adapted from: https://www.traegergrills.com/recipes/seafood/smoked-trout

↓↓ PRINTABLE RECIPE BELOW ↓↓

4 from 1 vote
Traeger Grill Smoked Trout
Prep Time
5 mins
Cook Time
1 hr 30 mins
Brining Time (inactive)
1 hr
Total Time
2 hrs 35 mins
 

Traeger Grill Smoked Trout is a great recipe for cooking smoked, fresh trout! Butterflied trout are soaked in a brine before smoking, for peak flavor!

Category: Entree-Seafood
Cuisine: American
Keyword: Traeger grill smoked trout
Servings: 4
Calories Per Serving: 392 kcal
Author: JB @ The Grateful Girl Cooks!
Ingredients
  • 4 medium trout (approx. 8 ounces per fish) , cleaned and head removed
For Brine:
  • ½ gallon water
  • cup salt
  • ¼ cup brown sugar (light or dark)
  • ½ Tablespoon black pepper
  • 1 Tablespoon soy sauce
Instructions
  1. To make brine: Place water, salt, brown sugar, black pepper and soy sauce in a LARGE covered container. Whisk ingredients together until sugar has dissolved.

Brine The Trout:
  1. Remove fish head. Clean and gut each trout. Butterfly cut each trout almost all the way to the tail, and then spread it out. Do not slice all the way through the bottom skin. You want the trout to be able to lie flat when smoking. Place the butterflied trout into the brine; make sure each fish is covered. You might need to weigh the fish down with a heavy plate, to keep them under the brine. Cover container, and let fish brine in liquid for 60 minutes in refrigerator. Once fish has brined for 1 hour, remove fish from brine and pat dry with a paper towel. Get fish as dry as possible before you put them onto the grill.

Smoking The Trout:
  1. Start Traeger by turning it on and waiting 4-5 minutes (with lid open) until it is smoking, and a fire has been established. Turn temperature gauge to 225°F., and let grill preheat (with lid closed). This might take anywhere from 10-15 minutes. Once pre-heated, quickly brush vegetable oil over the grill grates with a pastry brush. This helps to help prevent the fish skin from sticking to the grill. Place trout directly onto oiled grill grate, skin side down. Close the lid. Smoke trout for 1½ - 2 hours until the fish starts to flake and turns slightly opaque in color. You don't need to mess with them once they are on the grill. Remove trout once they are fully cooked; transfer to a baking sheet. De-bone each fish, and then serve. You can serve the trout hot or cold, however you prefer it.

    NOTE: Cooking times can vary a bit, due to the ambient temps of each smoker, and thickness of the trout.

Nutrition Facts
Traeger Grill Smoked Trout
Amount Per Serving (1 trout (whole))
Calories 392 Calories from Fat 135
% Daily Value*
Fat 15g23%
Saturated Fat 3g19%
Cholesterol 132mg44%
Sodium 3816mg166%
Potassium 847mg24%
Carbohydrates 14g5%
Fiber 1g4%
Sugar 13g14%
Protein 47g94%
Vitamin A 129IU3%
Vitamin C 1mg1%
Calcium 126mg13%
Iron 4mg22%
* Percent Daily Values are based on a 2000 calorie diet.

Here’s one more to pin on your Pinterest boards!Traeger Grill Smoked Trout is a great recipe for cooking smoked, fresh trout! Butterflied trout are soaked in a brine before smoking, for peak flavor!


Simple Szechuan Shrimp

Need dinner quick? Try delicious, Simple Szechuan Shrimp! This EASY, Asian-inspired meal can be cooked and on the table in about 15 minutes total!

My mom is downsizing, and preparing to move into a senior community on the other side of the country (Georgia). One of my sisters already lives in NW Florida, and my other sister is moving to the same town in Georgia as my mom next month.

I am sad she’s moving so far away, but happy to know she will be near more family members, and glad she’s looking forward to her new, smaller place. Our family is really gonna miss having her only a 2 hour plane ride away, here on the West Coast!  She mailed me some of her old cookbooks recently to add to my collection, including one from a church my husband had formerly worked at over 25 years ago.

I glanced through this little cookbook, and came across a recipe for Szechuan Shrimp a sweet friend of mine had in the book. The recipe sounded good, so I made it! Wow… it was very simple to make, and took under 15 minutes, from start to finish!

It was soooo good, I wanted to get it onto my blog, for others to enjoy! The original recipe (below) calls for 1 pound of large shrimp and serves 4. NOTE: I used a 3/4 pound bag of shrimp, which made 3 servings, since I cooked this meal only for my husband and myself. My photos reflect the smaller quantity. Let me tell you, this shrimp dish is ridiculously QUICK n’ EASY to make! Here’s how:

Scroll Down For A Printable Recipe Card At The Bottom Of The Page

Make The Asian-Inspired Sauce

This is a TOTALLY simple sauce to prepare! Measure dry sherry, soy sauce, sugar, salt, catsup, sweet chili sauce, and red pepper flakes into a small bowl. Use a whisk to mix all the Szechuan shrimp sauce ingredients together, until mixture is smooth, and the sugar has dissolved. Set the sauce aside while you stir-fry the shrimp.

Ingredients for the Asian-inspired sauce are measured into bowl for mixing.Sauce ingredients are whisked together until fully blended.

Prep The Shrimp

Pat the peeled and de-veined shrimp dry, using paper towels. Get as much moisture off the shrimp as possible. I used frozen, peeled and de-veined shrimp, and let them thaw before I pulled the little shell off the tails! Quick and easy!

Peeled, de-veined shrimp are patted dry on paper towels before cooking.

Cooking Simple Szechuan Shrimp Is Easy And FAST!

Heat peanut oil (or olive oil) on medium-high in a heavy skillet. Once the oil is hot, but not smoking, add the shrimp, minced garlic, chopped green onions, and minced fresh ginger to the skillet.

Stir-fry the shrimp, ginger, garlic and green onions on medium-high, stirring often, and turning to cook all sides of the shrimp. This will only take 3-4 minutes at most. Cook until the shrimp have turned pink in color.

The shrimp are cooked in hot oil, with garlic, green onion, and ginger.Cooking the shrimp only takes about 3-4 minutes.

As soon as they are cooked through, give the reserved sauce a stir, and then pour it into the skillet. Stir well, to cover everything with the sauce. Cook for one minute, stirring often, so the sauce and shrimp are heated through. Remove the pan from the heat, because it’s DONE! Time To serve this yummy dish!

Asian sauce is added to the cooked shrimp, and heated through before serving.

Serve The Szechuan Shrimp

Now you’re ready to serve the simple Szechuan shrimp!  Place a portion of white rice onto your serving plates or bowls. Place some of the shrimp on top of the rice, and then spoon extra sauce over the shrimp.

Garnish the dish with a few extra chopped green onions, and some white sesame seeds, if desired. Grab a fork (or your favorite pair of chopsticks), and dig in!

Once heated through, simple Szechuan shrimp dish is served on top of rice.

Ooh… yummy! These shrimp taste so good! Can you even believe how fast it is to make this dish? You’re gonna enjoy it, for sure!

A close-up of the simple Szechuan shrimp, on top of white, steamed rice.

I really hope you enjoy this simple, but absolutely delicious meal! It’s just as good as takeout (if not better!). Have a fantastic day, friends. God Bless You.

Looking For More SHRIMP Recipes?

You can find all of my shrimp recipes in the Recipe Index, located at the top of the page. They include:

Interested In More Recipes?

Thank you for visiting this website. I appreciate you using some of your valuable time to do soIf you’re interested, I publish a newsletter 2 times per month (1st and 15th) with all the latest recipes, and other fun info. I would be honored to have you join our growing list of subscribers, so you never miss a great recipe!
There is a Newsletter subscription box on the top right side (or bottom) of each blog post, depending on the device you use, where you can easily submit your e-mail address (only) to be included in my mailing list.

You Can Also Find Me On Social Media:
Facebook page: The Grateful Girl Cooks!
Pinterest: The Grateful Girl Cooks!
Instagram: jbatthegratefulgirlcooks

Author's signature

Original Recipe Source: my friend, Lanita Moen, in “Cooking With Love”, published by Chapel Ladies Fellowship, 1988, pages 146-147.

0 from 0 votes
Simple Szechuan Shrimp
Prep Time
10 mins
Cook Time
5 mins
Total Time
15 mins
 

Need dinner quick? Try delicious, Simple Szechuan Shrimp! This EASY, Asian-inspired meal can be cooked and on the table in about 15 minutes total!

Category: Entree-Seafood
Cuisine: Chinese
Keyword: simple szechuan shrimp
Servings: 4
Calories Per Serving: 231 kcal
Author: JB @ The Grateful Girl Cooks!
Ingredients
For Asian Sauce
  • 2 Tablespoons dry sherry
  • 2 Tablespoons soy sauce
  • 2 teaspoons granulated sugar
  • ½ teaspoon salt
  • Tablespoons catsup
  • 2 Tablespoons sweet chili sauce (I used Mae Ploy)
  • 1 teaspoon red pepper flakes
For Shrimp
  • 1 pound large shrimp (fresh, or frozen & thawed) (peeled, and de-veined)
  • 2 Tablespoons peanut or olive oil
  • ¼ cup green onion (thinly sliced) , bulb and green stem
  • 2 Tablespoons fresh ginger (finely minced)
  • 3 cloves garlic , finely minced
  • OPTIONAL: sesame seeds/ additional green onions , for garnish
Instructions
Make Asian Sauce
  1. Measure sherry, soy sauce, sugar, salt, catsup, sweet chili sauce, and red pepper flakes into a small bowl. Whisk the ingredients together, until mixture is smooth, and sugar has dissolved. Set sauce aside while you stir-fry the shrimp.

Prepare Shrimp
  1. Pat peeled and de-veined shrimp dry, using paper towels. Get as much moisture off shrimp as possible. Heat peanut oil (or olive oil) on medium-high in a heavy skillet. Once oil is hot, but not smoking, add shrimp, garlic, green onions, and minced ginger to skillet. Stir-fry on medium-high, stirring often to cook all sides of the shrimp until they turn pink and are cooked through. This only takes 3-4 minutes.

  2. As soon as shrimp are cooked through, give the reserved sauce a stir, and then pour it into the skillet. Stir well, to cover everything with sauce. Cook for one minute, stirring often, so the sauce and shrimp are fully heated through. Remove pan from heat. Serve immediately on top of rice, garnished with sesame seeds and additional green onions, if desired. Enjoy!

Nutrition Facts
Simple Szechuan Shrimp
Amount Per Serving (1 serving (1/4 of total))
Calories 231 Calories from Fat 81
% Daily Value*
Fat 9g14%
Saturated Fat 1g6%
Cholesterol 286mg95%
Sodium 1619mg70%
Potassium 185mg5%
Carbohydrates 12g4%
Fiber 1g4%
Sugar 9g10%
Protein 24g48%
Vitamin A 259IU5%
Vitamin C 7mg8%
Calcium 173mg17%
Iron 3mg17%
* Percent Daily Values are based on a 2000 calorie diet.

Here’s one more to pin on your Pinterest boards!Need dinner quick? Try delicious, Simple Szechuan Shrimp! This EASY, Asian-inspired meal can be cooked and on the table in about 15 minutes total!

Garlic Parmesan Rockfish

You will enjoy these delicious Garlic Parmesan Rockfish fillets, coated in well-seasoned bread crumbs & baked until flaky. Only 10 minutes prep time!

A couple years ago, my husband and I discovered rockfish, also known as Pacific Snapper. My husband brought some fillets home from the fish counter at our local grocery store. Since neither of us had tried rockfish before, I had to figure out WHAT to do with it.

Long story short… I found a great recipe, made it, and we loved it! Since that time, I’ve used this mild tasting fish in several recipes, including a few which are mentioned at the bottom of this post. NOTE: The recipe as written makes 4 servings. I cut the recipe in half (for myself and my hubby), so my photos will reflect that!

The recipe I am sharing today is one I found on the internet, and it does not disappoint! This rockfish recipe is really easy to prepare, and tastes delicious! It’s a perfect meal on a busy day, because it has minimal prep, and then into the oven it goes! Here’s how to make it!

Scroll Down For A Printable Recipe Card At The Bottom Of The Page

Prepare The Rockfish Fillets

Season the rockfish fillets on both sides with a little bit of salt and pepper. **Don’t forget to preheat your oven to 425° F. at the same time!

The fish fillets are lightly seasoned with salt and pepper.

Prepare Bread Crumb Coating For Garlic Parmesan Rockfish

The next thing you need to do is prepare the seasoned bread crumb topping that will cover the fish. This step is quick and EASY! I was able to use some of my homemade bread crumbs in this recipe, but any plain bread crumbs will do.

Place grated Parmesan cheese, bread crumbs, minced garlic, and lemon zest, and a pinch or two of salt and pepper onto a large plate. Combine these ingredients well, and then you’ll have seasoned bread crumbs, ready for the rockfish. Spread them out evenly on the plate.

Bread crumbs, lemon zest, garlic, and Parmesan cheese are combined to make topping for fish.

Cover Fish Fillets With The Bread Crumb Coating

Place one fillet at a time on top of the bread crumb topping, and coat the bottom with crumbs, then turn and coat the other side. This is called “dredging” the fish. Use your fingers to help press the bread crumb coating onto the fish.

When done, repeat with the other pieces of fish. If there is any of the bread crumb mixture remaining, press it onto the fish fillets.

Rockfish fillets are coated in the bread crumb topping before baking.

Drizzle 2 Tablespoons of olive oil onto a baking sheet. Place the crumb-coated garlic parmesan rockfish onto the oiled surface. Leave a little space between each of the fillets. Drizzle each fillet with the remaining olive oil, and the lemon juice. Once that step is completed, the garlic parmesan rockfish fillets are ready to bake!

Olive oil and lemon juice are drizzled over crumb-topped fish fillets before baking.

Bake The Garlic Parmesan Rockfish

Bake the garlic parmesan rockfish at 425° F. for approximately 20 minutes. When done, the fish should be golden brown, and should flake easily (with a fork). Remove from the oven, and transfer the fish with a spatula to each plate, for serving.

When done baking, garlic parmesan rockfish are golden brown and flaky.

If desired, garnish the fish with parsley and a thin lemon slice, and serve! We enjoyed our garlic parmesan rockfish served on top of rice, with sautéed green beans (from our garden), fresh corn, and a slice of sweet, cold watermelon on the side! YUM!

Garlic parmesan rockfish fillet on rice, with green beans, corn, and watermelon on the side.

We really did enjoy this meal, featuring garlic parmesan rockfish. My hope is that maybe you will be inspired to try this simple dish, and make it for those you love! Have a blessed day!

Looking For More ROCKFISH Recipes?

You can find all of my seafood recipes in the Recipe Index, located at the top of the page. A few rockfish recipes you might be interested in include:

Interested In More Recipes?

Thank you for visiting this website. I appreciate you using some of your valuable time to do soIf you’re interested, I publish a newsletter 2 times per month (1st and 15th) with all the latest recipes, and other fun info. I would be honored to have you join our growing list of subscribers, so you never miss a great recipe!
There is a Newsletter subscription box on the top right side (or bottom) of each blog post, depending on the device you use, where you can easily submit your e-mail address (only) to be included in my mailing list.

You Can Also Find Me On Social Media:
Facebook page: The Grateful Girl Cooks!
Pinterest: The Grateful Girl Cooks!
Instagram: jbatthegratefulgirlcooks

Original recipe source: https://www.delish.com/cooking/recipe-ideas/a26595710/garlic-parmesan-baked-flounder-recipe/

Author's signature

5 from 8 votes
Garlic Parmesan Rockfish
Prep Time
10 mins
Cook Time
20 mins
Total Time
30 mins
 

You will enjoy these delicious Garlic Parmesan Rockfish fillets, coated in well-seasoned bread crumbs & baked until flaky. Only 10 minutes prep time!

Category: Entree-Seafood
Cuisine: American
Keyword: garlic parmesan rockfish
Servings: 4
Calories Per Serving: 303 kcal
Author: JB @ The Grateful Girl Cooks!
Ingredients
  • ¼ cup extra virgin olive oil , divided use
  • 4 rockfish fillets , approx. 5 ounces each
  • salt and pepper , to season fish
  • ½ cup grated fresh Parmesan cheese
  • ¼ cup bread crumbs
  • 4 cloves garlic , minced
  • 1 lemon (juice and zest)
  • parsley and lemon slices (optional) , for garnish
Instructions
  1. Preheat oven to 425° F. Drizzle 2 Tablespoons of olive oil onto a baking sheet, and set aside.

  2. Season the rockfish fillets on both sides with a little bit of salt and pepper.

  3. Place Parmesan, bread crumbs, garlic, lemon zest, and a pinch or two of salt and pepper onto a large plate. Combine ingredients, and spread them out evenly on the plate. Place one fillet at a time on top of the mixture, and coat the bottom with crumbs, then flip and coat the other side. Use your fingers to help press coating onto fish. When done, repeat with other pieces, using all the crumb mixture.

  4. Place rockfish onto oiled baking sheet., leaving space between each fillet. Drizzle each piece with remaining olive oil, and the lemon juice.

  5. Bake fish at 425° F. for approx. 20 minutes. When done, the fish should be golden brown, and flake easily with a fork. Remove from oven; transfer fish with a spatula to plates, for serving. Garnish each fillet with parsley and a lemon wedge, if desired. Serve, and enjoy!

Nutrition Facts
Garlic Parmesan Rockfish
Amount Per Serving (1 fillet)
Calories 303 Calories from Fat 171
% Daily Value*
Fat 19g29%
Saturated Fat 4g25%
Cholesterol 65mg22%
Sodium 334mg15%
Potassium 474mg14%
Carbohydrates 7g2%
Fiber 1g4%
Sugar 1g1%
Protein 26g52%
Vitamin A 115IU2%
Vitamin C 4mg5%
Calcium 182mg18%
Iron 1mg6%
* Percent Daily Values are based on a 2000 calorie diet.

Here’s one more to pin on your Pinterest boards!You will enjoy these delicious Garlic Parmesan Rockfish fillets, coated in well-seasoned bread crumbs & baked until flaky. Only 10 minutes prep time!

Garlic Butter Grilled Trout

Have an avid fisherman in the family? Here’s a simple recipe for garlic butter grilled trout, with two methods given for preparing this fish on a BBQ.
Have an avid fisherman in the family? Here's a simple recipe for garlic butter grilled trout, with two methods given for preparing this fish on a BBQ.

Scroll Down For A Printable Recipe Card At The Bottom Of The Page

An Unexpected Surprise

Last month one of our neighbors gave us some recently caught trout! The fish had already been cleaned professionally, packaged and frozen. Our friend mentioned that a relative gives him lots of trout, but he’s the only one in his family that likes it, so he has way too much in his freezer. Lucky for us, he decided to bless us with 5 of them!

These are the five beautiful trout we received from our friendly neighbor down the street! What an unexpected, lovely surprise! They had already been cleaned, prepped, and frozen, so all I needed to do was thaw them and cook them!

The trout have been cleaned, gutted, frozen, and packaged before we received them.

Discovering New Ways To Cook Trout

In the past, I have typically dredged whole trout in beaten egg and then covered the fish in a cornmeal spice mixture and pan-fried them. This time, my husband and I came up with a new way (to us) for cooking a couple of the trout on our grill.

Shown below are the two trout we decided to grill on our Weber BBQ the FIRST time. Sometimes I think the only reason I don’t think I will enjoy trout is because of the eyes… just look at ’em. **Shudders.** Once I get past that, I’m good. Kinda.

Two trout are ready to be stuffed and then grilled.

Prepare The Garlic Butter Grilled Trout For Cooking

Anyways, here is how to make this dish. Spread the minced garlic inside the cavity of each fish, and place 2-3 thin slices of butter in there, as well.

Minced garlic and thin slices of butter are added to the fish cavity.

Place a couple thin slices of fresh lemon into the cavity of each trout, on top of the butter. Rub both sides of the trout generously with olive oil or vegetable oil.

Thin lemon slices are added to the garlic and butter in the fish cavity.

Making Sure The Fish Won’t Stick To The Foil Is Important

Place a large sheet of aluminum foil onto a large baking sheet. The baking sheet will hold the weight of the fish, until you slide the foil and fish onto the bbq grill. Spray the aluminum foil very generously all over with non-stick cooking spray or brush with oil, and then carefully transfer each stuffed trout onto the foil.

NOTE: Generously coating the foil with spray or oil is an important step, because you do not want the fish skin to stick to the foil as it cooks.

The trout is stuffed with garlic, lemon and butter before being grilled.

Two Methods For Cooking Garlic Butter Grilled Trout

There are two ways to cook the trout. My photos reflect method #1, but I will also explain how to cook via method #2. We’ve now cooked garlic butter grilled trout BOTH ways, with equally good results!

METHOD #1: Place the aluminum foil with both of the stuffed trout onto the grill grate directly over the hot coals. Cover the BBQ, and let the trout cook for 20 minutes. After 20 minutes, carefully transfer the trout off of the foil and directly onto the bbq grate. Cook 7 minutes (lid closed), and then flip to other side and cook for 7 more minutes (lid closed). Remove the fish from the grill.

METHOD #2: Do not stuff the trout before placing it on the bbq. Place generously oiled aluminum foil (one piece of foil for each trout) with the UNSTUFFED trout onto the grill grate, but NOT DIRECTLY over the hot coals. Cover the BBQ, and let the trout cook on indirect heat for 20 minutes. After 20 minutes, add the garlic, butter and lemon to each fish cavity. Add a top layer of foil, and wrap up each of the fish in foil, sealing foil packets tightly. Let the fish cook for 15 minutes (lid on the grill), then remove the foil packets from the grill.

The garlic butter grilled trout, cooked on foil, directly over hot coals on the bbq.

After Grilling, But Before Eating

This is what the garlic butter grilled trout looked like (below) once we brought it into the house. These trout were cooked using Method #1, as described above.

Once the trout is fully cooked, open it up and slice all the way through the back of the fish, resulting in two pieces. Be sure and pull the bones out by lifting the bone section up and pulling it up and away form the fish. IMPORTANT! Trout is notorious for it’s small bones, so take care when eating, to ensure bones have been removed.

The fish skin is crisp, after removing it from the grill.

Time To Serve the Garlic Butter Grilled Trout!

After de-boning and removing the skin (it pulls right off), the garlic butter grilled trout fillets are ready to serve! Remember to keep an eye out for any sneaky, hideaway, tiny little bones…

The grilled trout, on a plate with side veggies, ready to eat.Garlic butter grilled trout fillet, served with a baked potato and asparagus.

I hope you enjoy this simple recipe for garlic butter grilled trout! It tastes really yummy! Hope you have a great day, friends, and remember to show kindness to those you share this journey of life with. Thanks for reading!

Looking For More Fish Recipes?

You can find all of my fish recipes in the Recipe Index, located at the top of the page. A few you might enjoy include:

Interested In More Recipes?

Thank you for visiting this website. I appreciate you using some of your valuable time to do soIf you’re interested, I publish a newsletter 2 times per month (1st and 15th) with all the latest recipes, and other fun info. I would be honored to have you join our growing list of subscribers, so you never miss a great recipe!
There is a Newsletter subscription box on the top right side (or bottom) of each blog post, depending on the device you use, where you can easily submit your e-mail address (only) to be included in my mailing list.

You Can Also Find Me On Social Media:
Facebook page: The Grateful Girl Cooks!
Pinterest: The Grateful Girl Cooks!
Instagram: jbatthegratefulgirlcooks

Author's signature

0 from 0 votes
Garlic Butter Grilled Trout
Prep Time
10 mins
Cook Time
35 mins
Total Time
45 mins
 

Have an avid fisherman in the family? Here's a simple recipe for garlic butter grilled trout, with two methods given for preparing this fish on a BBQ.

Category: Main Course, Seafood
Cuisine: American
Keyword: garlic butter grilled trout
Servings: 4 (1/2 trout per serving)
Calories Per Serving: 307 kcal
Author: JB @ The Grateful Girl Cooks!
Ingredients
  • 2 trout , cleaned and gutted
  • teaspoons minced garlic
  • 2 Tablespoons butter (each Tablespoon cut into 3 thin slices)
  • 4 slices lemon (thin slices)
  • olive oil or vegetable oil , enough to brush on fish and coat aluminum foil
  • non-stick cooking spray
Instructions
  1. METHOD #1: Spread the minced garlic onto the inside of each fish, and place 2-3 thin slices of butter into the cavity, as well. Place a couple thin slices of fresh lemon into the cavity of each trout, on top of the butter. Brush both sides of the trout generously with olive oil or vegetable oil. Place a large sheet of aluminum foil onto a large baking sheet (the baking sheet helps hold the fish until you slide the foil and fish onto the grill. Spray the aluminum foil very generously all over with non-stick cooking spray or brush with oil, and then carefully transfer each stuffed trout onto the foil. Place the aluminum foil with the stuffed trout onto the grill grate directly over hot coals on the bbq. Cover the BBQ, and let the trout cook for 20 minutes. After 20 minutes, carefully transfer the trout off of the foil and directly onto the bbq grate. Cook 7 minutes (lid closed), then carefully flip trout to the other side and cook 7 more minutes (lid closed). Remove fish from grill. To serve: de-bone and skin the fish. Serve, and enjoy!

    NOTE: Generously coating the foil with spray or oil is an important step, because you do not want the fish skin to stick to the foil as it cooks.

  2. METHOD #2: Do not stuff the trout before placing it on the bbq. Place generously oiled aluminum foil (one piece of foil for each trout) with the UNSTUFFED trout onto the grill grate, but NOT DIRECTLY over the hot coals. Cover the BBQ, and let the trout cook on indirect heat for 20 minutes. After 20 minutes, add the garlic, butter and lemon to each fish cavity. Add a top layer of foil, and wrap up each of the fish in foil, sealing foil packets tightly. Let the fish cook for 15 minutes (lid on the grill), then remove the foil packets from the grill.

    NOTE: Generously coating the foil with spray or oil is an important step, because you do not want the fish skin to stick to the foil as it cooks.

Nutrition Facts
Garlic Butter Grilled Trout
Amount Per Serving (0.5 trout (half of 1 trout))
Calories 307 Calories from Fat 153
% Daily Value*
Fat 17g26%
Saturated Fat 6g38%
Cholesterol 114mg38%
Sodium 139mg6%
Potassium 623mg18%
Carbohydrates 1g0%
Fiber 1g4%
Sugar 1g1%
Protein 36g72%
Vitamin A 272IU5%
Vitamin C 5mg6%
Calcium 76mg8%
Iron 3mg17%
* Percent Daily Values are based on a 2000 calorie diet.

Here’s one more to pin on your Pinterest boards!Have an avid fisherman in the family? Here's a simple recipe for garlic butter grilled trout, with two methods given for preparing this fish on a BBQ.

Panko Crusted Rockfish

You’ll enjoy this simple, delicious recipe for panko crusted rockfish! Fish fillets are seasoned, coated with crispy panko crumbs, and pan-seared until done.
You'll enjoy this simple, delicious recipe for panko crusted rockfish! Fish fillets are seasoned, coated with crispy panko crumbs, and pan-seared.

Have you ever eaten rockfish before? It is a mild flavored, medium firm fish that my husband and I started buying over the past couple years. The first time my husband bought some fillets at the grocery store, and brought them home, I wasn’t sure WHAT to do with it, since I’d never tasted it before!

Long story short, I wound up creating a recipe we loved, and have been buying and using rockfish fillets in recipes ever since! We’ve enjoyed Cornmeal Spice-Crusted Rockfish, and Pan-Seared Rockfish with Fresh Herbs, to name a couple!

Scroll Down for A Printable Recipe Card At the Bottom Of The Page

How I Came Up With This Simple Recipe

I came up with this super simple recipe for panko crusted rockfish one evening when my husband was invited out for dinner with a friend at the last minute. I had some rockfish already thawed, so I decided to cook a nice meal just for me! Sure beats cold cereal or a peanut butter and jelly sandwich!

The idea of panko coating to make the fish nice and crispy on the outside sounded good. I made a simple seasoning mix to season the fish with, and boom! A delicious seafood dinner was enjoyed by ME. Here’s how easy this seafood dish is to make!

Make The Seasoning For The Fish

In a small bowl, combine the spices used to season the rockfish. These spices are garlic powder, onion powder, salt and pepper, Italian seasoning, paprika and dried parsley. EASY!

A few common spices are mixed to season the rockfish.

Prepare The Rockfish Fillets

Pat the rockfish fillets dry, using paper towels. Sprinkle one side of the fish with the seasoning mix, dividing it equally between the two pieces.

Each of the fish fillets are seasoned on one side before cooking.

Place the panko crumbs onto a dinner sized plate and spread them out. Place fish, one fillet at a time, onto the panko crumbs. Press down, to cover the bottom with the crumbs. Turn the fillet over and coat the other side with crumbs, as well.

Pat them firmly into the fish with your hands to make the crumbs adhere to the surface as much as possible. Set the fillet aside and repeat with other piece, keeping at it until you get as much of the fillet covered with panko crumbs, as possible.

The rockfish fillets are dredged in panko crumbs to coat both sides before cooking.

Pan-Sear The Panko Crusted Rockfish

Heat oil in a large skillet on medium heat until very hot, but not smoking.  Carefully place the fish into the hot oil, SEASONED SIDE DOWN. You should hear it sizzle when the fish goes into the skillet. Do not move the fish after it hits the skillet.

Cook for approximately 4 minutes, until you see the outside bottom edges of the panko crusted rockfish browning and getting crusty. Carefully turn each fillet to the other side, using a spatula. Cook the second side for about 4 minutes, until fish is cooked through and flakes easily.

Fish is pan-seared in hot oil.Panko custed fish is flipped and other side is cooked, as well.

Time To EAT!

Transfer the finished fish to serving plates, and dig in! I served the panko crusted rockfish with Quick Broccoli in Vinaigrette and a Wild Rice Salad (with pumpkin vinaigrette) on the side. It was a very satisfying and delicious meal!

Broccoli and rice salad were served with the panko crusted rockfish.

See how flaky the rockfish is inside? It sure tastes good, too. Trust me, this was SUCH a simple dish to prepare, in under 20 minutes from start to finish!

The panko crusted rockfish is cooked through, and flakes easily.

Hope you enjoy this recipe for crispy panko crusted rockfish!  I sure did. Be sure and check out the Recipe Index, located at the top of the page for a look at ALL of my Seafood recipes! Have a wonderful day.

Looking for More ROCKFISH Recipes?

You can find ALL my recipes in the Recipe Index, located at the top of the page. I have some other rockfish recipes you might want to check out, including:

Interested In More Recipes?

Thank you for visiting this website. I appreciate you using some of your valuable time to do soIf you’re interested, I publish a newsletter 2 times per month (1st and 15th) with all the latest recipes, and other fun info. I would be honored to have you join our growing list of subscribers, so you never miss a great recipe!
There is a Newsletter subscription box on the top right side (or bottom) of each blog post, depending on the device you use, where you can easily submit your e-mail address (only) to be included in my mailing list.

You Can Also Find Me On Social Media:
Facebook page: The Grateful Girl Cooks!
Pinterest: The Grateful Girl Cooks!
Instagram: jbatthegratefulgirlcooks

Author's signature

0 from 0 votes
Panko Crusted Rockfish
Prep Time
10 mins
Cook Time
8 mins
Total Time
18 mins
 

You'll enjoy this simple, delicious recipe for panko crusted rockfish! Fish fillets are seasoned, coated with crispy panko crumbs, and pan-seared.

Category: Entree-Seafood
Cuisine: American
Keyword: panko crusted rockfish
Servings: 2
Calories Per Serving: 316 kcal
Author: JB @ The Grateful Girl Cooks!
Ingredients
Seasoning For Fish:
  • ¼ teaspoon garlic powder
  • ¼ teaspoon onion powder
  • ¼ teaspoon dried parsley
  • teaspoon salt
  • teaspoon black pepper
  • teaspoon Italian seasoning
  • teaspoon paprika
Remainder of Ingredients:
  • 2 rockfish fillets (approx. 4-5 ounces each)
  • 1 cup Panko bread crumbs (must use panko crumbs for crunchiest crust!)
  • Tablespoons olive oil (or oil of your choice)
Instructions
  1. In a small bowl, combine the garlic powder, onion powder, salt, pepper, Italian seasoning, paprika and dried parsley. Pat the rockfish fillets dry, using paper towels. Sprinkle one side of the fish with the seasoning mix, dividing it equally between both pieces of fish.

  2. Place panko crumbs onto a dinner sized plate and spread them out. Place fish, one fillet at a time, onto the panko crumbs. Press down, to cover the bottom with the crumbs. Turn the fillet over and coat the other side with crumbs, as well. Pat them into the fish with your hands to make the crumbs adhere to the surface as much as possible. Set fish aside and repeat with other fillet.

  3. Heat oil in a large skillet on medium heat until very hot, but not smoking.  Carefully place fish into the hot oil, SEASONED SIDE DOWN. You should hear it sizzle when it goes into the skillet. Do not move the fish after it hits the skillet. Cook for approximately 4 minutes, until you see the outside bottom edges of the rockfish browning. Once well browned and crusty, carefully turn each fillet to the other side, using a spatula. Cook the second side for about 4 minutes, until fish is cooked through and flakes easily. Transfer the fish to serving plate once done, and enjoy!

Nutrition Facts
Panko Crusted Rockfish
Amount Per Serving (1 fillet (4 ounces))
Calories 316 Calories from Fat 126
% Daily Value*
Fat 14g22%
Saturated Fat 2g13%
Cholesterol 57mg19%
Sodium 450mg20%
Potassium 497mg14%
Carbohydrates 22g7%
Fiber 1g4%
Sugar 2g2%
Protein 25g50%
Vitamin A 62IU1%
Calcium 71mg7%
Iron 2mg11%
* Percent Daily Values are based on a 2000 calorie diet.

Here’s one more to pin on your Pinterest boards!You'll enjoy this simple, delicious recipe for panko crusted rockfish! Fish fillets are seasoned, coated with crispy panko crumbs, and pan-seared.


Baja Fish Tacos (Weight Watchers)

Baja Fish Tacos are a Weight Watchers dish, with seasoned broiled fish pieces in corn tortillas, topped with a crunchy slaw and creamy taco sauce!

Recently I tried a Weight Watchers recipe for baja fish tacos, and was pleasantly surprised! My husband and I both enjoy tacos (of any variety), and this recipe with broiled fish, sounded interesting, so I tried it! Broiling the fish helps cut calories, too, because it’s not fried!

Scroll Down For A Printable Recipe Card At The Bottom Of The Page

Low In WW Smart Points

This recipe for baja fish tacos has a fairly long ingredient list (mostly spices), but is actually VERY easy to prepare. Baked fish, is topped with fresh “slaw”, and creamy dressing, and served in warmed corn tortillas.

The recipe makes 8 tacos, serves 4 people ( 2 tacos per serving), and if following the WW Freestyle plan, is 6 Weight Watchers Smart Points per serving.

How To Make Baja Fish Tacos

First things first. Cover a baking sheet with aluminum foil, and spray with non-stick cooking spray. The spray will help the broiled fish become crispy on the outside!

A baking sheet is covered with foil, and coated with non-stick baking spray.

Prepare Seasoning Mix And The Fish For Broiling

The seasoning mix for baja fish tacos is really easy to make. Simply place the ingredients in a medium bowl, and mix together. The seasonings include corn flour (masa), salt, cayenne pepper, black pepper, cumin, garlic powder, and paprika.

Spices in bowl are combined to make seasoning for the baja fish tacos.

Cut the fish you are using into 2″ pieces. I used rockfish, but you can also use red snapper.  Place the fish, several at a time, into the bowl of seasonings, and toss to coat on all sides.

Place the coated fish pieces onto the sprayed foil on the baking sheet. Leave space between each piece of fish. Continue until all fish pieces are on baking sheet. Set aside, but preheat the broiler on the oven.

Fish is cut into 2" pieces, then tossed in seasoning before broiling.

Make The “Slaw”

In a small bowl, mix together the lettuce (romaine or iceberg), green onions, cherry tomato quarters and cabbage. I used a coleslaw mix for the cabbage, so there are a few carrot shreds in there, also! Set aside.

Topping for the baja fish tacos includes cabbage, lettuce, tomatoes, and green onions.

Make The Sauce For Baja Fish Tacos

Place plain, lowfat yogurt in a blender. Add fresh squeezed lime juice and the chipotle peppers in adobo sauce. Blend these until you have a smooth sauce. Set aside.

A baja style sauce is mixed in a blender to put on finished tacos.

Cook The Fish And Warm The Corn Tortillas

Warm The Tortillas: At the same time you are broiling the fish, wrap the corn tortillas in aluminum foil, and put them in the oven. Place them on a rack that is the furthest away from the source of heat.

Right before you put the fish in the oven, give the pieces a light spray on top with cooking spray. This will help the top of the pieces to get crispy, also. Place the baking sheet under the broiler, and cook the fish for about 4 minutes. Remove sheet, and quickly turn each piece of fish over, and cook the other side for 3-4 minutes.

The pieces of broiled fish are golden brown and crispy when done cooking.

Assemble The Baja Fish Tacos

When ready to serve baja fish tacos, place the warmed corn tortillas onto the serving plates.  Place 2-3 pieces of the cooked fish onto each tortilla.

Top the fish with some of the slaw mixture, and then top with a couple Tablespoons of the baja sauce. Garnish with fresh cilantro and a lime wedge, if desired (optional). Repeat until all of the baja fish tacos are ready to eat.

A few pieces of broiled fish are placed in each corn tortilla.

Baja fish tacos are topped with slaw salad and sauce before serving.

Now all that is left to do, is to pick up one of those big ol’ baja fish tacos, get a good grip on it, and take your first bite. YUM! They are delicious!

Time to eat a couple baja fish tacos!

Hope you will take the opportunity to make these delicious baja fish tacos sometime soon. We really enjoyed them! Have a great day.

Looking For More TACO Recipes?

You can find all of my recipes for Mexican food in the Recipe Index, located at the top of the page. A couple other taco recipes you might enjoy include:

Interested In More Recipes?

Thank you for visiting this website. I appreciate you using some of your valuable time to do soIf you’re interested, I publish a newsletter 2 times per month (1st and 15th) with all the latest recipes, and other fun info. I would be honored to have you join our growing list of subscribers, so you never miss a great recipe!
There is a Newsletter subscription box on the top right side (or bottom) of each blog post, depending on the device you use, where you can easily submit your e-mail address (only) to be included in my mailing list.

You Can Also Find Me On Social Media:
Facebook page: The Grateful Girl Cooks!
Pinterest: The Grateful Girl Cooks!
Instagram: jbatthegratefulgirlcooks

Author's signature

Recipe Adapted From: https://www.weightwatchers.com/us/recipe/baja-style-fish-tacos/5626a5f63d92b3c10eb8a514

0 from 0 votes
Baja Fish Tacos (Weight Watchers)
Prep Time
30 mins
Cook Time
8 mins
Total Time
38 mins
 

Baja Fish Tacos are a Weight Watchers dish, with seasoned broiled fish pieces in corn tortillas, topped with a crunchy slaw and creamy taco sauce!

Category: Entree-Seafood
Cuisine: Mexican, Southwestern
Keyword: baja fish tacos
Servings: 4 (2 tacos per serving)
Calories Per Serving: 332 kcal
Author: JB @ The Grateful Girl Cooks!
Ingredients
  • 1 pound rockfish or red snapper , cut into 2" chunks
  • 8 medium corn tortillas
  • 2 Tablespoons fresh cilantro sprigs (optional, for garnish)
  • 2 sprays cooking spray
For Seasoning Mix:
  • 1/2 cup yellow masa corn flour
  • 1 teaspoon table salt
  • 1/4 teaspoon ground black pepper
  • 1/8 teaspoon cayenne pepper
  • 1/4 teaspoon garlic powder
  • 1/2 teaspoon paprika
  • 1/8 teaspoon ground cumin
For Slaw:
  • 2 cups romaine lettuce or iceberg lettuce , outer leaves removed, cut in 1/4" strips
  • 2 stalks green onions (scallions) , thinly sliced
  • 10 small cherry tomatoes , quartered
  • 1/4 cup coleslaw mix OR purple cabbage , shredded
For Baja Sauce:
  • 3/4 cup plain, lowfat yogurt
  • 2 Tablespoons fresh lime juice
  • 1 teaspoon canned chipotle peppers , in adobo sauce, finely chopped
Instructions
PREP WORK:
  1. A) Cover a baking sheet with aluminum foil, and spray with non-stick cooking spray. The spray helps the fish become crispy! B) Place seasoning mix ingredients in medium sized bowl; stir to combine, and set aside. C) In a small bowl, mix together slaw ingredients. Set aside. D) Place plain, lowfat yogurt in a blender. Add fresh squeezed lime juice and chipotle peppers in adobo sauce. Blend until you have a smooth sauce. Set aside.

Prepare Fish Tacos:
  1. Cut fish into 2" pieces. Place the pieces, several at a time, into the bowl of seasoning mix, and toss to coat fish on all sides. Place the coated fish pieces onto baking sheet. Leave space between each piece. Continue until all pieces are on baking sheet. Set aside, and preheat your oven broiler.

  2. Warm The Tortillas: Wrap corn tortillas in aluminum foil, and put them in the oven to warm while you are broiling the fish. Place them on a rack that is the furthest away from the source of heat.

    Right before you put the fish in the oven, give fish a light spray on top with cooking spray. This helps top of the pieces get crispy, also. Place baking sheet under the broiler, and cook fish for about 3-4 minutes. Remove sheet, and quickly turn each piece of fish over, and cook the other side for 3-4 minutes. When done, remove fish and warmed tortillas from oven.

  3. When ready to serve, place warmed corn tortillas onto serving plates.  Place 2-3 pieces of broiled fish onto each tortilla. Top the fish with some slaw mixture, and then top with a couple Tablespoons of baja sauce. Garnish with cilantro sprigs and lime wedges, if desired. Repeat until all of the tacos are ready to eat. Serve, and enjoy!

Recipe Notes

Optional garnish: sprigs of fresh cilantro and lime wedge.
One serving = 2 tacos. For those following the Weight Watchers freestyle program, the total point value for 2 tacos (prepared as written) is 6 Smart Points.

Nutrition Facts
Baja Fish Tacos (Weight Watchers)
Amount Per Serving (1 2 tacos per serving)
Calories 332 Calories from Fat 45
% Daily Value*
Fat 5g8%
Saturated Fat 1g6%
Cholesterol 45mg15%
Sodium 736mg32%
Potassium 895mg26%
Carbohydrates 42g14%
Fiber 5g21%
Sugar 6g7%
Protein 31g62%
Vitamin A 2775IU56%
Vitamin C 19.4mg24%
Calcium 199mg20%
Iron 2.6mg14%
* Percent Daily Values are based on a 2000 calorie diet.

Here’s one more to pin on your Pinterest boards!Baja Fish Tacos are a Weight Watchers dish, with seasoned broiled fish pieces in corn tortillas, topped with a crunchy slaw and creamy taco sauce!

Cornmeal Spice-Crusted Rockfish

Cornmeal Spice-Crusted Rockfish is an EASY pan-seared Weight Watchers entree (2 SP). Delicious, simple, gluten free, and ready to eat in under 20 minutes!
Cornmeal Spice-Crusted Rockfish is an EASY pan-seared Weight Watchers entree. Delicious, simple, gluten free, and ready to eat in under 20 minutes!

Over the past couple of years, my husband and I have been trying to eat more seafood. One of the types of fish we have really enjoyed is rockfish, also known as Pacific Snapper.

Rockfish is typically found in the waters off the West Coast (CA, OR, WA and British Columbia), and it has a mild flavor and flaky texture. I’ve enjoyed using it in a couple of my recipes previously (see links below).

Scroll Down For A Printable Recipe Card At the Bottom Of The Page

How I Found This Recipe

As you may or may not know, I have been collecting cookbooks for over 40 years now. I LOVE to randomly look through cookbooks, seeking out interesting recipes to try! THIS is one of those recipes! Guess what? It’s from a Weight Watchers cookbook! Even if you are not watching your calories, you will love the flavors in this completely easy, low calorie seafood dish!

I found the recipe for cornmeal spice-crusted rockfish in a Weight Watchers Freestyle Cookbook I got last year. It is only 2 smart points per serving, if following a WW Freestyle plan! The original recipe uses tilapia, but I wanted to try it with the rockfish fillets I had in the freezer, so I did! We loved it!

How To Make Cornmeal Spice-Crusted Rockfish

The first step is to mix together the spice mixture for the rockfish. Place cornmeal and the seasonings onto a large sheet of wax paper, and mix together.

The spices which are added to the cornmeal are smoked sweet paprika, black pepper, Old Bay seasoning, brown sugar, and dried thyme. Once the ingredients are combined, spread the spice mixture out on the wax paper or work surface.

Spices are added to cornmeal to season the crust on the rockfish.

The spice mixture is spread out to dip the rockfish in.

Gently pat dry the fish using paper towels. FYI: There will be varying sizes of rockfish fillets, and because it was only my husband and I eating, I used three very small pieces of fish.

The recipe as written serves 4, and there will be enough spice mix to coat 4 decent sized pieces of fish.

Rockfish fillets are patted dry before rolling them in cornmeal spice mixture.

Dredge each piece of fish in the spice mixture, to coat all sides well. Use your fingers to press the seasonings onto the fish until it adheres to the surface. Set the coated piece of fish aside onto a plate, and continue with next piece, until all fish has been covered with spice/cornmeal mix.

The cornmeal spice-crusted rockfish fillets are now ready to cook.

Cook The Cornmeal Spice-Crusted Rockfish

Heat the canola oil in a large skillet, on medium-high heat. Once oil is very hot, add the cornmeal spice-crusted rockfish. Lightly spray the top surface of the fish with non-stick spray.

Cook the fish about 4 minutes, until the underside is deeply browned. Carefully turn each piece of cornmeal spice-crusted rockfish over to the other side, and continue cooking for approximately 4 more minutes. The cornmeal spice coating will crisp up as the fish cooks, and make a wonderfully seasoned outside “crust” on the fillets. This is a GOOD thing!

The cornmeal spice-crusted rockfish fillets are cooked in canola oil in a skillet.

After fish cooks on one side, each fillet is flipped to cook the other side.

Once the fish is cooked, transfer each piece to a dinner plate, and serve with your choice of side dishes! That’s it… now you’re ready to eat this delicious cornmeal spice-crusted rockfish! YAY! See how EASY it was to make this dish?

Serve The Cornmeal Spice-Crusted Rockfish

I served our cornmeal spice-crusted rockfish with a side of steamed rice (for my hubby), petite green peas, and my easy to make Southwestern Black Bean Salad (minus the avocadoes).

The fish is garnished with lemon wedges, which we squeezed over the fish before eating. That little extra zing of flavor made this dish even more delicious!

Lemon wedges garnish the finished cornmeal spice-crusted rockfish, served with rice and veggies.

We REALLY enjoyed this seafood dish, and I truly hope it has interested you enough to give it a try! This seafood dish is easy to make, is incredibly low calorie, cooks in no time at all, and tastes wonderful! Hope you’ll try it! Have a great day.

Looking For More Recipes Using ROCKFISH?

You can find all of my seafood recipes in the Recipe Index, located at the top of the page. A couple delicious recipes that use rockfish include:

Interested In More Recipes?

Thank you for visiting this website. I appreciate you using some of your valuable time to do soIf you’re interested, I publish a newsletter 2 times per month (1st and 15th) with all the latest recipes, and other fun info. I would be honored to have you join our growing list of subscribers, so you never miss a great recipe!
There is a Newsletter subscription box on the top right side (or bottom) of each blog post, depending on the device you use, where you can easily submit your e-mail address (only) to be included in my mailing list.

You Can Also Find Me On Social Media:
Facebook page: The Grateful Girl Cooks!
Pinterest: The Grateful Girl Cooks!
Instagram: jbatthegratefulgirlcooks

Author's signature

Original Recipe source: “The Essential WW Freestyle Cookbook”, published by Weight Watchers International, Inc., copyright 2018, page 84

0 from 0 votes
Cornmeal Spice-Crusted Rockfish
Prep Time
10 mins
Cook Time
8 mins
Total Time
18 mins
 

Cornmeal Spice-Crusted Rockfish is an EASY pan-seared Weight Watchers entree. Delicious, simple, gluten free, and ready to eat in under 20 minutes!

Category: Entree-Seafood
Cuisine: American
Keyword: cornmeal spice-crusted rockfish
Servings: 4
Calories Per Serving: 167 kcal
Author: JB @ The Grateful Girl Cooks!
Ingredients
  • 2 Tablespoons cornmeal
  • 2 teaspoons smoked sweet paprika
  • 1 teaspoon black pepper
  • 1 teaspoon Old Bay seasoning
  • 1 teaspoon dried thyme
  • 1 teaspoon packed brown sugar
  • 4 rockfish fillets (approx. 4-5 ounces each)
  • 4 teaspoons canola oil
  • Lemon wedges (for garnish)
Instructions
  1. Place cornmeal and the seasonings onto a large sheet of wax paper, and mix together. Once combined, spread the spice mixture out on the wax paper or work surface.

  2. Gently pat dry the fish using paper towels. Dredge each piece of fish in the spice mixture, to coat all sides well. Use your fingers to press the seasonings onto the fish until it adheres to the surface. Set the coated piece of fish aside onto a plate, and continue with next piece, until all fish has been covered with spice/cornmeal mix.

  3. Heat canola oil in a large skillet, using medium-high heat. Once oil is very hot, add the cornmeal spice-crusted rockfish. Lightly spray the top surface of the fish with non-stick spray. Cook the fish about 4 minutes, until the underside is deeply browned. Carefully turn each piece of fish over to the other side, and continue cooking for approximately 4 more minutes. Once the fish is done transfer each piece to a dinner plate, garnish each piece with lemon wedges, and serve with your choice of side dishes! Enjoy!

Recipe Notes

WW Freestyle = 2 Smart Points per serving!

Nutrition Facts
Cornmeal Spice-Crusted Rockfish
Amount Per Serving (1 fillet)
Calories 167 Calories from Fat 54
% Daily Value*
Fat 6g9%
Saturated Fat 1g6%
Cholesterol 57mg19%
Sodium 85mg4%
Potassium 477mg14%
Carbohydrates 6g2%
Fiber 1g4%
Sugar 1g1%
Protein 22g44%
Vitamin A 525IU11%
Calcium 26mg3%
Iron 1.2mg7%
* Percent Daily Values are based on a 2000 calorie diet.

Here’s one more to pin on your Pinterest boards!

Cornmeal Spice-Crusted Rockfish is an EASY pan-seared Weight Watchers entree (2 SP). Delicious, simple, gluten free, and ready to eat in under 20 minutes!


Classic Tuna Salad

Classic Tuna Salad is a filling, healthy, delicious entree salad that’s Weight Watchers friendly (ZERO points Freestyle), and is ready in 10 minutes!
Classic Tuna Salad is a filling, healthy, delicious entree salad that's Weight Watchers friendly (ZERO points Freestyle), and is ready in 10 minutes!

Do you enjoy tuna salad? We sure do, but typically we enjoy it on sandwiches. My husband likes to add hard boiled eggs and mayo to drained tuna, and that’s about it! Recently I stumbled upon a recipe for classic tuna salad that can be served as a quick lunch or dinner main course, and decided to give it a try! YUM!!!! The entire salad took under 10 minutes to make (including chopping and slicing the veggies). That’s a WIN, in my book.

The tuna salad is so delicious (even as leftovers the next day) I thought I would share it with you today.  This recipe was adapted by a Weight Watchers member from a cookbook recipe she had. Even if you are not following a WW plan, this is a very filling, low calorie and delicious salad.

This recipe for classic tuna salad uses non fat Greek yogurt instead of mayonnaise to cut out  some fat calories and make it compatible with a Weight Watchers Freestyle eating plan. That small change made this salad have ZERO Freestyle points (for those of you who follow a WW plan and know the over 200 foods that have a zero points value).

Scroll Down For A Printable Recipe Card At The Bottom Of The Page

How To Make This Classic Tuna Salad

Truthfully, there is nothing even remotely difficult involved in making this delicious tuna salad.  Simply prep the veggies, by cutting, chopping and slicing. Seen below are the chopped dill pickles, celery, fresh parsley and chives (from our garden), and red onion.

Celery, parsley, red onion, and dill pickles are chopped to add to tuna salad.

Once you’ve “prepped” the veggies, place them in a medium sized bowl with drained albacore tuna, spices, lemon juice, and non fat Greek yogurt.

Tuna, chopped veggies and non-fat Greek yogurt are mixed in bowl.

Combine all the ingredients, adding a little bit more Greek yogurt if necessary, to reach the consistency you prefer. I started with 3 Tablespoons, then added just a smidge more.

All the ingredients for the classic tuna salad are mixed together in bowl.

Here is an up close look at the tuna salad after all ingredients are mixed together.

Time To Enjoy A Classic Tuna Salad

Once everything is combined, you are ready to enjoy this wonderful ZERO point, flavor-packed, classic tuna salad! It is often said you eat with your eyes first, so I served it on a bed of chopped iceberg lettuce, and surrounded this classic tuna salad with a sliced Gala apple! 

The salad LOOKED good served this way, and the crunchy sweetness of the apple tasted GREAT alongside this delicious salad!

Classic tuna salad, on a bed of chopped lettuce, with apple slices on the side.

There you have it! A healthy, and quite filling entree salad that has ZERO Freestyle points if you follow a WW plan. That works for me! Cover and refrigerate any leftovers.  By the way, I had the exact same lunch the very next day, as well! It really is a great tasting lunch or dinner!

The classic tuna salad, with apple slices on the side is a filling, flavor packed meal!

I sure do hope you will consider trying this delicious classic tuna salad recipe! Even if you are not following a Weight Watchers plan, I am confident you will really enjoy this delicious salad. Have a wonderful day!

Looking For More MAIN COURSE SALAD Recipes?

You can find all of my entree salad recipes in the Recipe Index, located at the top of the page. Here’s a few favorites you might want to check out:

Interested In More Recipes?

Thank you for visiting this website. I appreciate you using some of your valuable time to do soIf you’re interested, I publish a newsletter 2 times per month (1st and 15th) with all the latest recipes, and other fun info. I would be honored to have you join our growing list of subscribers, so you never miss a great recipe!
There is a Newsletter subscription box on the top right side (or bottom) of each blog post, depending on the device you use, where you can easily submit your e-mail address (only) to be included in my mailing list.

You Can Also Find Me On Social Media:
Facebook page: The Grateful Girl Cooks!
Pinterest: The Grateful Girl Cooks!
Instagram: jbatthegratefulgirlcooks

Author's signature

Recipe Adapted From: The Cookbook “Well Fed 2: More Paleo Recipes For People Who Love To Eat”, by Melissa Joulwan, published by Smudge Publishing. Recipe was adapted by a WW member, then posted in WW connect community.

0 from 0 votes
Classic Tuna Salad
Prep Time
10 mins
Cook Time
0 mins
Total Time
10 mins
 

Classic Tuna Salad is a filling, healthy, delicious entree salad that's Weight Watchers friendly (ZERO points Freestyle), and is ready in 10 minutes!

Category: Entree/Salad
Cuisine: American
Keyword: classic tuna salad
Servings: 4
Calories Per Serving: 143 kcal
Author: JB @ The Grateful Girl Cooks!
Ingredients
  • 2 cans albacore tuna (in water) , drained (7 oz. per can)
  • 1/4 cup red onion , finely chopped
  • 1 rib celery , finely diced
  • 1/4 cup dill pickle , finely diced
  • 1/4 cup fresh parsley , chopped
  • 2 Tablespoons chives , finely chopped (fresh or dried)
  • 1/2 Tablespoon lemon juice , freshly squeezed
  • 1/4 teaspoon black pepper
  • 1/8 teaspoon salt
  • 1 dash cayenne pepper
  • 3-4 Tablespoons non fat, plain Greek yogurt
Instructions
  1. Drain tuna, and cut, chop or slice the veggies.

  2. Combine all ingredients in a medium sized bowl, and stir well, to fully mix all the veggies and spices with the tuna and non-fat Greek yogurt. Cover and refrigerate until ready to serve (can also be eaten immediately).

  3. To serve, place a rounded large scoop on a bed of chopped lettuce, or make into a sandwich, whichever way you want to enjoy this classic tuna salad. Cover and refrigerate any leftovers. Enjoy!

Nutrition Facts
Classic Tuna Salad
Amount Per Serving (1 (1/4 of total))
Calories 143 Calories from Fat 27
% Daily Value*
Fat 3g5%
Saturated Fat 1g6%
Cholesterol 42mg14%
Sodium 540mg23%
Potassium 312mg9%
Carbohydrates 2g1%
Fiber 1g4%
Sugar 1g1%
Protein 25g50%
Vitamin A 460IU9%
Vitamin C 7.7mg9%
Calcium 39mg4%
Iron 1.2mg7%
* Percent Daily Values are based on a 2000 calorie diet.

Here is one more to pin on your Pinterest boards!Classic Tuna Salad is a filling, healthy, delicious entree salad that's Weight Watchers friendly (ZERO points Freestyle), and is ready in 10 minutes!


Lemon Piccata Cod

Lemon Piccata Cod is a simple, delicious dish that features pan-seared cod, cooked in butter, and topped with a lemon, wine and caper sauce to serve.

Several months ago I had some cod fillets in the freezer that I wanted to use for dinner. I started pondering HOW I wanted to cook them. Isn’t that always the case? Here’s some fish… now how should I cook it?

I ended up deciding to cook them and use the sauce I make for my yummy chicken piccata. It would just have to work for cod! This plan sounded good to me. How can you go wrong with cooking fresh fish and serving it with a butter, wine, broth, capers and lemon juice sauce? It seemed like lemon piccata cod was just begging to be made. So… I made it! And it WAS good! Who knew?

Lemon piccata cod is very simple to make, as well, and the whole dish can be ready in about 20 minutes! The cod fillets are pan-seared (in browned butter) until done, then a simple but delicious pan sauce is made and spooned over the fish, when served. Here’s how to make this dish:

Scroll Down For A Printable Recipe Card At The Bottom Of The Page

Prepare The Cod Fillets

Place about 2-3 Tablespoons of flour onto a dinner sized plate.  Add salt and pepper, then mix these ingredients together, and spread it out on the plate.

Flour and seasonings are placed on a plate to dredge the cod fillets in before cooking.

Rinse the cod fillets, and then pat them dry with paper towels. Place each cod fillet into the flour mixture one at a time, and “dredge” the fish in the flour to completely cover BOTH sides.

The cod fillets (for lemon piccata cod) are rinsed and dried before coating in flour.

Cod fillets are dredged in flour and seasonings before cooking.

Cook The Cod Fillets

Heat 2 Tablespoons butter (on medium heat) in a large non-stick skillet. When butter has melted and skillet is really hot, add the pieces of fish. Cook the fish for about 4 minutes. When the bottom of the fish is nice and golden brown, carefully turn the fish to the other side.

Continue cooking the fish for another 3-4 minutes until golden brown and crispy on the outside. TIP: The butter will brown as you cook the fish. Spoon the browned butter over the top of the fish as they cook (after turning to second side). Do this often, because it helps to add even more flavor!

The floured, seasoned cod fillets are cooked in butter in large skillet.

The cod has been cooked on both sides in browned butter.

Once the fish is done, remove from the skillet and keep warm while you make the lemon piccata pan sauce. Do NOT clean the skillet. Leave all that browned butter in there!

Make The Pan Sauce For The Lemon Piccata Cod

To the browned butter in the skillet, add the white wine and minced garlic. Cook on medium high heat until the garlic has slightly browned and some of the wine has cooked away. This will take 2-3 minutes (approximately).

Add chicken broth, lemon juice and the capers to the skillet. Cook until very hot (2-3 minutes), and then add 1 Tablespoons of butter to the skillet, to finish the sauce. Cook, stirring often until butter has melted and is incorporated into the sauce. Once done, you are ready to serve the lemon piccata cod!

The lemon piccata sauce with capers cooks in a large skillet.

Serve The Lemon Piccata Cod

To serve this dish, place each of the lemon piccata cod fillets onto dinner plates. Spoon some of the lemon piccata sauce over the surface of the fish. Feel free to use as much or as little sauce as you wish. You will probably have a tiny bit extra left over.

The lemon piccata sauce adds so much flavor to the very mild tasting cod, so I recommend a good couple spoonfuls! Garnish each piece of fish with a couple thin lemon slices, and serve!

The lemon piccata cod is topped with lemon slices, and served with rice and veggies.

I truly hope you will consider trying this very simple, but tasty lemon piccata cod, and trust you will enjoy it! Have a wonderful day!

Looking For More Recipes That Use COD?

You can find all of my seafood recipes in the Recipe Index, located at the top of the page. A few favorites that use COD include:

Interested In More Recipes?

Thank you for visiting this website. I appreciate you using some of your valuable time to do soIf you’re interested, I publish a newsletter 2 times per month (1st and 15th) with all the latest recipes, and other fun info. I would be honored to have you join our growing list of subscribers, so you never miss a great recipe!

There is a Newsletter subscription box on the top right side (or bottom) of each blog post, depending on the device you use, where you can easily submit your e-mail address (only) to be included in my mailing list.

You Can Also Find Me On Social Media:
Facebook page: The Grateful Girl Cooks!
Pinterest: The Grateful Girl Cooks!
Instagram: jbatthegratefulgirlcooks

Author's signature

0 from 0 votes
Lemon Piccata Cod
Prep Time
5 mins
Cook Time
15 mins
Total Time
20 mins
 

Lemon Piccata Cod is a simple, delicious dish that features pan-seared cod, cooked in butter, and topped with a lemon, wine and caper sauce to serve.

Category: Entree-Seafood
Cuisine: American
Keyword: lemon piccata cod
Servings: 2
Calories Per Serving: 335 kcal
Author: JB @ The Grateful Girl Cooks!
Ingredients
  • 8 ounces cod fillets (2 fillets-4 ounces per fillet)
  • 3 Tablespoons all purpose flour
  • salt/pepper, to season fish
  • 2 Tablespoons butter
For Sauce
  • 1/3 cup dry white wine
  • teaspoons minced garlic
  • 3/4 cup chicken broth
  • 3 Tablespoons lemon juice (fresh)
  • 3 Tablespoons capers , drained
  • 1 Tablespoon butter
  • fresh lemon slices , for garnish (optional)
Instructions
  1. Place about 2-3 Tablespoons of flour onto a dinner sized plate.  Add salt and pepper, then mix these ingredients together, and spread it out on the plate.

  2. Rinse the cod fillets, and then pat them dry with paper towels. Place each cod fillet into the flour mixture one at a time, and "dredge" the fish in the flour to completely cover BOTH sides.

  3. Heat 2 Tablespoons butter (on medium heat) in a large non-stick skillet. When butter has melted and skillet is really hot, add the pieces of fish. Cook the fish for about 4 minutes. When the bottom of the fish is nice and golden brown, carefully turn the fish to the other side. Continue cooking for another 3-4 minutes until golden brown and crispy on the outside. TIP: The butter will brown as you cook the fish. Spoon the browned butter over the top of the fish as they cook (after turning to second side). Do this often, because it helps to add even more flavor! Once the fish is done, remove from the skillet and keep warm while you make the pan sauce. Do NOT clean the skillet. Leave all that browned butter in there!

  4. To the browned butter in the skillet, add the white wine and minced garlic. Cook on medium high heat until the garlic has slightly browned and some of the wine has cooked away. This will take 2-3 minutes (approximately). Add chicken broth, lemon juice and the capers to the skillet. Cook until very hot (2-3 minutes), and then add 1 Tablespoons of butter to the skillet, to finish the sauce. Cook, stirring often until butter has melted and is incorporated into the sauce. Once done, you are ready to serve the dish! To serve, place the fish onto dinner plates. Spoon the lemon piccata sauce over the surface of the fish. Feel free to use as much or as little sauce as you wish. Enjoy!

Nutrition Facts
Lemon Piccata Cod
Amount Per Serving (1 fillet with sauce)
Calories 335 Calories from Fat 162
% Daily Value*
Fat 18g28%
Saturated Fat 11g69%
Cholesterol 94mg31%
Sodium 869mg38%
Potassium 590mg17%
Carbohydrates 13g4%
Fiber 1g4%
Sugar 1g1%
Protein 23g46%
Vitamin A 570IU11%
Vitamin C 17.7mg21%
Calcium 30mg3%
Iron 1.4mg8%
* Percent Daily Values are based on a 2000 calorie diet.

Here’s one more to pin on your Pinterest boards!Lemon Piccata Cod is a simple, delicious dish that features pan-seared cod, cooked in butter, and topped with a lemon, wine and caper sauce to serve.

Sweet Chili Shrimp Pasta

Sweet Chili Shrimp Pasta, (in a soy/sweet chili/sesame sauce) is a simple, delicious Asian-inspired meal that can be ready in about 30 minutes!

A couple months ago I made a meal (for my husband and I) with shrimp in an Asian inspired sauce, and it was served with zucchini noodles. It tasted wonderful, and my husband suggested it would be a great recipe to try with pasta (instead of zoodles)!

So… that’s how this recipe for sweet chili shrimp pasta came from THAT conversation! This is one VERY EASY recipe, and if you can multi-task, it can be ready in about 30 minutes or less!

Scroll Down For A Printable Recipe Card At The Bottom Of The Page

Prepare The Pasta

To save time, begin cooking the pasta, and then make the sauce and cook the shrimp (while pasta cooks). This multi-tasking will save you a lot of precious time in the kitchen! Cook the spaghetti noodles in boiling, salted water, according to the package instructions. Once done, drain the noodles.

Cooking the spaghetti noodles for this shrimp an pasta dish.

Make the Sauce For The Sweet Chili Shrimp Pasta

While the pasta cooks, make the sauce, because it is ridiculously EASY to make. Place sweet chili sauce, low sodium soy sauce, and sesame oil in a small bowl, and whisk well, until fully combined.  Once combined, measure out 1/2 cup of the sauce, and set it aside.

Whisking ingredients together for the sauce used to flavor sweet chili shrimp pasta.

Place the peeled, deveined shrimp into a large mixing bowl, and pour the remaining sauce left in the bowl over them. Gently toss, to fully coat the shrimp with the sweet chili sauce.

Large shrimp marinate in sauce to season them for the sweet chili shrimp pasta.

Cook The Shrimp

Spray a large skillet with non-stick spray, and heat skillet on medium heat. Once the skillet is hot (but not smoking), add the shrimp to the skillet in a single layer. Cook the shrimp for about 2 minutes, then turn and cook the other side for 1-2 minutes. When done the shrimp will have turned pink and should be cooked through.

You can spoon some of the sauce in the skillet over the shrimp while they cook, if desired. Remove shrimp from skillet when done, and keep warm.

The marinated shrimp are pan-seared until done, in a skillet.

Once spaghetti noodles are finished cooking, drain them well and place in the skillet that you used to cook the shrimp. Add the 1/2 cup of reserved Asian sauce to the pasta, and toss, to fully combine.

An Asian sweet chili sauce is added to the drained, cooked pasta.

Add the shrimp to the pasta, and toss gently, to combine the pasta, sauce and shrimp. Cook until the sweet chili shrimp pasta is heated through. This should only take a minute or two, and then the dish is done!

Marinated shrimp are added to the skillet with the sweet chili sauce and pasta.

Serve The Sweet Chili Shrimp Pasta

When ready to serve, place half of the pasta onto a serving plate or into a bowl. Top with half of the shrimp, as well. Garnish the sweet chili shrimp pasta (if desired) with sesame seeds and thinly sliced green onions (white and green parts). Eat it while it’s hot, and ENJOY!

The sweet chili shrimp pasta is served, topped with sesame seeds and green onions.

I really hope you enjoy this recipe for sweet chili shrimp pasta! There is a lot of flavor in the noodles and on the shrimp! Hope you have a wonderful day!

Looking For More SHRIMP Recipes?

You can find all of my recipes in the Recipe Index, located at the top of the page. A few favorite shrimp recipes include:

Interested In More Recipes?

Thank you for visiting this website. I appreciate you using some of your valuable time to do soIf you’re interested, I publish a newsletter 2 times per month (1st and 15th) with all the latest recipes, and other fun info. I would be honored to have you join our growing list of subscribers, so you never miss a great recipe!

There is a Newsletter subscription box on the top right side (or bottom) of each blog post, depending on the device you use, where you can easily submit your e-mail address (only) to be included in my mailing list.

You Can Also Find Me On Social Media:
Facebook page: The Grateful Girl Cooks!
Pinterest: The Grateful Girl Cooks!
Instagram: jbatthegratefulgirlcooks

Author's signature

Recipe Source For The Sauce: https://iowagirleats.com/2017/06/14/sweet-chili-sesame-shrimp-and-zoodles/

↓↓ PRINTABLE RECIPE BELOW ↓↓

0 from 0 votes
Sweet Chili Shrimp Pasta
Prep Time
15 mins
Cook Time
15 mins
Total Time
30 mins
 
Sweet Chili Shrimp Pasta, (in a soy/sweet chili/sesame sauce) is a simple, delicious Asian-inspired meal that can be ready in about 30 minutes!
Category: Entree-Seafood
Cuisine: Asian
Keyword: sweet chili shrimp pasta
Servings: 2
Calories Per Serving: 489 kcal
Author: JB @ The Grateful Girl Cooks!
Ingredients
  • 4 ounces spaghetti pasta
  • 7 Tablespoons sweet chili sauce (I used Mae Ploy brand)
  • 1/4 cup low-sodium soy sauce (or Tamari)
  • teaspoons sesame oil
  • 1/2 pound large shrimp (peeled, deveined, patted dry)
For Garnish (optional)
  • 1 stem green onion (scallion) , sliced thinly
  • 1 teaspoon sesame seeds
Instructions
  1. To save time, begin cooking pasta, and then make sauce and cook shrimp (while pasta cooks). This multi-tasking will save you a lot of time in the kitchen! Cook pasta according to package instructions. Once done, drain the noodles.

  2. While pasta cooks, make the sauce. Place sweet chili sauce, soy sauce, and sesame oil in a small bowl, and whisk well, until fully combined.  Once combined, measure out 1/2 cup of the sauce, and set it aside.

  3. Place shrimp into a large mixing bowl, and pour remaining sauce left in the bowl over them. Gently toss, to fully coat shrimp with the sauce. Spray a large skillet with non-stick spray, and heat skillet on medium. Once skillet is hot (but not smoking), add shrimp to the skillet in a single layer. Cook shrimp for 2 minutes, then turn and cook the other side for 1-2 minutes. When done shrimp will have turned pink and should be cooked through. You can spoon some of the sauce in the skillet over the shrimp while they cook, if desired. Remove shrimp from skillet when done, and keep warm.

  4. Once pasta is done, place drained pasta into the skillet you used to cook shrimp. Add 1/2 cup reserved sauce to pasta, and toss, to combine. Add shrimp, and toss gently, to combine pasta, sauce and shrimp. Cook until dish is heated through (1-2 minutes). 

  5. To serve, divide hot pasta onto plates, and top with shrimp. Garnish (if desired) with sesame seeds and sliced green onions. Eat while hot... and ENJOY!

Nutrition Facts
Sweet Chili Shrimp Pasta
Amount Per Serving (1 (1/2 of total))
Calories 489 Calories from Fat 45
% Daily Value*
Fat 5g8%
Cholesterol 285mg95%
Sodium 2541mg110%
Potassium 274mg8%
Carbohydrates 74g25%
Fiber 2g8%
Sugar 30g33%
Protein 32g64%
Vitamin C 4.6mg6%
Calcium 182mg18%
Iron 3.8mg21%
* Percent Daily Values are based on a 2000 calorie diet.

Here’s one more to pin on your Pinterest boards!Sweet Chili Shrimp Pasta, (in a soy/sweet chili/sesame sauce) is a simple, delicious Asian-inspired meal that can be ready in about 30 minutes!