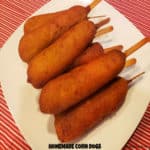
Make 8 yummy Homemade Corn Dogs for lunch, dinner or snack! They taste like you bought them at the fair. Kids of all ages will enjoy them!

I come by my unabashed love for corn dogs quite predictably, as I had them often at county fairs in California with my mom and dad, and as a young adult with a budget and a very small bank account! I love them, topped with yellow mustard.
My Mom absolutely LOVES corn dogs and douses them with mustard. She puts so much mustard on them that I say “Have a little corn dog with your mustard, Mom.” To each his own, whether you enjoy your corn dogs plain, or with mustard or ketchup!
For a few years now I have been holding on to a few recipes I found online for homemade corn dogs. I wasn’t sure they would compare to crunchy cornmeal battered corn dogs found at the store or at local fairs.
Well… I was wrong. This recipe gets a gold star, and has become my “go-to” when I want to make corn dogs! Hot dogs are covered in an easy-to-make cornmeal batter, then deep-fried until the outside is crunchy and the hot dog is cooked perfectly.
THEY ARE SO GOOD, and are easier to make than you’d think. Here’s how to make 8 yummy homemade corn dogs, just in time for summer, or any time of the year!
Scroll Down For A Printable Recipe Card At The Bottom Of The Page
Make The Batter For the Corn Dogs
Whisk or stir together flour, yellow cornmeal, baking powder, baking soda, salt, pepper, and granulated sugar in a large bowl until combined.


Add a lightly beaten egg, honey, and buttermilk to the flour mixture in the bowl. Stir the wet ingredients into the dry ingredients only until they have been combined. Don’t overmix!
The batter will be slightly thick. Cover the bowl, and refrigerate the corn dog batter for 15 minutes in your refrigerator.


Prepare The Hot Dogs For The Batter
While the batter chills in the refrigerator, you can prepare the hot dogs for the batter. Insert wooden skewers/sticks into each of the hot dogs, leaving enough stick remaining out, to hold.
Pat each hot dog dry with paper towels. Place additional flour onto a dinner plate, then roll each hot dog in the flour to cover.
The flour helps the batter adhere to the hot dog better. You do NOT want the batter to slip-slide right off the hot dog now, do ya? Nope!


Set the floured hot dogs aside while you heat the oil in a large deep pot or in an electric skillet. You will want to heat the oil on medium heat to 350°F.
Maintaining the correct temperature is really important, to ensure the corn dogs cook correctly (not burnt or “mushy” coating).

Ready… Dip… Fry!
The next step is to batter 2-3 corn dogs and immediately place them in the 350°F hot oil to fry. When they are done, repeat this step with the other corn dogs.
Here is the easiest way I have found to batter the corn dogs. Pour part of the batter into a tall drinking glass (about 3/4 of the way up). Holding the corn dog by the stick, carefully insert one hot dog into the glass.
Cover all exposed surfaces of the hot dog, by turning it in the batter. Remove the con dog from the batter, letting the excess batter drip back into the glass.

Immediately place the battered corn dog into the hot oil. It is best to only cook 2 or 3 at a time, keeping them separated in the hot oil.
Once the bottom side of the corn dogs are nicely browned (about 1½ minutes), roll them over, and cook the other side until it is browned and crispy on the outside.
The total time it normally takes to cook the corn dogs through is approximately 3 minutes.


Okay… Now What?
Transfer the homemade corn dogs carefully from the hot oil to a several layers of paper towels to absorb excess oil. They are usually VERY hot inside, so let them drain a minute on the paper towels before serving.
Before cooking more corn dogs, make sure temp is still heated to 350°F. Repeat process with the remaining corn dogs and batter. Add more batter to the glass, as needed.
If the batter has become too thick, simply stir in a tiny bit more buttermilk. You should have enough batter to make eight homemade corn dogs.

Who’s Ready For Some Homemade Corn Dogs?
Now it’s time, once the homemade corn dogs are all cooked, to enjoy these tasty treats! Grab the mustard or ketchup, a corn dog, and enjoy!
The outside of the corn dog is nice and crunchy, but the inside is soft and wonderful, covering the cooked hot dog. YES!!!


I hope you enjoy making (and eating) these homemade corn dogs with those you love! They taste great, and are a fantastic lunch, dinner, or snack I think you’re going to love.
Can You Freeze Them?
Yes, you can freeze any leftovers for another day once they are at room temperature. Simply lay the corn dogs in a single layer on a small cookie sheet, and freeze for 3-4 hours.
Once “flash-frozen”, remove them from the baking sheet, and store in large freezer bags (in the freezer!) until you want to enjoy them again.
You can reheat them in an air fryer, or in an oven (350°F) until heated through and crunchy again (about 18-20 minutes in oven without thawing).
Thanks for stopping by, and please come back soon for more family-friendly recipes. Take care, may God bless you, and have a GREAT day!
Looking For More LUNCH Recipes?
You can find ALL of my recipes in the Recipe Index, which is located at the top of the page. I have some delicious recipes for lunches (or dinners!) to enjoy, including:
- Easy Stovetop Macaroni and Cheese
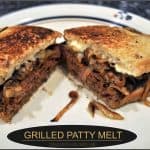
- Grilled Patty Melt
- Coney Dogs
- Grilled “Thai” PB & J Sandwich
- Italian Meatball Sandwiches
Want More Recipes? Get My FREE Newsletter!
I publish a newsletter 2 times per month (1st and 15th) with lots of recipes, tips, etc..
Would you like to join our growing list of subscribers?
There is a Newsletter subscription box on the top right (or bottom) of each blog post, depending on the device you use.
You can submit your e-mail address there, to be added to my mailing list.
Find Me On Social Media:
Facebook page: The Grateful Girl Cooks!
Pinterest: The Grateful Girl Cooks!
Instagram: jbatthegratefulgirlcooks

Original Recipe Source and with thanks to Sara, at: dinneratthezoo.com/corn-dogs-recipe/
↓↓ PRINTABLE RECIPE BELOW ↓↓
Make 8 yummy Homemade Corn Dogs for lunch, dinner or snack! They taste like you bought them at the fair. Kids of all ages will enjoy them!
- 1 cup all purpose flour
- 1 cup yellow cornmeal
- 2 Tablespoons granulated sugar
- 2 teaspoons baking powder
- ½ teaspoon salt
- ¼ teaspoon baking soda
- ⅛ teaspoon black pepper
- 1 large egg lightly beaten
- 2 Tablespoons honey
- 1 cup buttermilk
- neutral cooking oil enough to cover pot with 4" oil
- 8 weiners
- 8 wooden popsicle sticks or skewers
Whisk/stir flour, yellow cornmeal, baking powder, baking soda, salt, pepper, and sugar in large bowl until combined.
Add egg, honey, and buttermilk. Stir into the dry ingredients only until combined. Cover bowl; refrigerate batter for 15 minutes.
While batter chills, prepare hot dogs. Insert wooden sticks into each hot dog, leaving enough sticking out, to hold. Pat hot dogs dry with paper towels. Place additional flour onto a dinner plate; roll hot dogs in flour to cover. Set aside.
Pour enough oil in large pot (or electric skillet) to cover bottom with 4" of oil. Heat the oil on medium heat to 350°F. NOTE: Maintaining correct temperature is important, to ensure corn dogs cook correctly (not burnt or "mushy" coating).
Pour some batter into a tall drinking glass (about 3/4 of the way up). Holding a corn dog by the stick, carefully insert it into the batter. Cover entire hot dog, by turning it in the glass. Let excess batter drip back into glass. Batter only a couple corn dogs at a time.
Immediately place corn dog into hot oil. Cook 1-2 corn dogs at a time. Once the bottom side is nicely browned, roll them over. Cook other side until browned and crispy on the outside. Transfer cooked corn dogs to paper towels to absorb oil.
Before cooking more corn dogs, make sure temp is still at 350°F. Repeat process with remaining corn dogs and batter. Add more batter to the glass, as needed. If batter is too thick, stir in a little more buttermilk. Serve, and enjoy!
NOTE: Caloric calculation made without factoring in the oil used for cooking, as many varieties can be used, and 99% of the oil is not consumed.
Here’s one more to pin on your Pinterest boards!


! / The Grateful Girl Cooks!")


! / The Grateful Girl Cooks!")