Overrun with fresh garden green beans this summer? Learn how to can green beans for long term storage, to enjoy all year long!
One summer several years ago I was “overrun” with green beans growing in my backyard raised bed garden. I KNEW I wanted to learn how to can green beans to preserve them, so I used a birthday gift card I received and bought a pressure canner. The rest is history!
That was several summers ago, and I’ve now learned and progressed in my pressure canning (and water bath canning), to where I am now canning lots of veggies, beans, soups, jams, and stews… AND I LOVE IT! Do you know how to can green beans? It’s actually quite easy, once ya get the basics down.
There’s something wonderful about pulling a jar of homegrown green beans (or other foods) right out of our pantry that makes me smile! And the fact that I’ve never had a “bad” unsealed or cracked jar tells me I must be doing it right! So if you’re interested in learning how to can green beans here’s the “how to”.
Scroll Down For A Printable Recipe Card At The Bottom Of The Page
How To Can Green Beans
First thing is very important: always refer to your pressure canner’s manufacturer’s instructions for your specific canner before beginning. Note: Green beans must be canned using a PRESSURE canner. Vegetables and meats, soups, etc. must be pressure-canned, due to low acidity present in those foods. Unfortunately they CANNOT be processed in a water bath canner (not enough heat to kill off any potentially harmful bacteria!). This is the first thing I had to understand when it was time to learn how to can green beans!
Start with fresh beans (for this batch I combined green and yellow fillet beans from our garden). Rinse beans, and then drain them.
Trim the ends off the beans, then snap or cut them into 2 inch pieces. (I enjoy “snapping” beans while I watch TV). Typically I pack beans tightly into jars before canning to get an estimate of how many jars I will need. Once that’s done, I remove beans, re-wash jars, then proceed with the canning process. Set the beans aside until you’re ready to pack them into hot jars.

Prepare The Canning Jars And Flat Lids
Wash the canning jars, then place them upside down on a dish towel-lined baking sheet. Place them in a preheated 200 degree oven for about 20-25 minutes.
Some people put them in simmering water to heat, but I like the convenience of having my stove top free while I am heating the water up in my pressure canner and heating boiling water to add to the filled jars.

While the jars are in the oven heating, prepare pressure canner, jars and lids according to manufacturer instructions. Bring a kettle of water to a low boil. About 5 minutes before the jars are finished heating and the beans are ready to be added, pour some of the very hot water over the flat jar lids (and let them sit in the water in a bowl for 5 minutes – this softens the rubber seal).
Pack The Green Beans Into Hot Jars
I usually “raw pack” the beans (one of TWO canning methods), which means to tightly pack the raw green beans in the heated jars. Fill the jars to within one inch of the top of jar.
Place 1/2 teaspoon canning salt into each jar. Pour boiling water (I use a canning funnel) into each jar, leaving 1 inch headspace. (See NOTES section of the printable recipe below for alternate method).

Remove air bubbles from jar; adjust the headspace by adding or removing liquid to ensure you have the correct 1 inch headspace. Use a paper towel and wipe the rim of each jar dry/clean, to help ensure a good seal. Place the heated flat lid on jar, then add screw band and tighten to fingertip tightness.
Processing The Jars Of Green Beans
Carefully place the jars into simmering water in the pressure canner, lock the canner lid in place, then turn the stove top to medium high heat. As the water inside comes to a boil, steam will escape through the vent. Let the steam vent for 10 minutes, then place vent cover on to close vent.

Continue heating until the pressure canner reaches 10 pounds pressure. Maintain this pressure throughout the cooking time indicated. (Pint jars = process for 20 minutes, Quart jars = process for 25 minutes).

Once Canning Processing Time Is Completed
When processing time is completed, turn off the heat. Let the pressure of the canner drop down to zero naturally. Once the pressure returns to zero, wait a couple more minutes, then carefully remove the vent cover only. Wait another minute, then carefully remove canner lid. Let the jars sit in the canner for 10 more minutes, then remove them, using canning tongs.
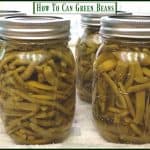
Place the HOT jars onto a dish towel on the counter (DO NOT place directly on counter… temperature variations could make the jars crack!). Here’s a picture from another batch of jars using only GREEN beans. At this point you’ve conquered learning how to can green beans. Yay for YOU!
 Let The Jars Cool
Let the jars cool completely (for 12-24 hours) without disturbing, then check to make sure they sealed properly, label and store. Smile… and enjoy the reward from your small amount of work… a pantry full of green beans!
I LOVE that I can preserve beans from our garden each year and pull a jar of home-grown green beans off a pantry shelf any time I want… (haven’t bought beans in years!).

For me personally, it is very rewarding to see jars of homegrown vegetables (and soups, stews, jam, etc) line our pantry shelves… it feels awesome! I am so glad I learned to pressure can and have enjoyed the results produced ever since! And just think… it all started with learning how to can green beans!
Looking For More CANNING Recipes?
You can find all of my recipes in the Recipe Index, located at the top of the page. I have quite a few canning recipes you might enjoy, including:
Interested In More Recipes?
Thank you for visiting this website. I appreciate you using some of your valuable time to do so. If you’re interested, I publish a newsletter 2 times per month (1st and 15th) with all the latest recipes, and other fun info. I would be honored to have you join our growing list of subscribers, so you never miss a great recipe!
There is a Newsletter subscription box on the top right side (or bottom) of each blog post, depending on the device you use, where you can easily submit your e-mail address (only) to be included in my mailing list.
You Can Also Find Me On Social Media:
Facebook page: The Grateful Girl Cooks!
Pinterest: The Grateful Girl Cooks!
Instagram: jbatthegratefulgirlcooks

Recipe Source: Ball Complete Book of Home Preserving, Published 2012, Robert Rose, Inc., Jarden Corporation, page 386 (and part of page 385)
- 4 pounds Green beans (approx. 1½ - 2½ pounds of beans per QUART jar)
- 2 teaspoons Canning salt
- 4 Pint Canning jars and lids/screwbands
- Boiling water
- Wash beans, then drain. Trim ends off beans, then snap or cut beans into 2 inch pieces.
- Wash canning jars, then place upside down on a dish towel-lined baking sheet. Place in a preheated 200 degree oven for 20-25 minutes. While jars are heating, prepare pressure canner, jars and lids according to manufacturer instructions. Bring a kettle of water to a low boil. About 5 minutes before the jars are finished heating and the beans are ready to be added, pour some of the very hot water over the flat jar lids (and let them sit in the water in a bowl for 5 minutes).
- Tightly pack the raw green beans in the heated jars. Fill the jars to within one inch of the top of jar. Place 1/2 teaspoon canning salt into each jar. Pour boiling water (use a canning funnel) into each jar, leaving 1 inch headspace. Remove air bubbles from jar; adjust headspace by adding or removing liquid to ensure you have a 1 inch headspace. Use a paper towel and wipe the rim of each jar dry/clean. Place the heated flat lid on jar, then add screwband and tighten to fingertip tight. Carefully place jars into simmering water in pressure canner, lock lid in place, then turn burner to medium high heat. As water inside comes to a boil, steam will escape through vent. Let the steam vent for 10 minutes, then place vent cover on to close vent.
- Continue heating until pressure canner reaches 10 pounds pressure. Maintain this pressure throughout the cooking time indicated. (Pint jars = process for 20 minutes, Quart jars = process for 25 minutes). Begin processing time once canner reaches 10 pounds pressure.
- When processing time is completed, turn off heat. Let the pressure drop to zero naturally. Once the pressure returns to zero, wait a couple more minutes, then carefully remove vent cover. Wait another minute, then carefully unlock and remove canner lid. Let the jars sit in canner for 10 minutes, then remove, using canning tongs. Place HOT jars onto a dish towel on counter (DO NOT place directly on counter... temperature variations could make jars crack!). Let jars cool completely (for 12-24 hours) without disturbing, check for proper seal, label and store.
Quantity will vary, based on how many beans you process.
Processing: 10# pressure. Pints=20 minutes, Quarts=25 minutes.
Alternate method: Hot Pack method: Cut beans combined with boiling water to cover. Bring liquid to boil (medium-high heat). Boil beans for 5 minutes. Drain (but reserve liquid for adding to jars, if desired). Put hot beans into jars; cover with boiling water or reserved liquid. Continue with rest of directions, as written.
Here’s one more to pin on your Pinterest boards!
Do you have to use salt?
You don’t HAVE to use salt according to most books/resources on canning, but it does help to enhance the flavor of the beans.
i saw today thaqt you can can greenbeans in oven , for 3 hrs. 250 degree oven wrick have u any information on this process ?
No, I have no information on that or experience with that. I highly recommend always pressure canning green beans, from a safety standpoint.
Can I just process 3 jars in a 7 jar canner and how long do I process
Hi, Shasta. Yes, you can do a smaller batch of jars. You will still need to process them for the exact same amount of time. Have a great day.
What causes the lid to buckle up after canning green beans? Please let me know? Thanks
Hi, Deb… thank you for writing. Just playing catch up today with all the comments on the blog. Well…there can be a number of reasons this happens. Typically the screwband is tightened too much, so air cannot be exhausted during the canning time (that tiny bit of air betweeen the food and the flat lid – the headspace). If screwband is too tight, that air cannot escape during the canning process. Another reason could also be that the jars might be over-filled. Hope that helps. Take care, and have a good day.
Are you adding canning salt to the beans & water when using the hot pack method, & if so, do you add it when cooking for five minutes, or after adding beans & liquid to the jars?
Hi, Donna… As I show in the photos and in the printable recipe, salt is added to the filled jars before placing in the pressure canner. Take care, and have a great day.
My Grandmother and Mother both canned green beans in a water bath canner for years I’m still alive ate them all my life I’m canning the same way as we speak.
I am glad to hear your story, Fred. I know there are lots of people who do the same thing. For the sake of this blog (and liability issues), I try to use current USDA guidelines for safe canning practices. Thank you so much for taking the time to write… I appreciate your perspective!
Is there a video to show you how to can vegetables and meats
Good evening, Mark. I do not have any videos like that on my blog, but I am fairly certain there would be lots of them pertaining to canning meats and vegetables on You Tube. Hope that helps you. Have a good evening.