
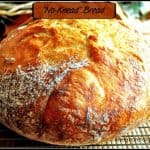
No Knead Bread is crusty on the outside…and incredibly soft and perfect on the inside! The best part is there are only a few ingredients and it is really EASY to make! Get it? You don’t NEED to KNEAD it., because it’s no knead bread!
How I Found This Recipe For No Knead Bread

Make The Batter For The Bread The Day BEFORE Baking

After a good night’s rest (15-18 hours), the dough will have dramatically increased in size, and its surface will be dotted with air bubbles. This is how you can tell the no knead bread dough is ready. Can you see the bubbles on the surface and how much it has risen in the bowl?

Getting The Bread Dough Ready To Bake
Turn the dough out on a lightly floured work surface; sprinkle dough with a little more flour; put some flour on your hands to keep dough from sticking to you, and fold the dough over on itself once or twice (that’s it!). Cover the dough loosely with plastic wrap and let dough rest another 15 minutes, Honestly, this dough must be really tired, because it rests so much.
Using just enough flour to keep dough from sticking to work surface or to your fingers, gently and quickly shape dough into a ball. Generously dust a cotton kitchen towel (not terry cloth – it will stick like crazy!) with flour, wheat bran or cornmeal; put dough, seam side down on towel and dust the dough with more flour, bran or cornmeal.
Let The No Knead Bread Dough Rise Again
Cover with another kitchen towel and let rise for 2-3 hours (Can you believe how tired this dough is AGAIN?). When it is ready, the no knead bread dough will be more than doubled in size and will not readily spring back when poked with a finger.

Baking No Knead Bread
At least 30 minutes before the dough is ready, preheat your oven to 450 degrees. Put a heavy, covered pot or dutch oven in the oven as it heats. (*Note: Use cast iron, enamel, Pyrex or ceramic – anywhere from 3.5 quarts. to 6-8 quarts.)
When the dough is ready, carefully remove covered pot from oven (remember, the covered pot will be blazin’ HOT). Slide your hands under the dish towel, take aim, and turn dough over into pot, seam side up; it may look like a mess, but that’s OK. Some of the dough may even stick to the dish towel. Don’t freak out. Just get as much of that dough ball into the pan as you can, as quickly as you can.
NOTE:**(Cleaning the tea towel up if the dough sticks a bit is really the “hardest” thing about the entire recipe…Just soak it to get some of the dough off, then throw it in the washing machine. I know this from personal experience! ☺)

Shake the pan once or twice if dough is unequally distributed; it will straighten out as it bakes. Trust me. I’m a grown-up. Cover with the lid and bake for 30 minutes, then remove the lid and bake for another 15-30 minutes, or until loaf is nicely browned. (Keep an eye on it…mine usually takes about 15 minutes).
Look At The Finished Loaf Of No Knead Bread!
Remove the bread from the oven, and transfer it from the hot pan to a wire rack. Let the bread cool a bit before attempting to slice. You can also use a pastry brush to brush off a little of the flour that might still be on the top of the loaf (but is not necessary).

After the bread has cooled down a bit, use a serrated knife to cut the loaf into slices. Here’s a peek at the inside of the no knead bread loaf!

Enjoy. Seriously…grab a knife and slather some softened butter on a warm piece of this bread. Take a bite…a BIG bite. This bread will more than likely make your eyes roll back in your head, it’s so good! Have a great day, and please come back soon.
Looking For More BREAD Recipes?
You can find ALL my recipes in the Recipe Index, located at the top of the page. I have a nice variety of delicious bread recipes you might want to check out, including:
Interested In More Recipes?
Thank you for visiting this website. I appreciate you using some of your valuable time to do so. If you’re interested, I publish a newsletter 2 times per month (1st and 15th) with all the latest recipes, and other fun info. I would be honored to have you join our growing list of subscribers, so you never miss a great recipe!
There is a Newsletter subscription box on the top right side (or bottom) of each blog post, depending on the device you use, where you can easily submit your e-mail address (only) to be included in my mailing list.
You Can Also Find Me On Social Media:
Facebook page: The Grateful Girl Cooks!
Pinterest: The Grateful Girl Cooks!
Instagram: jbatthegratefulgirlcooks
Have a blessed day!

Recipe Adapted from Jim Lahey, Sullivan Street Bakery, New York City
- 3 Cups bread flour
- 1/4 teaspoon instant yeast (such as Fleischmann's Rapid Rise Yeast) Note: Use INSTANT yeast!
- 2 1/2 teaspoons salt
- 1 1/2 Cups , plus 2 Tablespoons tepid (lukewarm) water
- Cornmeal or wheat bran as needed (optional-I didn't need it)
In a large bowl combine flour, yeast and salt. Add the water and stir until blended; dough will be "shaggy" and very sticky. Cover bowl with plastic wrap. Let dough rest at least 12 hours, preferably about 18 hours (I typically rest mine 15-18 hrs.- the longer the better!), at warm room temperature, about 70 degrees. After a good night's rest, the dough is ready and its surface is dotted with bubbles.
- Turn the dough out on a lightly floured work surface; sprinkle dough with a little more flour; put some flour on your hands to keep dough from sticking to you, and fold the dough over on itself once or twice (that's it!). Cover loosely with plastic wrap and let dough rest another 15 minutes.
- Using just enough flour to keep dough from sticking to work surface or to your fingers, gently and quickly shape dough into a ball. Generously dust a cotton kitchen towel (not terry cloth - it will stick like crazy!) with flour, wheat bran or cornmeal; put dough, seam side down on towel and dust the dough with more flour, bran or cornmeal. Cover with another kitchen towel and let rise for 2-3 hours. When it is ready, dough will be more than doubled in size and will not readily spring back when poked with a finger.
- At least 30 minutes before the dough is ready, preheat your oven to 450 degrees. Put a heavy, covered pot or dutch oven in the oven as it heats. (*Note: Use cast iron, enamel, Pyrex or ceramic - anywhere from 3.5 qts. to 6-8 qts.) When dough is ready, carefully remove covered pot from oven (remember, the covered pot will be blazin' HOT). Slide your hands under the dish towel, take aim, and turn dough over into pot, seam side up; it may look like a mess, but that's OK. Some of the dough may even stick to the dish towel...don't freak out. Just get as much of that dough ball into the pan as you can, as quickly as you can.
Shake pan once or twice if dough is unequally distributed; it will straighten out as it bakes. Cover with the lid and bake for 30 minutes, then remove the lid and bake for another 15-30 minutes, or until loaf is nicely browned. (Keep an eye on it...mine usually takes about 15 minutes). Cool the bread on a wire rack.
Prep time does NOT include overnight resting of the dough time. Tip: I find that if I start the recipe in the late morning and let it rest overnight (we all need a good night's "rest", don't we?), I can get up the next morning and continue the process. With additional "resting times" for the dough, it can be ready for dinner.
Cleaning the tea towel up if the dough sticks a bit is really the "hardest" thing about the entire recipe...Just soak it to get some of the dough off, then throw it in the washing machine. I know this from personal experience! ☺
Here’s one more to pin on your Pinterest boards!
I used this recipe numerous time the results are good and the bread delicious. I use parchment paper to put the dough into the Dutch oven and take the loaf out when baked it makes it to handle the hot Dutch Oven an loaf.
Wonder…should You use parchment paper inside the Dutch Oven? Many thx!
I’ve had tons of sticking issues in the past.
Hi, Robert… I will leave that up to you. I normally do not use it and have not had any problems with sticking to the hot pan, but others that make this bread do. Have a great day.