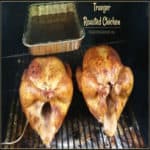
Traeger Roasted Chicken, well seasoned with a dry rub spice mix, is a great meal! Cooking whole chickens on a smoker/pellet grill couldn’t be easier!

My husband and I have enjoyed “getting to know” the Traeger grill he got for his birthday this past summer. We’ve made several items on it, including a smoked Pork Loin Roast, and a delicious dessert of Berry Cobbler. Both recipes were both amazing!
One of our favorite things we make often is Traeger roasted chicken. Whole chickens are covered with a dry spice rub mix, then the chickens roast, quite happily I might add, in the Traeger grill for about an hour, until done! It’s so easy to make chicken this way!
Scroll Down For A Printable Recipe Card At The Bottom Of The Page
Making The Spice Rub For Traeger Roasted Chicken
The dry rub mix for Traeger roasted chicken is ridiculously easy to prepare. The spices are combined in a small bowl. Spices are mixed well, until all spices are fully incorporated. The spice rub recipe makes approximately 2 cups. You will only have to use a small PART of this to coat one chicken.
My recommendation is to go ahead and make up the whole batch, as written. After seasoning chicken(s), place remaining dry rub mix into an airtight bottle, and store in pantry. The spices will keep for at least 6 months, so you will have it handy, to use over and over! Guess what? This spice rub tastes fantastic on PORK, too!


Applying Spice Rub On The Traeger Roasted Chicken
Rinse and pat dry (with a paper towel) one or more whole chickens. Remove any giblets that may be inside the chicken cavity, and discard.

Cover the entire chicken generously with dry rub mixture, patting it into chicken to adhere. Sprinkle some into the cavity of the chicken, also. NOTE: You will definitely have some of the spice rub left over, which can be used for other recipes, or to coat about 4 more chickens).

Prepare Chicken To Roast Evenly
Tuck the tips of the chicken wings under the chicken, to hold in place. Tie the front legs of chicken together with cooking twine. NOTE: I didn’t have cooking twine available, so used some of my raffia, from crafting, to tie legs together. It worked perfectly!
The reason it is a good idea to tuck wings under chicken, and tie legs together, is that it helps the chicken cook more evenly. You can see in the photo below how the legs were tied. As always, when working with fresh poultry, wash your hands thoroughly with soap and water after handling chicken.

How To Roast Chicken On A Traeger Grill
When ready to begin, start the Traeger grill on SMOKE setting, with the lid OPEN, until the fire has ignited and is smoking (about 4-5 minutes). Set the temperature gauge to 375°. Close the lid. Let the Traeger preheat for 10-15 minutes. Add a small pan of apple juice (or cider) to the top rack of the grill. This helps to keep some flavorful steam circulating while roasting the chicken.
After grill has preheated, place the chicken directly on the grill grate. Cook at 375°F (with the lid closed) for approximately 60 minutes, or until the internal temperature reaches 165°F.
How To Test For Correct Temperature Of Traeger Roasted Chicken
To test for internal temperature, insert the temperature probe into the chicken in between the leg and the thigh joint. You will need to also check the internal temperature of a chicken breast, to ensure it also reaches an internal temp of 165°F once done. NOTE: If it looks like the chicken is starting to get blackened on top when near the end of the roasting time, lightly cover the chicken with aluminum foil, and continue cooking until done.
Remember, due to varying weights of chicken used, fluctuating temps on your grill, and how chilled the chicken is before adding it to the grill, your cooking time may be shorter or longer.

Okay, The Chicken Is Ready, Now What?
Once Traeger roasted chicken has reached an internal temp of 165°, remove them from the grill and place on cutting board or tray with rimmed edges (to catch any juices). Untie the chicken legs by slicing through and removing the cooking twine.

Let the chicken rest for about 10-15 minutes, before attempting to slice. This will allow the juices inside the meat time to redistribute throughout the chicken. Trust me, you WANT juicy chicken!

After your Traeger roasted chicken has rested for 10-15 minutes, it is time to slice, and serve!

And that is how easy it is to make Traeger Roasted Chicken! The meat turns out perfectly juicy and flavorful. You can eat it, as is, or use it in a variety of other recipes! Sure hope you will consider trying this easy recipe for Traeger roasted chicken! You’re gonna love it!
Looking For More TRAEGER Recipes?
You can find ALL my recipes in the Recipe Index, located at the top of the page. I have a nice variety of Traeger recipes you might be interested in, including:
- Traeger Grilled Chocolate Lava Cake
- Smoked Chili Rib Eye Steaks
- Traeger Chili Smoked Chicken Breasts
- Grilled Asparagus With Lemon And Parmesan
Interested In More Recipes?
Thank you for visiting this website. I appreciate you using some of your valuable time to do so. If you’re interested, I publish a newsletter 2 times per month (1st and 15th) with all the latest recipes, and other fun info. I would be honored to have you join our growing list of subscribers, so you never miss a great recipe!
There is a Newsletter subscription box on the top right side (or bottom) of each blog post, depending on the device you use, where you can easily submit your e-mail address (only) to be included in my mailing list.
You Can Also Find Me On Social Media:
Facebook page: The Grateful Girl Cooks!
Pinterest: The Grateful Girl Cooks!
Instagram: jbatthegratefulgirlcooks

Recipe Source: The recipe booklet that came with the purchase of our Traeger grill.
Dry Rub Source: https://www.thegratefulgirlcooks.com/dry-rub-spice-mix/
↓↓ PRINTABLE RECIPE BELOW ↓↓
- 3 pound fresh young chicken (1 whole) (between 3-4 pounds total)
- 1/3 cup dark brown sugar
- 1/2 cup smoked paprika
- 1/4 cup garlic powder
- 1/4 cup salt
- 2 Tablespoons black pepper
- 2 Tablespoons onion powder
- 1 Tablespoon cayenne pepper
- 1 Tablespoon ground cumin
- 1 Tablespoon dry mustard
Make dry rub mix by combining all spices in small bowl. Stir or whisk well, to fully blend ingredients. Set aside.
Rinse and pat dry (with a paper towel) one or more whole chickens. Remove any giblets that may be inside the chicken cavity, and discard. Cover the entire chicken generously with dry rub mixture, patting it into chicken to adhere. Sprinkle some dry rub mix into the cavity of the chicken, also. Tuck the tips of the chicken wings under the chicken, to hold in place. Tie the front legs of chicken together with cooking twine. It's a good idea to do this, because it helps the chicken cook more evenly.
Start the Traeger grill on SMOKE setting, with the lid OPEN, until fire has ignited and is smoking (about 4-5 minutes). Set temperature gauge to 375°. CLOSE LID. Let grill preheat for 10-15 minutes. Add a small aluminum pan of apple juice (or cider) to the top rack of grill (this helps keep flavorful steam circulating while roasting). After grill has preheated, place chicken directly on the grill grate. Cook at 375°F (with lid closed) for about 60 minutes, or until internal temperature reaches 165°F.
To test for internal temperature, insert the temperature probe into the chicken in between the leg and the thigh joint. You will need to also check the internal temperature of a chicken breast, to ensure it also has reached 165° temp. NOTE: If it looks like chicken is starting to blacken on top near the end of roasting time, lightly cover chicken with aluminum foil; continue cooking until done.
Once chicken has reached an internal temp of 165°, remove from grill and place on cutting board or tray with rimmed edges (to catch any juices). Untie chicken legs by slicing through and removing cooking twine. Let chicken rest for 15 minutes (to let juices inside redistribute throughout meat). Slice and serve!
NOTE: Caloric calculation is an estimate for a WHOLE 3 pound chicken. Calorie counts will vary, due to pieces of chicken eaten, OR the total starting weight of the chicken.
Here’s one more to pin on your Pinterest boards!


! They're cute, yummy, and VERY EASY to make, with only a few ingredients! / The Grateful Girl Cooks!")


! They're cute, yummy, and VERY EASY to make, with only a few ingredients! / The Grateful Girl Cooks!")


 using a water bath canner! / The Grateful Girl Cooks!")


 using a water bath canner! / The Grateful Girl Cooks!")