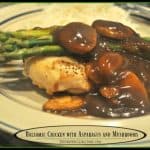
Pan-seared balsamic chicken with grilled asparagus and mushrooms, topped with a flavorful pan sauce, is an easy, delicious, and healthy dinner!
If you’re looking for a “new” chicken recipe that is healthy, packed with flavor and protein AND can be ready in about half an hour, check out this one for Balsamic Chicken with Asparagus and Mushrooms!
I found the recipe on Pinterest, and it sounded really good, was low in calories, but high in flavor! I made this for my husband and I a couple of weeks ago, and we really enjoyed it! Boneless, skinless chicken breasts are pan-seared, asparagus is steamed in a balsamic glaze, and mushrooms are cooked then added to a creamy balsamic sauce which covers it all! YUM!
*NOTE: The recipe as posted serves 4, but I cut the recipe in half and only made two servings, so my photos reflect that. Here’s how to make this delicious dish:
Scroll Down for A Printable Recipe Card At The Bottom Of The Page
How To Make Balsamic Chicken
Heat oil on medium-high heat in skillet until hot, but not smoking. Lightly season chicken breasts with salt and pepper. Place chicken in hot skillet. Cook each side for about 7 minutes (per side), until nicely browned.
Add 1/3 cup chicken broth to skillet (reserve the rest for later); cook on low for 3-4 minutes, or until chicken is fully cooked through. Remove from heat; set aside (and cover, to keep warm).

While chicken was cooking, I made the asparagus. Trim ends off fresh asparagus (discard). Place asparagus onto a grill pan (or in a large skillet with 2 T. water). Drizzle with balsamic glaze, and season lightly with salt and pepper.
Cook on medium heat, turning occasionally, until asparagus are crisp-tender. I put a lid on skillet to help steam the asparagus (you can place aluminum foil over grill pan to do same). When done, remove asparagus from skillet, but leave liquid IN the skillet.

Once asparagus has been removed, add sliced mushrooms to balsamic sauce remaining in skillet. Cook on medium-low to lightly brown mushrooms. Pour the reserved chicken broth into the skillet, and continue cooking.
In a small cup, mix together 1-2 Tablespoons cornstarch with 1-2 Tablespoons cold water until completely smooth. Pour this liquid into mushroom mixture, stirring as you add it. Cook for a couple of minutes to thicken the mushroom balsamic sauce.

Place the cooked chicken onto individual serving plates; top with some of the cooked asparagus spears; then spoon some mushroom balsamic sauce over the top of it all.
Serve, and enjoy this delicious balsamic chicken dinner! The chicken is tender, the asparagus is delicious, and those mushrooms in the balsamic sauce… amazing!


This balsamic chicken recipe is pretty straightforward and easy to prepare… I hope you will consider making this healthy meal for you and your loved ones!
As I sit here typing this blog post, I am reminded once again how very grateful I feel to live in this country, and how blessed I am to have food to cook available 24 hours a day in our pantry! Others in this big old world are not as fortunate, so I remain incredibly thankful to God for this blessing in our lives. I do not take it lightly. Hope you have a really good day.
Interested In More Recipes?
Thank you for visiting this website. I appreciate you using some of your valuable time to do so. If you’re interested, I publish a newsletter 2 times per month (1st and 15th) with all the latest recipes, and other fun info. I would be honored to have you join our growing list of subscribers, so you never miss a great recipe!
There is a Newsletter subscription box on the top right side (or bottom) of each blog post, depending on the device you use, where you can easily submit your e-mail address (only) to be included in my mailing list.
You Can Also Find Me On Social Media:
Facebook page: The Grateful Girl Cooks!
Pinterest: The Grateful Girl Cooks!
Instagram: jbatthegratefulgirlcooks

Recipe Source: http://fitnessfooddiva.com
Pan-seared balsamic chicken with grilled asparagus and mushrooms, topped with a flavorful pan sauce, is an easy, delicious, and healthy dinner!
- 4 chicken breasts , boneless and skinless
- 1 Tablespoon olive oil
- 14.5 ounces chicken broth , low sodium
- 1 bunch asparagus , fresh (not frozen)
- 2 Tablespoons balsamic glaze *see notes for substitute
- 12 ounces button mushrooms , sliced
- 1 Tablespoons corn starch , see Notes
- Pinch salt and pepper , to taste
- Heat oil on medium-high heat in skillet until hot, but not smoking. Lightly season chicken breasts with salt and pepper. Place chicken in hot skillet. Cook each side for about 7 minutes (per side), until nicely browned. Add 1/3 cup chicken broth to skillet (reserve the rest for later); cook on low for 3-4 minutes, or until chicken is fully cooked through. Remove from heat; set aside (and cover, to keep warm).
While chicken is cooking, make asparagus. Trim ends off asparagus (discard). Place asparagus onto a grill pan (or in a large skillet with 2 T. water). Drizzle with balsamic glaze; season lightly with salt and pepper. Cook on medium heat, turning occasionally, until asparagus are crisp-tender. Put a lid on skillet to help steam the asparagus (you can place aluminum foil over grill pan to do same). When done, remove asparagus from skillet, but leave liquid IN the skillet.
Once asparagus has been removed, add sliced mushrooms to balsamic sauce remaining in skillet. Cook on medium-low to lightly brown mushrooms. Pour reserved chicken broth into the skillet, and continue cooking. In a small cup, mix together 1-2 Tablespoons cornstarch with 1-2 Tablespoons cold water until completely smooth. Pour this liquid into mushroom mixture, stirring as you add it. Cook for a couple of minutes to thicken the mushroom balsamic sauce.
Place the cooked chicken onto individual serving plates; top with some of the cooked asparagus spears; then spoon some mushroom balsamic sauce over the top of it all. Serve, and enjoy!
Don't have access to balsamic glaze? Place 5 Tablespoons balsamic vinegar in saucepan. Heat over medium heat, stirring occasionally until sauce has reduced by half and has thickened slightly.
Here’s one more to pin on your Pinterest boards!