Category: Pork

Simple Savory Pork Chops

Simple Savory Pork Chops are an easy one skillet dish! Bone-in pork chops are pan-seared, then simmered until tender in a simple, tasty sauce.

Today I want to share a recipe for simple savory pork chops. They are a CINCH to make, and they taste fantastic, thanks in part to the flavor-packed sauce they are cooked in!

I discovered the original recipe in one of my old food magazines, and tweaked it slightly to suit our taste. This is a great recipe for whipping up a delicious meal with minimal effort or time involved.

The pork chops (bone-in) are pan-seared to get nicely browned, then they simmer in a covered skillet in an amazing sauce. By the way, did I mention that all that is involved in making the sauce is to stir the ingredients together? YEP. It’s EASY!

The pork chops come out really tender, and are served with some of that yummy sauce spooned over the top. They’re delicious, and here’s how to make this dish.

Scroll Down For A Printable Recipe Card At The Bottom Of The Page

Make The Savory Sauce

Combine water, chopped onion, orange marmalade, mustard powder, soy sauce, ketchup and Dijon mustard in a medium bowl.

Use a fork or spoon to stir these ingredients together until they have been fully combined. This is the sauce for the pork chops!

See how easy that was? I told ya! Set the sauce aside while you prepare the pork chops for cooking.

Ingredients for the savory sauce are placed in a small bowl.A savory sauce is made by combining ingredients in a bowl.

Dredge The Pork Chops

Now you are going to make a seasoned flour mixture that you will use to coat the pork chops. It is really easy to do this, too!

Measure all purpose flour, mustard powder, seasoning salt and black pepper onto a dinner sized plate. Use a fork to combine these ingredients, then spread them out on the plate.

Flour and several spices are combined to make a coating for the pork chops.

Pat the pork chops dry with paper towels. Now you will “dredge” or pull the pork chops (one at a time) through the seasoned flour mixture to coat each chop.

Coat the pork chop on all sides, then place it on a baking sheet and repeat this process with the other pork chops.

Each pork chop is dredged in the flour mixture to coat all sides.Four pork chops, coated with flour and spices, ready to be pan-seared.

Pan-Sear The Chops

Heat vegetable oil on Medium heat in a large skillet (big enough to lay all 4 pork chops down in a single layer).

When the oil is really hot (but not smoking), carefully lay the pork chops in the hot oil in a single layer. Do not move them for about 4 minutes.

The hot oil will pan-sear or brown the bottom of the pork chops. After 4 minutes, carefully turn the pork chops to the other side, and continue cooking for another 4 minutes.

Both sides of the pork chops should be nicely browned. They will finish cooking all the way through during the next step.

The seasoned pork chops cook in hot oil in a large skillet.After browning one side, pork chops are turned over to brown the other side.

Add Sauce And Cook The Pork Chops

Pour all of the sauce over the top of the pork chops. Cover the skillet. If there are any steam vents in the skillet lid, plug them with foil (as shown in the 2nd photo below).

Reduce the heat to Low, and simmer the pork chops for 23-25 minutes OR until they are tender. Do not remove the lid on the skillet while they cook.

NOTE: If you are using really THICK pork chops, it may take a few more minutes of cooking to produce a tender pork chop because of the thickness!

There’s no need to stir the pork chops while they simmer… just keep that lid on the skillet! 

Sauce is poured over the browned pork chops in the skillet.Skillet is covered, then pork chops simmer for about 25 minutes until tender.

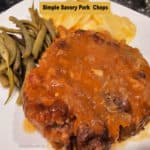
Serve The Simple Savory Pork Chops

When the simple savory pork chops have finished cooking, they are ready to be served and enjoyed! Transfer the pork chops to individual plates.

Spoon the remaining sauce in the skillet over the top of each pork chop, then serve immediately. We enjoy the pork chops served with our homegrown green beans and au gratin potatoes on the side. YUM!

The pork chops turn out very tender, and we can usually cut them with a butter knife. They’re a convenient (and delicious) main dish because they are so easy to prepare!

Simple savory pork chops served on a plate with green beans and potatoes.Green beans, au gratin potatoes on plate with simple savory pork chops.

I really hope you enjoy these simple savory pork chops! We love the faint taste of orange that the sauce provides, and how easy it is to make such a delicious dish.

Thank you for stopping by, and I invite you to come back soon for more family-friendly recipes. Take care, may God bless you, and have a GREAT day!

Looking For More PORK CHOP Recipes?

You can find ALL of my recipes in the Recipe Index, located at the top of the page. I have a wonderful variety of pork chop recipes for you to choose from, including:

Want More Recipes? Get My FREE Newsletter!

I publish a newsletter 2 times per month (1st and 15th) with lots of recipes, tips, etc..
Would you like to join our growing list of subscribers?

There is a Newsletter subscription box on the top right (or bottom) of each blog post, depending on the device you use.
You can submit your e-mail address there, to be added to my mailing list.

Find Me On Social Media:

Facebook page: The Grateful Girl Cooks!
Pinterest:
The Grateful Girl Cooks!
Instagram:
jbatthegratefulgirlcooks

Author's signature

Original recipe source: “Taste of Home Magazine”, April/May 2001 edition, page 41, published by Reiman Publications

↓↓ PRINTABLE RECIPE BELOW ↓↓

0 from 0 votes
Simple Savory Pork Chops
Prep Time
15 mins
Cook Time
25 mins
Total Time
40 mins
 

Simple Savory Pork Chops are an easy one skillet dish! Bone-in pork chops are pan-seared, then simmered until tender in a simple, tasty sauce.

Category: Main Dish
Cuisine: All Cuisines
Keyword: savory pork chops
Servings: 4
Calories Per Serving: 428 kcal
Author: JB @ The Grateful Girl Cooks!
Ingredients
For Pork Chops:
  • 4 pork chops, bone-in about ¾" thick
  • 3 Tablespoons all purpose flour
  • 1 Tablespoon ground mustard (powder)
  • 1 teaspoon seasoning salt
  • ¼ teaspoon black pepper
  • 2 Tablespoons vegetable oil
For Sauce:
  • 1 cup water
  • ½ cup chopped yellow onion
  • 2 Tablespoons orange marmalade
  • 2 Tablespoons ketchup
  • 1 Tablespoon soy sauce low sodium, if possible
  • 1 Tablespoon Dijon mustard
  • 2 teaspoons ground mustard (powder)
Instructions
  1. Combine water, onion, orange marmalade, mustard powder, soy sauce, ketchup and Dijon mustard in a medium bowl. Stir until combined. Set aside.

  2. Measure flour, mustard powder, seasoning salt and pepper onto a dinner plate. Use a fork to combine ingredients; spread them out on the plate.

  3. Pat pork chops dry with paper towels. Dredge or pull pork chops (one at a time) through flour mixture to coat each chop on all sides. Place it on baking sheet; repeat with remaining pork chops.

  4. Heat oil on Medium in a large skillet. When oil is really hot (but not smoking), lay pork chops in skillet in a single layer. Oil should sizzle when you add the chops. Do not move them. Cook for 4 minutes. Carefully turn the pork chops to the other side; continue cooking another 4 minutes. Both sides should be nicely browned.

  5. Pour sauce over pork chops. Cover the skillet. Reduce heat to Low; simmer for 23-25 minutes OR until chops are tender. Do not remove the lid while they cook. Note: If using really THICK pork chops, it may take a few more minutes cooking to produce a tender pork chop!

  6. To serve, transfer pork chops to individual plates. Spoon sauce over the top of each pork chop; serve immediately. Enjoy!

Nutrition Facts
Simple Savory Pork Chops
Amount Per Serving (1 chop + sauce)
Calories 428 Calories from Fat 207
% Daily Value*
Fat 23g35%
Saturated Fat 6g38%
Trans Fat 0.2g
Polyunsaturated Fat 6g
Monounsaturated Fat 8g
Cholesterol 117mg39%
Sodium 938mg41%
Potassium 683mg20%
Carbohydrates 16g5%
Fiber 1g4%
Sugar 9g10%
Protein 37g74%
Vitamin A 59IU1%
Vitamin C 2mg2%
Calcium 56mg6%
Iron 2mg11%
* Percent Daily Values are based on a 2000 calorie diet.

Here’s one more to pin on your Pinterest boards!Simple Savory Pork Chops are an easy one skillet dish! Bone-in pork chops are pan-seared, then simmered until tender in a simple, tasty sauce.

Ham And Parmesan Gnocchi

Ham and Parmesan Gnocchi with spinach is a simple, filling main dish. It’s easy to make (with pre-made gnocchi) and is absolutely delicious!
Ham and Parmesan Gnocchi with spinach is a simple, filling main dish. It's easy to make (with pre-made gnocchi) and is absolutely delicious!

Looking for a quick meal to serve after a busy day? I hope you’ll try this recipe for Ham and Parmesan Gnocchi. The recipe (for 4) comes together in hardly no time at all, and is filling and delicious.

Thanks to the convenience of store-bought potato gnocchi, this recipe is a cinch to make, with minimal effort. Basically you will boil the gnocchi, then add it to a cooked ham, onion, garlic, butter, spinach, Parmesan and cream mixture.

Can you multi-task? If you boil the gnocchi while you are preparing the rest of the dish, this dish will only take about 15 minutes from start to finish!

It’s a simple, tasty recipe I believe you’ll enjoy! Here’s how to make Ham and Parmesan Gnocchi.

Scroll Down for A Printable Recipe Card At The Bottom Of The Page

Cook The Butter, Ham and Onions

Melt 5 Tablespoons butter on Medium heat in a large skillet. Once the butter has melted, add cubed ham and diced onion.

Cook this until the onions become translucent in color and tender, stirring often. This usually will take about 3-4 minutes.

Cooked ham pieces are cooked in melted butter in a large skillet.Chopped onions are cooked with small ham pieces in melted butter.

Cook The Gnocchi

TIP: Packaged gnocchi only takes a few minutes to cook. If you boil the water for the gnocchi in a separate pan while melting the butter in step #1, you can save time by multi-tasking!

While the onions and ham are cooking, cook the gnocchi in boiling water, according to the package directions. Gnocchi is done cooking when they float to the top of the boiling water.

Potato gnocchi are cooked in boiling water until done.

Time To Add The Baby Spinach

Once you begin cooking the gnocchi, go back to the skillet with the ham and onion. Add fresh baby spinach leaves to the skillet, and stir to combine the ingredients.

As the spinach leaves begin wilting from the heat, add a heaping teaspoon of minced garlic and stir to combine. Be careful to not let the garlic burn or it will become bitter.

Baby spinach leaves are added to the skillet with ham, butte and onions.The spinach begins to wilt in the heat of the skillet.

Time To Add The Cooked Gnocchi

When the spinach is fully wilted (1-2 minutes), add the cooked and drained gnocchi to the skillet, and stir again, until combined.

Once spinach is wilted, this dish is ready for some sauce.

Stir 3 Tablespoons of heavy whipping cream and 3 Tablespoons of grated Parmesan cheese into the gnocchi. Stir well, until the sauce is covering the other ingredients.

Season with a little black pepper. You can taste the gnocchi and then add salt, if desired. I find the Parmesan cheese and ham add enough saltiness, but it’s your choice.

Whipping cream, Parmesan cheese and black pepper are added to gnocchi.

Serve The Ham And Parmesan Gnocchi

Continue cooking only until everything is heated through, and then transfer the hot Ham and Parmesan Gnocchi to a serving bowl.

Garnish the gnocchi with additional Parmesan cheese, if desired. Serve immediately while hot, and enjoy this delicious main dish. It tastes wonderful! 

The ham and Parmesan gnocchi is served hot, in a white bowl.A close up of the Ham and Parmesan Gnocchi with spinach, on a white plate.

I hope you have the chance to try this delicious meal, and trust you (and those you love) will enjoy it as much as we do.

Thank you for stopping by today. I’m so grateful you did, and invite you to come back again soon for more family-friendly recipes. Take care, may God bless you, and have a GREAT day!

Looking For More GNOCCHI Recipes?

You can find ALL of my recipes in the Recipe Index, which is located at the top of the page. I have several delicious recipes featuring gnocchi, including:

Want More Recipes? Get My FREE Newsletter!

I publish a newsletter 2 times per month (1st and 15th) with lots of recipes, tips, etc..
Would you like to join our growing list of subscribers?

There is a Newsletter subscription box on the top right (or bottom) of each blog post, depending on the device you use.
You can submit your e-mail address there, to be added to my mailing list.

Find Me On Social Media:

Facebook page: The Grateful Girl Cooks!
Pinterest:
The Grateful Girl Cooks!
Instagram:
jbatthegratefulgirlcooks

Author's signature

↓↓ PRINTABLE RECIPE BELOW ↓↓

0 from 0 votes
Ham And Parmesan Gnocchi
Prep Time
5 mins
Cook Time
10 mins
Total Time
15 mins
 

Ham and Parmesan Gnocchi with spinach is a simple, filling main dish. It's easy to make (with pre-made gnocchi) and is absolutely delicious!

Category: Main Dish
Cuisine: All Cuisines
Keyword: ham and Parmesan gnocchi
Servings: 4
Calories Per Serving: 451 kcal
Author: JB @ The Grateful Girl Cooks!
Ingredients
  • 5 Tablespoons butter
  • 2 Tablespoons chopped yellow onion
  • cups cooked ham (cut in cubes)
  • cups fresh baby spinach
  • teaspoons minced garlic
  • 4 Tablespoons heavy whipping cream
  • 4 Tablespoons grated Parmesan cheese
  • ½ teaspoon ground black pepper
  • salt and additional Parmesan for garnish (if desired)
  • 16 ounces potato gnocchi (some pkgs. may be 17.5 ounces)
Instructions
  1. TIP: Packaged gnocchi only takes a few minutes to cook. If you boil the water for the gnocchi in a separate pan while melting the butter in step #1, you can save time by multi-tasking!

  2. Melt butter on Medium heat in a large skillet. Add ham and onion. Cook until onions are translucent and tender, stirring often (3-4 minutes).

  3. While cooking ham/onions, cook gnocchi in a saucepan of boiling water, according to pkg. directions. Drain well, when done.

  4. Add baby spinach to skillet; stir to combine. As spinach wilts, add garlic; stir to combine. Don't let garlic burn or it becomes bitter. When spinach is fully wilted (1-2 minutes), add the cooked, drained gnocchi; stir to combine.

  5. Stir whipping cream and Parmesan cheese into the gnocchi, until sauce covers all ingredients. Season with pepper. Taste and add salt, if desired. Cook only until heated through.

  6. Transfer gnocchi to a serving bowl. Garnish with additional Parmesan, if desired. Serve immediately. Enjoy!

Nutrition Facts
Ham And Parmesan Gnocchi
Amount Per Serving (1 (1/4 of total))
Calories 451 Calories from Fat 225
% Daily Value*
Fat 25g38%
Saturated Fat 14g88%
Trans Fat 1g
Polyunsaturated Fat 1g
Monounsaturated Fat 7g
Cholesterol 90mg30%
Sodium 1087mg47%
Potassium 224mg6%
Carbohydrates 43g14%
Fiber 3g13%
Sugar 1g1%
Protein 15g30%
Vitamin A 1758IU35%
Vitamin C 14mg17%
Calcium 99mg10%
Iron 5mg28%
* Percent Daily Values are based on a 2000 calorie diet.

Here’s one more to pin on your Pinterest boards!Ham and Parmesan Gnocchi with spinach is a simple, filling main dish. It's easy to make (with pre-made gnocchi) and is absolutely delicious!

Pork Chops In Sour Cream Sauce

Pork Chops in Sour Cream Sauce is a delicious dish featuring browned, “bone-in” pork chops and onions baked in a sour cream wine sauce.
Pork Chops in Sour Cream Sauce is a delicious dish featuring browned, "bone-in" pork chops and onions baked in a sour cream wine sauce.

Today I want to share a recipe I discovered many, many years ago in one of my old cookbooks. The recipe was first published almost 30 years ago, but good recipes are timeless… right?

Making this dish is fairly simple. Basically, you will pan-sear pork chops until browned, cover with onion rings and an easy to make sour cream wine sauce, then bake until done.

The pork chops come out tender and juicy, and have great flavor from the onions and sauce they are baked in. I think you will enjoy this recipe. Here’s how to make it.

Scroll Down For A Printable Recipe Card At The Bottom Of The Page

Season The Pork Chops

Dry the pork chops on both sides with paper towels to remove extra moisture. This will allow the pork chops to brown better when they are pan-seared.

Season the pork chops on both sides with salt, pepper, and dried sage. Press the seasonings into the meat to help them adhere.

Pork chops are blotted dry, then lightly seasoned with salt, pepper and sage.

Pan-Sear The Seasoned Pork Chops

Heat a Tablespoon of vegetable oil on Medium heat in a large non-stick skillet, until very hot, but not smoking.

Place the pork chops in a single layer in the hot oil. You should hear them sizzle when they hit the hot oil in the skillet.

Brown the chops, without moving them in the skillet, for 5 minutes. Turn the pork chops over, and cook the other side for 5 minutes.

The pork chops should be nicely browned on both sides. They will finish cooking when they are baked later.

Four pork chops are pan-seared in hot oil in a large skillet.Both sides of the pork chops are pan-seared until browned.

Transfer the pork chops into a greased (or sprayed) 9″ x 9″ baking dish, keeping them in a single layer in the dish.

NOTE: Do not clean the skillet. You’ll use the drippings from cooking the chops later, when you make the sour cream sauce.

Spread thinly sliced onion rings on top of the pork chops, evenly distributing them. Set the dish aside.

The pan-seared pork chops are placed in a baking dish in single layer.Thin onion ring slices are placed on top of the pork chops.

Make The Sour Cream Sauce

Now it’s time o make the EASY sour cream sauce. Stir sour cream, Dijon mustard and flour in a small bowl until fully combined. Set aside.

Add chicken broth and dry white wine to the skillet you cooked the pork chops in. Bring the liquid to a boil, and let it boil for 1 minute.

Add the sour cream mixture and fresh, chopped parsley to the skillet. Stir well, to fully combine these ingredients.

Sour cream, flour and Dijon mustard are combined in a small bowl.A 4 photo collage showing how to make the sour cream sauce in a skillet.

Remove the skillet from the heat, and pour the sour cream sauce over the pork chops and onion rings, making sure the chops are covered.

Sour cream sauce is poured over the onion topped pork chops in dish.

Bake The Pork Chops In Sour Cream Sauce 

Place the pork chops (uncovered) in a preheated 350°F. oven. Bake them for 35 minutes, until the onions have slightly browned, and the sauce is bubbly.

Pork Chops in Sour Cream Sauce are bubbly and browned, after baking.

Serve The Pork Chops in Sour Cream Sauce

When finished baking, the pork chops are ready to be served. Transfer the pork chops to individual serving plates.

Spoon any remaining sour cream sauce left in the baking dish on top of the pork chops. Serve immediately with a favorite side dish, and enjoy!

One of the pork chops in sour cream sauce, on plate with a baked sweet potato.

I hope you enjoy making (and eating) these yummy pork chops.  I appreciate you taking the time to check out this recipe, and trust you’ll enjoy this recipe.

Thank you for stopping by today. Please come back again soon for more family friendly recipes. Take care, may God bless you, and have a GREAT day!

Looking For More PORK CHOP Recipes?

You can find ALL of my recipes in the Recipe Index, which is located at the top of the page. I have some absolutely delicious pork chop recipes you might enjoy, including:

Want More Recipes? Get My FREE Newsletter!

I publish a newsletter 2 times per month (1st and 15th) with lots of recipes, tips, etc..
Would you like to join our growing list of subscribers?

There is a Newsletter subscription box on the top right (or bottom) of each blog post, depending on the device you use.
You can submit your e-mail address there, to be added to my mailing list.

Find Me On Social Media:

Facebook page: The Grateful Girl Cooks!
Pinterest:
The Grateful Girl Cooks!
Instagram:
jbatthegratefulgirlcooks

Author's signature

Original recipe source: “What’s For Dinner?”, by Maryana Vollstedt, page 155, published by Chronicle Books in 1997

↓↓ PRINTABLE RECIPE BELOW ↓↓

0 from 0 votes
Pork Chops in Sour Cream Sauce
Prep Time
15 mins
Cook Time
35 mins
Total Time
50 mins
 

Pork Chops in Sour Cream Sauce is a delicious dish featuring browned, "bone-in" pork chops and onions baked in a sour cream wine sauce.

Category: Main Course
Cuisine: All Cuisines
Keyword: pork chops in sour cream sauce
Servings: 4
Calories Per Serving: 387 kcal
Author: JB @ The Grateful Girl Cooks!
Ingredients
  • 4 large bone-in pork chops
  • 2 teaspoons dried sage
  • 1 teaspoon salt
  • 1 teaspoon pepper
  • 1 Tablespoon vegetable oil
  • ½ medium yellow onion sliced very thin, separated into rings
For Sour Cream Sauce:
  • ½ cup light sour cream
  • 1 Tablespoon all purpose flour
  • 1 teaspoon Dijon mustard
  • ½ cup chicken broth
  • ¼ cup dry white wine
  • ¼ cup chopped parsley
Instructions
  1. Preheat oven to 350℉. Grease or spray a 9" x 9" baking dish.

  2. Pat pork chops dry (both sides) with paper towels. Season both sides with salt, pepper, and sage. Press spices into the meat to adhere.

  3. Heat oil on Medium heat in large, non-stick skillet, until hot, but not smoking. Place pork chops in skillet in a single layer. Brown chops (without moving them) for 5 minutes. Turn pork chops over; cook other side for 5 minutes.

  4. Transfer chops to a greased/sprayed 9" x 9" baking dish in a single layer. NOTE: Do not clean skillet. You'll use drippings from chops later. Spread onion rings on top of pork chops, evenly distributing. Set dish aside.

  5. Make Sour Cream Sauce- In small bowl, stir to combine sour cream, Dijon, and flour. Set aside. Add chicken broth and white wine to the skillet you cooked the pork chops in. Bring to a boil; let boil for 1 minute. Add sour cream mixture and parsley. Stir well, to fully combine ingredients. Remove skillet from heat,

  6. Pour sour cream sauce over pork chops/onion rings. Bake pork chops (uncovered) for 35 minutes, until sauce is bubbly. Serve, and enjoy.

Nutrition Facts
Pork Chops in Sour Cream Sauce
Amount Per Serving (1 pork chop)
Calories 387 Calories from Fat 198
% Daily Value*
Fat 22g34%
Saturated Fat 8g50%
Trans Fat 0.2g
Polyunsaturated Fat 4g
Monounsaturated Fat 8g
Cholesterol 128mg43%
Sodium 825mg36%
Potassium 710mg20%
Carbohydrates 6g2%
Fiber 1g4%
Sugar 1g1%
Protein 37g74%
Vitamin A 428IU9%
Vitamin C 6mg7%
Calcium 88mg9%
Iron 2mg11%
* Percent Daily Values are based on a 2000 calorie diet.

Here’s one more to pin on your Pinterest boards!

Pork Chops in Sour Cream Sauce is a delicious dish featuring browned, "bone-in" pork chops and onions baked in a sour cream wine sauce.

Baked Grilled Baby Back Ribs

Baked Grilled Baby Back Ribs are fall off the bone tender and delicious! Spice-coated and baked, then grilled with BBQ sauce, you’ll love ’em!
Baked Grilled Baby Back Ribs are fall off the bone tender and delicious! Spice-coated and baked, then grilled with BBQ sauce, you'll love 'em!

Do you enjoy eating BBQ ribs? We sure do! Today I am sharing a great recipe for baked grilled baby back ribs that are so tender, they practically fall right off the bone.

The ribs are covered in a wonderful spice rub, sealed tightly and baked for a couple hours until fully cooked (and tender!). Then they’re brushed generously with BBQ sauce, and grilled for several minutes until the sauce has nicely caramelized!

Thee ribs are delicious, EASY to make, and I’m confident you’re going to really, really enjoy them! Here’s how to make them.

Scroll Down For A Printable Recipe Card At The Bottom Of The Page

Make The Dry Spice Rub

The first thing you need to do is make a dry seasoning mix to rub onto the rack of ribs before baking them.

Stir together oregano, cumin, smoked paprika, parsley, onion powder, garlic powder, salt, pepper, ground mustard and brown sugar in a small bowl.

This is the spice rub for the ribs. See how easy it is to make? These seasonings add great flavor to the meat… yum!

Spices for the ribs are combined in a small metal bowl.Dry rub spice mixture is ready to season the baby back ribs.

Season And Bake The Ribs

Spray a large piece of heavy duty aluminum foil (on the dull side) with non-stick baking spray. Lay the foil on a very large rimmed baking sheet, greased side up. The piece of foil needs to be large enough to completely cover the ribs.

Lightly pat the pork ribs dry using paper towels. We used 1 full rack of ribs weighing 2¾ pounds, and it had about 15 ribs.

Carefully place the rib rack “bone side up” in the middle of the foil lined baking sheet. Season with about 1/3 of the spice mix, rubbing it into the meat and bones so it adheres.

Turn the ribs over and season the meaty part of the ribs using the remaining spice mix. Rub and pat it into the meat so it sticks as much as possible.

Light coating of seasoning covers the bone side of the rack of ribs.The meaty side of the rib rack is covered fully with dry rub seasonings.

Cover, Seal And Refrigerate The Ribs

Place another sprayed piece of foil on top (sprayed side down), and seal the foil packet tightly closed on all sides. You may need to put the rib packet corner to corner on the baking sheet so it fits .

TIP: For the best flavored ribs, place the ribs in the refrigerator for at least an hour at this point, to give the spices time to work their magic!

Seasoned ribs are sealed in foil packet on a baking sheet, then refrigerated.

Bake Then Prepare The Ribs For Grilling

Remove the ribs from the refrigerator 20 minutes before baking. Preheat your oven to 300°F (or 148.8°C) while you take the chill off the ribs.

Bake the ribs at 300°F (or 148.8°C) for 2 – 2½ hours, depending on the size rack of ribs you are using (we cook the “almost” 3 pounds of ribs for 2½ hours). This long baking time ensures the ribs come out of the oven “fall off the bone tender”.  

TIP: Light your gas or charcoal grill outside and get it hot, so it’s ready to go when the ribs are finished baking.

Unwrap the foil packet. Brush the ribs generously with your favorite BBQ sauce. Now they’re ready for the grill to caramelize the sauce!

After baking for 2 and a half hours, the ribs are fully cooked.BBQ sauce is liberally applied to the baked baby back ribs.

What If I Don’t Have A Grill?

A lot of people do not have access to a BBQ grill or are not allowed to have one, due to living arrangements (apartments, high rises, etc.). Where we live in Oregon it rains a lot, so sometimes it’s not even possible to light our charcoal grill.

This is not a problem. Simply coat the tender, slow-baked ribs generously with BBQ sauce (on both sides) after removing them from the oven, slice, serve and enjoy!

Onto The Grill They Go

Lightly oil the grill grate to prevent the meat from sticking. Place the ribs, BBQ sauce side down onto the hot grill, directly on the grate.

Brush the “bone side” facing up with additional BBQ sauce. Cook the ribs for 3-4 minutes until the bottom side gets a good char on it.

Carefully flip the ribs to the other side (we use 2 spatulas, one on each end), and continue grilling the ribs 3-4 more minutes, to char the other side.

NOTE: It’s important to remember the ribs are already fully cooked from baking. The grilling serves to caramelize the sauce and char the ribs for serving. Don’t overcook them on the grill!

Rack of ribs is placed, BBQ sauce side down on a hot BBQ grill.Baked grilled baby back ribs cooking over a hot BBQ grill.

Time To Serve The Baked Grilled Baby Back Ribs!

When done, remove the ribs from the BBQ. Carefully transfer the ribs to a cutting board, because they are so tender they may come off the bones.

Slice between the ribs (about 4-5 ribs per serving), then serve and enjoy! Serve with additional BBQ sauce on the side, so it can be drizzled on the ribs for even MORE flavor!

The baked grilled baby back ribs are done, and ready to be cut for serving.BBQ sauce on the baby back ribs, with fresh corn kernels on the side.

I really hope you have the chance to make these delicious baked grilled baby back ribs, and trust you (and those you love) will enjoy them as much as we do!

Thanks for stopping by. I invite you to come back again soon for more family-friendly recipes. Take care, may God bless you, and have a GREAT day!

Looking For More PORK Recipes?

You can find ALL of my recipes in the Recipe Index, which is locate at the top of the page. I have lots of delicious recipes featuring pork, including:

Want More Recipes? Get My FREE Newsletter!

I publish a newsletter 2 times per month (1st and 15th) with lots of recipes, tips, etc..
Would you like to join our growing list of subscribers?

There is a Newsletter subscription box on the top right (or bottom) of each blog post, depending on the device you use.
You can submit your e-mail address there, to be added to my mailing list.

Find Me On Social Media:

Facebook page: The Grateful Girl Cooks!
Pinterest:
The Grateful Girl Cooks!
Instagram:
jbatthegratefulgirlcooks

Author's signature

Recipe adapted from, and with thanks to Kori, at: seekinggoodeats.com

↓↓ PRINTABLE RECIPE BELOW ↓↓

0 from 0 votes
Baked Grilled Baby Back Ribs
Prep Time
10 mins
Cook Time
2 hrs 30 mins
Refrigeration Time
1 hr
Total Time
3 hrs 40 mins
 

Baked Grilled Baby Back Ribs are fall off the bone tender and delicious! Spice-coated and baked, then grilled with BBQ sauce, you'll love 'em!

Category: Main Dish
Cuisine: American
Keyword: baked grilled baby back ribs
Servings: 3 (4-5 ribs per serving)
Calories Per Serving: 647 kcal
Author: JB @ The Grateful Girl Cooks!
Ingredients
For Spice Rub:
  • Tablespoons smoked paprika
  • Tablespoons ground cumin
  • Tablespoons dried oregano
  • Tablespoons dried parsley
  • teaspoons garlic powder
  • teaspoons onion powder
  • 1 Tablespoon brown sugar
  • teaspoons ground mustard
  • 1 teaspoon kosher salt
  • ½ teaspoon ground black pepper
For Ribs:
  • pounds baby back pork ribs full rack- about 15 ribs
  • BBQ Sauce, to add and season to taste use your favorite brand
  • oil or baking spray for foil and BBQ grill grate
Instructions
  1. Spray a large piece of aluminum foil (on dull side) with non-stick baking spray. Lay foil on a large rimmed baking sheet, greased side up. Set aside.

  2. Stir spice rub ingredients together in a small bowl until combined.

  3. Pat ribs dry with paper towels. Lay rib rack "bone side up" in the middle of the foil. Season with ⅓ of the spice mix, rubbing it into the meat/bones so it adheres. Turn ribs over and season the meaty side with remaining spice mix. Rub/pat it into the meat so it adheres as much as possible. Place another sprayed piece of foil on top (sprayed side down), and seal the ribs in the foil packet, tightly closed on all sides. You may need to put the rib packet corner to corner on the baking sheet so it fits. TIP: For the best flavored ribs, place packet of ribs in refrigerator for at least an hour, to give the spices time to work their magic! Remove ribs from refrigerator 20 minutes before baking.

  4. Preheat oven to 300°F. (or 148.8°C.) when you remove ribs from refrigerator. Bake ribs at 300°F (or 148.8°C) for 2 - 2½ hours, depending on the size rack of ribs you're using (we cook "almost" 3 pounds of ribs for 2½ hours). This long baking time ensures ribs will be "fall off the bone tender".  TIP: Light your gas or charcoal grill (lightly oil the grates), so it's preheated and ready to go when ribs are finished baking.

  5. When done baking, unwrap foil packet. Brush ribs generously with BBQ sauce. Place ribs, meaty BBQ sauce side down onto hot grill, directly on metal grates. Brush "bone side" facing up with BBQ sauce. Cook ribs 3-4 minutes until slightly charred on bottom. Carefully turn ribs to the other side; continue cooking 3-4 more minutes, to char other side. NOTE: Remember- ribs are already fully cooked. Grilling caramelizes the sauce and chars them. Don't overcook ribs on the grill!

  6. Transfer ribs from BBQ to a cutting board. Slice between the ribs to serve (about 4-5 ribs per serving). Serve with additional BBQ sauce on the side. Enjoy!

Recipe Notes

NOTE: Caloric calculation does not include BBQ sauce because different brands may be used. Calorie count may also differ slightly based on total weight of ribs being used.

Nutrition Facts
Baked Grilled Baby Back Ribs
Amount Per Serving (1 (1/3 of total))
Calories 647 Calories from Fat 396
% Daily Value*
Fat 44g68%
Saturated Fat 15g94%
Trans Fat 0.4g
Polyunsaturated Fat 8g
Monounsaturated Fat 19g
Cholesterol 181mg60%
Sodium 1019mg44%
Potassium 884mg25%
Carbohydrates 12g4%
Fiber 3g13%
Sugar 5g6%
Protein 52g104%
Vitamin A 1884IU38%
Vitamin C 2mg2%
Calcium 181mg18%
Iron 6mg33%
* Percent Daily Values are based on a 2000 calorie diet.

Here’s one more to pin on your Pinterest boards!Baked Grilled Baby Back Ribs are fall off the bone tender and delicious! Spice-coated and baked, then grilled with BBQ sauce, you'll love 'em!


Vietnamese Skillet Pork Chops

Vietnamese Skillet Pork Chops are juicy, tender and delicious! Pork chops are marinated in a simple Vietnamese sauce, then pan-seared.

Many years ago I saved a recipe out of a Bon Appetit magazine I subscribed to. The recipe for Vietnamese Pork Chops sounded interesting, especially since I’ve never visited that country. I decided to try the recipe.

What I discovered is a very simple recipe using fish sauce as part of a marinade for the pork chops. In Vietnam their much loved fish sauce is called Nuoc Mam or Nuoc Cham (which translates to “dipping sauce”). It is typically made with fermented anchovies, sea salt and water.

For this recipe, fish sauce is combined with shallots, brown sugar, rice vinegar, and black pepper to make a flavorful marinade. Fish sauce can be found in most grocery stores in the Asian Food section. 

After marinating the pork chops, the remaining marinade will be boiled and reduced into a pan sauce, while the pork cooks. The delicious sauce is spooned on top of pan-seared pork chops for serving.

The recipe is EASY to make, and tastes wonderful. Here’s how to make Vietnamese Skillet Pork Chops.

Scroll Down For A Printable Recipe Card At The Bottom Of The Page

Make The Vietnamese-Style Marinade

Place one chopped shallot, brown sugar, fish sauce, rice vinegar, and black pepper in a medium sized bowl. 

Use a wire whisk or a fork, to fully combine these ingredients, until the brown sugar dissolves. Set aside.

Fish sauce, shallots, brown sugar rice vinegar and pepper, placed in a white bowl.The Vietnamese-inspired marinade is whisked together to combine ingredients.

Prepare The Pork Chops For The Marinade

Pierce the pork chops on all sides multiple times using the tines of a fork. You can see the indents in the meat in the photo below.

By doing this, the marinade gets into the pork chops quicker, which results in tender, tasty pork chops!

Pork chops are tenderized with the tines of a fork before marinating.

Marinate The Pork Chops

Put the pork chops into a LARGE resealable bag OR in a large shallow dish. Pour the marinade over the pork chops, then flip them over, so all sides are covered.

Spoon marinade on top of the pork chops, then cover the dish. Let the chops marinate (covered) in the sauce for 20 minutes at room temperature. Flip them over a couple times so each side is well coated.

TIP: You can marinate the chops up to one day ahead! Keep them covered in the marinade and then refrigerate, flipping them occasionally. This is a great timesaver!

Pork chops are marinated in the Vietnamese-inspired sauce.

Right before you cook the Vietnamese skillet pork chops, remove them from the marinade. Let excess sauce drain back into the dish, and scrape off the shallots, too.

IMPORTANT! SAVE ALL THE MARINADE AND SHALLOTS FOR THE PAN SAUCE! 

Pour all of the remaining marinade and shallots into a small saucepan. You will need to boil it so it is safe to consume after being in contact with raw meat.

Cook the marinade into a reduction sauce while the pork chops “rest” after being cooked.

Leftover marinade is placed in a small pan to boil.

Cook The Pork Chops

Heat 1 Tablespoon vegetable oil in a large skillet on Medium-High heat. If desired, you can lightly sprinkle salt on the pork chops, but I usually do not, as the sauce tends to be salty enough. Your choice.

Once the oil is very hot, but not smoking, add the pork chops to the skillet in a single layer. They should sizzle when they hit the pan!

Cook the pork chops for 4 minutes without moving them in the skillet, then flip them to the other side. Cook an additional 4 minutes.

When done, the pork chops should be browned on both sides, cooked through, and have an internal temperature of 145°F. Remove pork chops, cover (to keep them hot), and let them “rest” for 7-8 minutes before serving.

Pork chops are pan-seared in hot oil, after marinating.The pork chops are browned on both sides until fully cooked through.

While The Pork Chops Are “Resting”

While the cooked pork chops are “resting”, make the pan sauce using the reserved marinade in the saucepan. 

Bring the marinade to a full boil, stirring often, as it will bubble and rise in the pan as it cooks. Continue boiling and stirring for about 4 minutes (this kills any residual bacteria).

The sauce is done after it has boiled for about 4 minutes, and is reduced to about ¼ cup of pan sauce. 

Marinade is boiled to kill any bacteria present after being in contact with raw pork.Pan sauce is reduced in quantity by boiling, leaving small amount in pan.

Serve The Vietnamese Skillet Pork Chops

Now it’s time to serve the Vietnamese Skillet Pork Chops. Place a pork chop onto a plate, then spoon a little pan sauce on top. Add a sprig or two of parsley (optional) then serve the pork chops with a lime wedge on the side.

Squeeze the lime wedge over the pork chops. The juice adds a pop of bright citrus flavor to this dish. It’s fantastic, so don’t leave the lime out!

We enjoy these pork chops with mashed potatoes or steamed white rice on the side. The “blandness” of mashed potatoes or rice are a good backdrop for the wonderful flavor of the pork chops.

Vietnamese Skillet Pork Chops with sauce, mashed potatoes and lime wedge.One of the Vietnamese Skillet Pork Chops on a plate, with potatoes and lime wedge.

I hope you have the opportunity to try these delicious pork chops. They have lots of flavor, and we are delighted with how juicy and tender the pork chops are.

Thanks for stopping by, and please come back soon for more family-friendly recipes. Take care, may God bless you, and have a GREAT day!

Looking For More PORK CHOP Recipes?

You can find ALL of my recipes in the Recipe Index, which is located at the top of the page. I have lots of delicious pork chop recipes to choose from, including:

Want More Recipes? Get My FREE Newsletter!

I publish a newsletter 2 times per month (1st and 15th) with lots of recipes, tips, etc..
Would you like to join our growing list of subscribers?

There is a Newsletter subscription box on the top right (or bottom) of each blog post, depending on the device you use.
You can submit your e-mail address there, to be added to my mailing list.

Find Me On Social Media:

Facebook page: The Grateful Girl Cooks!
Pinterest:
The Grateful Girl Cooks!
Instagram:
jbatthegratefulgirlcooks

Author's signature

Original recipe source: Bon Appetit Magazine, June 2013 issue, “Fast, Easy, Fresh Weeknight Favorites”, on page 46

↓↓ PRINTABLE RECIPE BELOW ↓↓

0 from 0 votes
Vietnamese Skillet Pork Chops
Prep Time
10 mins
Cook Time
10 mins
Marinating (inactive prep)
20 mins
Total Time
40 mins
 

Vietnamese Skillet Pork Chops are juicy, tender and delicious! Pork chops are marinated in a simple Vietnamese sauce, then pan-seared.

Category: Main Course
Cuisine: Vietnamese
Keyword: Vietnamese Skillet Pork Chops
Servings: 4 (1 pork chop + sauce)
Calories Per Serving: 406 kcal
Author: JB @ The Grateful Girl Cooks!
Ingredients
  • 1 small shallot finely chopped
  • cup light brown sugar (packed)
  • ¼ cup fish sauce (nuoc nam or nam pla recommended)
  • 2 Tablespoons unseasoned rice vinegar
  • 1 teaspoon ground black pepper
  • 4 1" thick pork chops (bone-in) (approx. 2 pounds)
  • 1 Tablespoon vegetable oil
  • 1 lime , for serving (cut in wedges)
Instructions
  1. Make Marinade: Place shallots, brown sugar, fish sauce, rice vinegar, black pepper in medium bowl.  Use fork to combine; mix until brown sugar dissolves. Set aside.

  2. Marinate Pork Chops: Pierce pork chops on all sides multiple times using the tines of a fork. This helps marinade get into pork chops quicker, resulting in tender, tasty pork chops!

  3. Put pork chops in a LARGE resealable bag OR a large shallow dish in a single layer. Pour marinade over pork; flip chops over, to cover all sides. Spoon marinade on top of chops; cover dish. Marinate for 20 minutes at room temp. Flip a couple times so each side is well marinated. TIP: You can marinate chops one day ahead! Keep dish covered and refrigerate, flipping them occasionally in the sauce.

  4. When ready to cook pork chops, remove them from the marinade. Let excess sauce drain into the dish; scrape sauce and shallots off the chops. SAVE THE MARINADE FOR THE PAN SAUCE!  Pour marinade/shallots into a small saucepan.

  5. Cook Pork Chops: Heat vegetable oil in large skillet on Medium-High heat. Once oil is very hot, but not smoking, add pork chops in a single layer. Cook for 4 minutes without moving them in the skillet; flip to the other side. Cook about 4 more minutes. When done, pork chops should be browned on both sides, cooked through, and have an internal temp. of 145°F. Let pork chops "rest" for 7-8 minutes before serving, so juices can redistribute inside the meat.

Make Pan Sauce While Pork Chops "Rest":
  1. While chops are "resting", make the pan sauce using reserved marinade in saucepan. Bring marinade to a full boil, stirring often (it will bubble and rise in the pan as it cooks). Continue boiling/stirring for approx. 4 minutes. Sauce should be reduced, leaving about ¼ cup in the pan. 

  2. To Serve: Place a pork chop on a plate; spoon pan sauce on top. Garnish with fresh parsley (opt.), and serve with a lime wedge on the side (a must). Squeeze lime juice over pork chops. Serve with favorite side dishes, and enjoy!

Recipe Notes

NOTE: If desired, you can very lightly salt the pork chops before cooking. I find this not necessary as the sauce/marinade is salty enough, but this is up to you to decide.

Nutrition Facts
Vietnamese Skillet Pork Chops
Amount Per Serving (1 chop + sauce)
Calories 406 Calories from Fat 171
% Daily Value*
Fat 19g29%
Saturated Fat 6g38%
Trans Fat 0.2g
Polyunsaturated Fat 4g
Monounsaturated Fat 7g
Cholesterol 117mg39%
Sodium 1238mg54%
Potassium 694mg20%
Carbohydrates 22g7%
Fiber 1g4%
Sugar 19g21%
Protein 36g72%
Vitamin A 23IU0%
Vitamin C 5mg6%
Calcium 64mg6%
Iron 2mg11%
* Percent Daily Values are based on a 2000 calorie diet.

Here’s one more to pin on your Pinterest boards!Vietnamese Skillet Pork Chops are juicy, tender and delicious! Pork chops are marinated in a simple Vietnamese sauce, then pan-seared.

Easy Slow Cooker Pulled Pork

Make Easy Slow Cooker Pulled Pork to use in many main dishes (5 minutes prep)! Great for BBQ sandwiches, tacos, enchiladas, burritos, etc.

Looking for a simple way to cook a lot of meat to use in various recipes? This recipe for easy slow cooker pulled pork may be just the recipe you’re looking for!

With as little as 5 minutes of hands-on prep time and a few common spices, you can have a large pork shoulder seasoned and cooking away in a slow cooker.

After it cooks all day, you will be left with tender pork, that can be EASILY shredded, to use in a variety of dishes. Here’s how to make easy slow cooker pulled pork.

Scroll Down For A Printable Recipe Card At The Bottom Of The Page

Season The Pork 

The ingredients I use to season the pork are salt, pepper, liquid smoke, garlic powder and onion powder. Mix the salt, pepper, garlic powder and onion powder in a small bowl. Do NOT add the liquid smoke or water at this point.

I use these very basic spices to season the pork, because once the meat is done cooking and shredded, it can be used for a variety of main dishes with different flavor combinations.

Before seasoning, pat the pork shoulder dry by blotting it on all sides with paper towels. Sprinkle this seasoning mix over the entire surface of the pork shoulder, then place the pork shoulder into a large slow cooker.

For this recipe I used a 7 pound pork butt, also known as pork shoulder or Boston pork butt. All these types of pork come from the SHOULDER of the pig.

Onion powder, garlic powder, liquid smoke, salt and pepper help season the pulled pork.

Combine the liquid smoke and water in a small container, then pour it around the outside edges of the pork, onto the bottom of the slow cooker.

The liquid smoke will help flavor the meat with a semi-smoked flavor, which is helpful since we will not be cooking the pork on a smoker grill or BBQ. Liquid smoke can usually be found in most grocery stores, on the aisle with the BBQ sauces or condiments.

Pork but is dried, seasoned and then placed in a slow cooker for 8 hours cooking on low.

Time To Slow Cook The Seasoned Pork

Put the lid on the slow cooker, and then cook the pork for about 8 hours on LOW setting. Let it cook away while you got to work or do other things during the day.

After several hours you will begin to smell “good aromas” coming out of your slow cooker. No need to do anything else to the meat until it has finished slow cooking!

For this recipe, you will want the finished pork to have an internal temperature of 200°F (or 93.33°C) This higher internal temperature will ensure the pork becomes VERY tender, which is what you want for easily shredding the meat.

NOTE: If using a slightly smaller or larger pork shoulder, you may need to adjust the cooking time slightly.

Easy slow cooker pulled pork is cooked on Low for 8 hours.

What To Do When It Is Finished Cooking

Once the pork has cooked the full time, and reaches an internal temperature of 200°F. (or 93.33°C), unplug or turn off the slow cooker.

Let the pork rest (still covered in the slow cooker) for about 30 minutes. After it has rested, transfer the pork to a large bowl for shredding.

Remove the bone from the pork. It should come off easily, with no problem at all. Don’t forget to also save the juice that remains in the slow cooker, okay? Okay.

Shredding The Tender Cooked Pork

The easiest way I have found to shred the meat is to use two forks. The meat should be so tender that you can EASILY pull the meat off using them.

Continue shredding until all of the easy slow cooker pulled pork has been shredded. You should end up with a large pile of pulled pork.

After the bone is removed (and accounting for shrinkage while cooking, I usually will end up with somewhere between 5-6 pounds of pulled pork.

Cooked tender pork is shredded in a large bowl, using two forks

The next thing I do is to ladle some of the juices from the slow cooker into the shredded pork. Pour it through a strainer to help filter out any pieces of fat, etc. that might be hanging out in the juices.

By adding some (not all!) of the liquid back into the pulled pork, it ensures the meat will absorb some of the liquid and not be dry. The juices also adds back in some more flavor, too!

Toss the pulled pork with the liquids to combine, adding more juices as you feel are necessary for “juicy pork”. Once the easy slow cooker shredded pork has cooled, it can be divided into freezer bags and stored for future meals.

Juices from slow cooker are strainer into the pulled pork, to add additional flavor and moisture.Large blue bowl, full of the easy slow cooker pulled pork, ready to be used.

What Can Easy Slow Cooker Pulled Pork Be Used For?

There are a LOT of uses for this delicious pulled pork. Some of our favorite ways to use shredded pork is in burritos, tacos, enchiladas and tamales, adding additional Mexican seasonings, as desired.

Burritos can be made using the pulled pork.Two tamales made with shredded pork, shown on a plate.

Another of our favorite ways to use pulled pork is to add BBQ sauce and make BBQ pork sandwiches.  There are many ways available to enjoy it. YUM!

BBQ shredded pork sandwiches, with spicy coleslaw on top of the meat.

Storing The Pulled Pork For Other Meals

I always save enough easy slow cooker pulled pork for a meal I make the same night as I cook the pork. All the extra shredded pork is divided into freezer storage bags, with about a pound of meat in each one.

This is really convenient, because the next time I want to use pulled pork for another meal, all I have to do is thaw the package out, then use as I wish!

It is a real timesaver to do this, and the pulled pork will store safely for several months in our freezer. Since it is not difficult to prepare the shredded pork, it comes in handy a month or two later when I want to use pulled pork again for a meal. WIN-WIN!

Easy slow cooker pulled pork can be stored in freezer bags in a freezer.


Looking For More PORK Recipes?

You can find ALL of my recipes in the Recipe Index, which is located at the top of the page. I have some truly delicious recipes featuring pork to choose from, including:

Want More Recipes? Get My FREE Newsletter!

I publish a newsletter 2 times per month (1st and 15th) with lots of recipes, tips, etc..
Would you like to join our growing list of subscribers?

There is a Newsletter subscription box on the top right (or bottom) of each blog post, depending on the device you use.
You can submit your e-mail address there, to be added to my mailing list.

Find Me On Social Media:

Facebook page: The Grateful Girl Cooks!
Pinterest:
The Grateful Girl Cooks!
Instagram:
jbatthegratefulgirlcooks

Author's signature

↓↓ PRINTABLE RECIPE BELOW ↓↓

0 from 0 votes
Easy Slow Cooker Pulled Pork
Prep Time
5 mins
Cook Time
8 hrs
Resting Time (cooling)
30 mins
Total Time
8 hrs 35 mins
 

Make Easy Slow Cooker Pulled Pork to use in many main dishes (5 minutes prep)! Great for BBQ sandwiches, tacos, enchiladas, burritos, etc.

Category: Main Dishes
Cuisine: All Cuisines
Keyword: slow cooker, pulled pork
Servings: 19 (appro. 4 ounces per serving)
Calories Per Serving: 131 kcal
Author: JB @ The Grateful Girl Cooks!
Ingredients
  • 7 pounds pork shoulder (or Boston butt roast) bone-in
  • 2 teaspoons salt
  • 2 teaspoons black pepper
  • teaspoons garlic powder
  • teaspoons onion powder
  • Tablespoons liquid smoke
  • ½ cup water
Instructions
  1. Pat the pork shoulder dry by blotting it on all sides with paper towels.

  2. Combine salt, pepper, garlic powder and onion powder in a small bowl. Sprinkle the spices over entire surface of the meat. Put seasoned pork in a large slow cooker. Combine liquid smoke and water in a small container, then pour it around outside edges of the pork, onto the bottom of the slow cooker.

  3. Cook on LOW heat for 8 hours. The finished pork should reach an internal temperature of 200°F. (or 93.33℃) for easiest shredding. Turn off slow cooker; let pork rest for 30 minutes (still covered in slow cooker). NOTE: If using a slightly smaller or larger pork shoulder, you may need to adjust cooking time slightly.

  4. Remove bone from pork. It should come off easily. Transfer pork to a large bowl (reserving juice left in slow cooker). Shred the meat using two forks. The meat should be so tender you can EASILY shred it. Continue shredding until all pork has been shredded.

  5. Ladle some of the juices from slow cooker into the shredded pork. Pour it through a strainer to filter out any pieces of fat, etc that might be present By adding some (not all!) of the liquid back into the pulled pork, it ensures the meat will absorb some of liquid and not be dry. Juices also adds more flavor, too!Toss the pulled pork with the liquids to combine, Use in your favorite dishes. Enjoy!

  6. To store in freezer: let meat fully cool. Divide into freezer storage bags, and freeze up to several months. To use, thaw fully; add to favorite main dish recipes

Recipe Notes

Caloric estimate/calculation was made using 6 pounds of cooked, shredded pork, because the 7 pound pork used will reduce in volume when cooked, and also weigh less after the bone has been removed.

Nutrition Facts
Easy Slow Cooker Pulled Pork
Amount Per Serving (1 (approximately 4 oz.))
Calories 131 Calories from Fat 54
% Daily Value*
Fat 6g9%
Saturated Fat 2g13%
Polyunsaturated Fat 1g
Monounsaturated Fat 3g
Cholesterol 59mg20%
Sodium 314mg14%
Potassium 305mg9%
Carbohydrates 0.4g0%
Fiber 0.1g0%
Sugar 0.02g0%
Protein 17g34%
Vitamin A 6IU0%
Vitamin C 1mg1%
Calcium 14mg1%
Iron 1mg6%
* Percent Daily Values are based on a 2000 calorie diet.

Here’s one more to pin on you Pinterest boards!Make Easy Slow Cooker Pulled Pork to use in many main dishes (5 minutes prep)! Great for BBQ sandwiches, tacos, enchiladas, burritos, etc.

Air Fryer Pork Chops For Two

Make Air Fryer Pork Chops For Two! This quick, easy recipe yields delicious, spice-rubbed, bone-in pork chops for two people in 20 minutes.

If you enjoy eating pork chops and have an air fryer, then I’m confident you will LOVE this recipe! The recipe makes two servings, which is convenient for my husband and I, since we’re the only ones left at home. Both of our grown sons live on their own, so it is a fun challenge to alter recipes at times to only make enough for the TWO of us.

Air Fryer Pork Chops For Two is a recipe I originally found online. I cut the recipe in half for the two of us, and gave it a try in our air fryer a few months ago. My husband and I loved the flavor of the air-fried pork chops, thanks to a flavorful, homemade spice rub mixture!

The pork chops were perfectly cooked and browned on the outside, juicy on the inside, and they tasted wonderful! We’ve enjoyed this dish several times since then!

It only takes about 10 minutes to prepare the spice mix and season the meat, then into a preheated air fryer they go. The pork chops cook for about 8-10 minutes, or until they reach temp. All you need to do is flip them over halfway through the cooking time! How’s that for EASY? Here’s how to make them:

Scroll Down For A Printable Recipe Card At The Bottom Of The Page

Preheat Your Air Fryer

Preheat your air fryer for five minutes at 400°F. If your machine doesn’t have a Preheat function, simply heat it for 5 minutes at that temperature (400°F). You want your air fryer hot when you add the seasoned pork chops, for best results.

I usually mix up the spices, and season the pork chops while the air fryer preheats, because that saves time! Try it… you’ll see what I mean!

An air fryer is preheated to 400°F. before cooking seasoned pork chops.

Make The Seasoning Mix

The spice mix is simple to make from scratch! You need brown sugar, salt, Italian seasoning, smoked paprika, garlic powder, onion powder, black pepper and sweet paprika.

Mix these spices together in a small bowl, until they are fully combined.

There are quite a few spices that make up the spice rub for the air fryer pork chops.A bowl with homemade spice mixture to rub onto the pork chops before they cook.

Season The Pork Chops

For this recipe you will need two bone-in pork chops, approx. 6-7 ounces each. Each pork chop should be about ¾ to 1″ thick, so they will cook evenly and for about the same amount of time.

Pat the chops dry using paper towels to absorb extra moisture. Use a pastry brush to cover BOTH SIDES of each pork chop with melted butter.

Cover BOTH SIDES of each pork chop with the spice mixture, rubbing it into the buttered pork chops so it adheres as much as possible. Use all of the spice mix, for the very best flavor on those chops!

Once the pork chops are coated with the spices, they are ready to pop into a preheated air fryer!

Two, six ounce bone-in pork chops, patted dry, and ready to be seasoned.Both sides of the pork chops are brushed with melted butter.Spice mixture is rubbed into both sides of the pork chops before cooking.

Cooking The Pork Chops In the Air Fryer

Place the seasoned chops in a single layer in the basket of the air fryer. Please note that if you are making more than two pork chops, you may have to work in batches to ensure they fit in the basket. This also allows the meat to “air fry” better as the hot air can circulate around the pork chops more efficiently!

Cook the air fryer pork chops for two at 400°F. for about 6 minutes. Remove the basket, and flip the pork chops over to the other side.

Re-insert basket into the air fryer and continue cooking for 2-4 more minutes OR until a meat thermometer inserted into the middle of a chop reaches 145°F. When done, the pork chops should be nicely browned on the surface, and cooked to 145°F.

The thickness of the pork chops used will ultimately determine how long they take to air fry. Typically, it should take between 8-10 minutes TOTAL time to cook them to temperature.

A couple of times, ours were fully cooked after 7 minutes total time. Keep an eye on them, so you do not overcook or undercook them!

Well seasoned pork chops are placed in basket of air fryer in one layer.Air fryer pork chops for two have been flipped over to finish cooking.

Serve The Air Fryer Pork Chops For Two

Once done, remove the pork chops from the air fryer, and let them rest for 4-5 minutes before serving. This “resting” time lets the juices inside have time to redistribute inside the meat, so the pork chops remain juicy.

Once they’ve rested, garnish the pork chops with fresh parsley, and serve! The pork chops are juicy, and have wonderful flavor, thanks to the homemade spice mix you used to season them.

Serve immediately, while hot! We enjoy air fryer pork chops for two served with mashed potatoes and a green veggie on the side. YUM!

The air fryer pork chops for two are served, garnished with fresh parsley.A close up of one of the air fryer pork chops, with parsley garnish, on a white plate.

Thanks for stopping by today, and I hope you enjoy this delicious recipe for air fryer pork chops for two! Take care, please come back again soon, and have a GREAT day!

Looking For More AIR FRYER Recipes?

You can find ALL of my recipes in the Recipe Index, which is located at the top of the page. I have quite a few Air Fryer recipes for to you check out, including:

Want More Recipes? Get My FREE Newsletter!

I publish a newsletter 2 times per month (1st and 15th) with lots of recipes, tips, etc..
Would you like to join our growing list of subscribers?

There is a Newsletter subscription box on the top right (or bottom) of each blog post, depending on the device you use.
You can submit your e-mail address there, to be added to my mailing list.

Find Me On Social Media:

Facebook page: The Grateful Girl Cooks!
Pinterest:
The Grateful Girl Cooks!
Instagram:
jbatthegratefulgirlcooks

Author's signature

Recipe adapted from (and with thanks to) Sara, at: dinneratthezoo.com/air-fryer-pork-chops/

↓↓ PRINTABLE RECIPE BELOW ↓↓

0 from 0 votes
Air Fryer Pork Chops For Two
Prep Time
5 mins
Cook Time
10 mins
Total Time
15 mins
 

Make Air Fryer Pork Chops For Two! This quick, easy recipe yields delicious, spice-rubbed, bone-in pork chops for two people in 20 minutes.

Category: Main Dish
Cuisine: American
Keyword: air fryer pork chops
Servings: 2
Calories Per Serving: 315 kcal
Author: JB @ The Grateful Girl Cooks!
Ingredients
  • 2 bone-in pork chops (6-7 oz. each) approx. ¾-1" thick
  • Tablespoons butter melted
For Spice Mix:
  • ¾ Tablespoon brown sugar
  • ½ teaspoon salt
  • ½ teaspoon smoked paprika
  • ½ teaspoon Italian seasoning
  • ½ teaspoon sweet paprika
  • teaspoon onion powder
  • teaspoon garlic powder
  • teaspoon black pepper
Garnish (optional):
  • 1 Tablespoon chopped fresh parsley
Instructions
  1. Preheat air fryer for five minutes at 400°F.

  2. Mix brown sugar, salt, smoked paprika, Italian seasoning, sweet paprika, onion and garlic powders, and pepper in a small bowl, until well combined.

  3. Pat pork chops dry with paper towels to absorb moisture. Use a pastry brush to cover BOTH SIDES of each pork chop with melted butter.

  4. Cover BOTH SIDES of each pork chop with spice mix, rubbing it into the buttered pork chops so it adheres as much as possible.

  5. Place chops in a single layer in air fryer basket. Cook at 400°F. for about 6 minutes. Flip pork chops over. Continue cooking 2-4 minutes OR until a meat thermometer inserted into a chop reaches 145°F. and chops are nicely browned. NOTE: *If making more than two chops, work in batches. This allows meat to "air fry" better as hot air can circulate around pork chops more efficiently!

  6. Once done, remove pork chops from air fryer. Let them rest 4-5 minutes before serving. This lets juices have time to redistribute inside, so the pork chops remain juicy. Garnish chops with parsley (optional), and serve!

Nutrition Facts
Air Fryer Pork Chops For Two
Amount Per Serving (1 pork chop)
Calories 315 Calories from Fat 180
% Daily Value*
Fat 20g31%
Saturated Fat 9g56%
Trans Fat 0.5g
Polyunsaturated Fat 2g
Monounsaturated Fat 7g
Cholesterol 111mg37%
Sodium 722mg31%
Potassium 492mg14%
Carbohydrates 6g2%
Fiber 1g4%
Sugar 5g6%
Protein 27g54%
Vitamin A 940IU19%
Vitamin C 3mg4%
Calcium 45mg5%
Iron 1mg6%
* Percent Daily Values are based on a 2000 calorie diet.

Here’s one more to pin on your Pinterest boards!Make Air Fryer Pork Chops For Two! This quick, easy recipe yields delicious, spice-rubbed, bone-in pork chops for two people in 20 minutes.

Hoisin Marinated Pork Chops

Hoisin Marinated Pork Chops are boneless pork chops, marinated 8 hours in a simple Asian-style sauce, and grilled until done and delicious!Hoisin Marinated Pork Chops are boneless pork chops, marinated 8 hours in a simple Asian-style sauce, and grilled until done and delicious!Summer is here and with it comes lots of BBQ’s on our back deck! The recipe I want to share with you today is one I found many years ago in one of my old cookbooks. Hoisin marinated pork chops are so easy to make, and the only hard part of the recipe is YOU HAVE TO PLAN AHEAD to enjoy them!

That’s right… a simple Asian-style marinade is made and then the pork chops have to marinate in the sauce for 8 hours or overnight, so plan ahead. I thaw the pork chops out the night before we plan to cook them, then marinate them early in the morning on the day we will eat them.

The marinade for the pork is made with Hoisin sauce (a common Chinese cooking sauce) and a few other ingredients. Hoisin sauce can typically be found in the Asian section of most supermarkets. Combine the ingredients for the marinade and let the pork chops hang out in it overnight, then grill the pork chops once done marinating! The marinade helps tenderize the pork and imparts great flavor to the meat. Here’s how to make this dish:

Scroll Down For A Printable Recipe Card At The Bottom Of The Page

Make The Asian-Style Marinade

You will need hoisin sauce, soy sauce (regular or low-sodium), honey, crushed red peppers, and minced garlic to make the marinade for the pork. 

Marinade ingredients are hoisin sauce, soy sauce, garlic, honey, and crushed red peppers.

Place the ingredients for the marinade in a small bowl, and stir or whisk until combined. That’s it… you just made the marinade! See how easy it is? NOTE: I used four pork chops for this recipe, but there is enough marinade to coat 6 pork chops, if needed

Ingredients for the Asian-style marinade are placed in a small bowl.After mixing the ingredients, the Asian-style marinade is ready for the pork chops.

Prepare The Hoisin Marinated Pork Chops

The pork chops should be boneless, about 4 oz. each, and approx. 3/4″ thick. Pat them dry with paper towels, then place them in a gallon size re-sealable plastic bag or shallow container with a secure lid.

Pour the marinade over the pork chops and seal the bag or container securely.  Make sure to coat the pork chops on all sides with the sauce, then refrigerate 8 hours or overnight. If you do this early in the morning, the pork chops will be ready to grill by dinner. Don’t skip this step, because it helps tenderize the meat. The longer the pork chops marinate, the better the flavor.

Four boneless pork chops are patted dry, then are ready to be marinated.The marinade coats the pork chops in a large resealable bag in a refrigerator for 8 hours.

Time To Grill The Pork Chops Then Eat!

After the pork chops have fully marinated, they’re ready to grill. Prepare your BBQ for grilling, as normal. Spray the BBQ grill rack with cooking spray, then place over hot coals. Remove the chops from the bag/container, discarding any extra marinade. This extra marinade is not safe to eat, because its been in contact with raw meat and will not be cooked.

Cover the BBQ and cook the pork chops about 4-5 minutes, then flip them to the other side. Continue cooking until done (4-5 minutes typically). Keep an eye on the pork chops, so the sugar present in the honey doesn’t burn. The pork chops are done when they reach an internal temperature of 145°F. Cooking time may vary slightly, depending on the thickness of the pork chops being used (or the BBQ heat).

Once done, transfer the pork chops to a serving plate, and let them rest for a couple minutes to let the juices redistribute inside the meat. Serve, then enjoy these delicious hoisin marinated pork chops!

Four hoisin marinated pork chops are grilled over hot coals on a BBQ.Green beans and mashed potatoes, served with one of the hoisin marinated pork chops.A picture of a sliced open, juicy hoisin marinated pork chop, on a plate.

I hope you have the chance to grill some of these delicious hoisin marinated pork chops, and trust you’ll enjoy them like we do! Hey there… since we’re speaking of CHOPS, if you enjoy eating LAMB CHOPS, be sure to check out my recipe for Rosemary Wine Lamb Chops!

Thanks for stopping by today. I invite you to come back again soon, for more family-friendly recipes. Take care, may God bless you, and have a great day!

Looking For More Recipes For PORK CHOPS?

You can find ALL of my recipes in the Recipe Index, located at the top of the page. I have lots of great pork chop recipes, including:

Interested In More Recipes?

Thank you for visiting this website. I appreciate you using some of your valuable time to do soIf you’re interested, I publish a newsletter 2 times per month (1st and 15th) with all the latest recipes, and other fun info. I would be honored to have you join our growing list of subscribers, so you never miss a great recipe!
There is a Newsletter subscription box on the top right side (or bottom) of each blog post, depending on the device you use, where you can easily submit your e-mail address (only) to be included in my mailing list.

You Can Also Find Me On Social Media:

Facebook page: The Grateful Girl Cooks!
Pinterest:
The Grateful Girl Cooks!
Instagram:
jbatthegratefulgirlcooks

Author's signature

Recipe adapted from original recipe in the cookbook: “The Best Of Cooking Light”, page 186, published in 2004 by Oxmoor House

↓↓ PRINTABLE RECIPE BELOW ↓↓

0 from 0 votes
Hoisin Marinated Pork Chops
Prep Time
5 mins
Cook Time
9 mins
Marinating Time (inactive prep)
8 hrs
Total Time
8 hrs 14 mins
 

Hoisin Marinated Pork Chops are boneless pork chops, marinated 8 hours in a simple Asian-style sauce, and grilled until done and delicious!

Category: Main Dish
Cuisine: Asian
Keyword: hoisin marinated pork chops
Servings: 4
Calories Per Serving: 188 kcal
Author: JB @ The Grateful Girl Cooks!
Ingredients
  • 3 Tablespoons hoisin sauce
  • 3 Tablespoons low-sodium soy sauce (or regular)
  • 3 Tablespoons honey
  • ¾ teaspoon red chili flakes (crushed red peppers)
  • 2 garlic cloves minced
  • 4 (4-ounce) boneless pork chops about ¾ inch thick
  • cooking spray for grill rack
Instructions
  1. Place hoisin sauce, soy sauce, honey, red chili flakes and garlic in a small bowl; stir or whisk until combined.

  2. Pat pork chops dry with paper towels; place chops in a large, re-sealable plastic bag or shallow container with secure lid. Pour marinade over pork chops; seal bag or container securely.  Make sure pork chops are covered on all sides with sauce, then refrigerate 8 hours or overnight. Don't skip this step, because it helps tenderize the pork. The longer the pork chops marinate, the better the flavor.

  3. Once pork has marinated, prepare BBQ for grilling. Spray BBQ grill rack with cooking spray, then place over hot coals. Remove chops from bag/container, discard extra marinade. Extra marinade is not safe to consume, because its been in contact with raw meat and will not be cooked.

  4. Cover BBQ and cook pork chops for 4-5 minutes, then flip them to the other side. Continue cooking until done (4-5 minutes typically). Keep an eye on the pork chops, so the sugar present in the honey doesn't burn. Pork chops are done when they reach an internal temperature of 145°F. Cooking time may vary slightly, depending on thickness of the pork chops being used (or BBQ heat).

  5. Once done, transfer pork chops to serving plate. Let them rest 2-3 minutes to let juices redistribute inside the meat. Serve and enjoy!

Nutrition Facts
Hoisin Marinated Pork Chops
Amount Per Serving (1 pork chop)
Calories 188 Calories from Fat 56
% Daily Value*
Fat 6.2g10%
Saturated Fat 2.1g13%
Polyunsaturated Fat 0.7g
Monounsaturated Fat 2.8g
Cholesterol 62mg21%
Sodium 249mg11%
Carbohydrates 6.7g2%
Fiber 0.2g1%
Protein 25g50%
Calcium 27mg3%
Iron 1mg6%
* Percent Daily Values are based on a 2000 calorie diet.

Here’s one more to pin on your Pinterest boards!Hoisin Marinated Pork Chops are boneless pork chops, marinated 8 hours in a simple Asian-style sauce, and grilled until done and delicious!

Bacon, Onion and Spinach Tart

Enjoy a Bacon, Onion and Spinach Tart for breakfast, lunch or dinner! It’s yummy, and filled with caramelized onions, cheese, spinach & bacon.
Enjoy a Bacon, Onion and Spinach Tart for breakfast, lunch or dinner! It's yummy, and filled with caramelized onions, cheese, spinach & bacon.

If you’re interested in an absolutely scrumptious recipe that can do double duty as either breakfast, lunch OR dinner, may I suggest this bacon, onion and spinach tart? How convenient it is to make this tart, then have it in the fridge to enjoy the leftovers throughout the week!

Caramelized onions are the unabashed star of this dish, as their flavor and sweetness permeate every bite! Add some bacon, spinach, cheese, and eggs to the filling, and you’ve got yourself a fabulous recipe! Here’s how to make this flavor-packed bacon, onion and spinach tart.

Scroll Down For A Printable Recipe Card At The Bottom Of The Page

Prepare The Crust For The Tart

For this tart, feel free to use either a homemade pie crust OR a purchased, refrigerated rolled, flat pie crust. Roll the dough out, and fit the pie crust into a 9″ tart pan (with a removable bottom). Press the dough into the sides of the pan, then trim away excess crust from the top edge. You will want the top edge of the crust to be flush with the pan.

Use the tines of a fork to prick the dough in several places on the sides and bottom. Keep the prepared crust in the refrigerator while the filling for the tart is made.

Pie dough is placed and shaped in a tart pan, to be ready for the filling.

Cook The Bacon And Spinach

Cut 4 strips of bacon crosswise into small thin strips. I use kitchen scissors and stack the bacon strips to quickly cut the pieces. Place the bacon strips into a large non-stick skillet and cook on Medium heat, stirring often. Cook the bacon for approximately 6-8 minutes.

Add 6 cups of fresh baby spinach into the skillet with the bacon. It looks like a lot of spinach, but will greatly reduce in size as it cooks. Continue to stir and cook for 1 minute, or until the spinach has wilted. Transfer the bacon/spinach mixture out of the skillet with a slotted spoon. Place on a plate lined with paper towels, to absorb excess grease.

Strips of bacon are quickly cooked in a large skillet.Baby spinach leaves are added to the cooked bacon in a large skillet.After cooking, the bacon and spinach will be removed from the pan to cool.

Caramelize The Onions

Caramelized onions will take about 25 minutes to turn out perfect, so plan ahead! Place sliced onions, dried thyme and (part of) the salt into the same large skillet you cooked the bacon/spinach in. Turn the heat to MEDIUM, and put a lid on the skillet.

Cook the onions (covered) for 25 minutes, stirring occasionally. Continue to cook (covered) until the onions have caramelized. They will also reduce in size as they become browned and fully cooked. The longer they cook, the more caramelized and sweeter the onions become! TIP: PREHEAT your oven while the onions are cooking!

Once the onions have caramelized, take the skillet off the heat, stir, then let them cool, uncovered, for 5 minutes.

Sliced onions, salt and thyme are placed in large skillet to cook.A lid is placed on the skillet of onions while they cook and caramelize.Once caramelized, the onions in the skillet become brown in color.

Prepare The Bacon, Onion And Spinach Tart For Baking

Now it’s time to make the filling for the Bacon, Onion and Spinach Tart! In a large mixing bowl, whisk together eggs, half and half, pepper and remaining salt until fully combined. Stir in the bacon and spinach mixture. Add the cooled caramelized onions, and stir until all ingredients are incorporated.

Carefully pour the tart filling into the prepared crust. The filling will come very close to the top of the crust. Make sure the spinach and bacon are evenly distributed in the filling. Now the bacon, onion and spinach tart is ready for baking.

Cooked bacon and spinach are added to the tarts egg filling in a large bowl.Filling for the bacon, onion and spinach tart is poured into prepared crust in a tart pan.

Bake And Broil

Bake the tart at 375°F. for 15 minutes, then reduce the heat to 325°, and bake another 20 minutes at the lower temperature. Remove the tart from the oven and turn the oven to the BROIL setting. Sprinkle the top of the tart with shredded cheese, then place the tart about 6″ from the broiler heating element. Let it broil for 1-2 minutes, or only until the cheese has melted!. Keep an eye on it so you don’t burn the top!

Transfer the bacon, onion and spinach tart to a wire rack and let it cool about 5 minutes, before you attempt to slice and serve it.

After baking, cheese is sprinkled on top of the tart and placed under broiler to melt it.A baked bacon, onion and spinach tart cools on wire rack for 5 minutes before serving.

Slice And Serve The Bacon, Onion and Spinach Tart

Carefully remove the tart rim from the tart by pushing up from the bottom to separate the tart from the metal rim. Slice the tart into 8 slices, serve, and enjoy! Keep any leftovers covered and refrigerated for up to 4-5 days.

The leftovers can be easily microwaved to reheat, which makes this delicious tart a perfect choice to enjoy again for breakfast, lunch or dinner the next day! When we had this for dinner, we enjoyed it served with fresh fruit and Pistachio Asparagus In Orange Sauce!

A slice of the bacon, onion and spinach tart is removed from the pan, for serving.Asparagus and fresh fruit are served alongside a slice of bacon, onion and spinach tart.

I really do love the versatility of this dish! The leftovers are wonderful as they hold up well taste-wise, even after being refrigerated for several days! I’m confident you’re going to enjoy this meal. Thanks for stopping by, and I invite you to come back again soon for more family friendly recipes. Take care, and have a GREAT day! 

Looking For More TART Or QUICHE Recipes?

You can find ALL of my recipes in the Recipe Index, located at the top of the page. I have other tart recipes (quiches, too) that you might enjoy, including:

Interested In More Recipes?

Thank you for visiting this website. I appreciate you using some of your valuable time to do soIf you’re interested, I publish a newsletter 2 times per month (1st and 15th) with all the latest recipes, and other fun info. I would be honored to have you join our growing list of subscribers, so you never miss a great recipe!
There is a Newsletter subscription box on the top right side (or bottom) of each blog post, depending on the device you use, where you can easily submit your e-mail address (only) to be included in my mailing list.

You Can Also Find Me On Social Media:

Facebook page: The Grateful Girl Cooks!
Pinterest:
The Grateful Girl Cooks!
Instagram:
jbatthegratefulgirlcooks

Author's signature

Recipe adapted from and printed from original source in April, 2018 at FamilyCircle.com

↓↓ PRINTABLE RECIPE BELOW ↓↓

5 from 1 vote
Bacon, Onion and Spinach Tart
Prep Time
30 mins
Cook Time
35 mins
Total Time
1 hr 5 mins
 

Enjoy a Bacon, Onion and Spinach Tart for breakfast, lunch or dinner! It's yummy, and filled with caramelized onions, cheese, spinach & bacon.

Category: Breakfast, Dinner, Lunch
Cuisine: American
Keyword: bacon onion and cheese tart
Servings: 8
Calories Per Serving: 258 kcal
Author: JB @ The Grateful Girl Cooks!
Ingredients
  • 1 refrigerated rolled pie crust or homemade
  • 4 slices bacon crosswise cut into ¼" strips
  • 6 cups baby spinach leaves
  • pounds yellow onions (about 4) cut into ¼" slices (about 6 cups total)
  • ¾ teaspoon salt
  • ¼ teaspoon dried thyme
  • 3 large eggs
  • ¾ cup half and half
  • ¼ teaspoon black pepper
  • cup shredded cheddar cheese or Gruyere
Instructions
Prep:
  1. Roll out dough; fit it into a 9" tart pan (with removable bottom). Press dough into sides of pan; trim away excess crust from top edge, so top of crust is flush with pan. Use fork tines to prick dough on sides and bottom. Refrigerate crust while making tart filling.

  2. Cut 4 strips of bacon crosswise into small thin strips. Place bacon strips in a large non-stick skillet. Cook on Medium heat, stirring often. Cook approx. 6-8 minutes. Add spinach. Continue to stir; cook for 1 minute, or until spinach has wilted. Transfer bacon/spinach mixture out of skillet with a slotted spoon. Place on plate lined with paper towels, to absorb excess grease. Do not clean skillet.

Caramelize Onions:
  1. Place onions, thyme and ¼ teaspoon salt into the same skillet. Turn to Medium heat; put a lid on skillet. Cook onions (covered) for 25 minutes, stirring occasionally. Continue to cook (covered) until onions have caramelized, softened and are a rich brown color. When done, remove skillet from heat. Stir, then let them cool, uncovered, for 5 minutes. TIP: Preheat oven to 375°F. while onions are cooking.

Make Tart Filling:
  1. In large mixing bowl, whisk together eggs, half and half, pepper and remaining ½ tsp. salt until combined. Stir in bacon/spinach. Add cooled onions; stir until combined. Carefully pour filling into crust, making sure spinach/onions/bacon are evenly distributed.

Time For The Oven:
  1. Bake at 375°F. for 15 minutes, then reduce the heat to 325°, and bake another 20 minutes at lower temperature. Remove tart from oven, and turn oven to BROIL setting. Sprinkle top of tart with shredded cheese. Place tart about 6" from broiler heating element. Let it broil for 1-2 minutes, or until cheese has melted. Keep an eye on it so you don't burn the top! Transfer tart to wire rack. Let cool 5 minutes before removing from tart pan, slicing and serving.

  2. Carefully remove metal rim from the tart by pushing up from the bottom to separate tart from outer rim. Cut into 8 slices, serve, and enjoy! Keep any leftovers covered/refrigerated up to 4-5 days.

Nutrition Facts
Bacon, Onion and Spinach Tart
Amount Per Serving (1 slice (1/8 of total))
Calories 258 Calories from Fat 144
% Daily Value*
Fat 16g25%
Saturated Fat 6g38%
Trans Fat 1g
Polyunsaturated Fat 2g
Monounsaturated Fat 6g
Cholesterol 90mg30%
Sodium 470mg20%
Potassium 353mg10%
Carbohydrates 21g7%
Fiber 3g13%
Sugar 5g6%
Protein 8g16%
Vitamin A 2346IU47%
Vitamin C 13mg16%
Calcium 115mg12%
Iron 2mg11%
* Percent Daily Values are based on a 2000 calorie diet.

Here’s one more to pin on your Pinterest boards!Enjoy a Bacon, Onion and Spinach Tart for breakfast, lunch or dinner! It's yummy, and filled with caramelized onions, cheese, spinach & bacon.

Penne, Sausage and Peppers

Penne, Sausage and Peppers is an easy, yummy meal! Italian sausage, onions, spices and red/green bell peppers in pasta, topped with Parmesan!

Simple and delicious is how I would describe this recipe for penne, sausage and peppers I’m sharing here today. I found this recipe almost 7 years ago in a magazine I subscribed to at the time. It’s filling, and my husband and I enjoy it a lot.

Italian sausage is the star of this recipe, and you can use either sweet milk Italian sausage or spicy hot Italian sausage, whichever you prefer. The other ingredients are red and green bell peppers, onion, olive oil and a couple of Italian spices. That’s it! Here’s how to make this easy dish:

Scroll Down For A Printable Recipe Card At The Bottom Of The Page

Cook The Italian Sausage

Heat olive oil in a large skillet on medium heat. Remove the Italian sausage from their casings (if using links), and place the meat into the skillet. Cook the sausage for about 5-6 minutes, stirring to break up the chunks.

Once the sausage is lightly browned and no longer pink, it is done cooking. Use a slotted spoon to transfer the meat to a plate (letting grease drain back into skillet). Leave 1 Tablespoon of the grease remaining in the skillet, and discard the rest.

Italian sausage is crumbled and cooked in skillet.Once the Italian sausage is cooked and no longer pink, it is removed from the skillet.

Cook The Onions And Bell Peppers

On Medium heat, cook the onions, peppers and spices in reserved Tablespoon of oil/grease left in the skillet. Continue to cook, (stirring occasionally) for 10-12 minutes, or until the veggies are tender.

Red and green bell peppers, onions and spices are cooked in the skillet.

Add the cooked Italian sausage back into the skillet, and toss to combine all ingredients. Take a little bite, and season with salt and pepper, if desired.

Cooked Italian sausage is added back into skillet with cooked peppers and onions.

Prepare The Pasta And Finish The Dish

Prepare the penne pasta according to the package directions (usually around 10-11 minutes). Once done, reserve and set aside 1/2 cup of the starchy pasta water, and drain off the rest. Place the drained pasta back into the pan, and add the sausage and peppers mixture.

Pour in the reserved 1/2 cup of hot starchy pasta water, and toss, to combine all the ingredients. The water will help to moisten the pasta, because there is no sauce. Don’t worry… it won’t be “soupy”. That hot pasta will quickly absorb almost all the hot water as you toss the ingredients together. Cook, stirring often until heated through (about a minute).

Penne pasta is cooked in large pan, according to package instructions, then drained.After draining pasta, the peppers, onions and sausage are added to the pasta in pan.

Serving The Penne, Sausage and Peppers

Once heated through, place portions onto serving plates or into bowls. Top each portion of the penne, sausage and peppers with grated Parmesan cheese, and serve immediately while hot. 

The onions, peppers and sausage provide great flavor to this simple dish, and I’m sure you will enjoy it. TIP: Leftovers can be easily microwaved, but you may need to add a tiny bit of olive oil or hot water to re-hydrate the pasta before re-heating.

A portion of penne, sausage and peppers is topped with Parmesan cheese and served.

I hope you have the opportunity to try this recipe for penne, sausage and peppers. It really is easy to make, and really does tastes wonderful. Thanks for stopping by, and I invite you to come back again soon for more recipes. Take care, and have a GREAT day!

Looking For More PASTA Recipes?

You can find ALL of my recipes in the Recipe Index, located at the top of the page. I have lots of yummy pasta dishes for you to enjoy, including:

Interested In More Recipes?

Thank you for visiting this website. I appreciate you using some of your valuable time to do soIf you’re interested, I publish a newsletter 2 times per month (1st and 15th) with all the latest recipes, and other fun info. I would be honored to have you join our growing list of subscribers, so you never miss a great recipe!
There is a Newsletter subscription box on the top right side (or bottom) of each blog post, depending on the device you use, where you can easily submit your e-mail address (only) to be included in my mailing list.

You Can Also Find Me On Social Media:

Facebook page: The Grateful Girl Cooks!
Pinterest:
The Grateful Girl Cooks!
Instagram:
jbatthegratefulgirlcooks

Author's signature

Recipe adapted from: Jodi Braun, via “All You” magazine, November 2015 edition, page 64.

↓↓ PRINTABLE RECIPE BELOW ↓↓

0 from 0 votes
Penne, Sausage and Peppers
Prep Time
15 mins
Cook Time
20 mins
Total Time
35 mins
 

Penne, Sausage and Peppers is an easy, yummy meal! Italian sausage, onions, spices and red/green bell peppers in pasta, topped with Parmesan!

Category: Dinner, Pasta
Cuisine: Italian
Keyword: pasta, penne, sausage and peppers
Servings: 4
Calories Per Serving: 442 kcal
Author: JB @ The Grateful Girl Cooks!
Ingredients
  • 8 ounces penne pasta
  • 2 teaspoons olive oil
  • ½ pound Italian sausage (sweet or hot) removed from casings (approx. 3 links)
  • ½ large green bell pepper seeded, thinly sliced
  • ½ large red bell pepper seeded, thinly sliced
  • ½ medium yellow onion thinly sliced (top to bottom)
  • 1 teaspoon garlic powder
  • ½ teaspoon Italian seasoning
  • salt and pepper, to taste
  • Grated Parmesan for serving (optional)
Instructions
  1. Heat oil in large skillet on medium heat. Remove sausage from casings (if using links); place meat in skillet. Cook 5-6 minutes, stirring to break up chunks, cooking until meat is no longer pink. Use slotted spoon to transfer sausage to a plate (let grease drain into skillet). Leave 1 Tablespoon of the grease in skillet; discard the rest.

  2. On Medium heat, cook onions, peppers and spices in reserved oil/grease in skillet. Cook, stirring occasionally for 10-12 minutes, until veggies are tender.

  3. Add cooked sausage to veggies; toss to combine. Take a taste; season with salt and pepper, if desired.

  4. Prepare pasta according to pkg. directions (usually 10-11 minutes). Once done, reserve/set aside 1/2 cup of starchy pasta water; drain off the rest. Place drained pasta back into pan; add sausage/peppers. Pour in reserved 1/2 cup of hot starchy pasta water. Toss to combine. Cook, stirring often until heated through (about a minute).

  5. Transfer to serving plates; garnish portions with grated Parmesan cheese, and serve hot. Enjoy!

Recipe Notes

Can substitute rotini, farfalle or bow-tie pasta for the penne, if desired.

Nutrition Facts
Penne, Sausage and Peppers
Amount Per Serving (1 (1/4 of total))
Calories 442 Calories from Fat 189
% Daily Value*
Fat 21g32%
Saturated Fat 7g44%
Polyunsaturated Fat 3g
Monounsaturated Fat 10g
Cholesterol 43mg14%
Sodium 420mg18%
Potassium 381mg11%
Carbohydrates 47g16%
Fiber 3g13%
Sugar 3g3%
Protein 16g32%
Vitamin A 722IU14%
Vitamin C 45mg55%
Calcium 33mg3%
Iron 2mg11%
* Percent Daily Values are based on a 2000 calorie diet.

Here’s one more to pin on your Pinterest boards!Penne, Sausage and Peppers is an easy, yummy meal! Italian sausage, onions, spices and red/green bell peppers in pasta, topped with Parmesan!