Category: Pork

Creamy Honey Dijon Pork Chops

Creamy Honey Dijon Pork Chops are easy to prepare pork cutlets which are pan-seared, then covered with a simple, delicious honey Dijon sauce.

Today I want to share a delicious recipe for tender, juicy pork chop cutlets coated in creamy honey mustard sauce! The recipe for Creamy Honey Dijon Pork Chops is easy! They can be cooked and on the table in about 20 minutes!

Using what are commonly called “pork cutlets” (boneless pork chops about ½” thick), allows for less cooking time, which works for me! The pork chops are quickly seared in olive oil and butter, then topped with a simple 3-ingredient sauce to finish cooking. It really couldn’t be any easier to prepare, and the pork chops are juicy, tender, and taste GREAT! Let me show you how to make them in practically no time at all!

Scroll Down For A Printable Recipe Card At The Bottom Of The Page

Preparing The Pork Chops For Pan-Searing

The pork chops should be about ½” thick. They are sometimes called “pork cutlets” at the store, and they are thinner than other types of pork chops. We are using these pork chops to ensure less cooking time. Okay? Remember- if you are using thicker chops, your cooking time will need to be increased! My husband and I eat only ONE pork chop, but this recipe can be easily doubled for more people or big appetites!

Place the boneless pork chops on a sheet of plastic wrap. Use a meat mallet and pound down the meat on both sides with the sharp ends to help tenderize the pork chops. Once done, trim off any extra fat you find clinging onto the edges of the chops.

Measure flour, salt and pepper onto a large plate, and give it a stir to combine. Dredge the pork chops through the flour mixture (one at a time) to ensure all sides of the pork chops are covered with the flour mixture. Shake off any excess flour and place pork chop aside while you repeat the process with the other pork chop (or chops). Now it’s time to pan-sear them!

Boneless pork chops are tenderized using a meat mallet.The pork chops are dredged in a flour/salt/pepper mixture until covered.

Ready To Pan-Sear

Heat extra virgin olive oil and butter in a large skillet on medium-high heat. Once butter has melted and the skillet is really hot (but not smoking), carefully add the pork chops. They should sizzle when added to the hot oil/butter in the skillet. Don’t move the chops around in the skillet… just let them sear in the pan. This helps to give the meat a nice golden brown “crust”.

Cook the chops for 4 minutes, then carefully flip them over to the other side and cook for 4 more minutes. They pork cutlets should have a nice golden brown color when done. Transfer the pork chops to a plate and cover, to keep them warm.

Seasoned/floured pork chops are pan-seared in a skillet with oil and butter.Golden brown pork chops pan-searing in a large skillet.

Make The Creamy Honey Dijon Sauce

Without cleaning the pan, use the same skillet to make the quick and easy creamy honey Dijon sauce. Turn the heat to MEDIUM and add the whipping cream, Dijon mustard and honey to the skillet. Whisk well, to combine ingredients. Let the sauce simmer, stirring often, for one minute.

Whipping cream, honey and Dijon mustard are added to the skillet to make a sauce.The creamy honey Dijon sauce is whisked until creamy and ready for pork chops to be added.

Back Into The Sauce Go The Pork Chops

Carefully place the pork chops back into the skillet with the sauce. Spoon sauce over the top of the chops, to cover. Place a lid on the skillet PARTWAY (don’t fully cover). Let the meat simmer on medium heat for 5-6 more minutes to cook the creamy honey Dijon pork chops fully through.

During the cooking time, take the lid off and add more sauce to the top of the chops, then partly cover the skillet and finish cooking. When done, remove the skillet from the heat. The pork chops should have an internal temperature of 145°F. Because pork “cutlets” are thinner than other pork chops, they require less cooking time to reach temperature, which is a win-win in my book!

Pan-seared pork chops are added back into the skillet with creamy sauce and cooked.Creamy honey Dijon pork chops continue cooking in the sauce until done.

Serve And Enjoy The Creamy Honey Dijon Pork Chops

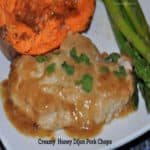
To serve the creamy honey Dijon pork chops, spoon some of the sauce over each piece. Garnish each portion with fresh thyme leaves or flat leaf Italian parsley. The green color of the parsley give the pork chops a pop of color, which we like!

Place a pork chop on each plate, adding additional sauce, if desired. Serve while hot, and enjoy! The pork chops should be tender, juicy, and have wonderful flavor, thanks to the tasty sauce it cooked in! I really hope you like them, because we sure do! We enjoyed them served with fresh asparagus and a stuffed sweet potato half on the side. YUM!

Chopped flat leaf parsley is sprinkled on top of the Creamy Honey Dijon Pork Chops before serving.Creamy Honey Dijon Pork Chops are served, with asparagus and sweet potato on the side.

I hope you like making and eating this delicious pork chop dish! We really do enjoy it, and trust you will, too! Thanks for stopping by today, and I hope you will come back again soon for more family-friendly recipes. Take care, and have a wonderful day.

Looking For More PORK CHOP Recipes?

You can find ALL of my recipes in the Recipe Index, which is located at the top of the page. I have many delicious pork chop recipes you might enjoy, including:

Interested In More Recipes?

Thank you for visiting this website. I appreciate you using some of your valuable time to do soIf you’re interested, I publish a newsletter 2 times per month (1st and 15th) with all the latest recipes, and other fun info. I would be honored to have you join our growing list of subscribers, so you never miss a great recipe!
There is a Newsletter subscription box on the top right side (or bottom) of each blog post, depending on the device you use, where you can easily submit your e-mail address (only) to be included in my mailing list.

You Can Also Find Me On Social Media:

Facebook page: The Grateful Girl Cooks!
Pinterest:
The Grateful Girl Cooks!
Instagram:
jbatthegratefulgirlcooks

Author's signature

Recipe adapted from Milena and Chris Perrine at:  craftbeering.com/thin-pork-chops-recipe-honey-mustard-cream-sauce/:

↓↓ PRINTABLE RECIPE BELOW ↓↓

0 from 0 votes
Creamy Honey Dijon Pork Chops
Prep Time
5 mins
Cook Time
14 mins
Total Time
19 mins
 

Creamy Honey Dijon Pork Chops are easy to prepare pork cutlets which are pan-seared, then covered with a simple, delicious honey Dijon sauce.

Category: Main Course
Cuisine: American
Keyword: creamy honey dijon pork chops
Servings: 2
Calories Per Serving: 480 kcal
Author: JB @ The Grateful Girl Cooks!
Ingredients
  • 2 boneless pork chops (½" thick) approx. 5 oz. each
  • 1 Tablespoon all purpose flour
  • teaspoon salt
  • teaspoon ground pepper
  • 1 Tablespoon extra virgin olive oil
  • 1 Tablespoon butter
  • cup heavy whipping cream
  • 1 Tablespoon Dijon mustard
  • 1 Tablespoon honey
  • fresh thyme leaves or flat leaf parsley OPTIONAL garnish
Instructions
  1. Place pork chops on plastic wrap. Using a meat mallet, pound meat on both sides to tenderize. Trim any extra fat from edges of chops.

  2. Measure flour, salt and pepper onto a large plate; stir to combine. Dredge chops in flour (one at a time), covering all sides. Shake off excess flour; place pork chop aside. Repeat with other pork chop (or chops).

  3. Heat olive oil and butter on medium-high heat in large skillet. Once skillet is really hot (but not smoking), add pork chops. They should sizzle when added to skillet. Don't move chops once in skillet. Let them sear, to create a golden brown "crust". Cook for 4 minutes, then flip chops to other side; cook 4 more minutes. Remove pan from heat. Transfer chops to plate; cover, to keep warm.

  4. Without cleaning, use same skillet to make sauce. Turn heat to MEDIUM; add whipping cream, Dijon and honey. Whisk well, to combine. Let sauce simmer, stirring often, for 1 minute.

  5. Place pork chops back into skillet with sauce. Spoon sauce over chops. Place a lid on skillet PARTWAY (don't fully cover). Let chops simmer on medium heat 5-6 minutes to cook fully through. During cooking, take lid off; spoon more sauce on top of chops, then partly re-cover skillet and finish cooking. When done, pork chops should have an internal temperature of 145°F.

  6. To serve, spoon sauce on each piece. Garnish with fresh thyme or flat leaf parsley. Serve hot... and enjoy!

Nutrition Facts
Creamy Honey Dijon Pork Chops
Amount Per Serving (1 chop + sauce)
Calories 480 Calories from Fat 297
% Daily Value*
Fat 33g51%
Saturated Fat 15g94%
Trans Fat 1g
Polyunsaturated Fat 2g
Monounsaturated Fat 13g
Cholesterol 163mg54%
Sodium 608mg26%
Potassium 602mg17%
Carbohydrates 13g4%
Fiber 1g4%
Sugar 9g10%
Protein 33g66%
Vitamin A 764IU15%
Vitamin C 1mg1%
Calcium 41mg4%
Iron 1mg6%
* Percent Daily Values are based on a 2000 calorie diet.

Here’s one more to pin on your Pinterest boards!Creamy Honey Dijon Pork Chops are easy to prepare pork cutlets which are pan-seared, then covered with a simple, delicious honey Dijon sauce.

Ham and Cheddar Gnocchi

Ham and Cheddar Gnocchi is a delicious, creamy, easy, one skillet meal, with ham, potato gnocchi, green beans, cheese, onions and garlic!

Do you enjoy eating gnocchi? I sure do… those little fluffy potato bundles can be combined with a number of sauces and/or meats for a delicious meal. Over the past few years I’ve enjoyed using them for a number of recipes, because they are easy and quick to cook!

I found the original recipe for the ham and cheddar gnocchi online, and made several changes to suit our taste buds! This recipe is pretty straightforward in that you add ingredients to a skillet, cook, add more ingredients, and cook again. Cover it all with a blanket of cheddar cheese then eat. You get the picture. It doesn’t take a rocket scientist to make this yummy all-in-one-skillet dish! Here’s how to make it:

Scroll Down for A Printable Recipe Card At The Bottom Of The Page

Ready, Get Set… And Go!

You will need a large, oven-proof skillet for this dish. Melt a Tablespoon of butter over medium heat in the skillet. Add two cups of chopped onions to the butter, and sauté them for approximately 4-5 minutes, or until they become tender and are golden brown.

Toss in the diced or shredded ham, and stir to combine. Cook the ham, onions and butter until heated through, approx. 2-3 minutes.

Chopped onions are cooked in melted butter in a large skillet.
Shredded (or cubed) ham is added to the cooked onions in the skillet.

Stir in the water and the chicken broth, and bring this mixture to a simmer. Once the liquid is simmering, add the gnocchi and sliced green beans. Stir everything well, then put a lid on the skillet.

Cook (covered) on medium-low heat for about 5 minutes, stirring once or twice during the cooking time. When done, the green beans AND the gnocchi should be tender to the bite.

Chicken broth and water are stirred into the skillet with ham and onions.Potato gnocchi and sliced green beans are added to the skillet.

Finishing The Ham And Cheddar Gnocchi

Turn on the broiler in your oven. to preheat. Add garlic powder, and season to taste with salt and black pepper. Stir in the half and half (or whipping cream, if using), then stir to combine these ingredients.

Sprinkle the gnocchi with grated cheddar cheese. If you don’t enjoy cheddar, you can use the cheese of your choice (such as Pepper Jack, Swiss, etc.). I use cheddar, because we always have it around, and it adds nice color to the dish. 

Put the skillet on a rack, positioned about 4-5 inches from the broiler heating element. Let the ham and cheddar gnocchi heat under the broiler about 2-3 minutes, until the cheese has melted and is bubbly on top. Be sure to keep an eye on it, so you don’t burn it! When done, remove from the oven and it’s ready to serve!

Seasonings and half and half are added to the ingredients for ham and cheddar gnocchi.Grated cheddar cheese is added to ham and cheddar gnocchi, then skillet is put under a broiler.

Serve The Ham And Cheddar Gnocchi

Serve the ham and cheddar gnocchi straight from the skillet. It is a rather rustic presentation, but it works! Besides, who needs one more serving dish to wash, right? Just grab a large spoon and dish it up onto individual serving plates Enjoy this flavorful all in one skillet meal!

Ham and cheddar gnocchi has been removed from broiler nd is ready to eat.A close up photo of the ham and cheddar gnocchi, ready for serving.

I really hope you enjoy this dish. We sure do, and enjoy how simple it is to make. The leftovers can be easily reheated using a microwave. Thank you for stopping by today, and I hope you will come back soon for more family-friendly recipes. Have a wonderful day, friends.

Looking For More Recipes Using GNOCCHI?

You can find ALL of my recipes in the Recipe Index, which is located at the top of the page. I have several delicious gnocchi recipes you might enjoy, including:

Interested In More Recipes?

Thank you for visiting this website. I appreciate you using some of your valuable time to do soIf you’re interested, I publish a newsletter 2 times per month (1st and 15th) with all the latest recipes, and other fun info. I would be honored to have you join our growing list of subscribers, so you never miss a great recipe!
There is a Newsletter subscription box on the top right side (or bottom) of each blog post, depending on the device you use, where you can easily submit your e-mail address (only) to be included in my mailing list.

You Can Also Find Me On Social Media:

Facebook page: The Grateful Girl Cooks!
Pinterest:
The Grateful Girl Cooks!
Instagram:
jbatthegratefulgirlcooks

Author's signature

Recipe adapted from: http://www.kevinandamanda.com/ham-and-cheese-gnocchi/

0 from 0 votes
Ham and Cheddar Gnocchi
Prep Time
5 mins
Cook Time
15 mins
Total Time
20 mins
 

Ham and Cheddar Gnocchi is a delicious, creamy, easy, one skillet meal, with ham, potato gnocchi, green beans, cheese, onions and garlic!

Category: Main Course
Cuisine: American
Keyword: ham and cheddar gnocchi
Servings: 4
Calories Per Serving: 593 kcal
Author: JB @ The Grateful Girl Cooks!
Ingredients
  • 1 Tablespoon butter
  • 2 cups diced yellow onion (approx. 1 large)
  • 12 ounces ham (diced or shredded)
  • ¾ cup water
  • ½ cup low-sodium chicken broth
  • 16 ounces potato gnocchi (1 pound pkg.)
  • ¾ cup sliced fresh green beans
  • ¼ cup half and half (or substitute heavy whipping cream)
  • ¼ teaspoon garlic powder
  • salt & pepper, to taste
  • 1 cup shredded cheddar cheese (sharp or mild)
Instructions
  1. Melt butter over medium heat in a large (ovenproof) skillet. Add chopped onions to skillet; sauté approx. 4-5 minutes, or until tender and translucent. Stir in diced or shredded ham. Cook 2-3 minutes until heated through,

  2. Stir in water and chicken broth; bring this mixture to a simmer. Once simmering, add gnocchi and sliced green beans. Stir well, then put a lid on the skillet. Cook (covered) on medium-low heat for about 5 minutes, stirring once or twice. When done, green beans AND gnocchi should be tender. Remove skillet from heat. **Turn on oven broiler to preheat while you finish making the gnocchi.**

  3. To gnocchi add garlic powder, and then salt and pepper (to taste). Stir in half and half (or whipping cream, if using), combining all ingredients. Sprinkle gnocchi with grated cheddar cheese.

  4. Put skillet on a rack, positioned about 4-5 inches from the broiler heating element. Broil 2-3 minutes, or until cheese has melted and is bubbly on top. Be sure to keep an eye on it, so you don't burn it! When done, remove skillet from oven, serve immediately and enjoy!

Nutrition Facts
Ham and Cheddar Gnocchi
Amount Per Serving (1 (1/4 of total))
Calories 593 Calories from Fat 261
% Daily Value*
Fat 29g45%
Saturated Fat 14g88%
Trans Fat 1g
Polyunsaturated Fat 2g
Monounsaturated Fat 11g
Cholesterol 96mg32%
Sodium 1616mg70%
Potassium 479mg14%
Carbohydrates 51g17%
Fiber 5g21%
Sugar 4g4%
Protein 32g64%
Vitamin A 568IU11%
Vitamin C 9mg11%
Calcium 278mg28%
Iron 5mg28%
* Percent Daily Values are based on a 2000 calorie diet.

Here’s one more to pin on your Pinterest boards!Ham and Cheddar Gnocchi is a delicious, creamy, easy, one skillet meal, with ham, potato gnocchi, green beans, cheese, onions and garlic!


Smoked Smothered Pork Chops

Smoked Smothered Pork Chops are tender, delicious and covered in onion gravy. They’re prepped on a stove, then cooked until tender on a smoker grill.
Smoked Smothered Pork Chops are tender, delicious and covered in onion gravy. Prepped on a stove, then cooked until tender on a smoker grill.

We love smothered pork chops, and typically we bake them. However, when it is summer and it’s really hot, I don’t want to heat up our kitchen by using our oven. That’s where our smoker comes in handy! We do the prep work for these smoked smothered pork chops on the stovetop for several minutes, then transfer them to our Traeger grill to cook low and slow!

I made a couple tweaks to a recipe I posted on this blog a few years ago, by doubling the ingredients (to serve 4) and adapting it to be cooked on a smoker grill. They turned out wonderful! Delicious and tender, this is an easy way to slow cook pork chops on a HOT summer day, without using the oven!

The long cooking time (1 hour, 45 minutes) on the smoker gives bone-in pork chops a chance to be infused with flavor and they always turn out really tender! The pork chops are “smothered” in a simple onion gravy while they cook away! YUM! Here’s how to make smoked smothered pork chops.

Scroll Down For A Printable Recipe Card At The Bottom Of The Page

Season The Pork Chops

Place paprika, onion powder, salt, black pepper, and cayenne pepper in a small bowl. Stir to combine these dry spices. Pat the pork chops dry using a paper towel, then sprinkle both sides of the pork chops evenly with the spice mix. Press the spices into the meat, so it adheres.

A simple spice mix is combined to use on the smoked pork chops.Four bone-in pork chops are coated with spices on both sides before cooking.

Prepare The Smoked Smothered Pork Chops

Before cooking the pork chops on your smoker, you will need to quickly pan-sear and brown them. Heat vegetable oil in a large oven-proof skillet on medium-high heat, until very hot, but just barely smoking.

Add the seasoned pork chops to the skillet in a single layer, and cook each side 3-4 minutes, until well browned. Transfer the pork chops from the skillet to a plate (once browned), and keep them warm. Do NOT clean out the skillet!

Seasoned pork chops are browned in a skillet before putting them on the smoker.Both sides of the pork chops are browned well in a large skillet.

Caramelize Onions To Smother The Pork Chops

Add butter to the same skillet, and let it melt on medium heat. Add the onion slices, and cook for 8-10 minutes, stirring occasionally, until well browned. Stir in thyme and minced garlic, and cook for about 30 additional seconds.

Add 1 cup beef broth to the skillet (reserving remaining 2 Tablespoons broth for later use). Toss in the bay leaf, and stir well, scraping up the browned bits (lots of flavor) from the bottom of the skillet while it cooks.

Bring this mixture to a simmer, then transfer the pork chops back into the skillet. Spoon some of the sauce and onions over the top of each piece, then remove skillet from the stove and cover it with aluminum foil.

Sliced onions are cooked in butter until well browned.Smoked smothered pork chops are covered with gravy and cooked onions.

Ready For The Smoker Grill

Preheat your smoker to 300°F according to manufacturer’s instructions. Once it is ready and at temperature, carefully place the foil-covered skillet onto the grill grate. Close the lid, and let the smoked smothered pork chops cook, (undisturbed) for 1 hour and 45 minutes, until the pork chops are tender.

Smoked smothered pork chops are cooked on a Traeger grill in a foil-covered skillet.

Last Step Before Serving The Smoked Smothered Pork Chops

When done, remove the skillet from the smoker, and carefully transfer the smoked smothered pork chops (meat only) to a plate. Cover them with foil to keep them hot. Place a large strainer on top of a medium-sized bowl.

Pour the sauce and onions from the skillet through the strainer. The sauce will run through strainer into the bowl below. The onions will remain in the strainer. Discard the bay leaves, and place the onions in a small bowl. If desired, remove any accumulated fat from the surface of the sauce.

Measure out 2/3 cup of the sauce, and place it back into the skillet. Bring the sauce to a low simmer. In a separate small bowl, whisk together the reserved 2 Tablespoons beef broth and the cornstarch until smooth. Add this to the sauce in the skillet, and whisk to combine. The sauce will slightly thicken as it cooks for about a minute. Once thickened, add the onions back into the sauce, and stir to combine. **If desired, season gravy with additional salt and pepper, to suit your taste.

Onions and juices are separated by straining juice over a bowl.Some of the onion sauce is used to make a gravy.The onions are added back into the gravy and cooked until gravy thickens.

Time To Eat!

Now it’s time to serve the smoked smothered pork chops! By this time you should be more than ready to enjoy this dish. Place a pork chop onto each plate, and then generously spoon some of the onion gravy over the top of each piece.

We always enjoy having mashed potatoes with the pork chops, and like to add a bit of the “gravy” to them! Serve, and enjoy these tender and delicious smoked smothered pork chops. I think you will really enjoy them!

A serving of smoked smothered pork chops, with mashed potatoes and broccoli on the side.A thick onion gravy tops the smoked smothered pork chops.

I hope you’ll have the opportunity to try these pork chops, because they are really yummy. You can also check out my original recipe for BAKED smothered pork chops (for two) here. Thank you for stopping by, and I hope you will come back again soon for more family-friendly recipes.

Looking for More PORK CHOP Recipes?

You can find ALL of my recipes in the Recipe Index, located at the top of the page. I have quite a few, delicious pork chop recipes you’ll enjoy, including:

Interested In More Recipes?

Thank you for visiting this website. I appreciate you using some of your valuable time to do soIf you’re interested, I publish a newsletter 2 times per month (1st and 15th) with all the latest recipes, and other fun info. I would be honored to have you join our growing list of subscribers, so you never miss a great recipe!
There is a Newsletter subscription box on the top right side (or bottom) of each blog post, depending on the device you use, where you can easily submit your e-mail address (only) to be included in my mailing list.

You Can Also Find Me On Social Media:

Facebook page: The Grateful Girl Cooks!
Pinterest:
The Grateful Girl Cooks!
Instagram:
jbatthegratefulgirlcooks

Author's signature


0 from 0 votes
Smoked Smothered Pork Chops
Prep Time
20 mins
Cook Time
1 hr 45 mins
Total Time
2 hrs 5 mins
 

Smoked Smothered Pork Chops are tender, delicious and covered in onion gravy. They're prepped on a stove, then cooked until tender on a smoker grill.

Category: Dinner
Cuisine: American
Keyword: smoked smothered pork chops
Servings: 4
Calories Per Serving: 441 kcal
Author: JB @ The Grateful Girl Cooks!
Ingredients
  • 1 teaspoon onion powder
  • ½ teaspoon paprika
  • ½ teaspoon (each) salt and pepper
  • ¼ teaspoon cayenne pepper
  • 4 bone-in pork chops , approx. 8 ounces each, (¾-1" thick)
  • 2 Tablespoons vegetable oil
  • 2 Tablespoons butter
  • 2 large yellow onions halved, sliced thin top to bottom
  • 2 cloves garlic , minced
  • 1 teaspoon fresh thyme, minced , OR ¼ tsp. dried thyme
  • 1 cup PLUS 2 Tablespoons low sodium beef broth , divided use
  • 2 bay leaves
  • teaspoons cornstarch
Instructions
  1. Place paprika, onion powder, salt, pepper, and cayenne pepper in small bowl. Stir to combine. Pat pork chops dry using paper towel; sprinkle both sides of meat with spice mix, pressing spices into meat to adhere.

  2. Heat oil in large oven-proof skillet on medium-high heat, until very hot. Add pork chops in single layer; cook each side 3-4 minutes, until well browned. Transfer pork chops from skillet to a plate & keep warm. Do NOT clean out skillet!

  3. Add butter to same skillet; melt on medium heat. Add sliced onions; cook for 8-10 minutes, stirring occasionally, until well browned. Stir in thyme and minced garlic; cook for 30 additional seconds. Add 1 cup beef broth to skillet (reserving remaining 2 Tablespoons for later). Add bay leaves and stir well, scraping up the browned bits from bottom of skillet while it cooks. Bring to a simmer; transfer pork chops back into skillet. Spoon sauce and onions over pork chops. Remove skillet from stove; cover it with aluminum foil.

  4. Preheat smoker to 300°F according to manufacturer instructions. Once at temp., place foil-covered skillet onto grill grate. Close smoker lid; let cook, (undisturbed) for 1 hour and 45 minutes, until pork chops are tender.

  5. When done, remove skillet from smoker; transfer pork chops (meat only) to a plate. Cover with foil to keep them hot. Place a large strainer on top of a medium-sized bowl. Pour sauce and onions from skillet through strainer. Sauce will run through strainer into bowl below. Onions will remain in strainer. Discard bay leaf. Place onions in small bowl. Remove any accumulated fat from surface of sauce. Place ⅔ cup of the sauce back into the skillet. Bring to a low simmer. In separate bowl, whisk reserved 2 Tablespoons beef broth and cornstarch until smooth. Add to sauce in skillet; whisk to combine. Sauce will slightly thicken as it cooks for about a minute. Once sauce thickens, add onions; stir to combine. **If desired, season gravy with additional salt and pepper, to taste.

  6. Place a pork chop onto each plate, and generously top each one with onion gravy. Serve, and enjoy!

Nutrition Facts
Smoked Smothered Pork Chops
Amount Per Serving (1 pork chop and gravy)
Calories 441 Calories from Fat 252
% Daily Value*
Fat 28g43%
Saturated Fat 14g88%
Trans Fat 1g
Polyunsaturated Fat 2g
Monounsaturated Fat 8g
Cholesterol 132mg44%
Sodium 548mg24%
Potassium 835mg24%
Carbohydrates 9g3%
Fiber 2g8%
Sugar 3g3%
Protein 37g74%
Vitamin A 389IU8%
Vitamin C 7mg8%
Calcium 59mg6%
Iron 1mg6%
* Percent Daily Values are based on a 2000 calorie diet.

Here’s one more to pin on your Pinterest boards!Smoked Smothered Pork Chops are tender, delicious and covered in onion gravy. Prepped on a stove, then cooked until tender on a smoker grill.

Ham ‘n Cheese Crescent Bites

Ham ‘n Cheese Crescent Bites are yummy, & easy to make with only 4 ingredients! A crescent roll braid is filled w/ ham, cheese, & honey mustard.
Ham 'n Cheese Crescent Bites are yummy, & easy to make with only 4 ingredients! A crescent roll braid filled w/ ham, cheese, & honey mustard.

Do you use crescent rolls? We do, and I find them VERY convenient to have around for a variety of purposes besides a quick side dish with dinner! I love to use them for a variety of other uses, including quick lunches or breakfast! That little can of dough is amazing!

The recipe I am sharing today is called Ham ‘n Cheese Crescent Bites. Crescent roll dough is filled with ham, cheese, and honey mustard, braided up in a long roll, and baked. It’s really easy to make… here’s how:

Scroll Down For A Printable Recipe Card At The Bottom Of The Page

What Ingredients Do I Need?

There are only a few main ingredients needed for this dish! You will need a can of refrigerated crescent roll dough, cooked and chopped ham, honey mustard, and cheddar cheese. That’s all you need for the basic recipe.

**I usually also add sliced green onions to mine (optional), but if you don’t like them, just leave them out! If desired you can garnish the finished bites with chopped parsley, green onions or chives, but that is also optional.

Okay… let’s get started! Place the ham, honey mustard and grated cheese in a medium bowl, and stir well, to combine. If you want to add the green onions, this is where to add them.

The main ingredients are crescent roll dough, honey mustard, ham and cheese.Ingredients are stirred together until combined in a small bowl.

Preparing The Crescent Roll Braid

Remove the crescent roll dough from the can. Don’t separate the individual rolls. Roll the dough out into a rectangle on a lightly greased baking sheet. Seal all the perforations in the dough. Spoon the ham, mustard and cheese filling down the middle of the dough rectangle (lengthwise).

Ham and cheese filling is placed down the center of crescent roll dough.

Cut 10 or 12 strips on each side of the dough (your choice). Make sure to slice almost all the way to the filling in the middle. Starting at the bottom, lift one strip up and across the filling at a slight angle.

Now lift the corresponding strip on the other side up and over the filling to kind of “meet in the middle” in a braided fashion. Repeat the process (left, right, left, right) OR (right, left, right, left), alternating strips, until all strips have been “braided”.

Slits are cut into the dough on each side of the ham and cheese filling.The crescent roll dough is braided together over the ham and cheese filling.

Time To Bake!

Place the baking sheet with the braided ham ‘n cheese crescent bites into a preheated 375°F oven. NOTE: When I make these, I let it bake for about 22-25 minutes total. A couple minutes before it is finished baking (shown in the photo below), I like to top it with a couple extra  Tablespoons of grated cheddar cheese. TIP: You don’t have to add the grated cheese, but it sure looks good once it melts on top of the crescent braid.

Once the ham ‘n cheese crescent bites are finished baking, the braid will be golden brown all across the top, and any added cheddar cheese will have melted.

When almost finished baking, more cheddar cheese is added to the top of the braid.

Serving The Ham ‘n Cheese Crescent Bites

Once nicely browned on top, remove the ham ‘n cheese crescent bites from the oven. Garnish with chopped chives, parsley or green onions, if desired. Let it cool for a couple minutes before attempting to slice it, to give the cheese a chance to solidify a bit inside. Slice into six portions, and serve immediately.

The braid of ham 'n cheese crescent bites is golden brown once baked.Six portions of ham 'n cheese crescent bites are cut for serving.

You can see all the yummy ham and cheese filling inside each piece. This is a great tasting quick lunch (or dinner) I’m sure you and your family will enjoy! Ham ‘n cheese crescent bites are so simple to make, and hardly take any time at all to whip up!

You can see meat and cheese inside one of the ham 'n cheese crescent bites..

Thank you for stopping by… I really appreciate it. Hope you have the chance to make these ham ‘n cheese crescent bites soon, and trust you will enjoy them, too. God Bless You.

Looking For More Recipes Using CRESCENT ROLLS?

You can find all of my blog recipes in the Recipe Index, located at the top of the page. I have several recipes that feature crescent rolls, including:

Interested In More Recipes?

Thank you for visiting this website. I appreciate you using some of your valuable time to do soIf you’re interested, I publish a newsletter 2 times per month (1st and 15th) with all the latest recipes, and other fun info. I would be honored to have you join our growing list of subscribers, so you never miss a great recipe!
There is a Newsletter subscription box on the top right side (or bottom) of each blog post, depending on the device you use, where you can easily submit your e-mail address (only) to be included in my mailing list.

You Can Also Find Me On Social Media:

Facebook page: The Grateful Girl Cooks!
Pinterest:
The Grateful Girl Cooks!
Instagram:
jbatthegratefulgirlcooks

Author's signature

Original recipe source: https://www.plainchicken.com/ham-cheese-braid/

0 from 0 votes
Ham 'n Cheese Crescent Bites
Prep Time
10 mins
Cook Time
20 mins
Total Time
30 mins
 

Ham 'n Cheese Crescent Bites are yummy, & easy to make with only 4 ingredients! A crescent roll braid filled w/ ham, cheese, & honey mustard.

Category: Appetizer/Snack, Dinner, Lunch
Cuisine: American
Keyword: crescent rolls, ham 'n cheese crescent bites
Servings: 6
Calories Per Serving: 288 kcal
Author: JB @ The Grateful Girl Cooks!
Ingredients
  • 1 can refrigerated crescent rolls
  • cup cooked, chopped ham
  • cup grated cheddar cheese
  • ¼ cup honey mustard dressing
  • 2 Tablespoons chopped green onions (OPTIONAL)
Optional Toppings:
  • 2-3 Tablespoons grated cheddar cheese , added to top, last 2-3 minutes of baking
  • chopped parsley, green onions, or chives
Instructions
  1. Preheat oven to 375°F. Very lightly grease/spray a large baking sheet.

  2. Place ham, honey mustard and grated cheese (plus green onions, if using) in a medium bowl; stir well, to combine.

  3. Remove crescent roll dough from can. Don't separate individual rolls. Roll dough out into a rectangle on the baking sheet. Seal all perforations in the dough. Spoon ham/cheese filling lengthwise down middle of dough.

  4. Cut 10 or 12 strips on each side of the dough. Make sure to slice almost all the way to the filling in the middle. Starting at the bottom, lift one strip up and across the filling at a slight angle. Now lift corresponding strip on the other side up and over the filling to kind of overlap in the middle, in a braided fashion. Repeat process (left, right, left, right) OR (right, left, right, left), alternating strips, until all strips have been "braided".

  5. Place baking sheet onto the middle rack in preheated 375°F oven. Bake for 22-25 minutes. NOTE: If desired, a couple minutes before it is finished baking, top the braid with a couple extra Tablespoons grated cheddar. When done, the braid should be golden brown on top, and any added cheddar cheese will have melted. Remove from oven. If desired, garnish with chopped parsley, chives or green onion. Let cool a few minutes, then slice into 6 portions. Serve, and enjoy!

Nutrition Facts
Ham 'n Cheese Crescent Bites
Amount Per Serving (1 (1/6 of total))
Calories 288 Calories from Fat 162
% Daily Value*
Fat 18g28%
Saturated Fat 8g50%
Cholesterol 35mg12%
Sodium 841mg37%
Potassium 112mg3%
Carbohydrates 19g6%
Sugar 6g7%
Protein 12g24%
Vitamin A 126IU3%
Calcium 93mg9%
Iron 1mg6%
* Percent Daily Values are based on a 2000 calorie diet.

Here’s one more to pin on your Pinterest boards!Ham 'n Cheese Crescent Bites are yummy, & easy to make with only 4 ingredients! A crescent roll braid filled w/ ham, cheese, & honey mustard.


Quiche Lorraine

Quiche Lorraine is delicious for breakfast, lunch or dinner! Easy to make, and filled with bacon, eggs, and cheese… you’re gonna love it!
Quiche Lorraine is delicious for breakfast, lunch or dinner! Easy to make, and filled with bacon, eggs, and cheese... you're gonna love it!

Quiche Lorraine is a versatile, easy and delicious dish, which can be enjoyed as a main dish or as a side dish! I’ve always wondered “just WHO is Lorraine, and why is HER quiche so famous?” So I did a little bit of research to find out the history of this yummy dish.

Quiche Lorraine’s Origins

Turns out, LORRAINE isn’t a woman (who knew?). It is a region in France that borders Germany. The story goes that in medieval times, this region (originally called Lothringen) was under German rule, and a recipe for a savory cake was created there.

The French word “quiche” is derived from the German word “kuchen”, which basically means “cake”. Many years later, after the region had returned to French rule, the “Quiche Lorraine” recipe was “enhanced”, and became the name of this beloved dish.

There are multitudes of quiche recipes with a variety of ingredients created throughout the world, but the Quiche Lorraine remains the most famous and loved. Apparently chef Julia Child is often credited for exposing  America to this classic dish, which typically includes pie crust, eggs, bacon (or other meat), and cheese.

We love this dish because it is so EASY to make, and tastes absolutely wonderful! This is my “go-to” favorite quiche, and I’ve been making it for over 40 years! Here’s how to make it:

Scroll Down For A Printable Recipe Card At The Bottom Of The Page

A Word About The Pie Crust

For this recipe you can use a homemade 9″ pie shell OR a purchased deep-dish pie shell. Either type will work just fine for this recipe.

Obviously a purchased pie shell is quicker and more convenient, but I like to use my Mom’s recipe for homemade pie crusts. 

Arrange the prepared pie dough in a 9″ pie pan, and crimp the edges to form a crust. Use the tines of a fork to prick the bottom and sides of the crust (as shown below).

A 9-inch unbaked deep dish pie shell is pricked with a fork before adding ingredients.

Making The Quiche Lorraine Is EASY!

Preheat your oven to 425°F., and then begin putting this quiche together. It’s EASY!  Place the cooked, crumbled crispy bacon on the bottom of the pie shell, spreading to cover. Add the chopped onions, and then top it off with grated Swiss cheese.

Cooked, crumbled bacon and chopped onions are added to pie shell.Grated Swiss cheese is added to the quiche ingredients in pie shell.

Whisk whipping cream, eggs, sugar, salt and cayenne pepper together in a medium bowl, until they’re fully combined. Pour this liquid over the ingredients in the pie shell. The pie shell will be very full!

Carefully give the ingredients a tiny bit of a stir, bringing some of the bacon, onion and cheese up to the surface. You don’t have to mix it up real well, just enough to combine the ingredients. Now it’s time to bake your Quiche Lorraine!

Eggs, whipping cream and spices are whisked for the Quiche Lorraine.Egg and cream mixture is poured over bacon, onion and cheese in pie shell.

Baking The Quiche Loraine

Carefully place the Quiche Lorraine on the middle rack of a preheated 425°F. oven. Be careful to not slosh it around, because it will be full (just a helpful tip!). Bake at 425°F. for 15 minutes, turn the oven down to 300°F. and continue cooking it for 30 more minutes.

You’ll know it’s done when the top is golden brown and a knife inserted into the middle comes out clean. Transfer the quiche to a wire rack to cool down a bit (still in pie pan). You’ll be able to see how puffy the quiche is, from the hot air inside.

The top of the quiche will “flatten” as the air dissipates inside while it cools, and that is what it is supposed to do!

Quiche Lorraine is ready to bake in a hot oven.Top of the quiche is golden brown after baking.Hot air puffs up the Quiche Lorraine after baking.

Ready To Eat!

Once the top of the quiche has flattened and it has cooled for 10-15 minutes, it’s ready to slice and enjoy! The Quiche Lorraine can be eaten hot, warm, cold, OR at room temperature, whichever way you prefer.

Slice the quiche into 8 portions (or 6 if you want larger pieces!), serve, and enjoy! It’s filled with GREAT flavor, lots of cheese, and yummy bacon. We love this quiche, and have it for breakfast, lunch OR dinner!

Cover and store any leftovers in the refrigerator for up to 4-5 days. You can easily microwave leftover pieces of quiche to bring them back to the temperature you prefer! 

A slice of quiche is removed, revealing bacon and onions inside.A slice of Quiche Lorraine, with fresh fruit on the side.

I really hope you will try this quiche, because it is so good! It is by far the most famous of all quiches, and is a great dish to have around, for a delicious dinner, lunch or breakfast!

Thank you for stopping by, and I invite you to come back soon for more family-friendly recipes. Take care, and I hope you have a great day. 

Looking For More QUICHE Recipes?

You can find all of my blog recipes in the Recipe Index, located at the top of the page. I recommend all of my quiche recipes, which include:

Want More Recipes? Get My FREE Newsletter!

I publish a newsletter 2 times per month (1st and 15th) with lots of recipes, tips, etc..
Would you like to join our growing list of subscribers?

There is a Newsletter subscription box on the top right (or bottom) of each blog post, depending on the device you use.
You can submit your e-mail address there, to be added to my mailing list.

Find Me On Social Media:

Facebook page: The Grateful Girl Cooks!
Pinterest:
The Grateful Girl Cooks!
Instagram:
jbatthegratefulgirlcooks

Author's signature

Original recipe source: unknown (had the handwritten recipe for over 40 years- no author noted)

↓↓ PRINTABLE RECIPE BELOW ↓↓

0 from 0 votes
Quiche Lorraine
Prep Time
10 mins
Cook Time
45 mins
Total Time
55 mins
 

Quiche Lorraine is delicious for breakfast, lunch or dinner! Easy to make, and filled with bacon, eggs, and cheese... you're gonna love it!

Category: Breakfast, Dinner, Lunch
Cuisine: American
Keyword: quiche lorraine
Servings: 8 slices
Calories Per Serving: 388 kcal
Author: JB @ The Grateful Girl Cooks!
Ingredients
  • 1 9" deep dish pie shell (uncooked) (homemade or store-bought)
  • 8 slices cooked bacon (cooked crisp/crumbled)
  • cup yellow onion (finely chopped)
  • 1 cup grated Swiss cheese
  • 2 cups heavy whipping cream
  • 4 large eggs
  • ¼ teaspoon granulated sugar
  • ¾ teaspoon salt
  • teaspoon cayenne pepper
Instructions
  1. Preheat oven to 425°F.

  2. Use a homemade 9" pie shell OR a purchased deep-dish pie shell. Arrange pie dough in a 9" pie pan; crimp edges to form crust. Use the tines of a fork to prick bottom and sides of the dough. Place cooked, crumbled bacon on bottom of pie shell, spreading to cover. Add onions and Swiss cheese.

  3. In medium bowl, whisk the whipping cream, eggs, sugar, salt and cayenne pepper until combined. Pour over ingredients in pie shell (it will be full). Carefully give ingredients a stir, bringing some bacon, onion and cheese up to the surface.

  4. Carefully place quiche on middle rack of preheated oven. Bake at 425°F. for 15 minutes, turn the oven down to 300°F. and continue cooking it for 30 more minutes. It's done when the top is golden brown and knife inserted into the middle comes out clean. Transfer quiche to wire rack to cool (still in pan). Quiche will be puffy, from the hot air inside. The top of the quiche will "flatten" as air dissipates inside while quiche cools.

  5. After cooling 10-15 minutes, it's ready to slice. Quiche can be eaten hot, warm, cold, OR at room temperature, whichever way you prefer. Slice into 8 portions (or 6 if you want larger pieces), serve and enjoy! Cover leftovers well; can refrigerate for up to 4-5 days. Reheat quiche slices in microwave (to temp. you prefer).

Nutrition Facts
Quiche Lorraine
Amount Per Serving (1 slice *1/8 of total))
Calories 388 Calories from Fat 333
% Daily Value*
Fat 37g57%
Saturated Fat 20g125%
Trans Fat 1g
Cholesterol 201mg67%
Sodium 448mg19%
Potassium 144mg4%
Carbohydrates 4g1%
Fiber 1g4%
Sugar 1g1%
Protein 11g22%
Vitamin A 1143IU23%
Vitamin C 1mg1%
Calcium 162mg16%
Iron 1mg6%
* Percent Daily Values are based on a 2000 calorie diet.

Here’s one more to pin on your Pinterest boards!Quiche Lorraine is delicious for breakfast, lunch or dinner! Easy to make, and filled with bacon, eggs, and cheese... you're gonna love it!


Brown Sugar Glazed Ham

Brown Sugar Glazed Ham is perfect for dinners or holiday feasts! A honey, brown sugar, OJ and spice glaze coats the ham (boneless or bone-in).Brown Sugar Glazed Ham is perfect for dinners or holiday feasts! A honey, brown sugar, OJ and spice glaze coats the ham (boneless or bone-in).

My husband LOVES ham! We don’t have it that much during the year, but wow, does he ever love it at Christmas time and at Easter. In the past we’ve bought pre-glazed hams (at Honey-Baked using gift certificates).

We’ve also bought hams at the grocery that come with the cute little glaze package attached (where all you add is water).

Those are all wonderful options, but truthfully, it is sooo easy to make your own homemade brown sugar glazed ham. Today I will show you how you can make your own sauce to baste your holiday ham.

The “recipe” is incredibly simple, and the ham tastes wonderful after being fully glazed at 3 different points during the baking time.

The recipe as written is for a six pound ham, but can be easily adapted for a much larger one, too! Here’s how easy it is to make this delicious glazed ham:

Scroll Down For A Printable Recipe Card At The Bottom Of The Page

Make The Brown Sugar Glaze

Simple, simple, simple. The sweet glaze is super easy to make! Basically it involves placing the ingredients in a pan and cooking for a couple minutes. That’s it!

Place brown sugar, orange juice, honey, white vinegar, mustard, onion powder, garlic powder and cinnamon in a medium saucepan. Whisk the ingredients together. Once combined, bring the sauce to a simmer on medium-low heat.

Let it cook for about 2 minutes (stirring occasionally) or until the sauce has slightly thickened, then remove the pan from the heat source.

Brown sugar, OJ, honey & spices are combined in saucepan to cook the glaze.The brown sugar glaze is cooked for 1-2 minutes until it thickens slightly.

Time To Glaze The Ham – Glaze #1

TIP: Take the ham out of the refrigerator about an hour before beginning, so some of the “chill” can be take off the meat. *It will cook more evenly if you do this.

Lay two large pieces of aluminum foil on counter (overlapping slightly in middle). Place your ham right in the middle of the foil. Use 1/3 of the brown sugar glaze to cover the entire outside surface of the ham.

If you are using a spiral sliced ham, let some of the glaze drizzle down between slices, if desired. Wrap up the ham tightly with the aluminum foil, until it is well sealed.

Place the ham in a large baking dish, flat side of the ham facing down in the dish, then place the dish into a preheated 325°F oven (on a middle rack).

A ham is place on aluminum foil, then coated with brown sugar glaze.Aluminum foil tightly seals the brown sugar glazed ham for baking.

Baking The Brown Sugar Glazed Ham – Glaze #2

Bake the brown sugar glazed ham at 325°F for 15 minutes for every pound of meat you are cooking, OR until the internal temperature of the ham reaches 100-110°F. For example, this 6 pound ham was cooked for 90 minutes. As the weight of your ham may vary, it is important to follow these guidelines to ensure a juicy ham!

Remove the ham from the oven, but TURN up the oven temperature to 400°F, as you remove it. Carefully open the foil wrap, and brush the ham with another 1/3 of the brown sugar glaze all over. Place the ham STILL UNCOVERED back into the now 400°F oven. Cook for 15-20 minutes more. Keeping it uncovered will help the sugar to slightly caramelize on the ham.

Glaze # 3- The Final Glaze

Remove the ham from the oven after 15-20 minutes OR when the internal temperature reaches 160°F. Brush the remaining glaze over the surface of the ham, then tightly seal the foil back up, and let the ham rest for 10 minutes (covered), before slicing.

The ham’s internal juices will redistribute throughout the meat during this 10 minute “resting” time. This will help it to stay juicy when serving. Once “rested”, the ham is ready to slice and eat.

After baking, another coating of glaze is applied to the ham, then cooked longer.Final glaze is applied to ham after baking, then it rests to redistribute internal juices.

Ready To Eat

Slice the ham and serve to your hungry family or guests. This boneless brown sugar glazed ham sliced easily, the meat was fully cooked and juicy, and the glaze added extra flavor!

Boneless brown sugar glazed ham is sliced for serving.

You can also use this glaze for your spiral-sliced bone-in hams, too. The simple, but sweet glaze adds a wonderful layer of extra flavor to any ham.

A spiral-sliced ham can also be used for this recipe.

We enjoyed our delicious ham slices with French-style green beans and maple cinnamon sweet potatoes. It was a simple, but absolutely delicious meal.

The ham leftovers were pretty incredible too, and were used to make ham and cheese scrambled eggs, ham sandwiches, and more. YUM.

Green beans and a sweet potato are served with a brown sugar glazed ham slice.

I hope you will consider trying this simple brown sugar glazed ham. I’m confident you will enjoy it on your favorite variety of ham.

Thank you so much for visiting this blog. May God bless and keep you, and make His face shine upon you. Have a GREAT day, friends.

Looking For More HAM Recipes?

You can find my recipes that use ham (or pork) in the Recipe Index, located at the top of the page. I have some delicious recipes, including:

Want More Recipes? Get My FREE Newsletter!

I publish a newsletter 2 times per month (1st and 15th) with lots of recipes, tips, etc..
Would you like to join our growing list of subscribers?

There is a Newsletter subscription box on the top right (or bottom) of each blog post, depending on the device you use.
You can submit your e-mail address there, to be added to my mailing list.

Find Me On Social Media:

Facebook page: The Grateful Girl Cooks!
Pinterest:
The Grateful Girl Cooks!
Instagram:
jbatthegratefulgirlcooks

Author's signature

Recipe adapted from: Melissa, at: https://www.blessthismessplease.com/brown-sugar-glazed-ham/

↓↓ PRINTABLE RECIPE BELOW ↓↓

0 from 0 votes
Brown Sugar Glazed Ham
Prep Time
5 mins
Cook Time
1 hr 45 mins
Total Time
1 hr 50 mins
 

Brown Sugar Glazed Ham is perfect for dinners or holiday feasts! A honey, brown sugar, OJ and spice glaze coats the ham (boneless or bone-in).

Category: Entree
Cuisine: American
Keyword: brown sugar glazed ham
Servings: 12
Calories Per Serving: 598 kcal
Author: JB @ The Grateful Girl Cooks!
Ingredients
  • 6 pound ham (bone-in or boneless) pre-cooked (intact or spiral cut)
  • ½ cup dark brown sugar (firmly packed)
  • ¼ cup orange juice
  • 1 Tablespoon white vinegar
  • 1 Tablespoon yellow mustard
  • Tablespoons honey
  • teaspoon ground cinnamon
  • 1 pinch nutmeg
  • ¼ teaspoon garlic powder
  • ¼ teaspoon onion powder
Instructions
  1. Remove ham from fridge 1 hour before beginning, to take chill off. Preheat oven to 325°F.

  2. Place remaining ingredients in a medium saucepan. Whisk together, to combine, and bring to a simmer on medium-low heat. Cook for 2 minutes (stirring occasionally) or until sauce has slightly thickened. Remove pan from heat source.

  3. Lay two large pieces of aluminum foil on counter (overlapping slightly in middle). Place ham in middle of the foil. Brush 1/3 of the brown sugar glaze on, to cover surface of ham. If using spiral sliced ham, let glaze drizzle down between slices. Wrap ham with foil, until well sealed. Place ham in a large baking dish, flat side down. Place dish on middle rack in 325°F oven.

  4. Bake at 325°F for 15 minutes for every pound of meat you are cooking, OR until the internal temperature of the ham reaches 100-110°F. As ham weights vary, it is important to follow these guidelines to ensure juicy ham! Remove ham from oven, and TURN up oven temperature to 400°F. Carefully open foil, and pull it slightly away from the meat (but leave it in pan); brush ham with another 1/3 of the brown sugar glaze. 

  5. Place ham (STILL UNCOVERED) back into 400°F oven. Cook 15-20 minutes more. Remove ham after 15-20 minutes OR when the internal temperature reaches 160°F. Brush ham with remaining 1/3 glaze; seal the foil back up, and let ham rest for 10 minutes (covered), before slicing to allow juices to redistribute through meat. Once "rested", it's ready to slice and serve.

Nutrition Facts
Brown Sugar Glazed Ham
Amount Per Serving (1 (8 ounce slice))
Calories 598 Calories from Fat 342
% Daily Value*
Fat 38g58%
Saturated Fat 14g88%
Cholesterol 141mg47%
Sodium 2709mg118%
Potassium 671mg19%
Carbohydrates 12g4%
Fiber 1g4%
Sugar 12g13%
Protein 49g98%
Vitamin A 10IU0%
Vitamin C 3mg4%
Calcium 23mg2%
Iron 2mg11%
* Percent Daily Values are based on a 2000 calorie diet.

Here’s one more to pin on your Pinterest boards!Brown Sugar Glazed Ham is perfect for dinners or holiday feasts! A honey, brown sugar, OJ and spice glaze coats the ham (boneless or bone-in).

Simply-Seasoned Pork Chops

Simply-Seasoned Pork Chops are a cinch to make and bake! These tasty, juicy, boneless or bone-in chops are ready to eat in under 30 minutes!

Have some pork chops and are looking for a quick and EASY way to fix them? May I suggest these simply-seasoned pork chops? They are ridiculously SIMPLE to make, but have great flavor!

If you don’t have much time to fix a fancy dinner, these simply-seasoned pork chops are the way to go! Season them, and toss ’em in the oven until done. BOOM! A delicious main dish is ready to go in under 25 minutes! Here’s how to whip up this recipe:

Scroll Down For A Printable Recipe Card At The Bottom Of The Page

Make The Spice Rub

Before making the spice rub, make sure to preheat your oven to 400°F. This recipe comes together quickly, so you want your oven to be ready.  Now… on to the simple seasoning, which is a CINCH to make. Simply mix together paprika, garlic powder, onion powder, salt, pepper and oregano in a small bowl. This is the spice rub for the simply-seasoned pork chops!

Prepare The Simply-Seasoned Pork Chops

Place the pork chops on a work surface. I use boneless pork chops for this simple recipe, but have included a cooking (timing) tip in the printable recipe card (below) in case you are using bone-in chops. Bone-in will take just a tiny bit longer to cook.

Drizzle HALF (1 Tablespoon) of the olive oil over the chops, on BOTH sides. Rub it in, to cover. Sprinkle the prepared spice mix over both sides of the pork chops. Rub the spice mix into the pork with your fingers and press to ensure it sticks to the meat. Make sure all sides of the meat are covered with spices.

Bake The Simply-Seasoned Pork Chops

Place the pork chops into a small baking dish that is just big enough to hold the pork chops in a single layer. Juice will tend to accumulate in the pan during baking. You want the meat juices to “pool together” so they don’t evaporate in a larger baking pan while baking. Drizzle the chops with the remaining Tablespoon of olive oil before baking.

Bake the pork chops at 400°F for 18 minutes, OR until they reach an internal temperature of 140° F. See my note in the printable recipe card below. Make sure to NOT overcook the chops, because that will dry them out!

When done, remove the pork chops from the oven, and let them REST in the baking dish for 5 minutes. They’ll continue to cook as they rest (safe internal temperature for pork chops is 145°F), and the juices in the meat will time to redistribute through the meat, for juicier chops. As you can see from the photos below, some juice from the meat has accumulated in the dish. You can use that, if desired, to drizzle on a veggie side dish OR as the base for a quick gravy, because it has GREAT flavor. 

Time To Eat!

Once the simply-seasoned pork chops have rested for 5 minutes, they are ready to serve. Transfer to individual serving plates and serve with your favorite side dishes. We enjoyed the simply-seasoned pork chops with creamy mashed potatoes and baked praline acorn squash slices.

The pork chops were nice and juicy inside, perfectly baked, and had wonderful flavor. It was nice to enjoy such simple, tasty pork chops that didn’t require a lot of effort to prepare. Hooray!

I truly hope you will have the opportunity to make these delicious pork chops for yourself or those you love. Thank you for stopping by my blog. I sincerely hope you will come back again. Have a blessed day!

Looking For Other Recipes Using PORK CHOPS?

You can find all of my recipes in the Recipe Index, located at the top of the page. I have quite a few pork chop recipes, including:

Interested In More Recipes?

Thank you for visiting this website. I appreciate you using some of your valuable time to do soIf you’re interested, I publish a newsletter 2 times per month (1st and 15th) with all the latest recipes, and other fun info. I would be honored to have you join our growing list of subscribers, so you never miss a great recipe!
There is a Newsletter subscription box on the top right side (or bottom) of each blog post, depending on the device you use, where you can easily submit your e-mail address (only) to be included in my mailing list.

You Can Also Find Me On Social Media:

Facebook page: The Grateful Girl Cooks!
Pinterest:
The Grateful Girl Cooks!
Instagram:
jbatthegratefulgirlcooks

Author's signature

Original recipe source: https://www.theendlessmeal.com/juicy-baked-pork-chops/

0 from 0 votes
Simply-Seasoned Pork Chops
Prep Time
5 mins
Cook Time
18 mins
Total Time
23 mins
 

Simply-Seasoned Pork Chops are a cinch to make and bake! These tasty, juicy, boneless or bone-in chops are ready to eat in under 30 minutes!

Category: Entree
Cuisine: American
Keyword: simply-seasoned pork chops
Servings: 4
Calories Per Serving: 285 kcal
Author: JB @ The Grateful Girl Cooks!
Ingredients
  • 1 Tablespoon paprika
  • 2 teaspoons garlic powder
  • 2 teaspoons onion powder
  • 1 teaspoon salt
  • 1 teaspoon black pepper
  • 1 teaspoon dried oregano
  • 2 Tablespoons extra virgin olive oil, divided
  • 4 boneless pork chops (1¼" thick)
Instructions
  1. Preheat oven to 400°F.

  2. Make Spice Mix: Combine paprika, garlic powder, onion powder, salt, pepper and oregano in a small bowl.

  3. Prepare Chops: Drizzle HALF (1 Tablespoon) of olive oil over chops, on BOTH sides. Rub it in, to cover. Sprinkle spice mix over both sides of chops. Rub spices into pork to ensure it sticks to meat. All sides of the meat should be covered.

  4. Place pork chops into a baking dish just big enough to hold the chops in a single layer. Drizzle chops with remaining Tablespoon of oil. Bake at 400°F for 18 minutes (see note below), OR until they reach an internal temperature of 140° F. Make sure to NOT overcook them, because that will dry them out! When done, remove them from oven; let meat REST in baking dish for 5 minutes. They'll continue to cook as they rest (safe internal temperature for pork chops is 145°F), and the juices in the meat will time to redistribute through the meat, for juicier chops. After resting, they are ready to serve. Enjoy.

Recipe Notes

BAKING NOTE: At 400°F, as a general guide, boneless chops should be baked approx. 6-7 minutes per 1/2" thickness (as thickness of chops will vary). Bone-in chops will require an additional 1 minute of cooking time per 1/2" thickness.

Nutrition Facts
Simply-Seasoned Pork Chops
Amount Per Serving (1 pork chop)
Calories 285 Calories from Fat 153
% Daily Value*
Fat 17g26%
Saturated Fat 4g25%
Cholesterol 90mg30%
Sodium 649mg28%
Potassium 567mg16%
Carbohydrates 3g1%
Fiber 1g4%
Sugar 1g1%
Protein 30g60%
Vitamin A 862IU17%
Vitamin C 1mg1%
Calcium 25mg3%
Iron 1mg6%
* Percent Daily Values are based on a 2000 calorie diet.

Here’s one more to pin on your Pinterest boards!Simply-Seasoned Pork Chops are a cinch to make and bake! These tasty, juicy, boneless or bone-in chops are ready to eat in under 30 minutes!

Awesome Grilled Pork Chops

Awesome Grilled Pork Chops are easy, flavorful & juicy! They’re brined in salt/water/sugar overnight, and coated with spices before grilling.
Awesome Grilled Pork Chops are easy, flavorful & juicy! They're brined in salt/water/sugar overnight, and coated with spices before grilling.

Do you enjoy pork chops? We do, and have them every two or three weeks! Today I want to share a recipe for grilled pork chops that are ridiculously EASY to make, juicy (not dry), and taste WONDERFUL!

The only catch is that you need to plan ahead, because the pork chops will need to soak overnight in a simple brine (which adds flavor, tenderness, and keeps ’em juicy).

The brine only takes a couple minutes to make, and then into the fridge they go. The next day, it only takes a minute or two to make a dry spice rub, and place on the brined chops. Then all that is necessary is someone to grill the pork chops on the ol’ BBQ!

It’s really a totally EASY recipe to make, and I’m confident you’ll enjoy these grilled pork chops! The recipe calls for bone-in chops, but you can substitute boneless if you want (we prefer the bone-in!) Here’s how to make them:

Scroll Down For A Printable Recipe Card At The Bottom Of The Page

Prepare The Brine For The Pork Chops

Making the brine solution is easy! Basically, brining is a technique where meats of all kinds are soaked for several hours in a water/salt (etc.) solution to increase flavor, tenderize, and keep meats juicy. For an interesting quick read on the pros of brining, check out this article.

For this brine, you will combine salt, water and sugar in a large saucepan. Stir and cook the brine on medium heat, until the sugar and salt particles have dissolved.

Take the pan off the heat, and add ice cubes. Let the ice cubes melt; once the brine is at room temperature, it’s ready for the pork chops! See how easy it is to make?

Place the pork chops in a large container with a lid, or in a gallon-sized resealable plastic bag. The container needs to be large enough so the pork chops are in a single layer (to soak up that brine!).

Turn to coat both sides. Let the chops brine overnight (covered) in the refrigerator.

A sweet/salty brine is prepared for the pork chops.The pork chops are refrigerated overnight in a sweet/salty brine.

Make The Spice Mix For The Easy Grilled Pork Chops

The pork chops are coated in a flavorful spice mixture on all sides, before putting them on the grill. The ingredients are paprika, garlic powder, cumin, onion powder, ground mustard, black pepper, and chili powder.

Combine the spices, and then set the spice mixture aside until you’re ready to cook the brined pork chops.

Spices are combined to make a dry rub for pork chops.Spice mix, ready to rub onto both sides of each pork chop before grilling.

Ready To Grill!

Rinse off the brine and then pat each pork chop dry with paper towels. Generously sprinkle each chop with the spice mixture (on all sides). Rub the spice mixture onto the surface of each pork chop so that it adheres to the meat.

Place the pork chops onto a hot grill. Cook for approximately 10-11 minutes, and then turn chops over. Cook for an additional 10-11 minutes or until the pork reaches an internal temperature of 145°F.

Four bone-in pork chops coated with dry rub spice mix, and ready to grill.The chops are cooked on the bbq grill over hot coals.

The thickness of the chops used will determine the actual length of cooking time. **Our chops were about an inch thick, and took about 11 minutes per side**.

Once done, remove the pork chops from the grill and let them sit for 4-5 minutes, to let the juices redistribute throughout the meat.

Awesome grilled pork chops are cooking and well browned on the bbq.

Time To Eat Some Awesome Grilled Pork Chops!

Once done, transfer the meat to a serving platter, and get ready to enjoy these awesome grilled pork chops!

We enjoyed them served with green beans, garden fresh Sun-Gold cherry tomatoes and creamy scalloped potatoes on the side.

The chops are quite juicy, and taste absolutely wonderful!

Time to serve the awesome grilled pork chops (on a large platter).Awesome Grilled Pork Chops, served with scalloped potatoes, green beans, and tomatoes.

I hope you enjoy this recipe for awesome grilled pork chops! Pretty sure you’re really going to like them.

Thank you so much for stopping by, and please pop in again sometime for another visit, and some wonderful recipes! Have a GREAT day.

Looking For More PORK CHOP Recipes?

You can find all of my pork recipes in the Recipe Index, located at the top of the page. I have quite a few, including:

Want More Recipes? Get My FREE Newsletter!

I publish a newsletter 2 times per month (1st and 15th) with lots of recipes, tips, etc..
Would you like to join our growing list of subscribers?

There is a Newsletter subscription box on the top right (or bottom) of each blog post, depending on the device you use.
You can submit your e-mail address there, to be added to my mailing list.

Find Me On Social Media:

Facebook page: The Grateful Girl Cooks!
Pinterest:
The Grateful Girl Cooks!
Instagram:
jbatthegratefulgirlcooks

Author's signature

Original recipe source: Stephanie, at: https://www.plainchicken.com/the-ultimate-pork-chops/

↓↓ PRINTABLE RECIPE BELOW ↓↓

0 from 0 votes
Awesome Grilled Pork Chops
Prep Time
10 mins
Cook Time
22 mins
Brining Time (inactive)
8 hrs
Total Time
8 hrs 32 mins
 

Awesome Grilled Pork Chops are easy, flavorful & juicy! They're brined in salt/water/sugar overnight, and coated with spices before grilling.

Category: Entree
Cuisine: American
Keyword: awesome grilled pork chops
Servings: 4
Calories Per Serving: 291 kcal
Author: JB @ The Grateful Girl Cooks!
Ingredients
  • ¼ cup salt
  • ¼ cup granulated sugar
  • 2 cups water
  • 2 cups ice cubes
  • 4 1" thick bone-in pork chops (approx. 6 ounces per chop)
Spice Mixture:
  • 3 Tablespoons paprika
  • 1 teaspoon ground cumin
  • 1 teaspoon garlic powder
  • 1 teaspoon onion powder
  • 1 teaspoon ground mustard
  • 1 teaspoon chili powder
  • 1 teaspoon black pepper
Instructions
  1. Make Brine: Combine salt, water and sugar in large saucepan. Stir; cook brine on medium heat until sugar and salt dissolves. Remove pan from heat; add ice cubes. Let brine cool to room temp.

  2. Place pork chops in a large container in a single layer, or in a gallon-sized resealable plastic bag. Add the room temp. brine. Let the chops brine overnight, or 8-12 hours in the refrigerator (covered, if using container) .

  3. Make Spice Mix: Combine spices in bowl; set aside until ready to cook brined pork chops.

  4. When Ready To Grill: Rinse brine off chops; pat dry with paper towels. Generously sprinkle chops with spice mix (all sides). Rub spices onto each pork chop so it adheres. Place chops on hot grill. Grill approx. 10-11 minutes; turn chops over. Cook additional 10-11 minutes, or until pork reaches internal temperature of 145°F. Remove from grill. Let chops sit for 4-5 minutes before serving. Enjoy!

Recipe Notes

PLEASE NOTE: The salt/sugar in the brine is not included in the caloric calculation (for sodium or sugar content), since almost all of the brine is rinsed off the meat prior to cooking.

Nutrition Facts
Awesome Grilled Pork Chops
Amount Per Serving (1 g)
Calories 291 Calories from Fat 117
% Daily Value*
Fat 13g20%
Saturated Fat 4g25%
Cholesterol 88mg29%
Sodium 84mg4%
Potassium 585mg17%
Carbohydrates 17g6%
Fiber 2g8%
Sugar 13g14%
Protein 28g56%
Vitamin A 2734IU55%
Calcium 41mg4%
Iron 2mg11%
* Percent Daily Values are based on a 2000 calorie diet.

Here’s one more to pin on your Pinterest boards!Awesome Grilled Pork Chops are easy, flavorful & juicy! They're brined in salt/water/sugar overnight, and coated with spices before grilling.

Brown Sugar Pork Chops

Brown Sugar Pork Chops are an easy and delicious dish, featuring seared pork chops baked in a simple garlic, butter, spices and brown sugar sauce!

Do you enjoy pork chops? We do, even though we don’t eat them too often. We used to prefer thick boneless chops, but have slowly gravitated back toward using bone-in chops in most of my recipes.

It’s good (for those who love to cook) to keep a few wonderful, “tried and true” recipes in “the old kitchen tool belt”. THIS is definitely one of those kind of recipes, so I’m happy to share it with you, and hope you enjoy it.

Brown sugar pork chops are a favorite way we enjoy “the other white meat”. They are simple to prepare, and taste wonderful!

Basically what you will do is brown the pork chops, make a simple sauce, and then bake the sauce-covered pork chops. It’s all so easy (and ready in about 35 minutes), so here’s how to make them:

Scroll Down For A Printable Recipe Card At The Bottom Of The Page

Season And Pan-Sear The Pork Chops

For this recipe you can use either bone-in or boneless pork chops (about 1″ thick). We prefer the bone-in, because the meat seems to stay a bit more juicy. Regardless of which type (bone-in or boneless) you decide to use, you’ll still enjoy these yummy pork chops!

NOTE: This recipe makes 4 pork chop servings- I was only making them for my husband and I this time, which is reflected in these photos.

The first thing you will need to do (after preheating your oven) is to season and pan-sear the pork chops. Pat the chops dry with paper towels, then lightly season BOTH sides with salt and ground black pepper.

Pork chops are seasoned with salt and pepper on both sides before pan-searing.

Heat the olive oil on medium-high heat in a large oven-proof skillet. Once the oil is very hot (but not smoking), carefully add the pork chops in one layer. They should sizzle when they hit the hot oil in the skillet. The hot oil will serve to give the chops a nicely browned exterior.

Cook the chops (without moving them) for 5-6 minutes. They should be well browned on the bottom. Carefully turn them to the other side, and continue cooking for another 5 minutes.

Transfer the pork chops to a plate or platter, and cover with foil to help keep them warm while you make the sauce. Do NOT clean out the skillet, because any little browned bits left in there will help flavor the sauce!

The meat is seasoned and then pan-seared in olive oil in a hot skillet.The pork chops are seared until browned, and then flipped to cook the other side.

Prepare The Brown Sugar Sauce

Now it’s time to quickly make the brown sugar sauce for the pork chops. Add butter to the skillet you cooked the pork chops in, and melt it on low heat.

Once melted, add the brown sugar, Italian seasoning, and minced garlic. Stir well to combine, and cook for 1 minute, stirring constantly, so the garlic doesn’t burn.

The brown sugar sauce will bubble quite a bit, but keep stirring! After one minute, add the pork chops back into the skillet, and turn off the heat.

Melted butter, garlic, brown sugar and Italian seasoning combine to make sauce for pork chops.Brown sugar sauce for pork chops is cooked before adding pork chops.

Bake The Pork Chops

When the pork chops are back in the skillet, spoon enough of the sauce over each one to cover the top. Pop the skillet into a preheated 400°F. oven, and bake the chops (uncovered) for 12-15 minutes.

The pork chops are safely cooked through once they reach an internal temperature of 145-160°F.

Chops are added to sauce, and covered with sauce before baking.

Serve The Brown Sugar Pork Chops

Once the brown sugar pork chops are done baking, they’re ready to be served. Spoon more of the pan sauce over the top of each chop, and then garnish with lemon wedges, chopped chives (or parsley), if desired.

Brown sugar pork chops are garnished with chives and lemon wedges before serving.

Our favorite way to enjoy these yummy brown sugar pork chops is to serve them placed on top of a bed of mashed potatoes. The meat and slightly sweet sauce taste wonderful when paired with creamy, buttery potatoes!

You can also serve these tasty chops with buttered orzo pasta or egg noodles, but mashed potatoes remain our favorite choice! We enjoyed fresh steamed asparagus served on the side, too! Gotta get those veggies in!

My husband told me that this recipe for brown sugar pork chops is one of his favorites, and that makes me happy! I suspect these fantastic tasting pork chops will make your taste buds happy, too.

The brown sugar pork chops are served on mashed potatoes, with asparagus on the side.

Thanks for stopping by today. I sincerely hope you have the opportunity to make this delicious dish for yourself and those you love. Also, if you have an air fryer, be sure to try my recipe for Air Fryer Pork Chops For Two, a quick and delicious recipe you’ll love!

Take care, and have a great day. A complete, printable recipe card is located below, for your convenience.

Looking For More PORK CHOP Recipes?

You can find all of my pork recipes in the Recipe Index, which is located at the top of the page. I have quite a few pork chop recipes, including:

Want More Recipes? Get My FREE Newsletter!

I publish a newsletter 2 times per month (1st and 15th) with lots of recipes, tips, etc..
Would you like to join our growing list of subscribers?

There is a Newsletter subscription box on the top right (or bottom) of each blog post, depending on the device you use.
You can submit your e-mail address there, to be added to my mailing list.

Find Me On Social Media:

Facebook page: The Grateful Girl Cooks!
Pinterest:
The Grateful Girl Cooks!
Instagram:
jbatthegratefulgirlcooks

Author's signature

Original recipe source: dinneratthezoo.com/brown-sugar-pork-chops/

↓↓ PRINTABLE RECIPE BELOW ↓↓

4.34 from 3 votes
Brown Sugar Pork Chops
Prep Time
10 mins
Cook Time
25 mins
Total Time
35 mins
 

Brown Sugar Pork Chops are an easy and delicious dish, featuring seared pork chops baked in a simple garlic, butter, spices and brown sugar sauce!

Category: Entree
Cuisine: American
Keyword: brown sugar pork chops
Servings: 4
Calories Per Serving: 420 kcal
Author: JB @ The Grateful Girl Cooks!
Ingredients
  • 4 bone-in or boneless pork chops , approx. 1" thick
  • salt and pepper , enough to lightly season chops
  • 2 teaspoons extra-virgin olive oil
  • 3 Tablespoons butter
  • 3 Tablespoons brown sugar
  • 2 teaspoons minced garlic
  • 1 teaspoon Italian seasoning
Optional Garnish: chopped chives (or parsley), lemon wedges
    Instructions
    1. Preheat oven to 400°F. Pat pork chops dry with paper towels; lightly season BOTH sides with salt and pepper.

    2. Heat olive oil on medium-high heat in a large oven-proof skillet. Once oil is very hot (but not smoking), carefully add pork chops in one layer. They should sizzle when they hit the hot oil. Cook chops for 5-6 minutes, without moving them. Turn them over, and continue cooking the other side for 5 minutes. Transfer pork chops to a platter, and cover with foil to keep them warm. Do NOT clean out the skillet.

    3. Make the sauce: Melt butter on low heat using the same skillet. Add brown sugar, Italian seasoning, and minced garlic. Stir well, and cook for 1 minute, stirring constantly, so the garlic doesn't burn. Add pork chops back into the skillet, and turn off the heat.

    4. Spoon enough sauce over each pork chop to cover. Place skillet into 400°F. oven and bake (uncovered) for 12-15 minutes. The pork is safely cooked once the chops reach an internal temperature of 145-160°F. When done, they are ready to be served.

    5. To serve, spoon pan sauce over pork chops; garnish with lemon wedges, chopped chives (or parsley) if desired. Serve chops on a bed of mashed potatoes, orzo pasta, or egg noodles. Enjoy!

    Nutrition Facts
    Brown Sugar Pork Chops
    Amount Per Serving (1 pork chop)
    Calories 420 Calories from Fat 234
    % Daily Value*
    Fat 26g40%
    Saturated Fat 11g69%
    Cholesterol 140mg47%
    Sodium 171mg7%
    Potassium 603mg17%
    Carbohydrates 10g3%
    Fiber 1g4%
    Sugar 9g10%
    Protein 35g70%
    Vitamin A 262IU5%
    Vitamin C 1mg1%
    Calcium 55mg6%
    Iron 1mg6%
    * Percent Daily Values are based on a 2000 calorie diet.

    Here’s one more to pin on your Pinterest boards!Brown Sugar Pork Chops are an easy and delicious dish, featuring seared pork chops baked in a simple garlic, butter, spices and brown sugar sauce!

    Bacon Broccoli Pasta Casserole

    Enjoy bacon broccoli pasta casserole, a cheesy, family-friendly baked dish with bacon, Parmesan, mozzarella, mushrooms, carrots, onions and broccoli.
    Enjoy bacon broccoli pasta casserole, a cheesy, family-friendly baked dish with bacon, Parmesan, mozzarella, mushrooms, carrots, onions and broccoli.

    Do you enjoy casseroles? We do, and I especially enjoy having leftovers, which are fantastic to have around for lunches or another dinner. Today I want to share with you a recipe I came up with “on the fly”. I simply used food items I found in my pantry and refrigerator, and experimented with, until I ended up with a wonderful tasting dish!

    The casserole is fully prepped on the stove top in a large saucepan (or Dutch Oven), and then it is finished by baking for 15 minutes. It has great flavor, and is fairly simple to prepare. Here’s how:

    Scroll Down For A Printable Recipe Card At The Bottom Of The Page

    Cook the Bacon, Carrot And Onions

    The first thing you will need to do is to cook the bacon, chopped onions and grated carrots. Stack the bacon slices on top of each other, and then cut into 1″ wide pieces. This will allow the bacon to cook faster.

    Place the sliced bacon in a large saucepan (or Dutch Oven), and cook it on medium-high heat, stirring often to separate bacon pieces.  Once the bacon has cooked for a 2-3 minutes, add the butter, chopped onions and grated carrots to the pan. Stir to combine, and continue to cook until bacon is cooked through (approx. 5 minutes).

    Bacon pieces, chopped onions, are grated carrots are prepped then cooked together.

    Add Liquids, Mushrooms And Pasta

    Pour a can of cream of mushroom soup, a can of mushroom slices (drained), and water into the saucepan with the bacon, etc. Season with salt and pepper, and stir to combine. Bring this to a boil on medium heat.

    Once the liquid is boiling in the pan, add four cups of dry bowtie pasta, and stir to combine. Once the pasta has been added, turn down the heat to LOW, and cover the pan. Cook for approximately 15 minutes, or until pasta is fully cooked. Stir occasionally.

    Mushrooms, cream of mushroom soup, water and seasoning cook in large saucepan.Bow tie pasta noodles are added, to cook in the liquid in saucepan.

    Add Broccoli And Cheeses

    After the pasta is fully cooked, add cooked broccoli, mozzarella and part of the Parmesan cheese (1/4 cup) to the pan. Stir and cook for 4-5 more minutes, so the cheeses will melt into the pasta.

    Cooked broccoli, mozzarella and Parmesan cheeses are added to the saucepan.

    Time To Bake The Bacon Broccoli Pasta Casserole!

    Spray a casserole dish with non-stick baking spray. Pour the bacon pasta casserole into the dish, and spread to cover. Sprinkle the top with the remaining grated Parmesan cheese, and then cover the pan with aluminum foil.

    Bake the bacon broccoli pasta casserole in a preheated 350°F oven for 15 minutes. When done, remove the casserole from the oven, and serve.

    Bacon broccoli pasta casserole is placed in baking dish and topped with Parmesan to bake.Here is the hot casserole after being removed from the oven.

    Portion out the bacon broccoli pasta casserole into individual serving bowls or onto plates, and then dig in! There are a lot of flavors to enjoy in this tasty dish!

    A bowl of the bacon broccoli pasta casserole, ready to eat.A close-up look at the pasta casserole, before it is eaten.

    I really hope you enjoy this bacon broccoli pasta casserole. Yes, there are a few prep steps involved, but the end result is a lovely pasta casserole you (and those you love) can enjoy! Have a wonderful day.

    Looking for More CASSEROLE RECIPES?

    You can find all of my recipes in the Recipe Index, located at the top of the page. I have several casserole dishes you might enjoy, including:

    Interested In More Recipes?

    Thank you for visiting this website. I appreciate you using some of your valuable time to do soIf you’re interested, I publish a newsletter 2 times per month (1st and 15th) with all the latest recipes, and other fun info. I would be honored to have you join our growing list of subscribers, so you never miss a great recipe!
    There is a Newsletter subscription box on the top right side (or bottom) of each blog post, depending on the device you use, where you can easily submit your e-mail address (only) to be included in my mailing list.

    You Can Also Find Me On Social Media:

    Facebook page: The Grateful Girl Cooks!
    Pinterest: The Grateful Girl Cooks!
    Instagram: jbatthegratefulgirlcooks

    Author's signature

    0 from 0 votes
    Bacon Broccoli Pasta Casserole
    Prep Time
    30 mins
    Cook Time
    15 mins
    Total Time
    45 mins
     

    Enjoy bacon broccoli pasta casserole, a cheesy, family-friendly baked dish with bacon, Parmesan, mozzarella, mushrooms, carrots, onions and broccoli.

    Category: Casserole, Main Course
    Cuisine: American
    Keyword: bacon broccoli pasta casserole
    Servings: 6
    Calories Per Serving: 386 kcal
    Author: JB @ The Grateful Girl Cooks!
    Ingredients
    • 6 slices bacon
    • 1 Tablespoon butter
    • cup brown onion chopped
    • 3 medium carrots grated
    • 10½ ounces cream of mushroom soup (canned)
    • 4 ounces canned mushrooms (sliced) , drained
    • cups water
    • ½ teaspoon salt and pepper ( ½ tsp. each)
    • 4 cups bow-tie pasta (12 ounce box)
    • 1 cup broccoli , pre-cooked and cut into small florets
    • cup shredded mozzarella cheese
    • ¾ cup grated Parmesan cheese divided (reserve ½ C. for topping)
    Instructions
    1. Stack bacon slices on top of each other, and cut into 1" wide pieces. Place bacon in a large saucepan (or Dutch Oven); cook for 2-3 minutes on medium-high heat, stirring often to separate pieces.  Add butter, chopped onions and grated carrots to pan. Stir to combine, and continue to cook until bacon is cooked through (approx. 5 minutes).

    2. Add cream of mushroom soup, mushroom slices (drained), and water into the saucepan with bacon, etc. Season with salt and pepper; stir to combine. Bring to a boil on medium heat. Once boiling, dry pasta; stir to combine. Turn down heat to LOW, and cover pan. Cook (covered) for approx. 15 minutes, or until pasta is fully cooked. Stir occasionally. While this is cooking, preheat oven to 350°F.

    3. Add cooked broccoli, mozzarella and 1/4 cup of the Parmesan cheese to the pasta. Cook 3-4 minutes on low, stirring often, until cheese has melted.

    4. Spray an oven-proof casserole dish with non-stick baking spray. Pour pasta casserole into dish. Sprinkle with remaining Parmesan cheese, and cover dish with aluminum foil.

    5. Bake the bacon broccoli pasta casserole at 350°F for 15 minutes. When done, remove casserole from oven, remove foil, and serve.

    Nutrition Facts
    Bacon Broccoli Pasta Casserole
    Amount Per Serving (1 (1/6 of total))
    Calories 386 Calories from Fat 162
    % Daily Value*
    Fat 18g28%
    Saturated Fat 8g50%
    Cholesterol 38mg13%
    Sodium 1047mg46%
    Potassium 394mg11%
    Carbohydrates 39g13%
    Fiber 3g13%
    Sugar 4g4%
    Protein 18g36%
    Vitamin A 5398IU108%
    Vitamin C 16mg19%
    Calcium 202mg20%
    Iron 1mg6%
    * Percent Daily Values are based on a 2000 calorie diet.

    Here’s one more to pin on your Pinterest boards!Enjoy bacon broccoli pasta casserole, a cheesy, family-friendly baked dish with bacon, Parmesan, mozzarella, mushrooms, carrots, onions and broccoli.