Category: Pork

Rigatoni Sausage Mushroom Ragu

You’re gonna enjoy rigatoni sausage mushroom ragu, an easy to make, one pot Italian meal that you will want to make again and again, because it is SO GOOD!
You're gonna enjoy rigatoni sausage mushroom ragu, an easy to make, one pot Italian meal that you will want to make again and again, because it is SO GOOD!

I found a recipe for a vegetarian ragu pasta dish online and thought it sounded interesting!  Just in case you’re wondering – no… this Ragu is not a brand of spaghetti sauce found in the jar on a grocery shelf.  Well, actually it is that, but the recipe I am sharing today is a homemade ragu sauce!

I made a couple changes to the original recipe, such as adding Italian sausage and beef broth, and ended up with an amazing rigatoni sausage mushroom ragu!

Don’t let the long ingredient list stop you from trying this dish… if you look closely, you will see that many of the ingredients are common ingredients or spices you probably already have in your home!  This hearty, delicious ragu tastes amazing, and I hope you will read on… and make this dish!

Scroll Down For A Printable Recipe Card At The bottom Of The Page

How To Make Rigatoni Sausage Mushroom Ragu

Before starting the actual cooking, be sure to have the veggies chopped ahead of time, and the rest of the ingredients ready to go!. You will thank me later. No… really! Note that half of the mushrooms are sliced, the other half are chopped. You will add them to the dish at different times. The chopped mushrooms will help add thickness to the sauce.

Mushrooms, onions, red pepper, celery and Italian sausage are used to make ragu sauce.

Put Italian sausage (taken OUT of the casings), butter and vegetable oil into a large stockpot (or skillet). Heat on medium heat, stirring often, until butter has melted. Add chopped onions and celery to the pot.

Cook them for a few minutes, stirring often, until the sausage has fully cooked, and the veggies have softened.

Italian sausage, mushrooms and celery are cooked in butter and olive oil for ragu sauce.

Add chopped red bell pepper and minced garlic. Cook, stirring often, for two minutes.

Red bell pepper and garlic added to ragu sauce in pot.

Add sliced mushrooms; cook for 1 more minute, stirring as they cook. You are slowly adding in layers of flavor!

Sliced mushrooms are added to ragu sauce in pot.

Add the chopped mushrooms, and cook for 1 minute.  Add red wine to pan. Heat, and let the wine gently boil for 2 minutes.

Chopped mushrooms, red wine, and broth are added to make ragu sauce.

Add canned tomatoes, tomato paste, beef stock (or vegetable stock), and spices. Stir to combine all ingredients.

Canned tomatoes and spices are added to make ragu sauce.

Time To Add The Rigatoni Pasta

Bring the sauce to a boil.

Sausage mushroom ragu sauce is cooking in large pot.

Once sauce is boiling, stir in the dry rigatoni noodles, to combine.  Put a lid on the pan (or cover with aluminum foil), and turn the heat down to LOW.

Rigatoni pasta is added to sausage musroom ragu sauce.

Let the pasta cook for 13-15 minutes (mine took 15), or until the pasta is cooked all the way through. Give the pasta a stir a few times while it is cooking, then put lid back on pan.

TIP: If at any time, the rigatoni sausage mushroom ragu looks like it is getting too dry (if heat was too high), then just add several spoonfuls of hot water to pan, and stir in, to combine.

Rigatoni sausage mushroom ragu is ready to be served.

Time To Serve Rigatoni Sausage Mushroom Ragu!

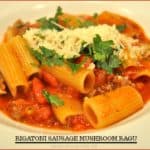
When the rigatoni sausage mushroom ragu is fully cooked, it is time to serve! Give the pasta a stir, then portion it out into serving bowls. Bowls seem to hold the sauce better than on a plate.

Garnish top of each bowl of pasta with some roughly chopped flat leaf parsley and grated Parmesan cheese. Serve… and enjoy! This rigatoni sausage mushroom ragu tastes AMAZING!

Rigatoni sausage mushroom ragu is garnished with flat leaf parsley and Parmesan cheese.

Rigatoni sausage mushroom ragu is served, garnished with Parmesan cheese and parsley.

And there you have it! Rigatoni sausage mushroom ragu for dinner! It tastes DELICIOUS, and I sincerely hope you will give this recipe a try!

If You Enjoy Pasta Recipes

If you enjoy pasta dishes, be sure to check out my recipes for Simple Chicken Sausage Pasta, Butternut Squash Ravioli with Browned Butter Sage Sauce, Vegetarian Spicy Noodles in Peanut Sauce, Shrimp and Penne Pasta Alfredo, or Florentine Lasagna Roll, to name a few!

ALL of my recipes are listed in the Recipe Index, located at the top of the page. I’m sure you will enjoy them, as well. Have a wonderful day!

Interested In More Recipes?

Thank you for visiting this website. I appreciate you using some of your valuable time to do soIf you’re interested, I publish a newsletter 2 times per month (1st and 15th) with all the latest recipes, and other fun info. I would be honored to have you join our growing list of subscribers, so you never miss a great recipe!
There is a Newsletter subscription box on the top right side (or bottom) of each blog post, depending on the device you use, where you can easily submit your e-mail address (only) to be included in my mailing list.

You Can Also Find Me On Social Media:

Facebook page: The Grateful Girl Cooks!
Pinterest:
The Grateful Girl Cooks!
Instagram:
jbatthegratefulgirlcooks

Author's signature

Recipe adapted from Nicky at: https://www.kitchensanctuary.com/one-pot-mushroom-ragu-with-pasta/

0 from 0 votes
Rigatoni Sausage Mushroom Ragu
Prep Time
10 mins
Cook Time
30 mins
Total Time
40 mins
 
You're gonna enjoy rigatoni sausage mushroom ragu, an easy to make, one pot Italian meal that you will want to make again and again, because it is SO GOOD!
Category: Entree
Cuisine: Italian
Keyword: rigatoni sausage mushroom ragu
Servings: 5
Calories Per Serving: 484 kcal
Author: JB @ The Grateful Girl Cooks!
Ingredients
  • 2 links Italian sausage (mild or hot) , casings removed
  • 1/2 pound mushrooms ,1/2 sliced, 1/2 chopped
  • 2 Tablespoons butter
  • 1 Tablespoon vegetable oil
  • 1 medium red bell pepper , de-seeded and chopped
  • 1 medium onion , finely chopped
  • 1 stick celery , finely chopped
  • 2 cloves garlic , minced
  • 1/4 cup red wine
  • 28 ounces canned diced tomatoes , 2 cans (14 oz.)
  • cups beef stock (or vegetable)
  • 1 teaspoon granulated sugar
  • 1 Tablespoon dried thyme
  • 1 teaspoon dried oregano
  • 1/2 teaspoon salt
  • 1/2 teaspoon black pepper
  • 2 Tablespoons tomato paste
  • 8 ounces rigatoni pasta
  • 2 Tablespoons Parmesan cheese
  • 1/4 cup flat leaf parsley , roughly chopped (for garnish)
Instructions
  1. Put Italian sausage (taken OUT of the casings), butter and vegetable oil into a large stockpot (or skillet). Heat on medium heat, stirring often, until butter has melted. Add chopped onions and celery to the pot. Cook for a few minutes, stirring often, until the sausage has fully cooked, and veggies have softened.

  2. Add chopped red bell pepper and minced garlic. Cook, stirring often, for two minutes. Add SLICED mushrooms; cook for 1 more minute, stirring as they cook. You are slowly adding in layers of flavor! Add CHOPPED mushrooms, and cook for 1 minute.  Add red wine to pan. Heat, and let wine gently boil for 2 minutes. Add canned tomatoes, tomato paste, beef stock (or vegetable stock), and spices. Stir, to combine all ingredients. 

  3. Bring sauce to a boil. Once sauce is boiling, add dry rigatoni noodles; stir to combine.  Put a lid on the pan (or cover with aluminum foil); turn heat down to LOW. Let pasta cook for 13-15 minutes (mine took 15), or until pasta is cooked all the way through. Give pasta a stir a few times while it is cooking, then put lid back on pan. If at any time, the rigatoni sausage mushroom ragu looks like it's getting too dry (if heat was too high), add several spoonfuls of hot water to pan, and stir in, to combine.

  4. When the rigatoni sausage mushroom ragu is fully cooked, it's time to serve! Give the pasta a stir, then portion it out into serving bowls. Bowls seem to hold the sauce better than on a plate. Garnish top of each bowl of pasta with some roughly chopped flat leaf parsley and grated Parmesan cheese. Serve... and enjoy!

Nutrition Facts
Rigatoni Sausage Mushroom Ragu
Amount Per Serving (1 (1/5 of total))
Calories 484 Calories from Fat 207
% Daily Value*
Fat 23g35%
Saturated Fat 10g63%
Cholesterol 47mg16%
Sodium 1068mg46%
Potassium 990mg28%
Carbohydrates 50g17%
Fiber 5g21%
Sugar 10g11%
Protein 18g36%
Vitamin A 1505IU30%
Vitamin C 55mg67%
Calcium 135mg14%
Iron 4.8mg27%
* Percent Daily Values are based on a 2000 calorie diet.

Here’s one more to pin on your Pinterest boards!You're gonna enjoy rigatoni sausage mushroom ragu, an easy to make, one pot Italian meal that you will want to make again and again, because it is SO GOOD!


Traeger Smoked Pork Loin Roast

Traeger Smoked Pork Loin Roast (seasoned with dry rub spices) tastes amazing right off the smoker, OR as a tasty pulled pork sandwich, coated in BBQ sauce!

Someone Got A TRAEGER!

My husband has a NEW Traeger grill that he received for his birthday and Father’s Day (what a great combo gift) this past June. We have had fun trying new recipes for chicken, sausages, pork, steak, (and even dessert) ever since!

Someone is excited to have a new Traeger grill!
We were anxious to try pulled pork (as well as a “bazillion” other recipes), so I searched for a spice rub recipe online that sounded like it would be really good. My husband bought a 3 pound pork loin roast and we decided to cook it on our grill, seasoned with some of the spice rub I found online (which is perfect for pork or chicken).

We used the cookbook that came with the grill purchase to determine how long the roast would take to smoke, then slow roast. We crossed our fingers and followed the process exactly, and the results were wonderful! YAY- SUCCESS on a smoked pork loin roast!

Scroll Down For A Printable Recipe Card At The Bottom Of The Page

Here’s How We Made This Delicious Roast On Our Traeger Grill

Start by making the dry spice rub. EASY! Place the dry rub spices in a medium sized bowl. Mix well, to fully combine ingredients. I cut the recipe in half. The flavor-filled dry rub recipe made enough for the pork roast, PLUS a couple of extra uses. We’ve  also used the spice rub on a whole chicken, and STILL have some left over (stored in an airtight container) for the next pork roast or chicken we grill.

Dry rub spices for smoked pork loin

Dry rub to put on pork roast before smoking on grill

Cover all sides of the pork roast with the dry spice rub, patting it onto the surface of the meat. The slight moisture of the meat will help the spices stick!  When done, set seasoned roast aside until ready to put it in the smoker.

Pork loin roast is covered with dry spice rub before smoking meat on grill

Ready To Make A Traeger Smoked Pork Loin Roast?

When ready to begin, turn the Traeger grill to the SMOKE setting. Let it fire up for 4-5 minutes, with the lid OPEN. Once grill is smoking, turn the temperature gauge to 225° F. Close the lid on the grill and let it preheat for 10 to 15 minutes. It doesn’t really matter, but in case you’re curious… we used Mesquite wood pellets for our Traeger smoked pork loin.

Once the grill/smoker is preheated, place an aluminum pan with 2 cups of apple juice into a corner (this will help keep some nice moisture in the grill during the long smoking process). Another option for this is to use a spray bottle and spritz the apple juice onto the roast about once an hour, if desired. Place the seasoned pork loin roast on the grill, FAT SIDE UP. Insert the temperature probe into the meat. Roast the pork for 3 hours, with the lid closed.

Pork loin roast smoking on Traeger grill

After pork has smoked/roasted for 3 hours, transfer the meat into an aluminum pan, and place back onto grill (with temperature probe still attached). Continue to cook the smoked pork loin roast for 5-6 hours, or until the temperature in the thickest part of the meat (not touching any bones) reaches an internal temperature of 190° F. The long cooking time ensures the meat will be very tender!

Smoked pork loin roast moved to aluminum pan on Traeger grill, to finish cooking.

Almost Time to EAT!

This is what the pork loin roast looked like, once it was done. Remove roast from grill. Cover the pan loosely with aluminum foil, and let the meat rest for approximately 30 minutes. Pour any accumulated juices in the pan into a separate container (or gravy separator). Transfer the Traeger smoked pork loin roast to a cutting board.

Finished smoked pork loin roast.

While the pork is still quite hot, slice it OR pull the pork into chunks (or shred with two forks). Be sure to discard any fat or bones (nobody wants a big bite of THAT!). You can add additional seasoning rub (and a little of the reserved juices) to the meat at this point OR mix meat with a favorite BBQ sauce. At that point, it’s ready to gobble up, and we cut off a portion of the Traeger smoked pork loin roast to eat just as it was (with it’s incredible smoked flavor). Yum.

We Shredded Part Of The Pork Loin To Make BBQ Sandwiches

After that, we took the remaining half of the roast, and pulled it into shreds. To the shredded pork we added a delicious a sweet n’ spicy BBQ sauce (Sweet Baby Ray’s), and mixed it until everything was covered! You can still see part of the pink “smoke” ring in the meat before I mixed in the sauce!

Barbecue sauce is added to pulled smoked pork, for sandwiches

Since we decided to make BBQ pulled pork sandwiches, the next thing I did was to lightly toast hamburger buns, piled each one high with shredded BBQ smoked pork, covered the pork with homemade coleslaw (for added crunch), and enjoyed it for dinner!

Oh boy… this was a fantastic BBQ Traeger smoked pork loin sandwich! YUM! We enjoyed the leftovers for days!

Traeger smoked pork loin and BBQ sauce, with coleslaw makes a GREAT tasting sandwich!

I hope you enjoyed seeing the process of making this delicious Traeger smoked pork loin on our grill.  If you own a smoker of any kind, I hope you will consider trying this recipe for your loved ones. We truly enjoyed it, and will make it again, this exact way!

If you have a smoker grill, you might also be interested in my recipe for Berry Cobbler (Traeger Grill Style), another of our first experiments on our Traeger. It was absolutely DELICIOUS!

Looking For More TRAEGER Recipes?

You can find all of my recipes in the Recipe Index, which is located at the top of the page. I have quite a few Traeger recipes you might enjoy, including:

Interested In More Recipes?

Thank you for visiting this website. I appreciate you using some of your valuable time to do soIf you’re interested, I publish a newsletter 2 times per month (1st and 15th) with all the latest recipes, and other fun info. I would be honored to have you join our growing list of subscribers, so you never miss a great recipe!
There is a Newsletter subscription box on the top right side (or bottom) of each blog post, depending on the device you use, where you can easily submit your e-mail address (only) to be included in my mailing list.

You Can Also Find Me On Social Media:

Facebook page: The Grateful Girl Cooks!
Pinterest:
The Grateful Girl Cooks!
Instagram:
jbatthegratefulgirlcooks

Have a wonderful day!

Author's signature

Recipe Source for cooking pork: Cookbook that came with purchase of Traeger grill.
Source for dry rub recipe: https://www.tastesoflizzyt.com/pulled-pork-rub/

↓↓ PRINTABLE RECIPE BELOW ↓↓

0 from 0 votes
Traeger Smoked Pork Loin Roast
Prep Time
15 mins
Cook Time
9 hrs
Total Time
9 hrs 15 mins
 
Traeger Smoked Pork Loin Roast (seasoned with dry rub spices) tastes amazing right off the smoker, OR as a tasty pulled pork sandwich, coated in BBQ sauce!
Category: Dinner, Grill
Cuisine: American
Keyword: smoked pork loin roast
Servings: 10 servings
Calories Per Serving: 246 kcal
Author: JB @ The Grateful Girl Cooks!
Ingredients
Dry Rub Spice Mix (makes about 2 cups total- you need 1/3 cup for this roast. See NOTES below):
  • 1/3 cup dark brown sugar
  • 1/2 cup smoked paprika
  • 1/4 cup garlic powder
  • 1/4 cup salt
  • 2 Tablespoons black pepper
  • 2 Tablespoons chili powder
  • 2 Tablespoons chipotle chili pepper (optional)
  • 2 Tablespoons onion powder
  • 1 Tablespoon cayenne pepper
  • 1 Tablespoon ground cumin
  • 1 Tablespoon dry mustard
For pork roast:
  • 3 pounds pork loin roast
  • 2 cups apple juice
Instructions
  1. Make the dry spice rub by placing spices in a medium sized bowl. Mix well, to fully combine ingredients. Cover roast with about 1/3 cup of the dry spice rub, patting  it onto the surface of the meat, making sure to cover all sides. *You will have leftover spice rub- SEE RECIPE NOTES BELOW)*. When done, set roast aside until ready for smoker.

  2. When ready to begin, turn the Traeger grill to the SMOKE setting. Let it fire up for 4-5 minutes, with the lid OPEN. Once grill is smoking, turn the temperature gauge to 225° F. Close the lid on the grill and let it preheat for 10 to 15 minutes. We used mesquite pellets.

  3. Once the grill/smoker is preheated, place an aluminum pan with 2 cups of apple juice into a corner (this will help keep some nice moisture in the grill during the long smoking process). Another option for this is to use a spray bottle and spritz the apple juice onto the roast about once an hour, if desired. Place the seasoned pork loin roast on the grill, FAT SIDE UP. Insert the temperature probe into thickest part of meat (but not touching any bones). Roast the pork for 3 hours, with the lid closed.

  4. After pork has smoked/roasted for 3 hours, transfer the roast into an aluminum pan, and place back onto grill (with temperature probe still attached).  Continue to cook the smoked pork loin roast for 5-6 hours, or until the temperature in the thickest part of the meat reaches an internal temperature of 190° F.

  5. Remove roast from grill. Cover the pan loosely with aluminum foil, and let the meat rest for approximately 30 minutes. Pour any accumulated juices in the pan into a separate container (or gravy separator). Transfer the roast to a cutting board.

  6. While the pork is still quite hot, slice it, or pull the pork into chunks or shred with two forks. Be sure to discard any fat or bones that you find (nobody wants a big bite of THAT!). You can add additional seasoning rub (and a little of the reserved juices) to the meat at this point OR a favorite BBQ sauce (if using pork to make sandwiches). Serve sliced or pulled, with or without and enjoy the delicious smoky flavor!

Recipe Notes

NOTE: As written, dry rub recipe makes almost 2 cups. I cut the recipe for the dry rub in half. The quantities are easy to cut in half (except for the 1/3 cup of dark brown sugar. If cutting brown sugar in half, use 2 Tablespoons PLUS 2 teaspoons brown sugar). If halved, you'll end up with about 1 cup of spice rub, which is enough for 3 pork roasts or chickens (about 3 pounds each). Each roast uses about 1/3 cup of the rub to cover. Store leftover spice mix in airtight sealed container.

Nutrition Facts
Traeger Smoked Pork Loin Roast
Amount Per Serving (1 g)
Calories 246 Calories from Fat 63
% Daily Value*
Fat 7g11%
Saturated Fat 1g6%
Cholesterol 85mg28%
Sodium 2956mg129%
Potassium 759mg22%
Carbohydrates 14g5%
Fiber 3g13%
Sugar 8g9%
Protein 32g64%
Vitamin A 3830IU77%
Vitamin C 0.7mg1%
Calcium 56mg6%
Iron 3.2mg18%
* Percent Daily Values are based on a 2000 calorie diet.

Here’s one more to pin on your Pinterest boards!Traeger Smoked Pork Loin Roast (seasoned with dry rub spices) tastes amazing right off the smoker, OR as a tasty pulled pork sandwich, coated in BBQ sauce!


Hoisin Pork with Noodles and Broccoli

You’ll LOVE Hoisin Pork with Noodles and Broccoli, featuring marinated pork with noodles, broccoli and carrots cooked in an Asian inspired sauce!
You'll LOVE Hoisin Pork with Noodles and Broccoli, featuring marinated pork with noodles, broccoli and carrots cooked in an Asian inspired sauce!

I discovered this recipe on Pinterest, and decided to make it for dinner a few weeks ago… wow… it was fantastic!  Don’t let the long ingredient list deter you from making this! Almost all of the ingredients in this recipe are for the delicious Asian flavored sauce which is used to marinate pork strips.

The rest of the ingredients are few, and the recipe is not hard to make, either! Once the meat has been marinated, it is pan-seared, then combined with cooked noodles, broccoli florets, shredded carrots, chopped peanuts, and some additional sauce, mixed together… and BOOM- that’s it!

Scroll Down For A Printable Recipe Card At The Bottom Of The Page

Can I Still Make This Dish If I Have A Peanut Allergy?

If you have a peanut allergy, simply leave the peanut butter out of the marinade sauce (it will still taste fantastic), and leave the chopped peanuts out of the dish.

How To Make Hoisin Pork With Noodles And Broccoli

The recipe itself is very easy to make.  Because the pork needs to marinate for awhile, I highly recommend planning ahead… making the sauce and marinating the pork strips EARLY in the day (or even overnight), for absolute BEST flavor! Here’s how to make this dish:

Place all marinade ingredients in large bowl. Whisk together until smooth (or use a food processor, if desired). IMPORTANTOnce marinade is mixed, measure out 6 heaping Tablespoons, and place it in a separate bowl and set aside (reserving it to add to noodles later).

Hoisin marinade sauce for pork

Thinly slice the pork, and add to the marinade still in large bowl. Stir to fully coat pork slices. Cover bowl, and refrigerate at least 4 hours (overnight or 8 hours is best, for flavor saturation).

Slices of pork marinating in hoisin sauce

After Hoisin Pork Has Marinated

When ready to make this meal, remove pork from refrigerator. Heat a large, non-stick skillet on medium high. Once hot, remove pork strips from bowl with a slotted spoon (to drain off some of the marinade), and place pork into hot skillet (discard the rest of the marinade left in the bowl the pork was in).

Cook the hoisin pork, turning once, until both sides of the meat are browned.  When done, remove the skillet from the heat.

Hoisin pork cooking in large skillet

While the pork is cooking, cook noodles separately, according to package directions (do NOT discard the cooking water).  Lightly steam broccoli florets (or fully thawed, previously frozen chopped broccoli).

Finishing Making This Meal

Add the cooked noodles, broccoli, shredded carrots, chopped peanuts, and the 6 Tablespoons RESERVED hoisin sauce mixture to the skillet with the browned pork.

Noodles, hoisin pork, carrots and broccoli in skillet

Add 1/4 cup of the hot water used for cooking the noodles (the starch in the water will help the hoisin sauce stick to the noodles). Mix all the ingredients together, until coated with sauce.  Heat on low, stirring often, to ensure the hoisin pork is heated through before serving.

Pork, hoisin sauce, noodles and broccoli mixed in skillet

Close up of pork slices, broccoli, carrots and noodles in skillet

Serve the Hoisin Pork

If desired, garnish each serving with chopped cilantro, sliced green onions, and additional chopped peanuts. Serve immediately, and enjoy!

Hoisin pork, noodles and broccoli served in white bowl

I really hope you will consider trying this wonderful pork dish!  The flavors are wonderful, and it is a filling, satisfying “all in one” meal… meat, carbs, and veggies! Have a great day!

Looking For More PORK Recipes?

Interested In More Recipes?

Thank you for visiting this website. I appreciate you using some of your valuable time to do soIf you’re interested, I publish a newsletter 2 times per month (1st and 15th) with all the latest recipes, and other fun info. I would be honored to have you join our growing list of subscribers, so you never miss a great recipe!
There is a Newsletter subscription box on the top right side (or bottom) of each blog post, depending on the device you use, where you can easily submit your e-mail address (only) to be included in my mailing list.

You Can Also Find Me On Social Media:

Facebook page: The Grateful Girl Cooks!
Pinterest:
The Grateful Girl Cooks!
Instagram:
jbatthegratefulgirlcooks

Author's signature

Recipe adapted from: Lindsay, at https://pinchofyum.com/hoisin-pork-with-rice-noodles

0 from 0 votes
Hoisin Pork with Noodles and Broccoli
Prep Time
15 mins
Cook Time
15 mins
Total Time
30 mins
 

You'll LOVE Hoisin Pork with Noodles and Broccoli, featuring marinated pork with noodles, broccoli and carrots cooked in an Asian inspired sauce!

Category: Main Dish
Cuisine: Asian
Keyword: hoisin pork
Servings: 6 servings
Calories Per Serving: 683 kcal
Author: JB @ The Grateful Girl Cooks!
Ingredients
For Pork Marinade
  • 1/3 cup soy sauce , low sodium
  • 1/4 cup water
  • 3.5 Tablespoons sesame oil
  • 2 Tablespoons honey
  • 1 Tablespoon granulated sugar
  • 1 dash fish sauce
  • 3 Tablespoons vinegar
  • 1 teaspoon lime juice
  • 5 cloves garlic , finely minced
  • 2 Tablespoons ginger (fresh) ,finely grated
  • 1/4 teaspoon red pepper flakes
  • 3 Tablespoons hoisin sauce
  • 3 Tablespoons peanut butter
For Rest of Dish
  • 1.5 pounds pork , cut into thin strips
  • 9 ounces spaghetti noodles , or rice noodles
  • 1.5 cups broccoli , chopped
  • 1/2 cup carrots , grated
  • 1/4 cup peanuts , chopped
  • 6 Tablespoons Reserved Hoisin sauce mixture
Optional Garnish (not included in calorie count)- cilantro, additional chopped peanuts, sliced green onions
    Instructions
    1. Place all marinade ingredients in large bowl. Whisk together well, until smooth.  Once mixed, measure out 6 heaping Tablespoons and place it in a small, separate bowl (reserving it to add to noodles later). Thinly slice the pork, and add to the marinade still in large bowl. Stir to fully coat pork slices. Cover bowl; refrigerate at least 4 hours (overnight or 8 hours is recommended, for full flavor saturation). 

    2. Heat a large, non-stick skillet on medium high. Once hot, remove pork strips from bowl with a slotted spoon (to drain off some of the marinade-discard any remaining marinade in bowl), and place pork strips into hot skillet in a single layer. Cook pork, turning once, until both sides are browned. Remove skillet from heat. 

    3. While the pork is cooking, cook noodles in separate pan, according to package directions (do NOT discard the cooking water).  Lightly steam broccoli florets, or thawed (previously frozen) broccoli. Add cooked noodles, broccoli, shredded carrots, chopped peanuts, and the 6 Tablespoons RESERVED hoisin sauce mixture to the skillet with browned pork.

    4. Add 1/4 cup of the hot cooking water used for noodles to skillet (the starch in the water will help the hoisin sauce stick to the noodles). Mix all ingredients together, until  coated with sauce.  Heat on low, stirring often, to ensure dish is heated all the way through before serving. If desired, garnish each serving with chopped cilantro, sliced green onions, or additional chopped peanuts. Serve and enjoy!

    Nutrition Facts
    Hoisin Pork with Noodles and Broccoli
    Amount Per Serving (1 serving)
    Calories 683 Calories from Fat 360
    % Daily Value*
    Fat 40g62%
    Saturated Fat 11g69%
    Cholesterol 81mg27%
    Sodium 736mg32%
    Potassium 678mg19%
    Carbohydrates 50g17%
    Fiber 3g13%
    Sugar 13g14%
    Protein 30g60%
    Vitamin A 1950IU39%
    Vitamin C 22.8mg28%
    Calcium 58mg6%
    Iron 2.5mg14%
    * Percent Daily Values are based on a 2000 calorie diet.

    Here’s one more to pin on your Pinterest boards!You'll LOVE Hoisin Pork with Noodles and Broccoli, featuring marinated pork with noodles, broccoli and carrots cooked in an Asian inspired sauce!

    Creamy Italian Sausage Gnocchi

    If you’re looking for a flavorful, 30 minute, one pot, comfort food dinner to serve family or friends, then you’ll love this satisfying and filling Creamy Italian Sausage Gnocchi, with baby spinach, tomatoes and mozzarella!
     If you're looking for a flavorful, 30 minute, 1 pot, comfort food dinner, you'll love Creamy Italian Sausage Gnocchi, with spinach, tomatoes and mozzarella!

    I love gnocchi, those cute little Italian potato “dumplings”, usually found in the pasta section of the grocery store.  Have you tried them?  I first tried them in soup at a local restaurant, loved them, and went home to make my own Olive Garden Chicken Gnocchi Soup.

    Since then I’ve also used them to make other delicious gnocchi dishes! So when I discovered THIS recipe on Pinterest recently, I just KNEW it would be good! It most certainly WAS! The recipe is incredibly EASY to make, and tastes amazing!  This meal fills you up, and is so creamy and packed with Italian flavor!  Here’s how easy it is to make, all in ONE PAN, in about 30 minutes:

    Scroll Down For A Printable Recipe Card At The Bottom Of The Page

    Making Creamy Italian Sausage Gnocchi

    Place Italian sausage, diced onion, minced garlic, Italian seasoning, salt, pepper, and garlic powder in a large skillet (I used a cast iron skillet). Cook on medium high heat, until sausage has browned, stirring often. If there is any grease left in skillet, simply remove and discard.

    Sausage, onion, and garlic cooking in black skillet

    Browned Italian sausage and onion in cast iron skillet

    Add gnocchi (straight from the package), canned diced tomatoes, and whipping cream to the sausage in skillet. Carefully stir to combine ingredients.

    Cream and diced tomatoes added to skillet with gnocchi

    Tomatoes and cream added to gnocchi in skillet

    Add The Fresh Spinach

    Add handfuls of fresh baby spinach to the skillet. Stir and let spinach wilt just a bit in the hot liquid. If necessary, add spinach in batches (I added mine in two batches).  Cook mixture on low for about 10 minutes, stirring often, until the spinach has fully wilted down, the sauce has reduced in volume a bit, and the gnocchi is cooked and hot.

    Fresh spinach added to cast iron skillet and creamy sauce

    Spinach wilted into cast iron skillet with potato gnocchi

    Add the grated mozzarella cheese to the skillet; stir well, to fully incorporate cheese into the sauce and it melts.

    Mozzarella cheese added to skillet with creamy sausage gnocchi

    Cheese stringing from creamy sausage gnocchi on wooden spoon

    Time to Serve The Creamy Italian Sausage Gnocchi

    That’s it!  See how easy this dish is to make?  Sprinkle a tiny bit more Mozzarella cheese on top before serving it up into individual bowls, because, you know… it’s cheese! If you want even more pops of color, place a couple small spinach leaves on top, as well.

    Italian Sausage Gnocchi in cast iron skillet with wooden spoon

    Single serving Italian sausage gnocchi in white bowl

    This Italian sausage gnocchi was such an easy, delicious dish to prepare!  My husband and I really enjoyed it (and we’re looking forward to the leftovers, too)! Hope you will consider trying this recipe out… it tastes wonderful! Have a great day!

    Looking for More GNOCCHI Recipes?

    You can find all of my recipes in the Recipe Index, located at the top of the page. I have a couple more gnocchi recipes you might enjoy, including:

    Interested In More Recipes?

    Thank you for visiting this website. I appreciate you using some of your valuable time to do soIf you’re interested, I publish a newsletter 2 times per month (1st and 15th) with all the latest recipes, and other fun info. I would be honored to have you join our growing list of subscribers, so you never miss a great recipe!
    There is a Newsletter subscription box on the top right side (or bottom) of each blog post, depending on the device you use, where you can easily submit your e-mail address (only) to be included in my mailing list.

    You Can Also Find Me On Social Media:

    Facebook page: The Grateful Girl Cooks!
    Pinterest:
    The Grateful Girl Cooks!
    Instagram:
    jbatthegratefulgirlcooks

    Author's signature

    Recipe Source: Alli at https://tornadoughalli.com/2018/01/one-pot-creamy-sausage-gnocchi/

    0 from 0 votes
    Creamy Italian Sausage Gnocchi
    Prep Time
    10 mins
    Cook Time
    20 mins
    Total Time
    30 mins
     

    If you're looking for a flavorful, 30 minute, one pot, comfort food dinner, you'll love Creamy Italian Sausage Gnocchi, with spinach, tomatoes and mozzarella! 

    Category: Dinner
    Cuisine: Italian
    Keyword: Italian sausage gnocchi
    Servings: 6 servings
    Calories Per Serving: 559 kcal
    Author: JB @ The Grateful Girl Cooks!
    Ingredients
    • 1 pound Italian sausage *can substitute 3 links with casings removed
    • 1 brown onion , diced
    • 2 cloves garlic . minced
    • 2 teaspoons Italian seasoning
    • 1 teaspoon salt
    • 1 teaspoon black pepper
    • 1 teaspoon garlic powder
    • 1 15 ounce can petite diced tomatoes
    • 3/4 cup heavy whipping cream
    • 16 ounces gnocchi
    • 3 cups spinach , fresh
    • 1 cup Mozzarella cheese , grated
    Instructions
    1. Place Italian sausage, diced onion, minced garlic, Italian seasoning, salt, pepper, and garlic powder in a large skillet. Cook on medium high heat, until sausage has browned, stirring often. Drain and discard any grease accumulated in skillet.

    2. Add gnocchi, canned diced tomatoes, and whipping cream to the skillet. Carefully stir to combine ingredients. Add handfuls of fresh baby spinach to the skillet. Stir and let spinach wilt just a bit in the hot liquid. If necessary, add spinach in batches (I added mine in two batches).  Cook mixture on low for about 10 minutes, stirring often, until the spinach has fully wilted down and the gnocchi is cooked.

    3. Add the grated mozzarella cheese to the skillet; stir well, to fully incorporate cheese into the sauce and it melts. Once cheese is fully melted, serve the dish! May garnish with additional grated cheese, if desired.

    Recipe Notes

    Gnocchi does not have to be precooked before adding it to dish.

    Nutrition Facts
    Creamy Italian Sausage Gnocchi
    Amount Per Serving (1 serving)
    Calories 559 Calories from Fat 351
    % Daily Value*
    Fat 39g60%
    Saturated Fat 18g113%
    Cholesterol 112mg37%
    Sodium 1338mg58%
    Potassium 352mg10%
    Carbohydrates 32g11%
    Fiber 2g8%
    Sugar 1g1%
    Protein 19g38%
    Vitamin A 1980IU40%
    Vitamin C 7.6mg9%
    Calcium 174mg17%
    Iron 4.4mg24%
    * Percent Daily Values are based on a 2000 calorie diet.

    Here’s one more to pin on your Pinterest boards!

     If you're looking for a flavorful, 30 minute, 1 pot, comfort food dinner, you'll love Creamy Italian Sausage Gnocchi, with spinach, tomatoes and mozzarella!

    Smothered Pork Chops

    Smothered Pork Chops are pan-seared, then baked until tender and smothered in a rich, thick onion gravy. Full of flavor, you will LOVE these glazed chops!Smothered Pork Chops are pan-seared, then baked until tender and smothered in a rich, thick onion gravy. Full of flavor, you will LOVE these glazed chops!

    Smothered Pork Chops, how I love thee! Pan-seared, bone-in pork chops, baked until tender, and smothered in a rich, thick onion gravy. How could I NOT love you?

    I found this recipe for smothered pork chops in a cookbook I got for my birthday.  The photo in the cookbook LOOKED really good, and the recipe sounded wonderful, so I gave it a try.  Wow… were they ever YUMMY!  Tender and packed with flavor, this pork chop dinner for two was a winner!

    There are a few steps involved in making these smothered pork chops, but it’s actually easy to prepare if you prep everything before beginning. You will LOVE the finished dish! The recipe, as written, serves two, but is EASILY doubled.  Here’s how to make this delicious pork dish:

    Scroll Down for A Printable Recipe Card At the Bottom Of The Page

    How To Make Smothered Pork Chops

    Preheat oven to 300° F.  While oven is preheating, mix paprika, onion powder, salt, pepper, and cayenne pepper in a small bowl.  Pat the pork chops dry with a paper towel, then rub both sides with spice mix, to evenly cover meat.

    Bone in pork chops are seasoning with spices before pan-searing.

    Place the oil in an ovenproof 10 inch skillet. Heat oil on medium-high heat until it just begins to smoke. Place the chops into the skillet and cook each side 3-5 minutes until well browned. Transfer the chops to a plate and keep warm, but DO NOT clean out skillet.

    Pork chops are seared until brown on both sides before baking.

    Add butter to the skillet and melt, on medium heat.  Add the onion slices; cook them for 8-10 minutes until well browned.

    Onion slices are cooked in butter for smothered pork chops.

    Once the onions have browned fully, stir the thyme and minced garlic into the skillet.  Cook, stirring constantly for 30 seconds.

    Thyme and garlic is added to cooked onions for smothered pork chops gravy.

    Add Broth To Make The Sauce

    Add 1/2 cup beef broth (reserve the remaining Tablespoon of broth called for in recipe) and the bay leaf to the skillet. Stir well, making sure to scrape up all those browned bits from the bottom of the skillet (flavor-packed!). Bring this liquid mixture to a simmer in the skillet.

    Beef broth is added to cooked onions to make gravy for smothered pork chops.

    Bake The Smothered Pork Chops

    Place the chops (and any juices that have accumulated on the plate) back into the skillet. Spoon a bit of the sauce over the chops. Cover the skillet, and place the smothered pork chops into the preheated oven.  Bake for 1½ hours, until the pork is tender.

    Smothered Pork Chops are baked for 90 minutes in oven.

    Making The Sauce AFTER The Pork Chops Have Baked

    When the pork chops are done, carefully remove the hot skillet from the oven.  Place the chops onto a serving platter, and cover with foil to keep them warm. Pour the liquid from the skillet through a strainer into a medium bowl.

    Throw away the bay leaf, then place the remaining onions into a small bowl. As you can see in the photo below, those are onions in the strainer. The liquid has been strained through, into the bowl under the strainer.

    Cooked onions are strained with sauce going into a bowl underneath strainer.

    Let the liquid settle for a couple minutes, then remove any accumulated fat from the surface of the liquid with a large spoon.  Measure out 1/3 cup of the liquid and put it back into the (still hot) skillet. Bring this to a low simmer.

    In a small bowl, whisk together the remaining Tablespoon of beef broth, and the cornstarch until smooth. Add this mixture to the skillet, and whisk to combine. The sauce will thicken slightly as you continue to cook it. Stir the sauce for about a minute. Once slightly thickened, add the onions to the sauce, then season with additional salt and pepper, to taste.

    Corn starch is added to onion gravy for smothered pork chops.

    Onions and gravy have thickened for smothered pork chops.

    Time To EAT!

    Spoon the sauce over the smothered pork chops, and serve!  The meat will be extremely tender, and full of FLAVOR!

    Smothered pork chops on plate with baked potato and brussel sprouts on the side.

    I hope you will consider making this recipe. We absolutely LOVED it!  Don’t be put off by the low and slow baking time- that is what makes the pork chops so tender! If you enjoyed these pork chops, be sure to check out my recipe for Creamy Honey Dijon Pork Chops! They’re sooo good! 

    While the smothered pork chops baked, I was able to get the dishes cleaned up and make the side dishes, with no time constraints! I’m very grateful to have found this recipe, and thankful to be able to share it with YOU!

    Looking For More PORK CHOP Recipes?

    You can find all of my pork chop recipes in the Recipe Index, located at the top of the page. I have some delicious ones, including:

    Interested In More Recipes?

    Thank you for visiting this website. I appreciate you using some of your valuable time to do soIf you’re interested, I publish a newsletter 2 times per month (1st and 15th) with all the latest recipes, and other fun info. I would be honored to have you join our growing list of subscribers, so you never miss a great recipe!
    There is a Newsletter subscription box on the top right side (or bottom) of each blog post, depending on the device you use, where you can easily submit your e-mail address (only) to be included in my mailing list.

    You Can Also Find Me On Social Media:

    Facebook page: The Grateful Girl Cooks!
    Pinterest:
    The Grateful Girl Cooks!
    Instagram:
    jbatthegratefulgirlcooks

    Author's signature

    Recipe Adapted From: The cookbook: “The Complete Cooking For Two Cookbook, Published 2014 by The Editors at America’s Test Kitchen, pages 151-152.

    0 from 0 votes
    Smothered Pork Chops
    Prep Time
    20 mins
    Cook Time
    1 hr 30 mins
    Total Time
    1 hr 50 mins
     
    Smothered Pork Chops are pan-seared, then baked until tender and smothered in a rich, thick onion gravy. Full of flavor, you will LOVE these glazed chops!
    Category: Entree
    Cuisine: American
    Keyword: smothered pork chops
    Servings: 2 servings
    Calories Per Serving: 434 kcal
    Author: JB @ The Grateful Girl Cooks!
    Ingredients
    • 1/4 teaspoon paprika
    • 1/2 teaspoon onion powder
    • 1/4 teaspoon (each) salt and pepper
    • 1/8 teaspoon cayenne pepper
    • 2 (8-10 oz. each) bone-in pork chops (about 3/4-1 inch thick)
    • 1 Tablespoon vegetable oil
    • 1 Tablespoon butter
    • 1 large brown onion , halved (top to bottom), sliced thin
    • 1 clove garlic , minced
    • 1/2 teaspoon fresh thyme, minced , or 1/8th teaspoon dried
    • 1/2 cup plus 1 Tablespoon beef broth
    • 1 bay leaf
    • 3/4 teaspoon cornstarch
    Instructions
    1. Preheat oven to 300° F. Mix paprika, onion powder, salt, pepper, and cayenne pepper in a bowl. Pat pork chops dry with a paper towel, then rub both sides with spice mix, to evenly cover meat.
    2. Heat oil in an ovenproof 10 inch skillet on medium-high heat until it barely begins to smoke. Place chops into skillet and cook each side 3-5 minutes until well browned. Transfer chops to a plate; keep warm. Do NOT clean out skillet.
    3. Add butter to same skillet; melt using medium heat. Add onion slices; cook for 8-10 minutes until well browned. Once browned, stir thyme and garlic into skillet. Cook and stir for 30 seconds. Add 1/2 cup beef broth (reserve remaining Tablespoon broth called for in recipe) and bay leaf to skillet. Stir well, scraping browned bits from bottom of skillet (flavor-packed!). Bring to a simmer.
    4. Place chops (and any juices accumulated on plate) back into skillet. Spoon sauce over chops. Cover skillet, and place into oven. Bake for 1½ hours, until pork is tender.
    5. When done, carefully remove hot skillet from oven. Place chops onto a plate; cover with foil to keep warm. Pour the liquid from skillet through a strainer into a medium bowl. Throw away the bay leaf, then place onions into a small bowl. Let liquid in bowl settle a couple minutes, then remove any accumulated fat from surface with a spoon.
    6. Measure out 1/3 cup of the liquid; put it back into skillet. Bring to a low simmer. In a small bowl, whisk the reserved Tablespoon of beef broth and cornstarch until smooth. Add this to skillet, and whisk to combine. The sauce will thicken slightly as you cook and stir, for about a minute. Once slightly thickened, stir onions back into to sauce; season with salt and pepper, to taste. Place chops on plate, and spoon sauce over the top. Serve, and enjoy!
    Nutrition Facts
    Smothered Pork Chops
    Amount Per Serving (1 chop with gravy)
    Calories 434 Calories from Fat 252
    % Daily Value*
    Fat 28g43%
    Saturated Fat 14g88%
    Cholesterol 132mg44%
    Sodium 660mg29%
    Potassium 696mg20%
    Carbohydrates 7g2%
    Sugar 2g2%
    Protein 36g72%
    Vitamin A 325IU7%
    Vitamin C 5.4mg7%
    Calcium 45mg5%
    Iron 1.3mg7%
    * Percent Daily Values are based on a 2000 calorie diet.

    Here’s one more to pin on your Pinterest boards!

    Smothered Pork Chops are pan-seared, then baked until tender and smothered in a rich, thick onion gravy. Full of flavor, you will LOVE these glazed chops!

    Honey Garlic Pork Chops

    Honey Garlic Pork Chops are marinated in soy sauce, honey, lemon juice, garlic and sherry, and can be grilled or broiled for an easy, delicious dinner!
    Honey Garlic Pork Chops are marinated in soy sauce, honey, lemon juice, garlic and sherry, and can be grilled or broiled for an easy, delicious dinner!
    I found the recipe for these honey garlic pork chops on an old newspaper clipping in a recipe box I’ve had for years, and decided to make them for a simple dinner. The recipe itself is incredibly simple… marinate the pork, then grill or broil it until done. Easy, right?

    The pork is at its very best in flavor when it has had a chance to marinate for at least 4 hours.  My suggestion is to mix up marinade early in the day (or even the night before), drop in the pork chops and let them refrigerate all day, for best flavor!

    Scroll Down For A Printable Recipe Card At The Bottom Of The Page

    Prepare The Pork Chops

    Start with 1½ inch thick boneless pork chops. Trim off some of the extra fat around edges, if necessary.

    Fat is trimmed off boneless pork chops before cooking.

    Make The Honey Garlic Marinade

    In a small bowl, mix together the lemon juice, honey, soy sauce, sherry and minced garlic. Stir well, to combine. This is the marinade.

    Marinade for honey garlic pork chops is mixed in bowl.

    Place the pork chops in a large gallon sized re-sealable plastic bag. Pour the marinade over the chops. Seal bag, then turn to coat chops with the marinade on all sides.

    Place the sealed bag on a plate (I do this in case the bag leaks), then place in refrigerator for at least 4-24 hours.  Occasionally turn the bag over to fully coat each side.

    Pork chops are marinated in honey garlic sauce before cooking.

    When ready to cook, preheat oven broiler (or outside BBQ grill).  If using broiler (as I did this time), place a piece of aluminum foil or parchment paper on a 9×13 cookie sheet. Spray a wire rack (oven safe) with non-stick cooking spray. Place the pork chops on the rack (by doing these steps, it will make your cleanup a lot easier). Save the marinade left in bag.

    Cooking The Honey Garlic Pork Chops

    Cook under broiler or on grill for 12-15 minutes. Turn the chops at least once, and baste occasionally with the remaining marinade while the chops are cooking. Cook the pork chops until they reach an internal temperature of 160 degrees. Do not overcook, as this will dry out the chops.  When done, discard the remaining marinade.

    Marinated pork chops are placed on wire rack to broil.

    Remove the cooked honey garlic pork chops from wire rack and serve.  I served them with Toasted Orzo with Lemon and Chives, and a simple green salad. My husband and I really enjoyed this meal (and it was soooo easy to make!).

    Honey garlic pork chops served with salad and toasted orzo side dish.

    I hope you will have the opportunity to give this easy and delicious pork recipe a try.  You certainly will appreciate that you won’t have to put in a lot of effort or time in order to have some yummy pork chops for dinner!

    Looking For More PORK Recipes?

    You can find all of my recipes in the Recipe Index, located at the top of the page. I have quite a few recipes that feature pork, including:

    Interested In More Recipes?

    Thank you for visiting this website. I appreciate you using some of your valuable time to do soIf you’re interested, I publish a newsletter 2 times per month (1st and 15th) with all the latest recipes, and other fun info. I would be honored to have you join our growing list of subscribers, so you never miss a great recipe!
    There is a Newsletter subscription box on the top right side (or bottom) of each blog post, depending on the device you use, where you can easily submit your e-mail address (only) to be included in my mailing list.

    You Can Also Find Me On Social Media:
    Facebook page: The Grateful Girl Cooks!
    Pinterest: The Grateful Girl Cooks!
    Instagram: jbatthegratefulgirlcooks

    Author's signature

    Recipe Source: unknown (all I have is an old newspaper clipping-no source or date)

    0 from 0 votes
    Honey Garlic Pork Chops
    Prep Time
    5 mins
    Cook Time
    15 mins
    Total Time
    20 mins
     
    Honey Garlic Pork Chops are marinated in soy sauce, honey, lemon juice, garlic and sherry, and can be grilled or broiled for an easy, delicious dinner!
    Category: Entree
    Cuisine: American
    Keyword: honey garlic pork chops
    Servings: 4 servings
    Calories Per Serving: 285 kcal
    Author: JB @ The Grateful Girl Cooks!
    Ingredients
    • 1/4 cup fresh squeezed lemon juice
    • 1/4 cup honey
    • 2 Tablespoons soy sauce
    • 1 Tablespoon cooking sherry (or dry sherry)
    • 2 cloves garlic , minced
    • 4 (1½-inch thick) center cut boneless pork chops
    Instructions
    1. Trim off extra fat around edges of pork chops. Set aside.
    2. In a small bowl, mix together lemon juice, honey, soy sauce, sherry and minced garlic. Stir well, to combine. This is the marinade.
    3. Place pork chops in a large gallon size re-sealable plastic bag. Pour marinade over the chops. Seal bag, then turn to cover all sides of chops with marinade. Place sealed bag on a plate (do this in case the bag leaks), then place in refrigerator for between 4-24 hours to marinate. Occasionally turn the bag over, to fully coat each side of the pork.
    4. When ready to cook, preheat oven broiler (or outside BBQ grill). If using broiler, place a piece of aluminum foil or parchment paper on a 9x13 cookie sheet. Spray a wire rack (oven safe) with non-stick cooking spray, then place pork chops on the rack (by doing these steps, it will make your cleanup a lot easier). Save the marinade left in bag.
    5. Cook under broiler or on grill for 12-15 minutes, turning chops at least once, and baste occasionally with the remaining marinade while the chops are cooking. Cook pork chops until they reach an internal temperature of 160 degrees. Do not overcook, as this will dry out the chops. When done, discard remaining marinade. Transfer pork chops from wire rack to serving plate and serve.
    Nutrition Facts
    Honey Garlic Pork Chops
    Amount Per Serving (1 pork chop)
    Calories 285 Calories from Fat 81
    % Daily Value*
    Fat 9g14%
    Saturated Fat 3g19%
    Cholesterol 89mg30%
    Sodium 332mg14%
    Potassium 540mg15%
    Carbohydrates 19g6%
    Sugar 17g19%
    Protein 29g58%
    Vitamin C 6.4mg8%
    Calcium 12mg1%
    Iron 0.9mg5%
    * Percent Daily Values are based on a 2000 calorie diet.

    Here’s one more to pin on your Pinterest boards!Honey Garlic Pork Chops are marinated in soy sauce, honey, lemon juice, garlic and sherry, and can be grilled or broiled for an easy, delicious dinner!

    Save

    Save

    Save

    Save

    Save

    Save

    Save

    Save

    Save

    Pork Medallions in Mushroom Marsala Sauce

    Pork medallions in mushroom marsala sauce is a one-pan wonder, featuring pork tenderloin and mushrooms in a creamy wine sauce, and can be “on the table” in 30 minutes!Pork medallions in mushroom Marsala sauce is a one-pan wonder, featuring pork tenderloin and mushrooms in a creamy wine sauce, and "on the table" in 30 minutes!

    Looking for a delicious “new” way to cook pork tenderloin? How about this recipe for pork medallions?  The recipe is a one-pan wonder, featuring tender pork and mushrooms in a creamy Marsala wine sauce. This easy to make dish can be “on the table” in 30 minutes! The best part is that it tastes amazing!

    I originally found the recipe on Pinterest months ago, from Jennifer at Seasons and Suppers, and finally got around to trying it. Delicious!!!!  The recipe (as written below) serves 4; since I was only cooking for my husband and myself, I halved the recipe, so the photos reflect that.

    Scroll Down For A Printable Recipe Card At The Bottom Of The Page

    Prepare The Pork Medallions

    Trim any excess fat (and silverskin) from pork. Slice into 2 inch thick medallions. Lightly season the pork with salt and pepper.  In a large skillet, heat the olive oil and 1 Tablespoon of the butter using medium-high heat. Once you see the butter melt and get foamy (and the skillet is really hot), add the slices of pork in a single layer (cook it in two batches, if you need to).

    Sear the pork until lightly browned (2-3 minutes). Turn the pork over; continue to cook the other side for another 2-3 minutes until golden brown. Remove pork from skillet to a plate. Set aside. Do not clean out skillet.

    Pork medallions are lightly seasoned with salt, pepper.

    Pork medallions are cooked in butter.

    Pork medallions are cooked until browned on all sides.

    Melt the rest of the butter (2 T.) in the same skillet you cooked pork in. Add chopped shallots; season with a touch of salt and pepper. Cook for 30 seconds, stirring and scraping browned bits off bottom of skillet with a wooden spoon.

    Add sliced mushrooms; cook until golden in color and any mushroom liquid has evaporated. This will take approximately 2-3 minutes.

    Butter and shallots are cooked for marsala sauce for pork medallions.

    Sliced mushrooms are added to marsala sauce for pork medallions.

    Make The Marsala Sauce for The Pork Medallions

    Sprinkle mushrooms with flour, then pour in the Marsala wine. Stir to combine. Cook until the Marsala wine has almost completely evaporated. Add the chicken broth, stir and cook until the amount of liquid in skillet is reduced in half (this will take about 3-4 minutes).

    Stir the whipping cream and parsley into the pan. True Story- I accidentally dumped a bit of extra whipping cream into the skillet, so the sauce is lighter in color than it normally would be-oops!.

    Chicken broth and whipping cream are added to marsala wine sauce for pork medallions.

    Mushroom marsala sauce has thickened; parsley is added to pan.

    Return The Pork to the Skillet

    Add the pork medallions (and any extra juices on plate) back into the skillet. Stir to combine and turn, to coat pork with sauce. Cook on medium-low for an additional 2-4 minutes, stirring often, until pork is hot. Try not to let the sauce boil.

    Browned pork medallions are added into mushroom marsala sauce in skillet.

    Time To EAT!

    Taste test the sauce. Season with additional salt and pepper, if desired. Serve and enjoy! I served the pork medallions with creamy mashed potatoes and green beans from our garden.

    Pork medallions in mushroom marsala sauce, served with potatoes and green beans.

    The flavor of the sauce is wonderful, and really makes the dish! I hope you will consider trying this easy, quick recipe for pork medallions, and trust that you will enjoy it as much as we did.

    Have a fantastic day and remember to be kind to those you meet or cross paths with today. It feels good to be a positive force for good in our often harsh, hurting world. God Bless You.

    Looking For More PORK Recipes?

    You can find ALL my recipes in the Recipe Index, located at the top of the page. I have lots of pork recipes, including:

    Interested In More Recipes?

    Thank you for visiting this website. I appreciate you using some of your valuable time to do soIf you’re interested, I publish a newsletter 2 times per month (1st and 15th) with all the latest recipes, and other fun info. I would be honored to have you join our growing list of subscribers, so you never miss a great recipe!
    There is a Newsletter subscription box on the top right side (or bottom) of each blog post, depending on the device you use, where you can easily submit your e-mail address (only) to be included in my mailing list.

    You Can Also Find Me On Social Media:

    Facebook page: The Grateful Girl Cooks!
    Pinterest:
    The Grateful Girl Cooks!
    Instagram:
    jbatthegratefulgirlcooks

    Author's signature

    Recipe Source:  https://www.seasonsandsuppers.ca/skillet-pork-medallions-mushroom-marsala-sauce/

    0 from 0 votes
    Pork Medallions in Mushroom Marsala Sauce
    Prep Time
    10 mins
    Cook Time
    20 mins
    Total Time
    30 mins
     

    Pork medallions in mushroom Marsala sauce is a one-pan wonder, featuring pork tenderloin and mushrooms in a creamy wine sauce, and "on the table" in 30 minutes!

    Category: Entree
    Cuisine: American
    Keyword: pork medallions
    Servings: 4 servings
    Calories Per Serving: 566 kcal
    Author: JB @ The Grateful Girl Cooks!
    Ingredients
    • 2 pound pork tenderloins (2 small tenderloins)
    • Salt and pepper
    • 3 Tablespoons extra-virgin olive oil
    • 3 Tablespoons butter
    • 2 medium shallots , finely diced (can substitute red onion)
    • 12 ounces button mushrooms (or cremini)
    • 1 Tablespoon all purpose flour
    • 1/2 cup dry Marsala wine
    • 1 cup chicken broth
    • 3 Tablespoons heavy whipping cream
    • Tablespoons dried parsley (or 1/4 cup fresh chopped flat leaf parsley)
    Instructions
    1. Trim excess fat (and silverskin) from pork. Slice into 2 inch thick medallions. Lightly season the pork with salt and pepper.
    2. In a large skillet, heat the olive oil and 1 Tablespoon of the butter using medium-high heat. Once you see the butter getting foamy (and the skillet is really hot), add the slices of pork in a single layer (cook it in two batches, if you need to). Sear the pork until lightly browned (2-3 minutes). Turn the pork over; continue to cook the other side for another 2-3 minutes until golden brown. Remove pork from skillet to a plate. Set aside. Do not clean out skillet.
    3. Melt the rest of the butter (2 T.) in the same skillet you cooked pork in. Add chopped shallots; season with a touch of salt and pepper. Cook for 30 seconds, stirring and scraping browned bits off bottom of skillet with a wooden spoon. Add sliced mushrooms; cook until golden in color and mushroom liquid is evaporated. This will take approximately 2-3 minutes.
    4. Sprinkle mushrooms with flour, then pour in the Marsala wine. Stir to combine. Cook until the Marsala wine has almost completely evaporated. Add the chicken broth, stir and cook until the amount of liquid in skillet is reduced in half (this will take about 3-4 minutes). Stir the whipping cream and parsley into the pan. Add the pork (and any extra juices on plate) back into the skillet. Stir to combine and coat pork with sauce. Cook on medium-low for an additional 2-4 minutes, until pork is hot. Try not to let the sauce boil.
    5. Taste test the sauce. Season with additional salt and pepper, if desired. Serve... and enjoy!
    Nutrition Facts
    Pork Medallions in Mushroom Marsala Sauce
    Amount Per Serving (1 g)
    Calories 566 Calories from Fat 279
    % Daily Value*
    Fat 31g48%
    Saturated Fat 12g75%
    Cholesterol 185mg62%
    Sodium 424mg18%
    Potassium 1298mg37%
    Carbohydrates 11g4%
    Fiber 1g4%
    Sugar 5g6%
    Protein 50g100%
    Vitamin A 440IU9%
    Vitamin C 7.8mg9%
    Calcium 43mg4%
    Iron 3.3mg18%
    * Percent Daily Values are based on a 2000 calorie diet.

    Here’s one more to pin on your Pinterest boards!Pork medallions in mushroom Marsala sauce is a one-pan wonder, featuring pork tenderloin and mushrooms in a creamy wine sauce, and "on the table" in 30 minutes!

    Save

    Save

    Save

    Save

    Save

    Save

    Save

    Save

    Save

    Save

    Save

    Save

    Save

    Save

    Save

    Save

    Save

    Save

    Cumin-Dusted Pork Cutlets With Citrus Sauce

    Cumin dusted pork cutlets are lightly seasoned with Southwestern spices, pan-seared, then served covered in a delicious, fresh citrus sauce.
    Cumin dusted pork cutlets are lightly seasoned with Southwestern spices, pan-seared, then served covered in a delicious, fresh citrus sauce.

    I recently made some delicious Cumin-Dusted Pork Cutlets with Citrus Sauce for our dinner and wanted to share this very simple recipe with you today. The recipe originated on the Epicurious website and sounded interesting, so I decided to try it, only making a couple tweaks to the original recipe. The pork cutlets are seasoned, then pan-seared.

    As soon as they are done, a quick and easy citrus sauce (with orange juice, lemon juice, and garlic) is made and then spooned over the cooked pork cutlets. The cutlets are then served. It really couldn’t be any easier!

    Scroll Down For A Printable Recipe Card At The Bottom Of The Page

    How To Make Cumin Dusted Pork Cutlets With Citrus Sauce

    If you are using thin, small cutlets, a serving size would be 2 cutlets per adult (and you will NOT need to pound them down).  You want to use fairly thin pork cutlets, so they will cook quickly.  Lightly season the pork with salt and pepper, and set aside.

    Raw pork cutlets on plate before pan-searing.

    **NOTE: I ended up using slightly larger and thicker boneless chops that I already had in my freezer for this meal, so I pounded each piece with a meat mallet between plastic wrap to flatten them out more (to about 1/2 inch). Since they were large pork chops to begin with, we had 1 cutlet per serving.

    Pork cutlets can be flattened with a meat mallet.

    Prepare Seasoning Mix For The Pork Chops

    Mix the flour, ground cumin, chili powder, garlic powder, salt and pepper on a large dinner plate until the ingredients are fully combined.

    Flour, cumin and other spices for pork cutlets, in bowl.

    Once mixed, coat both sides of each of the pork cutlets with seasoning. Make sure to shake off any excess flour from the pork cutlets.

    Pork cutlets are dredged in flour/spice mixture until covered, before cooking.

    Heat 1 Tablespoon of olive oil on medium-high heat in a large non-stick skillet. Once oil is very hot (but not smoking), add cutlets. They should sizzle when they hit the hot oil.

    Pork cutlets are seared in large skillet with oil.

    Cooking the Cumin Dusted Pork Cutlets

    Cook 3-4 minutes on first side, then turn over and cook other side for same amount of time (until fully cooked through and golden brown). Transfer the pork cutlets to a serving plate; keep them warm. If your pork cutlets are thicker, be sure to cook them longer. Chops should reach a safe, internal temperature of 145°F.

    Cumin dusted pork cutlets are browned on all sides.

    Making The Citrus Sauce For The Pork Cutlets

    Do not clean out the skillet (the brown bits on bottom of skillet help to flavor citrus sauce!). Add 2 Tablespoons olive oil to skillet; heat on medium.  Add minced garlic to skillet; cook for about 15-30 seconds, stirring constantly (don’t burn it!).

    Add fresh orange and lemon juices, and a few orange slices.  Bring this mixture to a boil, stirring occasionally. Cook the sauce until the liquid has reduced in volume and has thickened a bit. This will take about a minute or so. Taste the citrus sauce; add additional salt and pepper, if needed. Remove the sauce from the heat.

    Orange juice, garlic and orange slices in skillet for citrus sauce to top pork cutlets.

    Spoon the citrus sauce over the pork cutlets. Garnish each serving with thin orange slices and parsley (fresh or dried) if desired. Serve and enjoy!

    Cumin dusted pork cutlets on plate with rice, peas, and orange slices.

    The pork cutlets have a nice, slightly Southwestern flavor (the cumin does not overpower it).  There is enough sauce for 4 servings (single cutlet). If serving 2 cutlets per person, the recipe as written makes enough sauce for 2 servings.

    Hope you will consider making this easy, tasty pork cutlets meal. Have a great day, friends. Thanks for stopping by. I hope you will come back again soon.

    Looking For More PORK CHOP Recipes?

    You can find all of my recipes in the Recipe Index, located at the top of the page. I have quite a few delicious recipes featuring pork chops, including:

    Interested In More Recipes?

    Thank you for visiting this website. I appreciate you using some of your valuable time to do soIf you’re interested, I publish a newsletter 2 times per month (1st and 15th) with all the latest recipes, and other fun info. I would be honored to have you join our growing list of subscribers, so you never miss a great recipe!
    There is a Newsletter subscription box on the top right side (or bottom) of each blog post, depending on the device you use, where you can easily submit your e-mail address (only) to be included in my mailing list.

    You Can Also Find Me On Social Media:
    Facebook page: The Grateful Girl Cooks!
    Pinterest: The Grateful Girl Cooks!
    Instagram: jbatthegratefulgirlcooks

    Author's signature

    Recipe Adapted From:  http://www.epicurious.com/recipes/food/views/cumin-dusted-pork-cutlets-with-citrus-pan-sauce-105363

    0 from 0 votes
    Cumin Dusted Pork Cutlets With Citrus Sauce
    Prep Time
    10 mins
    Cook Time
    10 mins
    Total Time
    20 mins
     

    Cumin dusted pork cutlets are lightly seasoned with Southwestern spices, pan-seared, then served covered in a delicious, fresh citrus sauce.

    Category: Entree
    Cuisine: American
    Keyword: pork cutlets
    Servings: 4 servings (1 per person)
    Calories Per Serving: 311 kcal
    Author: JB @ The Grateful Girl Cooks!
    Ingredients
    For Pork:
    • 4 boneless pork cutlets
    • 2 Tablespoons all purpose flour
    • 2 teaspoons ground cumin
    • 1/4 teaspoon garlic powder
    • 1/2 teaspoon chili powder
    • 1/2 teaspoon salt
    • 1/2 teaspoon ground black pepper
    • 1 Tablespoon olive oil
    For Citrus Sauce:
    • 2 Tablespoons olive oil
    • 2 garlic cloves , minced
    • 1/3 cup fresh orange juice
    • 3 Tablespoons fresh lemon juice
    • A few orange slices (see below)
    For garnish:
    • 1 orange , sliced into thin slices, then cut in half (divided)
    • Chopped fresh parsley or dried parsley
    Instructions
    1. Lightly season pork with salt and pepper, and set aside.
    2. On a plate, mix together flour, ground cumin, chili powder, garlic powder, salt and pepper. Once mixed, coat each pork cutlet (on both sides) with seasoning. Shake off excess flour.
    3. Heat 1 Tablespoon of olive oil on medium-high heat in a large non-stick skillet. Once oil is very hot (but not smoking), add cutlets. Cook 3-4 minutes on first side, then flip and cook other side for same amount of time (until cooked through and golden brown). Remove pork to serving plate; keep warm.
    4. Do not clean out the skillet. Add 2 Tablespoons olive oil to skillet; heat oil on medium. Add minced garlic to skillet; cook for about 15-30 seconds, stirring constantly (don't burn it!). Add fresh orange and lemon juices, and a few orange slices. Bring mixture to a boil, stirring occasionally, until liquid has reduced and thickened a bit (this will take about a minute or so). Taste sauce; add additional salt and pepper, if desired. Remove sauce from heat.
    5. Spoon sauce over the pork cutlets. Garnish with thin orange slices and parsley (fresh or dried) if desired. Serve and enjoy!
    Recipe Notes

    If a slightly sweeter citrus sauce is desired, add 1 teaspoon honey.

    Nutrition Facts
    Cumin Dusted Pork Cutlets With Citrus Sauce
    Amount Per Serving (1 piece)
    Calories 311 Calories from Fat 135
    % Daily Value*
    Fat 15g23%
    Saturated Fat 3g19%
    Cholesterol 88mg29%
    Sodium 363mg16%
    Potassium 648mg19%
    Carbohydrates 10g3%
    Fiber 1g4%
    Sugar 5g6%
    Protein 31g62%
    Vitamin A 200IU4%
    Vitamin C 32.6mg40%
    Calcium 32mg3%
    Iron 1.5mg8%
    * Percent Daily Values are based on a 2000 calorie diet.

    Here’s one more to pin on your Pinterest boards!Cumin dusted pork cutlets are lightly seasoned with Southwestern spices, pan-seared, then served covered in a delicious, fresh citrus sauce.

    Save

    Save

    Save

    Save

    Save

    Save

    Save

    Save

    Save

    Save

    Save

    Save

    Grilled Pork Tenderloin Sandwich with Mozzarella and Caramelized Onions

    Have leftover pork roast and need a tip on how to use it up? Make a delicious grilled pork tenderloin sandwich with mozzarella and caramelized onions!Have leftover pork roast and need a tip on how to use it up? Make a delicious grilled pork tenderloin sandwich with mozzarella and caramelized onions!
    Ever have leftover pork roast or pork tenderloin and wonder what you can do to use it up creatively?  Recently I had leftover pork from dinner, so I made a Grilled Pork Tenderloin Sandwich with Mozzarella and Caramelized Onions for lunch!  It tasted wonderful!

    I enjoy having leftovers in the fridge, unlike my little sister Joni, who hates having them around. My personal theory is it’s awesome when you can cook once, then take some of the leftovers and “morph” them into a completely different meal.  That was how this sandwich came into existence.

    I was looking for something in our refrigerator for lunch, but didn’t want to have leftover pork… unless I could transform it into something else! 

    So… I put my thinking cap on and came up with the idea for this pork tenderloin sandwich!  Here’s how to make it:

    Scroll Down For A Printable Recipe Card At The bottom Of The Page

    Caramelize The Onions

    Cook the sliced onions slowly in a skillet with a bit of olive oil for several minutes. Continue to cook until the onions have browned and caramelized.

    Sliced onions are caramelized in skillet before adding to sandwich.

    “Build” The Pork Tenderloin Sandwich

    Melt the butter in a large skillet on medium-low heat.  Butter one side of a large piece of sourdough bread and place it butter side DOWN in skillet.

    Generously layer the bread with thin slices of leftover cooked pork tenderloin. If necessary, lightly season the pork slices with salt and pepper.

    Thin slices of pork tendeloin are arranged on buttered bread in skillet.
    Arrange the caramelized onions on top of the pork slices.

    Caramelized onion slices are added to the pork tenderloin sandwich.
    Spread a thin layer of sliced mozzarella (or grated) on top of the onions.

    Mozzarella cheese slices are placed on top of the caramelized onions.

    Butter one side of the other pieces of sourdough bread, and place them on top of the sandwich, butter side UP.

    Time To Cook The Grilled Pork Tenderloin Sandwich

    Cook the sandwich on medium-low heat until the bottom side of the bread has lightly browned.

    The pork tenderloin sandwich is grilled in a skillet.
    Carefully turn sandwich over and cook the other side (like a grilled cheese sandwich).  See how nice and golden brown the sourdough bread is now?

    Continue cooking slowly until cheese has melted. You want the grilled pork tenderloin sandwich to be heated all the way through (low and slow!).

    The pork tenderloin sandwich is flipped to other side once golden and toasted.

    When the sandwich is done cooking, remove it from the skillet. Transfer it to a plate, and get ready to enjoy this sandwich!

    It’s Time To Eat The Grilled Pork Tenderloin Sandwich!

    Carefully cut the grilled sandwich in half… and enjoy!  The tender pork slices, crunchy buttery sourdough bread, gooey melted mozzarella cheese and slight sweetness of the caramelized onions really make this sandwich special.

    An entire grilled pork tenderloin sandwich is very filling! A half of this sandwich was all I could eat! If you don’t want to eat a whole sandwich, you can get 4 servings when you make two sandwiches.

    The grilled pork tenderloin sandwich, cut in half to serve.

    Hope you will consider creating a delicious pork tenderloin sandwich when you have leftover pork roast or tenderloin!  The sandwich was very good!

    Looking For More SANDWICH Recipes?

    You can find all of my sandwich recipes in the Recipe Index, located at the top of the page. A few of them include:

    Interested In More Recipes?

    Thank you for visiting this website. I appreciate you using some of your valuable time to do soIf you’re interested, I publish a newsletter 2 times per month (1st and 15th) with all the latest recipes, and other fun info. I would be honored to have you join our growing list of subscribers, so you never miss a great recipe!
    There is a Newsletter subscription box on the top right side (or bottom) of each blog post, depending on the device you use, where you can easily submit your e-mail address (only) to be included in my mailing list.

    You Can Also Find Me On Social Media:
    Facebook page: The Grateful Girl Cooks!
    Pinterest: The Grateful Girl Cooks!
    Instagram: jbatthegratefulgirlcooks

    Author's signature

    5 from 1 vote
    Grilled Pork Tenderloin Sandwich w/ Mozzarella & Caramelized Onions
    Prep Time
    10 mins
    Cook Time
    10 mins
    Total Time
    20 mins
     

    Have leftover pork roast and need a tip on how to use it up? Make a delicious grilled pork tenderloin sandwich with mozzarella and caramelized onions!

    Category: Sandwich
    Cuisine: Sandwich
    Keyword: pork tenderloin sandwich
    Servings: 2 servings
    Calories Per Serving: 666 kcal
    Author: JB @ The Grateful Girl Cooks!
    Ingredients
    • 4 slices sourdough bread
    • 1 Tablespoon butter (for skillet)
    • 2 Tablespons enough butter to spread on bread (for grilling)
    • 8 thin slices precooked pork tenderloin (enough to cover each sandwich)
    • 1/2 onion , thinly sliced
    • 1 Tablespoon olive oil
    • thin slices mozzarella cheese (enough to cover sandwich)
    Instructions
    1. Heat olive oil in skillet on medium heat. Add sliced onions; cook slowly, stirring occasionally, for several minutes, until they have browned and caramelized.
    2. Melt butter in a skillet on medium-low heat. For each sandwich, butter one side of bread and place it butter side DOWN in skillet.
    3. Cover bread with thin slices of leftover cooked pork tenderloin. Lightly season pork with salt and pepper. Divide and spread caramelized onions on top of pork. Spread a thin layer of sliced mozzarella (or grated) on top of onions. Butter one side of remaining pieces of sourdough bread, and place on top of the sandwich, butter side UP.

    4. Cook on medium-low until bottom side has lightly browned.Carefully turn sandwich over. Continue cooking slowly until cheese has melted and sandwich is heated through (low and slow!). When sandwiches are done cooking, remove from skillet. Slice sandwich in half... and enjoy!

    Nutrition Facts
    Grilled Pork Tenderloin Sandwich w/ Mozzarella & Caramelized Onions
    Amount Per Serving (1 sandwich)
    Calories 666 Calories from Fat 207
    % Daily Value*
    Fat 23g35%
    Saturated Fat 9g56%
    Cholesterol 88mg29%
    Sodium 932mg41%
    Potassium 524mg15%
    Carbohydrates 75g25%
    Fiber 3g13%
    Sugar 4g4%
    Protein 37g74%
    Vitamin A 365IU7%
    Vitamin C 2.1mg3%
    Calcium 206mg21%
    Iron 5.5mg31%
    * Percent Daily Values are based on a 2000 calorie diet.

    Here’s one more to pin on your Pinterest boards!Have leftover pork roast and need a tip on how to use it up? Make a delicious grilled pork tenderloin sandwich with mozzarella and caramelized onions!


    Save

    Save

    Save

    Save

    Save

    Save

    Save

    Easy Island Glazed Pork Tenderloin

    Easy to prepare in about 30 minutes, this scrumptious glazed pork tenderloin is coated with Island-inspired spices and a sweet/spicy glaze.Easy to prepare in about 30 minutes, this scrumptious glazed pork tenderloin is coated with Island-inspired spices and a sweet/spicy glaze.

    If you are looking for an easy to prepare, budget friendly AND flavor-filled dinner, then you just have to try this Easy Island Glazed Pork Tenderloin! It tastes FANTASTIC! I enjoy cooking pork tenderloin, because it is fairly inexpensive. The pork tenderloin I used was one and a half pounds and cost $6.99, but gave us enough for 4 good sized servings.  It takes less time to cook than a large pork roast or thick chops.

    This glazed pork tenderloin recipe is very easy to prepare, because there are not a lot of steps. A dry rub of “Island-inspired” spices are used to coat the tenderloin, and the meat is pan-seared. Next, a  sweet n’ slightly spicy glaze is added to the tenderloin, and then it bakes for about 25 minutes. That’s it!

    There is so much phenomenal flavor on the pork, I really think you will enjoy this just as much as we did… it’s THAT good!  Here’s what you do to prepare this dish:

    Scroll Down For A Printable Recipe Card At The Bottom Of The Page

    How To Make This Glazed Pork Tenderloin

    Preheat your oven to 350 degrees F. While oven is preheating, mix together the spices for the dry rub (salt, cinnamon, cumin, chili powder, and black pepper). Once mixed, rub the spices over the entire tenderloin (top, bottom and sides). Make sure to rub the spices into the meat, using your fingers.

    Easy Island Glazed Pork Tenderloin / The Grateful Girl Cooks!

    Easy Island Glazed Pork Tenderloin / The Grateful Girl Cooks!

    Pan-Sear The Seasoned Tenderloin

    Heat olive oil in an OVENPROOF skillet (see NOTES section of printable recipe for tip). Heat oil on medium-high. Once oil is very hot (but not smoking), add the seasoned tenderloin to the hot skillet. It should sizzle as it hits the hot oil.

    Let it sear on one side for a couple minutes, then turn it over and brown the other side for two or three minutes. Turn the meat onto its side, as well, to give the tenderloin a nice brown appearance all over.

    Easy Island Glazed Pork Tenderloin / The Grateful Girl Cooks!

    Easy Island Glazed Pork Tenderloin / The Grateful Girl Cooks!

    Prepare The Glaze

    Mix up the glaze ingredients with a fork or spoon in a small bowl (brown sugar, minced garlic and sriracha sauce) until you end up with a thick glaze.

    Easy Island Glazed Pork Tenderloin / The Grateful Girl Cooks!

    Easy Island Glazed Pork Tenderloin / The Grateful Girl Cooks!

    Glaze The Pork Tenderloin

    Coat the tenderloin (top and sides) with the glaze. I used a spoon, and spread it all over. Some will run down the sides into the pan. No problem… it will be a wonderful sauce to drizzle over the cooked pork slices, when done.

    Easy Island Glazed Pork Tenderloin / The Grateful Girl Cooks!

    Bake The Easy Island Glazed Pork Tenderloin

    Bake, uncovered, in a 350 degree oven for about 23-25 minutes. Cooking times will vary slightly, depending on the size tenderloin you are cooking, but make sure pork is cooked through, to an internal temperature of at least 145 degrees.

    When the glazed pork tenderloin is done, remove the hot skillet (carefully) from the oven. Let pork sit, undisturbed for about 5 minutes to let the juices redistribute inside the pork.

    Ready To Serve

    Carve the glazed pork tenderloin into one inch slices, and place on serving plates. Make sure to spoon up some of that delicious glaze, and drizzle it over the slices of pork before serving!

    Easy Island Glazed Pork Tenderloin / The Grateful Girl Cooks!

    Easy Island Glazed Pork Tenderloin / The Grateful Girl Cooks!

    Here is how I served this delicious Island glazed pork tenderloin, with a small baked potato and sautéed vegetable medley on the side. It was amazingly delicious; the meat was very tender (cut with a fork tender), and the flavor was outstanding!

    Easy Island Glazed Pork Tenderloin / The Grateful Girl Cooks!

    I really hope you will consider making this recipe for easy island glazed pork tenderloin. It is quick and easy to prepare, easy on the budget (4 servings for about $7) and truly… the spice combination is wonderful. We loved this dish, and I will definitely make it again.

    Have a blessed day, and may God bless the work of YOUR hands in all you do for others!

    Looking For More PORK Recipes?

    You can find all of my recipes in the Recipe Index, located at the top of the page. I have lots of delicious recipes featuring pork you might enjoy, including:

    Interested In More Recipes?

    Thank you for visiting this website. I appreciate you using some of your valuable time to do soIf you’re interested, I publish a newsletter 2 times per month (1st and 15th) with all the latest recipes, and other fun info. I would be honored to have you join our growing list of subscribers, so you never miss a great recipe!
    There is a Newsletter subscription box on the top right side (or bottom) of each blog post, depending on the device you use, where you can easily submit your e-mail address (only) to be included in my mailing list.

    You Can Also Find Me On Social Media:
    Facebook page: The Grateful Girl Cooks!
    Pinterest: The Grateful Girl Cooks!
    Instagram: jbatthegratefulgirlcooks

    Easy Island Glazed Pork Tenderloin / The Grateful Girl Cooks!

    Recipe Source:  http://www.lecremedelacrumb.com/2015/09/island-glazed-pork-tenderloin-html

    0 from 0 votes
    Easy Island Glazed Pork Tenderloin
    Prep Time
    5 mins
    Cook Time
    25 mins
    Total Time
    30 mins
     

    Easy to prepare in about 30 minutes, this scrumptious glazed pork tenderloin is coated with Island-inspired spices and a sweet/spicy glaze.

    Category: Entree
    Cuisine: American
    Keyword: glazed pork tenderloin
    Servings: 4 servings
    Calories Per Serving: 439 kcal
    Author: JB @ The Grateful Girl Cooks!
    Ingredients
    • pounds pork tenderloin (can use one medium-large tenderloin or 2 small)
    • 2 Tablespoons olive oil
    For Spice Rub:
    • 2 teaspoons salt
    • 1 teaspoon ground cinnamon
    • 1 teaspoon cumin
    • 1 teaspoon chili powder
    • ½ teaspoon ground black pepper
    For Glaze:
    • ¾ cup brown sugar (light or dark)
    • 2 Tablespoons minced garlic
    • 1 Tablespoon Sriracha sauce (SEE NOTES SECTION)
    Instructions
    1. Preheat your oven to 350 degrees F.
    2. Mix together the spice rub (salt, cinnamon, cumin, chili powder, and black pepper) in a small bowl. Sprinkle the spice rub mix all over the pork tenderloin (on all sides). Use your fingers to rub the spices into the meat. Set aside.
    3. Measure the olive oil into an oven-proof skillet. Heat the oil on medium-high until it is pretty hot (but not smoking). Once oil is hot, add the pork to the skillet. Sear the meat for about 4-5 minutes total, turning pork occasionally until sides/top and bottom are all browned. Remove from heat.
    4. In a separate small bowl, mix the glaze ingredients together (brown sugar, minced garlic, and sriracha), until it becomes a thick glaze. Spread the glaze over the top and sides of the pork, to coat. Place the pork (in same ovenproof skillet) into your preheated oven. Cook, uncovered for 23-25 minutes at 350 degrees, until pork is cooked through. The length of cook time will vary, depending on size of tenderloin used (cooked pork tenderloin or pork roast should have a minimum internal temperature of 145 degrees). Once done, remove hot skillet from oven and let pork sit undisturbed for 5-6 minutes (to let juices redistribute through meat).
    5. To serve: Slice, place on serving plates, drizzle meat with extra glaze from skillet...and enjoy!.
    Recipe Notes

    Not familiar with Sriracha Sauce? It is an mildly hot chili sauce (usually located in Asian section at grocery store. Other hot sauces may be substituted, but sriracha is the best way to go for this recipe!
    No ovenproof skillet? No problem. Sear meat in regular skillet. Place into casserole dish, add glaze, then bake!

    Nutrition Facts
    Easy Island Glazed Pork Tenderloin
    Amount Per Serving (1 g)
    Calories 439 Calories from Fat 117
    % Daily Value*
    Fat 13g20%
    Saturated Fat 3g19%
    Cholesterol 110mg37%
    Sodium 1359mg59%
    Potassium 772mg22%
    Carbohydrates 44g15%
    Sugar 40g44%
    Protein 35g70%
    Vitamin A 150IU3%
    Vitamin C 4.8mg6%
    Calcium 68mg7%
    Iron 2.5mg14%
    * Percent Daily Values are based on a 2000 calorie diet.

    Here’s one more to pin on your Pinterest boards!Easy to prepare in about 30 minutes, this scrumptious glazed pork tenderloin is coated with Island-inspired spices and a sweet/spicy glaze.


    Save

    Save

    Save

    Save

    Save

    Save

    Save

    Save

    Save

    Save

    Save

    Save

    Save

    Save