Maple Cinnamon Butternut Squash

Maple Cinnamon Butternut Squash is an easy to make, healthy and delicious roasted vegetable side dish – this is caramelized squash you’re gonna love!
Maple Cinnamon Butternut Squash is an easy to make, healthy and delicious roasted vegetable side dish - caramelized squash you're gonna love!

Do you like butternut squash? While it is not something I routinely fix in our home, I sure do enjoy this delicious veggie once made. A few years ago I made the best butternut squash soup (with bacon) that I’ve ever had. Now we routinely enjoy this soup, especially in the Fall and Winter. Seriously… YUM!

I’ve also used this versatile “winter” vegetable to make a couple other delicious recipes. The recipes include Roasted Butternut Squash with Cranberries, Honey & Feta, and Butternut Squash Ravioli with Browned Butter Sage Sauce. Both are delicious!

THIS recipe I am sharing today is for simple roasted maple cinnamon butternut squash. This dish is gluten-free, and doesn’t contain any refined sugar, for those of you that are interested. Crispy on the outside, soft and creamy on the inside, it’s easy to prepare, and is a GREAT side dish!

Scroll Down For A Printable Recipe Card At The Bottom Of The Page

How To Make Maple Cinnamon Butternut Squash

Before starting, preheat your oven to 400° F.  Peel a large butternut squash with a vegetable peeler. This is the “hardest” and “messiest part of the recipe (and it’s not really that bad). Once peeled, carefully slice the squash in half lengthwise.

Use a spoon (and maybe even your fingers) to remove all the seeds and “fibrous strings” from the inside. Once all seeds have been removed, cut the squash into bite sized cubes. Try to keep most of the pieces about the same size, for even baking.

Butternut squash is ready to be peeled, seeded and cubed, to make maple cinnamon butternut squash.

The butternut squash is peeled, seeded, then cut into bite sized pieces before baking.

Place the butternut squash pieces into a large bowl, and drizzle them with the olive oil. Season the squash with a pinch of salt and pepper (to taste), then add the cinnamon, and maple syrup. Stir the ingredients, in order to fully combine and lightly season all the pieces of maple cinnamon butternut squash.

Maple syrup and cinnamon are mixed into the butternut squash pieces before baking.

Line a large baking sheet with parchment paper. Spread the butternut squash cubes out in a single layer, leaving a bit of space between each piece.

The pieces of maple cinnamon butternut squash are placed on parchment paper to bake.

Roast The Maple Cinnamon Butternut Squash

Roast the maple cinnamon butternut squash in a preheated 400° F. oven for 35 minutes. HALFWAY through the baking time, rotate the pan in the oven to ensure even baking. When the 35 minutes is up, carefully flip each piece over so the bottom side is up, and put back in oven. Cook for 5 more minutes, to help caramelize the squash a bit on the other side.

Halfway through baking time, maple cinnamon butternut squash is turned to other side to finish cooking.

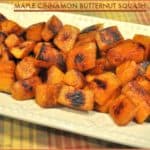
Once the maple cinnamon butternut squash has finished roasting, remove from oven; transfer squash to a serving platter. It is now ready to enjoy!  This time, we enjoyed it served alongside our main dish of grilled chicken!

Once done, the maple cinnamon butternut squash is transferred to serving platter before serving.

See the dark caramelized parts of the roasted maple cinnamon butternut squash? It tastes wonderful!  The natural sugars (and maple syrup) caramelize slightly while baking, which leaves the outside slightly crispy, while the inside is soft and creamy!

The maple cinnamon butternut squash is caramelized on the outside and soft on the inside.

This really is a GREAT tasting, simple side dish that pairs especially well with chicken, turkey or pork!  Maple cinnamon butternut squash would also be an easy veggie side dish for Thanksgiving or Christmas dinner!  If you prefer your butternut squash “mashed”, be sure to try my recipe for Creamy Mashed Butternut Squash, too! Sure hope you enjoy it! Have a GREAT day, friends.

Looking For More VEGETABLE SIDE DISH Recipes?

You can find all of my recipes in the Recipe Index, located at the top of the page. A few favorite vegetable dishes include:

Interested In More Recipes?

Thank you for visiting this website. I appreciate you using some of your valuable time to do soIf you’re interested, I publish a newsletter 2 times per month (1st and 15th) with all the latest recipes, and other fun info. I would be honored to have you join our growing list of subscribers, so you never miss a great recipe! 

There is a Newsletter subscription box on the top right side (or bottom) of each blog post, depending on the device you use, where you can easily submit your e-mail address (only) to be included in my mailing list.

You Can Also Find Me On Social Media:

Facebook page: The Grateful Girl Cooks!
Pinterest:
The Grateful Girl Cooks!
Instagram:
jbatthegratefulgirlcooks

Author's signature.

Original Recipe Source: https://lifemadesweeter.com/maple-cinnamon-roasted-butternut-squash/

0 from 0 votes
Maple Cinnamon Butternut Squash
Prep Time
10 mins
Cook Time
40 mins
Total Time
50 mins
 
Maple Cinnamon Butternut Squash is an easy to make, healthy and delicious roasted vegetable side dish - caramelized squash you're gonna love!
Category: Side Dishes, Vegetable Dish
Cuisine: American
Keyword: maple cinnamon butternut squash
Servings: 4
Calories Per Serving: 151 kcal
Author: JB @ The Grateful Girl Cooks!
Ingredients
  • 1 large butternut squash
  • Tablespoons extra virgin olive oil
  • Tablespoons pure maple syrup
  • 1/2 teaspoon ground cinnamon
  • 1 pinch salt and pepper, to taste
Instructions
  1. Preheat oven to 400° F.  Carefully peel a large butternut squash with a vegetable peeler (or sharp knife).  Once peeled, slice the squash in half lengthwise. Use a spoon to remove all the seeds and "fibrous strings" inside squash. Cut squash into bite sized cubes. Try to keep the pieces about the same size, for even baking.

  2. Place squash cubes into a large bowl; drizzle with olive oil. Season the squash with a pinch of salt and pepper (to taste), then add the cinnamon and maple syrup. Stir to combine ingredients, so all pieces are coated.

  3. Line a large baking sheet with parchment paper. Spread seasoned squash out in a single layer, leaving a bit of space between each piece. Roast in 400° F. oven for 35 minutes. HALFWAY through baking time, rotate the pan in the oven to ensure even baking. When 35 minutes is up, carefully flip each piece over so the bottom side is up, and put back in oven. Cook for 5 more minutes, to help caramelize the squash a bit on the other side. Once squash is done, remove from oven; transfer to a serving platter. Serve, and enjoy!

Nutrition Facts
Maple Cinnamon Butternut Squash
Amount Per Serving (1 (1/4 of total))
Calories 151 Calories from Fat 45
% Daily Value*
Fat 5g8%
Sodium 17mg1%
Potassium 676mg19%
Carbohydrates 27g9%
Fiber 3g13%
Sugar 8g9%
Protein 1g2%
Vitamin A 19930IU399%
Vitamin C 39.4mg48%
Calcium 98mg10%
Iron 1.3mg7%
* Percent Daily Values are based on a 2000 calorie diet.

Here’s one more to pin on your Pinterest boards!Maple Cinnamon Butternut Squash is an easy to make, healthy and delicious roasted vegetable side dish - caramelized squash you're gonna love!

Thai Turkey Meatballs and Zoodles

Thai turkey meatballs are baked, then combined with spiralized zucchini noodles, and covered with a soy/sriracha/lime/honey glaze in this yummy dish!

I saw this recipe on Pinterest recently, and though it sounded really good!  Sometimes cooking with ground turkey can be rather “bland”, but these Thai turkey meatballs, zoodles, and glaze were packed with flavor! Hooray! They are delicious, and one serving comes in at about 300 calories!

The turkey meatballs are filled with green onions, garlic, soy sauce, sesame oil, cilantro and fresh grated ginger, so you KNOW they will be good! Knowing these Thai turkey meatballs are baked, not fried, and also accompanied zucchini noodles, helped me decide to try this simple yet delicious recipe!

Scroll Down For A Printable Recipe Card At The Bottom Of The Page

How To Make Thai Turkey Meatballs and Zoodles

The first thing you will need to do is make the meatballs. Place ground turkey, garlic, ginger, green onions, cilantro, soy sauce, sesame oil, and chia seeds into a large mixing bowl. NOTE: The chia seeds will help the meatballs to hold together (without having to use eggs).

Mix all of the ingredients together using your (clean) hands or a fork. You want this Thai turkey meatballs mixture to be very well combined. Cover the bowl, and refrigerate the mixture for 30 minutes (this helps the chia seeds to work as a gel to firmly hold ingredients together).

Ground turkey with chopped onions, cilantro and spices, ready to make Thai turkey meatballs.

Meat mixture is ready to form Thai turkey meatballs for baking.

Form The Meatballs

Before shaping the Thai turkey meatballs, preheat your oven to 400° F. and line a 13×9 inch baking sheet with parchment paper. To form the meatballs, place a heaping Tablespoon of the turkey mixture into your hands, and gently roll the meat into a meatball.  This recipe will make approximately 18 meatballs.

PLEASE NOTE:  This recipe, as written, yields 3 servings (with 3 meatballs per serving). You, obviously will have leftover meatballs. You can freeze leftover baked meatballs OR you can double the amount of zucchini and sauce used, in order to make 6 servings.

As you finish rolling each meatball, place it onto the parchment paper lined baking sheet. Be sure to leave space between each meatball.

Bake The Thai Turkey Meatballs

Place the meatballs into the preheated 400° F oven.  Set a timer for 10 minutes, and bake.

The Thai turkey meatballs on parchment paper lined baking sheet before baking.

Prepare The Glaze and Zoodles While Meatballs Bake

While the meatballs are baking, whisk together the ingredients for the Asian-inspired glaze. These ingredients are soy sauce, fresh squeezed lime juice, honey and sriracha sauce. Set aside.

The ingredients for Asian sauce to coat the Thai turkey meatballs after baking is whisked in bowl.

While the meatballs are baking, spiralize the 3 zucchini into spaghetti-style noodles, then “trim” the noodles into smaller lengths. If you don’t own a spiralizer, use a vegetable peeler to peel the length of the zucchini into long strips, then cut into thin strands.

I like to blot the noodles semi-“dry”, using paper towels. This helps to absorb a lot of their natural moisture. When done, set zoodles aside.

Spiralized zucchini noodles are ready to add to the Thai turkey meatballs and sauce.

Flip Meatballs

After the Thai turkey meatballs have baked for 10 minutes, remove from oven and quickly flip each one to other side. The first photo below, shows what they looked like after 10 minutes.

Pop ’em back into the oven and continue baking for another 10 minutes. When done, the meatballs should be cooked all the way through, and will be nice and golden brown on the outside. The second photo below shows what they looked like when done baking.

When the Thai turkey meatballs are halfway through baking, they are flipped to other side.

When the Thai turkey meatballs are done baking, they will be golden brown.

To Finish Making Thai Turkey Meatballs and Zoodles

Pour the glaze into a large skillet. Bring the glaze to a boil over medium-high heat. Let it cook until it thickens a bit (usually about a minute), stirring often. Add half of the meatballs (9) to the skillet, and stir to cover them with the glaze. Push the Thai turkey meatballs to one side of skillet, then add the zucchini noodles. Stir to cover with glaze.

Cook for 4-5 minutes (al dente), then the Thai turkey meatballs and zoodles are ready to serve!

Thai turkey meatballs and zucchini noodles are added to glaze in skillet to cook for a few minutes.

To Serve This Dish

This recipe is written to yield THREE servings, with 3 meatballs per serving . Portion out the zucchini onto three individual plates, and top each with three meatballs (or 4, if you’re feeling quite hungry!). Since the recipe only utilizes HALF of the meatballs made, it is very easy to freeze them, to use the next time you make this recipe!

The zucchini noodles, sauce and Thai turkey meatballs are served, along with rice on the side.

I really hope you will try this recipe for Thai turkey meatballs and zucchini noodles. Pretty sure you will really like it! By the way… you can also substitute ground chicken breast for the turkey, too, if you prefer!

Looking For Other MEATBALL Recipes?

You can find all of my recipes in the Recipe Index. located at the top of the page. A few favorite meatball recipes include:

Interested In More Recipes?

Thank you for visiting this website. I appreciate you using some of your valuable time to do soIf you’re interested, I publish a newsletter 2 times per month (1st and 15th) with all the latest recipes, and other fun info. I would be honored to have you join our growing list of subscribers, so you never miss a great recipe!
There is a Newsletter subscription box on the top right side (or bottom) of each blog post, depending on the device you use, where you can easily submit your e-mail address (only) to be included in my mailing list.

You Can Also Find Me On Social Media:

Facebook page: The Grateful Girl Cooks!
Pinterest:
The Grateful Girl Cooks!
Instagram:
jbatthegratefulgirlcooks

Author's signature.

Recipe Adapted From: https://inspiralized.com/thai-chicken-meatballs-with-zucchini-noodles/

0 from 0 votes
Thai Turkey Meatballs and Zoodles
Prep Time
45 mins
Cook Time
30 mins
Total Time
1 hr 15 mins
 
Thai turkey meatballs are baked, then combined with spiralized zucchini noodles, and covered with a soy/sriracha/lime/honey glaze in this yummy dish!
Category: Dinner, Entree
Cuisine: Thai
Keyword: Thai turkey meatballs
Servings: 3 (3 meatballs each)
Calories Per Serving: 303 kcal
Author: JB @ The Grateful Girl Cooks!
Ingredients
For meatballs:
  • 1 pound ground turkey breast
  • 3 cloves garlic , finely minced
  • teaspoons fresh ginger , peeled and grated
  • 3 stems green onions (scallions) , chopped (white/light green parts only)
  • 1/4 cup fresh cilantro leaves , finely chopped
  • 2 teaspoons sesame oil
  • teaspoons low-sodium soy sauce
  • 2 Tablespoons chia seeds
For Zoodles:
  • 3 medium zucchinis
For Glaze:
  • 3 Tablespoons low-sodium soy sauce
  • 1/2 large lime (juice of)
  • 1 Tablespoon honey
  • 1 Tablespoon sriracha sauce
Instructions
  1. Place meatball ingredients into a large mixing bowl. NOTE: Chia seeds help meatball ingredients bind together (without using eggs). Mix all the ingredients together using your hands (or fork), until fully combined. Cover bowl, and refrigerate for 30 minutes, to let chia seeds "gel" ingredients.

  2. Preheat oven to 400° F. and line a 13x9 inch baking sheet with parchment paper. To make meatballs: place a heaping Tablespoon of turkey mixture into your hands, and gently roll between both hands into a meatball. As you finish rolling each meatball, place it onto the parchment paper lined baking sheet. Be sure to leave space between meatballs. This recipe yields about 18 meatballs. PLEASE NOTE:  Recipe, as written, yields 3 servings (with 3 meatballs per serving). You will have leftover meatballs. You can freeze leftover baked meatballs OR you can double the amount of zucchini and glaze used, in order to make 6 servings (3 meatballs each). 

  3. Place the meatballs into preheated 400° F oven.  Set a timer for 10 minutes, and bake. After meatballs have baked for 10 minutes, remove from oven and quickly turn each one to other side. Pop 'em back into oven and continue baking for another 10 minutes. When done, meatballs should be cooked all the way through, and will be nice and golden brown on the outside. Remove from oven.

  4. While meatballs are baking, whisk glaze ingredients in a small bowl. Set aside. While meatballs are baking, spiralize 3 zucchini into spaghetti-style noodles, then "trim" the noodles into smaller lengths. Blot the zoodles semi-"dry", using paper towels. This helps absorb a lot of their natural moisture. Set aside.

  5. Pour glaze into a large skillet. Bring to a boil over medium-high heat. Let it cook until it thickens a bit (about a minute), stirring often. Add half of the meatballs (9) to skillet, and stir gently, to cover with glaze. Push meatballs to one side of skillet, then add zucchini noodles. Stir, to cover with glaze. Cook for 4-5 minutes (al dente), then it's ready to serve!

  6. To serve, divide zucchini noodles onto 3 plates; top each serving with 3 meatballs. ENJOY! 

Recipe Notes

NOTE: Since the recipe only utilizes HALF of the meatballs made, it is very easy to freeze them, to use the next time you make this recipe!

Nutrition Facts
Thai Turkey Meatballs and Zoodles
Amount Per Serving (1 (3 meatballs + 1/3 of zoodles))
Calories 303 Calories from Fat 72
% Daily Value*
Fat 8g12%
Saturated Fat 1g6%
Cholesterol 83mg28%
Sodium 827mg36%
Potassium 1030mg29%
Carbohydrates 18g6%
Fiber 4g17%
Sugar 11g12%
Protein 40g80%
Vitamin A 520IU10%
Vitamin C 41.1mg50%
Calcium 92mg9%
Iron 2.8mg16%
* Percent Daily Values are based on a 2000 calorie diet.

Here’s one more to pin on your Pinterest boards!Thai turkey meatballs are baked, then combined with spiralized zucchini noodles, and covered with a soy/sriracha/lime/honey glaze in this yummy dish!

Homemade Chocolate Pudding

Make your own rich and decadent homemade chocolate pudding from scratch in about 10 minutes! Let it chill, then enjoy this creamy, delicious dessert!

Do you like chocolate pudding? We sure do! We tend to keep boxes of the stuff around, for those moments when you want something cold and creamy, and SWEET!

Well, did you know it is really EASY to make HOMEMADE chocolate pudding, from scratch? The ingredients are cooked, then the pudding is chilled until really cold. That’s it!  The hardest part is waiting for the pudding to chill, because it usually takes a couple hours. That’s not really too much of a sacrifice though, because then you get to enjoy this delicious pudding!

Scroll Down For A Printable Recipe Card At The Bottom Of The Page

How To Make Homemade Chocolate Pudding

Place milk, sugar, cornstarch, cocoa powder and salt into a medium sized saucepan. Use a whisk and whisk these ingredients together until fully blended.

Cocoa, milk, sugar, cornstarch and salt are mixed and heated in pan to make homemade chocolate pudding

Bring this mixture to a full boil, over medium-high heat. Continue to whisk the ingredients often while it cooks. Boil for one minute, and continue to whisk. The homemade chocolate pudding mixture will slightly thicken as it cooks.

The mixture for the homemade chocolate pudding is brought to a boil to thicken.

After boiling the pudding mixture for one minute, remove the pan from the heat and immediately add all of the grated chocolate and vanilla extract to the pan. Stir, and keep stirring, until all of the grated chocolate has melted into the homemade chocolate pudding mixture. You want the ingredients to be fully blended.

Grated bittersweet chocolate is added to hot homemade chocolate pudding mixture in pan.

Homemade chocolate pudding mixture is stirred until all chocolate pieces have melted.

Once the homemade chocolate pudding is fully blended and all the chocolate has melted, pour (and scrape) the pudding into a medium sized bowl.

Time To Refrigerate The Homemade Chocolate Pudding!

Cover the pudding with plastic wrap, making sure to press the plastic wrap gently right onto the surface of the pudding.  By applying the wrap directly onto the top of the pudding, it will prevent a “skin” from forming on top of the pudding!

Place the bowl of pudding into the refrigerator, and let it chill for AT LEAST 2 hours, or until it gets really cold! It’s easy to make this up early in the day, or at night, then chill all day OR overnight, for best results!

The homemade chocolate pudding is poured into bowl, then covered with plastic wrap, to seal.

Serve The Homemade Chocolate Pudding

When the pudding is fully chilled, it is ready to serve! Spoon the homemade chocolate pudding into small individual serving dishes. Garnish with whipped cream, if desired and serve!

This recipe for homemade chocolate pudding, as written, will make enough for 4 servings. The serving dishes I used were only 4 ounce dishes, so I had enough for 5 servings! Keep any extras covered and refrigerated. The pudding will “keep” for a couple days!

The cold homemade chocolate pudding is portioned into dishes, topped with whipped cream and served.

Hope you enjoy making and eating this simple, homemade chocolate pudding! It is a nice, chocolatey, creamy treat, and will be enjoyed. If you enjoy homemade pudding, be sure to check out my yummy recipe for Old-Fashioned Tapioca Pudding, too! Thanks for stopping by, and I hope you will come back soon. Have a great day.

Looking For More CHOCOLATE DESSERTS?

You can find all of my recipes in the Recipe Index, located at the top of the page. A few favorite chocolate dessert recipes include:

Interested In More Recipes?

Thank you for visiting this website. I appreciate you using some of your valuable time to do soIf you’re interested, I publish a newsletter 2 times per month (1st and 15th) with all the latest recipes, and other fun info. I would be honored to have you join our growing list of subscribers, so you never miss a great recipe!
There is a Newsletter subscription box on the top right side (or bottom) of each blog post, depending on the device you use, where you can easily submit your e-mail address (only) to be included in my mailing list.

You Can Also Find Me On Social Media:

Facebook page: The Grateful Girl Cooks!
Pinterest:
The Grateful Girl Cooks!
Instagram:
jbatthegratefulgirlcooks

Author's signature

Recipe Source: Woman’s Day Magazine clip out recipe card, from issue dated November 1, 2010.

0 from 0 votes
Homemade Chocolate Pudding
Prep Time
10 mins
Cook Time
0 mins
Refrigeration
2 hrs
Total Time
2 hrs 10 mins
 
Make your own rich and decadent homemade chocolate pudding from scratch in about 10 minutes! Let it chill, then enjoy this creamy, delicious dessert!
Category: Dessert
Cuisine: American
Keyword: homemade chocolate pudding
Servings: 4
Calories Per Serving: 317 kcal
Author: JB @ The Grateful Girl Cooks!
Ingredients
  • 2 cups milk
  • 5 Tablespoons granulated sugar
  • 2 Tablespoons cornstarch
  • 1 Tablespoon unsweetened cocoa powder
  • 1 pinch salt
  • 4 ounces bittersweet chocolate , grated or chopped finely
  • 1 teaspoon vanilla extract
Instructions
  1. Place milk, sugar, cornstarch, cocoa powder and salt into a medium sized saucepan. Use a whisk and whisk these ingredients together until fully blended. Bring this mixture to a full boil, over medium-high heat. Continue to whisk often while it cooks. Boil for one minute, and continue to whisk. The pudding mixture will slightly thicken as it cooks.

  2. After boiling the pudding for one minute, remove pan from the heat and immediately add the grated chocolate and vanilla extract to the pan. Stir, and keep stirring, until all of the grated chocolate has melted into the pudding. You want the ingredients to be fully blended.

  3. Once pudding is fully blended and all chocolate has melted, pour (and scrape) pudding into a medium sized bowl. Cover the pudding with plastic wrap, making sure to press the plastic wrap gently right onto the surface of the pudding.  By applying the wrap directly onto the top of the pudding, it will prevent a "skin" from forming on top! Place the bowl of pudding into the refrigerator, and let it chill for AT LEAST 2 hours, or until it gets really cold! It's easy to make this up early in the day, or at night, then chill all day OR overnight, for best results!

  4. When the pudding is fully chilled, it is ready to serve! Spoon the homemade chocolate pudding into 4 small individual serving dishes. Garnish with whipped cream, if desired and serve! Enjoy!

Recipe Notes

NOTE: Caloric calculation was made using whole milk in the recipe.

Nutrition Facts
Homemade Chocolate Pudding
Amount Per Serving (1 (1/4 of total))
Calories 317 Calories from Fat 135
% Daily Value*
Fat 15g23%
Saturated Fat 8g50%
Cholesterol 13mg4%
Sodium 65mg3%
Potassium 340mg10%
Carbohydrates 40g13%
Fiber 2g8%
Sugar 31g34%
Protein 5g10%
Vitamin A 210IU4%
Calcium 155mg16%
Iron 2mg11%
* Percent Daily Values are based on a 2000 calorie diet.

Here’s one more to pin on your Pinterest boards!Make your own rich and decadent homemade chocolate pudding from scratch in about 10 minutes! Let it chill, then enjoy this creamy, delicious dessert!

Black Bean Burgers

Looking for a recipe for fantastic tasting black bean burgers, that vegetarians and meat lovers both will LOVE? Look no further – here it is!
Looking for a recipe for fantastic tasting black bean burgers, that vegetarians and meat lovers both will LOVE? Look no further - here it is!

I recently saw a recipe for the BEST black bean burgers ever on Pinterest. Being curious, I KNEW I just HAD TO TRY THEM!

So I pinned the recipe, made them, and the rest is history. Oh yeah… they truly just might be the BEST black bean burgers ever. Amen!

Scroll Down For A Printable Recipe Card At The Bottom Of The Page

What’s The Story Behind These Black Bean Burgers?

One of our grown sons is now a vegetarian. He used to be our STEAK eating guy… sigh. He is now a grown man who happens to be vegetarian.

What’s a meat-lovin’ mom supposed to do when he and his girlfriend (also a vegetarian) come over for a burger BBQ?

Well, up to this point, I would just buy those thin little veggie or vegetarian black bean burgers in the frozen section at the grocery store! That way I could offer them a vegetarian burger to eat, along with all of our traditional BBQ sides.

No longer! THIS will now be my new “go to” recipe for veggie burgers, because they’re delicious!

What Makes THESE Black Bean Burgers So “Special”?

These black bean burgers are special, I believe, in part due to one little bitty step that is taken before making the patties, that ensures the burgers will be firm and not MUSHY! 

What is this little bitty step, you ask? Popping the rinsed beans into the oven for a few minutes, which helps to partially dry out the canned beans. Yep, you heard that right! Brilliant tip!

The Secret To Making Nice, Firm, Black Bean Burgers

Preheat your oven to 325° F. Rinse, and then drain two cans of black beans in a colander. Pour the drained beans onto a couple layers of paper towels, and pat them dry.

Spread the beans out onto a parchment paper-lined large baking sheet. Bake the beans for 15 minutes, which will help to slightly dry them out. Trust me on this – don’t skip this step! This one little step will help those burger patties to really hold firmly together, and not break down into MUSH!!

Once done, remove the beans from the oven, and set aside.

Canned black beans are drained, blotted dry, then baked, to make black bean burgers.

While the beans are baking, place olive oil, chopped bell peppers, onion, and minced garlic in a skillet. Cook this mixture on medium heat, stirring occasionally, for 5-6 minutes, until the veggies have softened.

Once cooked, pat the veggies gently with a paper towel, to help absorb a bit of their moisture.

Onion, green peppers, and garlic is cooked in oil to add to black bean burgers mix.

Prepare The Patties For Black Bean Burgers

Place the cooked veggies into a large mixing bowl.  Add the remaining ingredients, except for the black beans. Give this mixture a good stir to fully combine the ingredients.

Eggs, feta cheese, bread crumbs, ketchup and spices added to black bean burgers mix.

Now add the baked black beans to the bowl. Use a potato masher or a fork to really “mash” this patty mixture together, making sure to leave some of the black beans intact.

NOTE: This step can also be done in a food processor. PULSE the ingredients, but do not fully blend.

The baked black beans are added to the black bean burgers mixture, and mashed to combine.

Form The Patties

For each patty, use 1/3 cup of bean mixture. Scoop out 1/3 cup, then transfer to a parchment paper lined baking sheet.

This recipe makes 6 thick black bean burgers. After placing all 6 scoopfuls on the paper, flatten them down and round out, using your hands.

Black bean burgers mix is portioned out into 6 (1/3 cup) patties, then flattened.

Cook The Black Bean Burgers

There are TWO ways to cook these burgers. 1) Bake at 375° F., and cook for 10 minutes on each side, OR 2) Lay the patties onto aluminum foil (on your BBQ grill), and grill each side for 8 minutes.

I chose to BAKE the black bean burgers. The photo below shows what the patties look like up close and personal before baking.  You can see there are some whole black beans in each one.

One of the black bean burgers, up close, before baking.

After the black bean burgers have cooked for 10 minutes on each side, they are done!  They hold together VERY well, and are nice and thick, firm burgers!

Six black bean burgers on parchment paper, after baking.

Black Bean Burgers Can Be Frozen, Too!

IMPORTANT NOTE: These burgers freeze well, too! Six burgers was way too many for just my hubby and I to eat, so I was able to freeze a few after cooking! You can also freeze the raw patties this way, also.

Once the burgers have cooled, stack the patties between sheets of parchment paper and place in freezer bags or freezer container. Perfect for future use (just thaw and reheat)!

The black bean burgers can be frozen between sheets of parchment paper in a freeze bag.

All that is left to do… is EAT one of these delicious, thick, black bean burgers!  The burgers were served on a toasted bun, with tomato slices, crisp lettuce, red onion slices and some homemade guacamole (as a condiment)!

That’s it!  Oh my goodness, such great flavor… this burger was soooo good! The guacamole was a perfect substitute for mayo, mustard or ketchup…never even missed them!

One of the black bean burgers, served on bun with tomato, red onion, lettuce and guacamole!

Believe me when I tell you… these black bean burgers taste fantastic! Hope you will consider trying them, too! This is a perfect dish for “Meatless Mondays” or any other day, for that matter!

If you’re looking for another “healthy” delicious burger recipe, be sure to check out my Turkey, Feta and Spinach Burgers! Have a GREAT day!

Looking for More SANDWICH Recipes?

You can find all of my recipes in the Recipe Index, located at the top of the page. I have some delicious sandwich recipes, including:

Interested In More Recipes?

Thank you for visiting this website. I appreciate you using some of your valuable time to do soIf you’re interested, I publish a newsletter 2 times per month (1st and 15th) with all the latest recipes, and other fun info. I would be honored to have you join our growing list of subscribers, so you never miss a great recipe!
There is a Newsletter subscription box on the top right side (or bottom) of each blog post, depending on the device you use, where you can easily submit your e-mail address (only) to be included in my mailing list.

You Can Also Find Me On Social Media:

Facebook page: The Grateful Girl Cooks!
Pinterest:
The Grateful Girl Cooks!
Instagram:
jbatthegratefulgirlcooks

Author's signature

Original Recipe Source: https://sallysbakingaddiction.com/best-black-bean-burgers/

0 from 0 votes
Black Bean Burgers
Prep Time
20 mins
Cook Time
20 mins
Total Time
40 mins
 
Looking for a recipe for fantastic tasting black bean burgers, that vegetarians and meat lovers both will LOVE? Look no further - here it is!
Category: Meatless Entree
Cuisine: American
Keyword: black bean burgers
Servings: 6 burgers
Calories Per Serving: 264 kcal
Author: JB @ The Grateful Girl Cooks!
Ingredients
  • 28 ounces canned black beans (two 14 oz. cans) , drained/rinsed/patted dry
  • 1 Tablespoon extra virgin olive oil
  • 3/4 cup green bell pepper , finely chopped
  • 1 cup yellow onion , finely chopped
  • 1 Tablespoon minced garlic cloves (approx. 3 cloves)
  • teaspoons ground cumin
  • 1 teaspoon chili powder
  • 1/2 teaspoon garlic powder
  • 1/4 teaspoon smoked paprika
  • 1/2 cup feta cheese , crumbled
  • 1/2 cup bread crumbs
  • 1 Tablespoon Worcestershire sauce
  • 2 large eggs
  • 2 Tablespoons ketchup or BBQ sauce
  • 1 pinch (each) salt and pepper
Instructions
  1. Preheat oven to 325° F. Rinse, and drain black beans. Blot the beans dry on paper towels. Spread beans out onto parchment paper-lined large baking sheet. Bake the beans for 15 minutes, to slightly dry them out. Don't skip this step! Once done, remove beans from oven, and set aside. NOTE: If you will be baking the burger patties, turn oven up to 375° once you remove the beans from oven.

  2. While beans bake, place olive oil, chopped bell peppers, onion, and minced garlic in a skillet. Cook on medium heat, stirring occasionally, for 5-6 minutes, until veggies have softened. Once cooked, pat the veggies gently with a paper towel, to absorb a bit of their moisture. 

  3. Place cooked veggies into a large mixing bowl. Add remaining ingredients, except for the black beans. Stir to combine. Add the black beans. Use a potato masher or fork to "mash" this together, making sure to leave some black beans intact. NOTE: This step can also be done in a food processor. PULSE the ingredients, but do not fully blend.

  4. For each patty, use 1/3 cup of bean mixture. Scoop out 1/3 cup, then transfer to parchment paper lined baking sheet. After placing 6 scoopfuls on the paper, flatten them down and round out into thick patties, using your hands.

  5. There are TWO ways to cook these burgers. 1) Bake at 375° F., and cook for 10 minutes on each side, OR 2) Place the patties onto aluminum foil (on your BBQ grill), and grill each side for 8 minutes. After the black bean burgers have baked for 10 minutes on each side (or grilled for 8 on each side), they are done! Prepare burgers with your favorite toppings. Enjoy!

Recipe Notes

NOTE: The caloric calculation is for one black bean burger patty only. Any additions (bun, condiments, etc.) will need to be calculated separately, as they will differ for each person.

Nutrition Facts
Black Bean Burgers
Amount Per Serving (1 burger patty)
Calories 264 Calories from Fat 63
% Daily Value*
Fat 7g11%
Saturated Fat 3g19%
Cholesterol 81mg27%
Sodium 886mg39%
Potassium 584mg17%
Carbohydrates 35g12%
Fiber 10g42%
Sugar 4g4%
Protein 14g28%
Vitamin A 390IU8%
Vitamin C 21.5mg26%
Calcium 153mg15%
Iron 4mg22%
* Percent Daily Values are based on a 2000 calorie diet.

Here’s one more to pin on your Pinterest boards!Looking for a recipe for fantastic tasting black bean burgers, that vegetarians and meat lovers both will LOVE? Look no further - here it is!

Fried Cabbage with Bacon, Onion and Garlic

This simple, yet absolutely delicious side dish of fried cabbage is enhanced with the addition of crisp bacon crumbles, onions, carrots and garlic!

Over the past 30+ years, I have made fried cabbage very simply, just like I was taught by my mom.  She cooked cabbage with onion and butter, and seasoned it with salt and pepper, for a no-frills version.

Recently I tried a NEW WAY to make this simple veggie side dish, and it tastes so good that it will be the way I will cook it, from now on!  My husband and I LOVED this fried cabbage (with bacon, onion and garlic)!

This simple dish of fried cabbage went from good to GREAT, with the addition of a few extra ingredients, so I am sharing the recipe with you today. The recipe, as written below, makes 4 servings of about 3/4 cup each, but can be EASILY doubled.

Scroll Down For A Printable Recipe Card At the Bottom Of The Page

How To Make Fried Cabbage (with bacon, onion and garlic)

Before beginning to cook this dish, get all the veggies prepped and ready.  Chop the onions, grate the carrots, and core, then thinly slice the green cabbage. Once done with this step, set the veggies aside.

Chopped onions, shredded carrots and cabbage are ready to make fried cabbage.

Place the chopped bacon into a large stockpot. Turn heat to medium-high, then cook the bacon until it is brown and crispy, stirring often. This step will take between 8-10 minutes. When done, do NOT drain the bacon grease from the pan. It will be left in the pan, which will add lots of flavor to the fried cabbage!

Thinly sliced bacon is cooked to add to fried cabbage.

Bacon is cooked until crispy, before adding to fried cabbage.

Add the chopped onions to the bacon in the pan. Stir and cook for about 5 minutes, until the onions have softened and slightly browned. Now add the minced garlic and cook for one minute, stirring the mixture often, so the garlic doesn’t burn.

Chopped onions are added to bacon, before adding them to fried cabbage.

Add the sliced cabbage and shredded carrots to the bacon and onion mixture. Stir the mixture to combine, and cook for 5-6 minutes (uncovered), stirring often.

Shredded carrots and cabbage are added to bacon and onions to make fried cabbage.

Season the fried cabbage with salt, pepper, paprika, onion powder and garlic powder. Put a lid on the pan, and turn the heat down to LOW. Continue to cook the fried cabbage (covered) on low heat for about 10 minutes. Stir occasionally during this cooking time. The fried cabbage will “wilt down” as it cooks.

The fried cabbage ingredients are combined, then cooked until tender.

The Fried Cabbage Is Ready To Serve

Once the fried cabbage has finished cooking, it is ready to serve!  Transfer the cabbage into a serving bowl, and serve while hot!

Once done, the fried cabbage (with bacon, onions and garlic) are served.

The fried cabbage is so delicious, and filled with flavor! With pieces of delicious bacon, onions, and carrots throughout it, how could you not like this simple vegetable side dish?

Fried cabbage, with bacon, onions, carrots and garlic is served as a side dish.

Sure hope you will consider trying this easy, simple, and DELICIOUS side dish of fried cabbage, with bacon, onion, carrots, and garlic! It’s going to be my “new” way of cooking cabbage!  Have a wonderful day… there really is so much to be thankful for!

Looking For More VEGETABLE SIDE DISHES?

You can find all of my recipes in the Index Page, located at the top of the page. A few of our favorite veggie side dishes include:

Interested In More Recipes?

Thank you for visiting this website. I appreciate you using some of your valuable time to do soIf you’re interested, I publish a newsletter 2 times per month (1st and 15th) with all the latest recipes, and other fun info. I would be honored to have you join our growing list of subscribers, so you never miss a great recipe!
There is a Newsletter subscription box on the top right side (or bottom) of each blog post, depending on the device you use, where you can easily submit your e-mail address (only) to be included in my mailing list.

You Can Also Find Me On Social Media:

Facebook page: The Grateful Girl Cooks!
Pinterest:
The Grateful Girl Cooks!
Instagram:
jbatthegratefulgirlcooks

Author's signature

Recipe Adapted From: https://www.justpaleofood.com/fried-cabbage-bacon-onion-garlic/

0 from 0 votes
Cabbage with Bacon, Onion and Garlic
Prep Time
20 mins
Cook Time
10 mins
Total Time
30 mins
 
This simple, yet absolutely delicious side dish of fried cabbage is enhanced with the addition of crisp bacon crumbles, onions, carrots and garlic!
Category: Side Dish, Vegetable Dish
Cuisine: American
Keyword: fried cabbage
Servings: 4 (3/4 cup servings)
Calories Per Serving: 131 kcal
Author: JB @ The Grateful Girl Cooks!
Ingredients
  • 4 slices bacon , chopped
  • 1/2 large onion , diced
  • 2 cloves garlic ,minced
  • 1/2 head cabbage (large) , cored/thinly sliced
  • 1/2 teaspoon salt
  • 1/2 teaspoon pepper
  • 1/4 teaspoon garlic powder
  • 1/4 teaspoon onion powder
  • 1/8 teaspoon paprika
Instructions
  1. Chop onions, grate carrots, and core, then thinly slice the green cabbage. Once done with this step, set the veggies aside.

  2. Place the chopped bacon into a large stockpot. Turn heat to medium-high, then cook the bacon until it is brown and crispy, stirring often. This will take about 8-10 minutes. When done, do NOT drain the bacon grease from the pan. It will be left in the pan, which will add lots of flavor to the fried cabbage!

  3. Add chopped onions to the pot. Stir and cook for about 5 minutes, until the onions have softened and slightly browned. Add the minced garlic and cook for an additional minute, stirring often so the garlic doesn't burn. Add the sliced cabbage and shredded carrots to the bacon and onion mixture. Stir the mixture to combine, and cook for 5-6 minutes (uncovered), stirring often.

  4. Season cabbage with salt, pepper, paprika, onion powder and garlic powder. Put a lid on the pot, and turn the heat down to LOW. Continue to cook the fried cabbage (covered) on low heat for 10 minutes. Stir occasionally during this cooking time. The fried cabbage will "wilt down" as it cooks. Once the cabbage has finished cooking, it's ready to serve!  Transfer cabbage into a serving bowl, and serve while hot! Enjoy!

Nutrition Facts
Cabbage with Bacon, Onion and Garlic
Amount Per Serving (1 (3/4 cup serving))
Calories 131 Calories from Fat 72
% Daily Value*
Fat 8g12%
Saturated Fat 2g13%
Cholesterol 14mg5%
Sodium 458mg20%
Potassium 263mg8%
Carbohydrates 9g3%
Fiber 3g13%
Sugar 4g4%
Protein 4g8%
Vitamin A 140IU3%
Vitamin C 43.4mg53%
Calcium 52mg5%
Iron 0.6mg3%
* Percent Daily Values are based on a 2000 calorie diet.

Here’s one more to pin on your Pinterest boards!This simple, yet absolutely delicious side dish of fried cabbage is enhanced with the addition of crisp bacon crumbles, onions, carrots and garlic!

Baked Asian Chicken Wings

Baked Asian Chicken Wings are seasoned with spice rub, baked, then glazed with a sticky soy/Sriracha/sesame sauce before serving as an appetizer or main dish!Baked Asian Chicken Wings are seasoned with spice rub, baked, then glazed with a sticky soy/Sriracha/sesame sauce before serving!

Okay… seriously… these baked Asian chicken wings are wonderful! They have GREAT flavor, thanks to the spices used AND the delicious Asian-inspired sauce they are coated in. YUM!

I have loved traditional hot buffalo wings for a long time, but I’m telling you… sticky Asian wings are a force to be reckoned with! Chicken wings are seasoned, baked, then broiled for crispness, then coated in a yummy sauce, and served.  Believe it or not, baked Asian chicken wings are also very easy to make.  Here’s how to make these lip-smackin’ appetizers:

Scroll Down For A Printable Recipe Card At The Bottom Of The Page

Make Spice Rub For The Baked Asian Chicken Wings

Mix the ingredients for the spice rub together in a small bowl. The ingredients in the spice rub are ground ginger, baking powder, garlic powder, onion powder, salt, pepper, and cayenne pepper. Set aside. See? Not too hard at all!

Spices are mixed to apply to chicken wings, before baking.

Prepare The Wings For Baking

Lay the chicken wing pieces on several layers of paper towel, and pat them dry. Place the dried chicken wings into a large mixing bowl (or freezer bag), and sprinkle with the dry spice rub. If you are doubling the recipe, make sure to do this step in two batches.

Toss the chicken several times until all the wings have been evenly coated on all sides with the spices.

Chicken wings are patted dry, then coated with dry rub spices before baking.

Cover a baking sheet with foil, and spray with a non-stick baking spray. Lay the seasoned chicken wings out on the foil, in a single layer, with a bit of space between each one.

Baked Asian Chicken Wings are then cooked (on the middle rack) in a preheated 400° F. oven. Bake the wings for 45-50 minutes, until they are nice and golden brown.

Baked Asian chicken wings are ready for the oven.

Prepare Sauce For The Baked Asian Chicken Wings

While the chicken wings are cooking, prepare the Asian-inspired sauce that will cover the wings, once they are done.

Whisk together soy sauce, dry sherry (or Japanese sweet rice wine/mirin), water, sesame seed oil, grated ginger, Sriracha sauce, minced garlic cloves, salt, pepper and cornstarch in a small bowl. Set the sauce aside, while you make a simple syrup.

Sauce is mixed to put on baked Asian chicken wings, after they finish cooking.

Make Simple Syrup For The Sauce

A few minutes before the wings are done, you will need to make a sticky simple syrup that will be added to the Asian sauce.  To do this, place water and sugar in a large skillet. Stir to combine.

Bring this mixture to a boil on medium heat, and once boiling, let it cook for one minute, stirring often. IMPORTANT: Make sure to only cook it for ONE minute, otherwise it might harden up!

Finishing The Asian Sauce

Once the syrup has cooked for one minute, immediately add the reserved Asian sauce into the skillet. Stir to combine, and cook this sauce on low heat for about 2 minutes, stirring often, until it has thickened.

Sticky syrup is cooked, then Asian sauce is added to skillet for chicken wings sauce.

Broil Wings After Baking, To Desired Crispness

As soon as the baked Asian chicken wings are done baking, turn on the broiler element for the oven. Move the chicken wings on the baking sheet up in oven until they are about 6-8 inches from the broiler.

Let the wings broil until they become crispy, but make sure to keep your eye on them so they won’t burn.  Turn the wings over and crisp up the other side under the broiler, then remove from oven. This step will only take a few minutes total! Remove from oven once done.

Prepare Baked Asian Chicken Wings For Serving

Place the baked and broiled chicken wings into a large bowl. Pour the warm Asian sauce over the top, then toss gently, to fully coat the wings with the sauce.

The photo on the left (below) is how the chicken looked after broiling. The pic on the right (below) is how the baked Asian chicken wings looked, once the yummy sauce had been added to coat them!

The wings come out of oven and are tossed in sauce to become Baked Asian Chicken Wings.

Now all that is left to do is to serve the wings!  Place the baked Asian chicken wings onto a serving platter, and sprinkle lightly with sesame seeds. You can also add some fresh cilantro (optional) if you want, for extra color!

The baked Asian chicken wings are served, garnished with sesame seeds.

That’s it! This recipe, as written below, will make a dozen YUMMY baked Asian chicken wings, but can be easily doubled!  We enjoyed these wings while watching the super bowl, along with a delicious batch of Buffalo Honey Hot Wings!

A green plate, with baked Asian chicken wings, is ready to serve and eat!

Hope you have an opportunity to make these delicious appetizers for a family get together, a party, or just a “lay on the couch in sweat pants and watch sports all afternoon” day. I really think you will enjoy these wings… they taste wonderful!

Looking For More APPETIZER Recipes?

You can find all of my recipes in the Recipe Index, located at the top of the page. A few favorites include:

Interested In More Recipes?

Thank you for visiting this website. I appreciate you using some of your valuable time to do soIf you’re interested, I publish a newsletter 2 times per month (1st and 15th) with all the latest recipes, and other fun info. I would be honored to have you join our growing list of subscribers, so you never miss a great recipe!
There is a Newsletter subscription box on the top right side (or bottom) of each blog post, depending on the device you use, where you can easily submit your e-mail address (only) to be included in my mailing list.

You Can Also Find Me On Social Media:

Facebook page: The Grateful Girl Cooks!
Pinterest:
The Grateful Girl Cooks!
Instagram:
jbatthegratefulgirlcooks

Author's signature

Recipe Adapted From: http://carlsbadcravings.com/recipe/baked-sticky-general-tsos-chicken-wings/

0 from 0 votes
Baked Asian Chicken Wings
Prep Time
10 mins
Cook Time
45 mins
Total Time
55 mins
 
Baked Asian Chicken Wings are seasoned with spice rub, baked, then glazed with a sticky soy/Sriracha/sesame sauce before serving as an appetizer or main dish!
Category: Appetizers, Main Dish
Cuisine: Asian
Keyword: baked Asian chicken wings
Servings: 24 wings
Calories Per Serving: 136 kcal
Author: JB @ The Grateful Girl Cooks!
Ingredients
  • 24 chicken wings , skin on, rinsed and patted dry
  • Sesame seeds, to garnish when serving wings
For Spice Rub:
  • 2 Tablespoons baking powder
  • 2 Tablespoons ground ginger
  • 1 teaspoon (EACH) salt, garlic powder and onion powder
  • 1/2 teaspoon black pepper
  • 1/4 teaspoon cayenne pepper
For Asian Sauce:
  • 1/3 cup low sodium soy sauce
  • 1/3 cup dry sherry
  • 1/3 cup water
  • 1 Tablespoon sesame seed oil
  • 3/4 teaspoon Sriracha sauce (or Asian hot chili sauce) , can double amt. if you like the heat
  • Tablespoons ginger, freshly grated
  • 3 garlic cloves , minced
  • 1/4 teaspoon salt
  • black pepper (a pinch)
  • 1 Tablespoon corn starch
For Sticky Simple Syrup
  • 1/2 cup granulated sugar
  • 2 Tablespoons water
Instructions
  1. Preheat oven to 400° F. Mix ingredients for spice rub in a small bowl, then set aside.

  2. Lay chicken wings on several layers of paper towels; pat them dry. Place wings into a large mixing bowl (or freezer bag), and sprinkle with spice rub. If you are doubling the recipe, make sure to do this step in two batches. Toss the chicken several times until all wings have been evenly coated on all sides.

  3. Cover a baking sheet with foil; spray with non-stick baking spray. Lay seasoned wings out on the foil, in a single layer, with space between each one. Bake at 400° F. on the middle rack in oven for 45-50 minutes, until nice and golden brown.

  4. While wings are cooking, prepare the Asian sauce that will cover the wings, once done. Whisk together soy sauce, dry sherry, water, sesame seed oil, grated ginger, Sriracha sauce, minced garlic cloves, salt, pepper and cornstarch in a small bowl. Set the sauce aside, while you make a simple syrup.

  5. A few minutes before wings are done, make a sticky simple syrup that will be added to the Asian sauce.  To do this, place water and sugar in a large skillet. Stir to combine. Bring this to a boil on medium heat; once boiling, let it cook for one minute, stirring often. IMPORTANT: Make sure to only cook it for ONE minute, otherwise it might harden up! Once it has cooked for one minute, immediately add the reserved Asian sauce. Stir to combine, and cook on low heat for about 2 minutes, stirring often, until it has thickened.

  6. As soon as the wings are done baking, turn on the broiler element for the oven. Move the chicken wings on the baking sheet up in oven until they are about 6-8 inches away from the broiler. Let the wings broil until they become crispy, but  keep your eye on them so they don't burn.  Turn the wings over and crisp up the other side under the broiler. This step will only take a few minutes total! Remove from oven, once done. 

  7. Place hot chicken wings into a large bowl. Pour warm Asian sauce over the top, then toss gently to fully coat the wings with sauce. Transfer wings onto a serving platter, and sprinkle lightly with sesame seeds. You can also add some fresh cilantro (optional) if you want, for extra color! Serve, and enjoy!

Nutrition Facts
Baked Asian Chicken Wings
Amount Per Serving (1 wing)
Calories 136 Calories from Fat 72
% Daily Value*
Fat 8g12%
Saturated Fat 2g13%
Cholesterol 37mg12%
Sodium 260mg11%
Potassium 100mg3%
Carbohydrates 5g2%
Sugar 4g4%
Protein 9g18%
Vitamin A 80IU2%
Vitamin C 0.6mg1%
Calcium 11mg1%
Iron 0.6mg3%
* Percent Daily Values are based on a 2000 calorie diet.

Here’s one more to pin on your Pinterest boards!Baked Asian Chicken Wings are seasoned with spice rub, baked, then glazed with a sticky soy/Sriracha/sesame sauce before serving as an appetizer or main dish!

Apple Pie Pancakes

You can easily transform ordinary pancake mix into Apple Pie Pancakes, with only a couple added ingredients! You’ll love this special breakfast treat!
You can easily transform ordinary pancake mix into Apple Pie Pancakes, with only a couple added ingredients! You'll love this special breakfast treat!

We happen to love pancakes in our home, but tend to only have them about once a month. I’ve made many different kinds from scratch, but always keep a convenient bag of pancake mix around, for those times we just really want a pancake or two without any fuss!

This recipe for apple pie pancakes evolved out of one of those kind of mornings!  Pancakes sounded GOOD, but I wanted to tweak  or “class” them up just a little bit! 

I went to our pantry and pulled out a jar of my home-canned apple pie filling! Into the kitchen I went, to create something quick, yummy (and different) for breakfast!

The lure of a big, convenient bag of pancake mix was calling to me (nice, quick and easy), so I grabbed it, and as quick as a flash, these apple pie pancakes were born!

The use of pancake mix makes this such a simple, convenient recipe to throw together, but it results in a delicious twist on plain, “normal” pancakes! Here’s how to make delicious apple pie pancakes:

Scroll Down For A Printable Recipe Card At The Bottom Of The Page

It’s EASY To Make Apple Pie Pancakes

Measure out the pancake mix and water that the mix you are using calls for, into a medium sized mixing bowl.  I used Krusteaz brand pancake mix, so I measured out the mix, then added the water.

Whatever brand of pancake mix you use, use their ingredient list, and remember to make enough for 12 (4″) pancakes!

Add 1/2 cup of the apple pie filling to the pancake mix. You can use home-canned apple pie filling or store bought.  Can you see the small apple chunks in the pie filling I made? Yum.

The apple pie filling will add lots of flavor to the pancake batter. Stir the batter until blended.

Mixing apple pie filling into the batter for apple pie pancakes.

Add the ground cinnamon to the batter, and stir it in, as well.  Even though the pie filling had cinnamon in it, adding EXTRA cinnamon really helps add even more flavor to the pancakes.

Cinnamon is added to the apple pie pancakes batter.

Time To Cook The Apple Pie Pancakes

Spray a griddle or large skillet with non-stick baking spray. Heat griddle (or skillet) until hot. Pour the batter onto griddle, forming 4″ wide pancakes, leaving a bit of space between each one.

You will probably have to cook the apple pie pancakes in batches, because the recipe, as written, will yield about 12 pancakes (4″ each).  Cook until bubbles form on the top of the pancakes, then carefully flip to the other side.

Continue cooking the other side of the apple pie pancakes until done in the center, then remove to serving plate, and keep warm. Repeat process until all batter has been used.

Apple pie pancakes cooking on electric grill.

The apple pie pancakes are turned when nicely browned, to finish cooking.

Ready For Serving!

Once all the apple pie pancakes are finished cooking, transfer the pancakes to individual serving plates.

Place 2 pancakes on each plate, and top with a pad of butter (if desired), and about 4 Tablespoons of the reserved apple pie filling.

Butter and warm apple pie filling top a stack of apple pie pancakes.

There is no need for any maple syrup, because the apple pie topping is sweetened already!

The addition of cinnamon flavor, and the bits of softened, sweet apples really take these pancakes from “ordinary” to “extra-ordinary”! YUMMMM!

A nice forkful of the apple pie pancakes, ready to eat!

These apple pie pancakes are really a quick and easy way to make an average breakfast more unique! Sure do hope you will consider trying this “recipe”, because I’m pretty confident you will enjoy it!

Looking For More PANCAKE Or WAFFLE Recipes?

You can find all of my published recipes in the Recipe Index, located at the top of the page. Here are a few other pancake or waffle recipes I think you might enjoy:

Want More Recipes? Get My FREE Newsletter!

I publish a newsletter 2 times per month (1st and 15th) with lots of recipes, tips, etc..
Would you like to join our growing list of subscribers?

There is a Newsletter subscription box on the top right (or bottom) of each blog post, depending on the device you use.
You can submit your e-mail address there, to be added to my mailing list.

Find Me On Social Media:

Facebook page: The Grateful Girl Cooks!
Pinterest:
The Grateful Girl Cooks!
Instagram:
jbatthegratefulgirlcooks

Author's signature

Recipe Source: My hungry brain. After coffee.

↓↓ PRINTABLE RECIPE BELOW ↓↓

0 from 0 votes
Apple Pie Pancakes
Prep Time
4 mins
Cook Time
5 mins
Total Time
9 mins
 
You can easily transform ordinary pancake mix into Apple Pie Pancakes, with only a couple added ingredients! You'll love this special breakfast treat!
Category: Breakfast
Cuisine: American
Keyword: apple pie pancakes
Servings: 6 ( 2 pancakes (4") per serving)
Calories Per Serving: 170 kcal
Author: JB @ The Grateful Girl Cooks!
Ingredients
  • 2 cups pancake mix (I used Krusteaz)
  • 1 +1/3 cups water
  • 1 teaspoon ground cinnamon
  • 16 ounces apple pie filling (home canned or store bought) , divided use
  • non-stick baking spray
Instructions
  1. Measure out pancake mix and water that the mix you are using calls for, into a medium sized mixing bowl.  Whatever brand of pancake mix you use, use their ingredient list, and remember to make enough for 12 (4") pancakes! Add 1/2 cup of the apple pie filling to the mix (reserving the rest for later). Add the ground cinnamon to the batter, and stir just until the batter is fully mixed.

  2. Spray a griddle or large skillet with non-stick baking spray. Heat on medium heat until hot. Pour batter onto griddle, forming 4" wide pancakes, leaving a bit of space between each one. Cook until bubbles form on the top of the pancakes and the bottom edges are golden brown, then carefully flip to the other side. Continue cooking until done in the center, then remove to serving plate, and keep warm. Repeat process until all batter has been used.

  3. To serve, transfer pancakes to individual plates. Place 2 pancakes on each plate, and top each serving with a pad of butter (if desired), and about 4 Tablespoons of the reserved apple pie filling. Serve, and enjoy!

Recipe Notes

Other Serving Suggestions: 

  • Add toasted, chopped walnuts to batter (or use as garnish on top).
  • Top apple pie filling on pancakes with whipped cream.
Nutrition Facts
Apple Pie Pancakes
Amount Per Serving (2 pancakes + 4 T. topping)
Calories 170 Calories from Fat 27
% Daily Value*
Fat 3g5%
Cholesterol 30mg10%
Sodium 257mg11%
Potassium 120mg3%
Carbohydrates 32g11%
Fiber 1g4%
Sugar 10g11%
Protein 3g6%
Vitamin A 125IU3%
Vitamin C 1.6mg2%
Calcium 100mg10%
Iron 0.8mg4%
* Percent Daily Values are based on a 2000 calorie diet.

Here’s one more to pin on your Pinterest boards!You can easily transform ordinary pancake mix into Apple Pie Pancakes, with only a couple added ingredients! You'll love this special breakfast treat!


Kale Orange Salad

Kale Orange Salad, topped with a creamy citrus vinaigrette, crumbled goat cheese, fresh oranges, and jalapeño slices, may surprise you with just how GOOD it tastes!
Kale Orange Salad, topped with citrus vinaigrette, crumbled goat cheese, fresh oranges, and jalapeño slices, may surprise you with how GOOD it tastes!

KALE… most people either LIKE it or HATE it! I happen to like it. Several years ago I found a recipe for a kale and citrus salad online, from Ree Drummond, also known as The Pioneer Woman.  She had ordered a similar salad at a restaurant in Hollywood, loved it, then went home and recreated it! I enjoy her cookbooks and recipes, so I knew this kale orange salad just HAD to be GOOD!

Our little backyard raised bed garden, at the time, happened to be overflowing with kale! I use our homegrown kale in my recipe for Olive Garden’s “Zuppa Toscana” Soup (a favorite), so I try to have it around. After reading through the ingredient list, a kale orange salad sounded very interesting, so I harvested a bunch from our garden, and made this salad! YUM!

My husband and I really enjoyed this unique salad (and he’s not a HUGE kale fan)!  It’s also easy to make, which is always a big PLUS in my book! Here’s how to make this delicious salad:

Scroll Down For a Printable Recipe Card At the Bottom Of The Page

Prepare The Kale For The Salad

Rinse and drain the kale thoroughly, then place the leaves onto a cutting surface. Using a sharp knife, remove the long stem from the middle of the leaves (discard the stems). Once de-stemmed, thinly slice the kale, a handful of leaves at a time. Place all the sliced kale into a large salad bowl, and set aside.

Kale is rinsed, then finely chopped to prepare it for the kale orange salad.

Make The Salad Dressing For The Kale Orange Salad

Place the orange juice, olive oil, white wine vinegar, granulated sugar, minced garlic, salt and pepper in a small bowl.  Whisk these ingredients together until fully blended. Add the sour cream (or plain Greek yogurt, if using), and whisk again, to blend fully. The finished salad dressing will be smooth and creamy.

The citrus vinaigrette is prepared, to dress the finished kale orange salad.

You will need beautiful, peeled orange chunks for this salad. Below is a handy photo of how to peel an orange to get perfect little chunks, without all the bitter tasting white “pith” attached!

Cut a slice off the bottom of the orange. Stand up the orange with the sliced edge on the bottom. Carefully cut off the peel, from top to bottom, following the curve of the orange. Remove all the white “pith” from the outside of the orange. Slice the peeled orange into chunks.

Photo collage showing how to peel whole orange to add to the kale orange salad.

Assemble The Kale Orange Salad

Gather the salad bowl and the rest of the ingredients when ready to build the salad. This includes the thinly sliced kale, seeded and thinly sliced jalapeños, citrus salad dressing, orange chunks, and the goat cheese. (Oops… sorry about the slightly blurry photo).

Kale, jalapenos, orange chunks, goat cheese and salad dressing ready to make a kale orange salad.

Pour HALF the salad dressing over the sliced kale, and give it a good toss.  Add the oranges and the sliced jalapeños, and toss again, to ensure everything is covered with salad dressing. If the kale orange salad needs a bit more dressing, add more, until it is to your liking. TIP: Any extra salad dressing can be stored (covered), in the refrigerator for several days, and can be used on other salads.

Use a fork to crumble up the goat cheese, and add it to the kale orange salad right before you serve it! Give the salad one final toss, to combine ingredients, then serve!

The kale orange salad is tossed with the salad dressing before serving.

We enjoyed this simple, but yummy salad, along with a piece of pan seared creole salmon, and a small baked potato! The creamy goat cheese, along with the sweet oranges and creamy citrus salad dressing really make this a delicious side salad!

Baked potato and roasted salmon on dinner plate with the kale orange salad.

I hope you will consider trying this kale orange salad, and have a feeling you will be pleasantly surprised with the taste (even if you’re not a big KALE fan!). Have a wonderful day!

Looking For More SALAD Recipes?

Interested In More Recipes?

Thank you for visiting this website. I appreciate you using some of your valuable time to do soIf you’re interested, I publish a newsletter 2 times per month (1st and 15th) with all the latest recipes, and other fun info. I would be honored to have you join our growing list of subscribers, so you never miss a great recipe!
There is a Newsletter subscription box on the top right side (or bottom) of each blog post, depending on the device you use, where you can easily submit your e-mail address (only) to be included in my mailing list.

You Can Also Find Me On Social Media:

Facebook page: The Grateful Girl Cooks!
Pinterest:
The Grateful Girl Cooks!
Instagram:
jbatthegratefulgirlcooks

Author's signature

Original Recipe Source: http://tastykitchen.com/recipes/salads/kale-citrus-salad/

0 from 0 votes
Kale Orange Salad
Prep Time
20 mins
Cook Time
0 mins
Total Time
20 mins
 

Kale Orange Salad, topped with citrus vinaigrette, crumbled goat cheese, fresh oranges, and jalapeño slices, may surprise you with just how GOOD it tastes!

Category: Salad
Cuisine: American
Keyword: kale orange salad
Servings: 6
Calories Per Serving: 127 kcal
Author: JB @ The Grateful Girl Cooks!
Ingredients
For Salad:
  • 1 bunch kale , rinsed, stems removed
  • 1 large orange , peeled and cut into chunks
  • 1 medium fresh jalapeño pepper , seeded/sliced very thin
  • 4 ounces goat cheese (chevre)
For Salad Dressing:
  • 1/4 cup orange juice
  • 2 Tablespoons olive oil
  • 1 teaspoon white wine vinegar
  • 1 clove garlic , minced
  • 1 teaspoon granulated sugar
  • Salt and Pepper, to taste
  • 1 Tablespoon sour cream , or plain Greek yogurt
Instructions
  1. Prepare kale: Rinse and drain kale thoroughly, then place leaves onto cutting surface. Using a sharp knife, remove long stem from the middle of the leaves (discard the stems). Once de-stemmed, thinly slice kale, a handful at a time. Place sliced kale into a large salad bowl; set aside.

  2. Make The Salad Dressing: Place orange juice, olive oil, white wine vinegar, granulated sugar, minced garlic, salt and pepper in a small bowl.  Whisk together until fully blended. Add sour cream (or plain Greek yogurt, if using), and whisk again, to blend fully. Finished salad dressing will be smooth and creamy.

  3. Build Salad: Pour HALF the salad dressing over sliced kale in bowl; give it a good toss, to distribute salad dressing.  Add orange pieces and sliced jalapeños, and toss again, to ensure everything is coated with salad dressing. If salad needs a bit more dressing, add more until it is to your liking. TIP: Any extra dressing can be stored (covered), in refrigerator for several days, and can be used on other salads.

    Use a fork to crumble up the goat cheese, and add it to the kale orange salad right before you serve it! Give the salad one final toss, to combine ingredients, then serve! Enjoy!

Recipe Notes

Substitutions for the orange chunks in the Salad: 3 tangerines or clementines.

Nutrition Facts
Kale Orange Salad
Amount Per Serving (1 (1/6th of total))
Calories 127 Calories from Fat 81
% Daily Value*
Fat 9g14%
Saturated Fat 3g19%
Cholesterol 9mg3%
Sodium 79mg3%
Potassium 182mg5%
Carbohydrates 7g2%
Sugar 4g4%
Protein 4g8%
Vitamin A 2475IU50%
Vitamin C 50.4mg61%
Calcium 74mg7%
Iron 0.7mg4%
* Percent Daily Values are based on a 2000 calorie diet.

Here’s one more to pin on your Pinterest boards!Kale Orange Salad, topped with citrus vinaigrette, crumbled goat cheese, fresh oranges, and jalapeño slices, may surprise you with how GOOD it tastes!

Broiled Salmon with Pineapple Salsa

Broiled Salmon with Pineapple Salsa features spice rubbed salmon fillets, glazed with honey and brown sugar, topped with a simple fruit salsa.

It was a cold, rainy day recently… the kind you do NOT want to go outside in. I had laid out some salmon to fix for our dinner, and wanted to try a new recipe I had come upon in my cookbook collection. The recipe is from the editors at American’s Test Kitchen, so I knew it would be good.

We LOVE salmon, so I am always on the lookout for new ways to cook this healthy, delicious fish! This “tropical-sounding” salmon recipe with pineapple salsa was a perfect meal for this COLD rainy day, to help us dream of warm summer days! This is a perfect “Dinner For Two!”

Normally I pan-sear, bake or grill our salmon when we eat it. This “new to us” recipe called for BROILING the salmon. Hmmm… that sounded interesting, so into the kitchen I went, and this Broiled Salmon with Pineapple Salsa is the result. Oh my goodness… this broiled salmon dish is so quick and easy to make… and tastes so good! The cleanup was a breeze, too! We enjoyed this dish so much I want to share the recipe with you today. Here’s how to make it:

Scroll Down For A Printable Recipe Card At The Bottom Of The Page

Make Pineapple Salsa For The Broiled Salmon

The pineapple salsa for the broiled salmon couldn’t be any easier to make! Mix the pineapple pieces, sliced green onion, minced jalapeño, lime juice and cilantro together, in a medium bowl. Fresh pineapple is recommended, but you can CERTAINLY use canned just as easily!

Lightly season the salsa with a little salt and pepper (to taste), then set aside until the broiled salmon is ready to serve. That’s it – your pineapple salsa is done! See how EASY that was?

Pineapple salsa is mixed together to top broiled salmon.
Make The Spice Rub For The Broiled Salmon

The next thing to make is the spice rub which will season the salmon fillets before cooking. Combine brown sugar, ground coriander, ground ginger, granulated garlic, salt and pepper in a small bowl. Stir until blended, then set the spice mix aside.

Spice rub mixture in bowl, ready to season broiled salmon.

Prepare The Salmon Fillets

Prepare the salmon fillets for cooking by first placing them onto a layer of paper towels, and blotting them dry with additional paper towels.

Salmon fillets are blotted dry with paper towels before cooking.

Place the dried salmon fillets onto a baking sheet that has been covered with foil, and lightly sprayed with non-stick baking spray. Trust me… do this step! The foil will help the glazed broiled salmon not stick to the pan, and will make your cleanup much easier!

Stir the honey and water together until blended in a small cup. Using a pastry brush, “paint” this glaze over the top of each of the salmon fillets.

Honey and water glaze is brushed onto salmon before broiling.

Sprinkle the salmon fillets with the spice mixture, evenly dividing it between the two pieces. Use your fingers to lightly press the spices onto the salmon, so it adheres to the fish better.

The broiled salmon recipe calls for sprinkling fillets with spice mix before broiling.

The last thing you need to do right before cooking the salmon is lightly spray the top of each fillet with non-stick vegetable oil spray.

The honey glaze and the brown sugar in the spice rub will caramelize slightly while cooking, to form a type of “crust” on top. That extra bit of vegetable oil spray will also help to ensure a nice, slightly crispy “crust” on the broiled salmon!

Cook The Salmon Fillets

Place an oven rack about 6 inches from the broiler element. Preheat the broiler, then place the baking sheet with the salmon onto the rack.

Broil the salmon (keeping an eye on it), until it is nice and browned. This should take about 6-8 minutes, and the internal temperature (if tested) should be 125° F. Remove the broiled salmon from the oven, once done.

Seasoned salmon fillets are spritzed with non-stick baking spray before being broiled.

Serve The Broiled Salmon

To serve, transfer the broiled salmon to individual dinner plates. Top each salmon fillet with a generous portion of the pineapple salsa, dividing it equally between the two pieces of fish.

We had some white steamed rice, and a simple mixed green salad  with a balsamic dressing on the side for this meal. The bland white rice paired very well with the rich salmon and vibrant pineapple salsa!

Broiled salmon with pineapple salsa, served on plate with rice and green salad.

Close up photo of the pineapple salsa on top of the seasoned broiled salmon.

Sure hope you will give this broiled salmon recipe a try! It is light in calories, but big in flavor, and is really EASY to make! I really think you will enjoy this dish. Have a wonderful day!

Looking For More SALMON Recipes?

You can find all of my recipes in the Recipe Index, located at the top of the page.  I have many recipes using salmon, including:

Interested In More Recipes?

Thank you for visiting this website. I appreciate you using some of your valuable time to do soIf you’re interested, I publish a newsletter 2 times per month (1st and 15th) with all the latest recipes, and other fun info. I would be honored to have you join our growing list of subscribers, so you never miss a great recipe!
There is a Newsletter subscription box on the top right side (or bottom) of each blog post, depending on the device you use, where you can easily submit your e-mail address (only) to be included in my mailing list.

You Can Also Find Me On Social Media:

Facebook page: The Grateful Girl Cooks!
Pinterest:
The Grateful Girl Cooks!
Instagram:
jbatthegratefulgirlcooks

Author's signature

Original Recipe Source: My beloved cookbook titled “The Complete Cooking For Two Cookbook”, by America’s Test Kitchen, published in 2014 by the Editors at America’s Test Kitchen, pages 182-183.

0 from 0 votes
Broiled Salmon with Pineapple Salsa
Prep Time
15 mins
Cook Time
8 mins
Total Time
23 mins
 
Broiled Salmon with Pineapple Salsa features spice rubbed salmon fillets, glazed with honey and brown sugar, topped with a simple fruit salsa.
Category: Main Course
Cuisine: American
Keyword: broiled salmon
Servings: 2
Calories Per Serving: 304 kcal
Author: JB @ The Grateful Girl Cooks!
Ingredients
For Salsa:
  • 3/4 cup pineapple pieces (1/2") , can substitute canned pineapple
  • 1 scallion (green onion) , thinly sliced
  • 1/2 medium jalapeño pepper , stemmed, seeded, minced
  • 2 teaspoon fresh lime juice
  • 1 teaspoon fresh cilantro leaves , minced
  • Salt and Pepper , to taste
For Salmon:
  • vegetable oil spray
  • 2 6 oz. salmon fillets (skinless) ,
  • 2 teaspoons honey
  • 1/2 teaspoon brown sugar
  • 1/4 teaspoon water
  • 1/2 teaspoon ground coriander
  • 1/4 teaspoon ground ginger
  • 1/4 teaspoon granulated garlic
  • 1/4 teaspoon black pepper
  • 1/8 teaspoon salt
Instructions
  1. Make salsa: Mix pineapple, green onion, jalapeño, lime juice and cilantro together, in a medium bowl. Season with salt/pepper (to taste), then set aside. 

  2. Make spice rub: Place brown sugar, ground coriander, ground ginger, granulated garlic, salt & pepper in a small bowl. Stir until blended, then set aside.

  3. Prepare salmon: Place fillets onto a layer of paper towels, and blot dry with additional paper towels. Place salmon onto a baking sheet that has been covered with foil, and lightly sprayed with non-stick baking spray. Stir honey and water together until blended in a small cup. Brush this glaze over the top of each fillet. Sprinkle salmon with the spice mixture, dividing it between the two pieces. Lightly press spices onto salmon. Lightly spray each fillet with non-stick spray.

  4. Cook Salmon: Place an oven rack about 6 inches from the broiler element. Preheat broiler, then place the baking sheet with salmon onto the rack. Broil salmon (keep an eye on it), until nice and browned. This should take about 6-8 minutes, and the internal temperature (if tested) should be 125° F. Remove  salmon from oven, once done.

  5. To Serve: Transfer salmon to plates. Top each piece with a generous portion of the pineapple salsa, dividing it equally between the two fillets. Enjoy!

Recipe Notes

Variation Idea: Substitute 1/2 cup of diced fresh mango for the pineapple in the recipe.

Nutrition Facts
Broiled Salmon with Pineapple Salsa
Amount Per Serving (1 serving (with salsa))
Calories 304 Calories from Fat 90
% Daily Value*
Fat 10g15%
Saturated Fat 1g6%
Cholesterol 93mg31%
Sodium 222mg10%
Potassium 900mg26%
Carbohydrates 16g5%
Fiber 1g4%
Sugar 13g14%
Protein 34g68%
Vitamin A 200IU4%
Vitamin C 36.4mg44%
Calcium 28mg3%
Iron 1.5mg8%
* Percent Daily Values are based on a 2000 calorie diet.

Here’s one more to pin on your Pinterest boards!Broiled Salmon with Pineapple Salsa features spice rubbed salmon fillets, glazed with honey and brown sugar, topped with a simple fruit salsa.

Irish Soda Bread

Irish Soda Bread is a classic St. Patrick’s Day treat! This high-rising bread is very easy to make, filled with sweet raisins, and tastes amazing!
Irish Soda Bread is a classic St. Patrick's Day treat! This high-rising bread is very easy to make, filled with sweet raisins, and tastes amazing!

I subscribed to Taste Of Home magazines for many, many years, and have kept all of my issues! Let me tell you, I have lots of those magazines in my office! I keep them for inspiration, and still look through some of these back issues for great ideas!

Many years ago I cut out a recipe from the pages for a classic Irish soda bread, and have kept it all these years in my trusty recipe box! The recipe card doesn’t indicate which magazine issue it was from (month/year), so I have no way of knowing WHICH of my MANY Taste of Home magazines I clipped it from. But, since the recipe is so good, I want to share it with you today!

St. Patrick’s Day is just around the corner, and Irish soda bread can EASILY be part of your traditional Irish dinner, or ANY meal, for that matter! This delicious bread is so easy to prepare, and the taste is wonderful!  Serve a loaf of this bread, along with some corned beef and cabbage, and you’ve got yourself a wonderful Irish meal!

Scroll Down For A Printable Recipe Card At The Bottom Of The Page

How To Make Irish Soda Bread

Preheat your oven to 375° F.  While the oven preheats, place flour, brown sugar, baking powder, baking soda and salt in a large mixing bowl. Whisk or stir the dry ingredients together.  Use a pastry blender (or two forks), to cut in very cold butter, until the mixture is crumbly, and the butter has been reduced almost to the size of peas.

In a separate container, mix together buttermilk and one egg, and pour it into the bowl with the dry ingredients. Stir to combine, but only until the flour mixture is just moistened. Be careful not to over mix the dough!

Butter, eggs, and buttermilk is added to dry ingredients to make Irish soda bread dough.

The batter will be fairly sticky/tacky. Add the raisins, and fold them into the dough.

Raisins are added to the Irish soda bread dough.

Transfer the dough onto a floured work surface. Lightly sprinkle with additional flour, and knead the dough for 1 minute, adding flour as necessary. Shape the Irish soda bread dough into a round circle.

The dough for the Irish soda bread is kneaded, then formed into a circle before baking.

Place the round Irish soda bread loaf onto a well greased baking pan/sheet. Use a sharp knife, and cut a cross shape in the top of the loaf, cutting about 1/4″ deep.

A cross is cut into the top of the Irish soda bread before baking.

Lightly beat the one remaining egg, and brush it over the top of the loaf. Bake the Irish soda bread for 30-35 minutes in a preheated 375° F. oven. When done, the loaf should be gorgeous and golden brown and “set” in the top/middle of the loaf. Transfer the loaf to a wire rack to cool for several minutes before slicing.

Irish soda bread is baked for about 30 minutes until done and golden brown.

Here, the baked Irish soda bread is cooling down on a wire rack before slicing.

When ready to serve the Irish soda bread, use a sharp serrated knife, and cut the loaf into 8 slices. The bread tastes fantastic when eaten warm, with a little bit of butter on it! YUM!

A slice is cut out of the Irish soda bread, to reveal the inside of the loaf.

Hope you enjoy this Irish soda bread for St. Patrick’s Day or ANY time of year! It truly is quite an easy bread to make, and really does taste wonderful. Thanks for reading… have a GREAT day!

Looking For More BREAD Recipes?

You can find all of my recipes in the Recipe Index, located at the top of the page. A few of our family’s favorite homemade bread recipes include:

Interested In More Recipes?

Thank you for visiting this website. I appreciate you using some of your valuable time to do soIf you’re interested, I publish a newsletter 2 times per month (1st and 15th) with all the latest recipes, and other fun info. I would be honored to have you join our growing list of subscribers, so you never miss a great recipe! 

There is a Newsletter subscription box on the top right side (or bottom) of each blog post, depending on the device you use, where you can easily submit your e-mail address (only) to be included in my mailing list.

You Can Also Find Me On Social Media:

Facebook page: The Grateful Girl Cooks!
Pinterest:
The Grateful Girl Cooks!
Instagram:
jbatthegratefulgirlcooks

Author's signature

Recipe Source: Gloria Warczak (from Cedarburg, Wisconsin), on a recipe card cut out of one of my old “Taste Of Home” Magazines (original date unknown, recipe was on page 13).

0 from 0 votes
Irish Soda Bread
Prep Time
10 mins
Cook Time
30 mins
Total Time
40 mins
 
Irish Soda Bread is a classic St. Patrick's Day treat! This high-rising bread is very easy to make, filled with sweet raisins, and tastes amazing!
Category: Bread
Cuisine: Irish
Keyword: Irish soda bread
Servings: 8 servings
Calories Per Serving: 215 kcal
Author: JB @ The Grateful Girl Cooks!
Ingredients
  • 2 cups all purpose flour
  • 2 Tablespoons brown sugar
  • 1 teaspoon baking powder
  • 1/2 teaspoon baking soda
  • 1/4 teaspoon salt
  • 3 Tablespoons butter (very cold)
  • 2 large eggs , divided use
  • 3/4 cup buttermilk
  • 1/3 cup raisins
Instructions
  1. Preheat oven to 375° F.  Place flour, brown sugar, baking powder, baking soda and salt in a large mixing bowl. Whisk the dry ingredients together.  Use a pastry blender (or two forks), to cut in very cold butter, until the mixture is crumbly, and the butter is about the size of peas.

  2. In a separate container, mix together buttermilk and one egg, and pour it into the bowl with the dry ingredients. Stir to combine, but only until flour mixture is just moistened. Do not overmix! The batter will be fairly sticky/tacky. Add the raisins, and fold them into the dough.

  3. Transfer the dough onto a floured work surface. Lightly sprinkle with additional flour, and knead dough for 1 minute, adding flour as necessary. Shape the dough into a round loaf. Place the loaf onto a well greased baking pan/sheet. Use a sharp knife, and cut a cross shape in the top of the loaf, cutting about 1/4" deep.

  4. Lightly beat the one remaining egg, and brush it over the top of loaf. Bake for 30-35 minutes in a preheated 375° F. oven. When done, the bread should be golden brown and "set" in the top/middle of the loaf. Transfer the loaf to a wire rack to cool for a few minutes before slicing. Slice loaf into 8 slices, spread with softened butter, serve and enjoy!

Nutrition Facts
Irish Soda Bread
Amount Per Serving (1 (1/8th of loaf))
Calories 215 Calories from Fat 54
% Daily Value*
Fat 6g9%
Saturated Fat 3g19%
Cholesterol 66mg22%
Sodium 225mg10%
Potassium 183mg5%
Carbohydrates 32g11%
Fiber 1g4%
Sugar 4g4%
Protein 5g10%
Vitamin A 245IU5%
Vitamin C 0.3mg0%
Calcium 66mg7%
Iron 1.9mg11%
* Percent Daily Values are based on a 2000 calorie diet.

Here’s one more to pin on your Pinterest boards!Irish Soda Bread is a classic St. Patrick's Day treat! This high-rising bread is very easy to make, filled with sweet raisins, and tastes amazing!