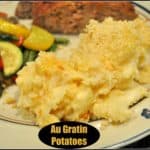
Au Gratin Potatoes are a comforting classic side dish, with thinly sliced potatoes covered in a homemade cheese sauce, then baked until golden brown and bubbly!

Do you like Potatoes au Gratin? Pretty fancy sounding French name for potatoes and cheese, right? My husband found a simple translation online for “au gratin” which said that it simply means “cooked with a cover of cheese and bread crumbs mixed with butter”.
Well, I do not speak French, but I do know that I love this “comfort food” side dish! That description of au gratin fits this recipe perfectly! How can you go wrong with baked russet potatoes smothered in cheese sauce, and covered with a buttery bread crumb topping?
I found an old recipe recently that I had written down on an index card many years ago, made a few slight changes to the original, then made them for dinner. It is fairly straight forward to make, and was very delicious!
Scroll Down For A Printable Recipe Card At The Bottom Of The Page
Here’s How To Make Au Gratin Potatoes:
Melt butter in a medium saucepan on medium low heat. Stir in flour. Continue stirring; the mixture will clump up a bit (as seen in photo). Continue cooking for one minute, stirring often (this helps cook the “floury” taste out of it).

Stir the milk, salt and pepper into butter mixture. Continue to cook on medium heat until mixture thickens considerably. Add sharp cheddar cheese; stir until cheese has fully melted, and sauce is quite thick.

Peel, then slice potatoes into 1/8″ round slices. If you have a mandoline, use that to get very thin slices (1/8″ is best!). I have a mandoline, but used a knife to slice the potatoes to show how thin the potato slices should be (when using a knife try hard to get them 1/4″ or thinner), in case you don’t have one.
If the potatoes slices are too thick, it will take much longer to cook them until tender! The thinner the slices are, the better!

Place the sliced potatoes to the cheese sauce in pan. Stir well, to completely cover potatoes with cheese sauce.

Spray a 2 quart sized baking dish with non-stick spray (bottom and sides). Add the cheesy potatoes to the dish, and evenly spread to disperse. Set aside.

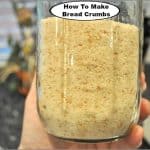
Create the buttery crumb topping by mixing together melted butter and soft breadcrumbs.

Sprinkle the buttered bread crumbs over the entire surface of the au gratin potatoes.

Bake potatoes in a preheated 400 degree oven for 60 minutes (covered with foil). Remove foil and continue baking for an additional 15 minutes, or until surface of potatoes is golden brown and cheese sauce is bubbly around the edges of dish.

When done baking, remove dish to a wire rack. The cheese should be bubbling around the edges, and the potatoes should be fully cooked through and tender. Season with additional salt and pepper, if desired, serve, and enjoy these au gratin potatoes!

We enjoyed the potatoes, served with grilled vegetables and my REALLY GOOD meatloaf. This meal was a tried and true meat and potatoes dinner, to be sure! Hope you will consider making this delicious side dish to compliment YOUR favorite meal!
Looking For More POTATO Recipes?
You can find all of my recipes in the Recipe Index, located at the top of the page. I have quite a few recipes featuring potatoes, including:
Interested In More Recipes?
Thank you for visiting this website. I appreciate you using some of your valuable time to do so. If you’re interested, I publish a newsletter 2 times per month (1st and 15th) with all the latest recipes, and other fun info. I would be honored to have you join our growing list of subscribers, so you never miss a great recipe!
There is a Newsletter subscription box on the top right side (or bottom) of each blog post, depending on the device you use, where you can easily submit your e-mail address (only) to be included in my mailing list.
You Can Also Find Me On Social Media:
Facebook page: The Grateful Girl Cooks!
Pinterest: The Grateful Girl Cooks!
Instagram: jbatthegratefulgirlcooks
Have a wonderful day… God Bless You!

Original Recipe Source: unknown (written down many years ago on 3×5 card-no author noted)
- 6 medium potatoes (or 4 large), peeled, thinly sliced into 1/4" rounds
- 4 Tablespoons butter
- 4 Tablespoons all purpose flour
- 1/2 teaspoon Salt , plus more to taste (if desired)
- 1/4 teaspoon Pepper
- 2 cups milk
- 2½ cups sharp cheddar cheese (grated)
- 1/2 cup bread crumbs
- 2 Tablespoons butter, melted
Melt butter in a medium saucepan on medium low heat. Stir in flour. Continue stirring; the mixture will clump up a bit. Continue cooking for one minute, stirring often (this helps cook the "floury" taste out of it). Stir the milk, salt and pepper into butter mixture. Continue to cook on medium heat until mixture thickens considerably. Add sharp cheddar cheese; stir until cheese has fully melted, and sauce is quite thick.
Peel, then slice potatoes into 1/8" round slices. If you have a mandoline, use that to get very thin slices. If using a knife to slice potatoes, slice them as thin as possible (no more than 1/4" thin). If the potatoes slices are too thick, it will take much longer to cook them until tender! The thinner the slices are, the better!
Add potatoes to the cheese sauce in pan. Stir well, to completely cover potatoes. Spray a 2 quart sized baking dish with non-stick spray (bottom and sides). Add potatoes to the dish, and evenly spread to disperse. Set aside.
Make the buttery crumb topping by mixing together melted butter and soft breadcrumbs. Sprinkle the buttered bread crumbs over the entire surface of the au gratin potatoes.
Bake potatoes in a preheated 400 degree oven for 60 minutes (covered with foil). Remove foil and continue baking for an additional 15 minutes, or until surface of potatoes is golden brown and cheese sauce is bubbly around the edges of dish. Remove from oven, season with additional salt and pepper, if desired. Serve, and enjoy!
Here’s one more to pin on your Pinterest boards!
 is super easy to make, delicious, and is a great way to keep your kitchen cool during hot summer days, by cooking outside! / The Grateful Girl Cooks!")


 is super easy to make, delicious, and is a great way to keep your kitchen cool during hot summer days, by cooking outside! / The Grateful Girl Cooks!")


, served with a seasoned Ranch/Sour Cream dipping sauce and BBQ sauce, are the perfect appetizer to munch on at any dinner, get together or party! / The Grateful Girl Cooks!")


, served with a seasoned Ranch/Sour Cream dipping sauce and BBQ sauce, are the perfect appetizer to munch on at any dinner, get together or party! / The Grateful Girl Cooks!")