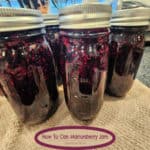
Learn how to can Marionberry jam, a delicious fruit jam for toast, biscuits and scones. Recipe yields 5 pint-sized jars, ready for pantry storage. 
Marionberries are delicious eaten fresh AND are totally awesome used in cobblers, crisps, pies, turnovers, scones and JAM! They’re from the same “family” as blackberries but have a couple slight differences.
Marionberries are primarily grown here in Oregon (where I live). This variation of a traditional blackberry was developed in Oregon, as well.
They’re similar to a traditional blackberry but are slightly longer and larger. Marionberries also tend to be firmer in texture than a traditional blackberry.
Today I want to share how to make delicious homemade jam using this fruit, step by step. Here’s how to make Marionberry jam.
Scroll Down For A Printable Recipe Card At The Bottom Of The Page
Picking Fresh Marionberries
In late June, I went on an EARLY morning berry-picking adventure with one of my neighbors. We went to the first day a local U-Pick farm was open for the season. She wanted to get there in the cool morning air.
She picked me up at 5:45 a.m. and I truly thought we would be the only ones crazy enough to get to the farm at 6:00 a.m. when they opened.
When we arrived at about 6:05 a.m., I was shocked to see LOTS of people already out in the fields picking berries! Oregonians love their U-Pick farms, especially on a nice dry day!
When ripe, marionberries turn from red to a deep purple in color. You can see in the 2 photos below the fresh marionberries on the vines and my marionberry haul for the morning (I also picked lots of blueberries and raspberries!).


Making Jam Requires A Little Prep First
Before you begin cooking the jam, make sure you have all of your ingredients and equipment (canner, jars, lids, utensils, etc.) ready to go. Wash the jars in soapy hot water and drain.
Fill a water bath canner half full of water and bring the water to a low simmer. Place the jars on an elevated rack in the canner and let the low simmering water keep them warm while you make the jam.
You can also put the empty jars on a dish towel-lined cookie sheet and put them in the oven at 250°F. for 20 minutes to keep them warm.
It’s important to only fill warm or hot jars with the hot jam (cold or room temp. jars might crack or break when hot jam is added).
Before beginning I also measure out the full amount of granulated sugar into a huge bowl or pot, because it needs to be added all at once at the right stage of the jam-making process.
How To Can Marionberry Jam
For this recipe you will need 6 cups of finely crushed ripe marionberries, which should be measured AFTER they have been crushed! I recommend crushing them one cup at a time, using a potato masher, which works very well!
After you crush the berries, measure them to make sure it is 1 full cup, then add those berries to the large water bath canner you’ll be using.
Continue crushing and measuring one cup at a time to get accurate measurements and 6 cups total of finely crushed berries, which you’ll need to make this jam.

Add Pectin And Sugar
Once you have all 6 cups of crushed berries in the canner, stir in a box of powdered pectin until combined. Turn the heat to HIGH, and bring the mixture to a full rolling boil, stirring constantly.
NOTE: A full rolling boil is when it’s boiling so hard it doesn’t stop bubbling, even when it is stirred.
Once the berries reach the full rolling boil stage, stir in the granulated sugar quickly and all at once! Stir the mixture very well to combine the ingredients and dissolve all of the sugar.

Bring the jam mixture back to a full, rolling boil. Once it has reached that stage, set a timer and boil it for EXACTLY 4 minutes, stirring constantly.
When the time is up, remove the pan from the heat, and skim off any accumulated foam that has appeared on top (discard).

Filling the Jars
I always put a dish towel under the hot canning jars before filling, because it helps to catch any drips. Ladle the hot jam into hot drained jars, leaving 1/8″ (one-eighth inch) of headspace in each jar. I suggest using a canning funnel to do this, because it is much easier (and less messy!).
Insert a plastic knife down into each jar a couple times to help remove any air bubbles that may be present, then adjust the headspace to 1/8″ by removing or adding jam, if necessary.
Use a damp dish cloth or paper towel to wipe down the rim and edges of the jar. You need the jars to have clean edges and clean rims so the flat lids can seal properly.
Add the flat lids, then screw on the jar rings to fingertip tightness (don’t overtighten). Place the filled jars on an elevated rack in the canner with the simmering water.

Processing The Jars Of Marionberry Jam
Lower the elevated rack of jam jars into the simmering water. The jars will need to be fully covered by the water, with at least an inch of water above the top of the jars.
Add more boiling water, if necessary so the water line is 1″ above the top of the jars. Cover the canner.
Bring the water in the canner to a gentle boil (not a rolling boil). Once the water is boiling, process the jam for 10 minutes. When done, wait a couple minutes then remove the canner lid (lift it away from you because of steam).

Carefully lift each jar out of the water using canning tongs. Set the jars on a dish towel to cool (don’t put HOT jars directly on the kitchen counter because temperature variances could cause the jars to crack).
As the jars cool, you should hear a “ping” sound as each jar seals. Let the jam cool for 12-24 hours without disturbing the jars.
Once cool, check to ensure each jar sealed properly. The jar lid should not spring back when pressed lightly in the middle.
If you find a jar lid that did not seal (and the lid springs or pops back when pushed), you will need to refrigerate (and use) that jar of jam because it cannot be safely stored long term in a pantry.

Storing And Enjoying Homemade Marionberry Jam
Store the properly sealed (and labeled) jars of marionberry jam in a dark pantry for up to a year (or more). Remove the screw band (outer jar ring) when you store the jars.
I love to give jars of jam to our friends and family to “spread the love”, but my favorite thing to do is to eat it!

When you’re ready to enjoy some delicious marionberry jam, open a jar and serve it on toast, biscuits or English muffins, etc.
It is absolutely delicious and is a great taste and reminder of Summer that can be enjoyed even in the cold wintertime!

I hope you’ve enjoyed learning how to make marionberry jam and trust you (and those you love) will enjoy it as much as we do! It really is a delicious berry jam, and I love having jars of it available year-round in our pantry.
Thank you for stopping by, and I invite you to come back again soon for more family-friendly recipes. Take care, may God bless you, and have a wonderful day!
Looking For More HOMEMADE JAM Recipes?
You can find ALL of my recipes in the Recipe Index, which is located at the top of the page. I have a wonderful variety of jam recipes to choose from, including:
Want More Recipes? Get My FREE Newsletter!
I publish a newsletter 2 times per month (1st and 15th) with lots of recipes, tips, etc.
Would you like to join our growing list of subscribers?
There is a Newsletter subscription box on the top right (or bottom) of each blog post, depending on the device you use.
You can submit your e-mail address there, to be added to my mailing list.
Find Me On Social Media:
Facebook page: The Grateful Girl Cooks!
Pinterest: The Grateful Girl Cooks!
Instagram: jbatthegratefulgirlcooks

Recipe adapted from instructions found in a box of MCP Powdered Pectin
↓↓ PRINTABLE RECIPE BELOW ↓↓
Learn how to can Marionberry jam, a delicious fruit jam for toast, biscuits and scones. Recipe yields 5 pint-sized jars, ready for pantry storage.
- 6 cups finely crushed marionberries rinsed. **SEE NOTE BELOW)
- 2 ounces powdered fruit pectin =1 box (some boxes are 1.75 oz.)
- 8½ cups granulated sugar
1) Wash and drain jars. Prepare flat lids and screw bands.
2) Fill canner ½ full of water, simmer water on Low.
3) Get the jars warm/hot: Place jars on rack in the canner; let simmering water keep them warm while cooking jam OR put empty jars on a dish towel-lined cookie sheet; warm in oven at 250°F. for 20 minutes. *Important-only fill warm or hot jars with hot jam (cold/room temp. jars may crack when hot jam is added).
4) Measure total amount of sugar into a huge bowl; it must be added all at once at the right stage of the jam-making process.
Crush marionberries (need 6 cups finely crushed berries- measured AFTER they're crushed! Crush 1 cup at a time, using a potato masher. Add crushed berries to a large (separate) stockpot.
Stir in pectin until combined. Turn heat to HIGH- bring berry mixture to a full rolling boil, stirring constantly. NOTE: A full rolling boil is when it's boiling so hard it doesn't stop bubbling, even when stirred. Once it reaches a full rolling boil, stir in sugar all at once! Stir well to combine and dissolve the sugar.
Bring berry mixture back to a full, rolling boil on High. Once fully boiling, set a timer- boil jam for EXACTLY 4 minutes, stirring constantly. When time is up, remove stockpot from the heat. Skim/discard any foam on top.
Put a dish towel under hot canning jars before filling (helps to catch drips). Ladle hot jam into hot, drained jars using a canning funnel, Leave1/8" (one-eighth inch) headspace in each jar. Insert a plastic knife down into each jar a couple times to remove air bubbles, then adjust headspace to 1/8" (if necessary) by removing or adding jam. Use a damp cloth or paper towel to wipe down rims and edges of each jar (need to be clean so flat lids can seal properly). Add flat lids, then screw on jar rings to fingertip tightness (don't overtighten). Place jars on elevated rack in the canner.
Lower rack of jars into the simmering water. Jars must be fully covered with water, with at least 1" of water above the top of the jars. Add more boiling water, if necessary so water line is 1" above the top of the jars. Cover the canner. Bring water in canner to a gentle boil. Once water is gently boiling, process jam for 10 minutes. When done, wait 2-3 minutes then remove canner lid (lift it away from you because of steam).
Carefully lift jars out of the water with canning tongs. Set jars on a dish towel to cool (don't put HOT jars directly on the kitchen counter because temperature variances could cause the HOT jars to crack). As jars cool, you should hear a "ping" sound as each jar seals. Let jam cool for 12-24 hours without disturbing. Once cool, check to ensure each jar sealed properly. The jar lid should not spring back when pressed lightly in the middle. If a jar did not seal properly (lid springs or pops back when pushed), you need to refrigerate (and use) that jar of jam because it cannot be safely stored long-term.
Wipe down, then label the jars. Remove the screw band before storing jars. Store jam in pantry for up to a year (or more). Enjoy!
NOTE: Plan ahead... total amount of berries needed is 6 cups CRUSHED. Make sure to have a couple cups of extra whole berries before beginning to ensure you have the correct amount of crushed berries necessary for this jam!
Here’s one more to pin on your Pinterest boards!