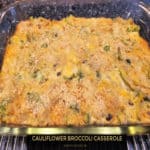
Dover Sole Mediterranean Style

Dover Sole Mediterranean Style is a delicious dish with fillets baked on zucchini, and topped with tomatoes, capers, olives and Parmesan.

A lot of information has been published lately on social media explaining why a Mediterranean-inspired way of eating (or typical diet) is often a very healthy choice.

While I do not follow a Mediterranean diet, I have found many delicious low-fat recipes from this region in my cookbooks and food magazines, and we like them very much!

This recipe for Dover Sole Mediterranean Style is one we really, truly love. I found the original recipe in one of my cookbooks, made several ingredient changes, and ended up with this recipe we enjoy a lot!

Overall it is a very simple recipe to make, and the fish has GREAT flavor, thanks to zucchini, garlic, tomatoes, onions, kalamata olives, capers, lemon juice, green bell peppers and Parmesan cheese! Here’s how to make it.

Scroll Down for A Printable Recipe Card At The Bottom Of The Page

Pat The Dover Sole Dry

The first thing you will need to do is preheat your oven to 400°F. ( 204.4°C.). After that, pat the Dover sole fillets very dry using paper towels.

For this recipe you will need four boneless, skinless fillets, each weighing between 4-6 ounces each. Once dry, set the fish aside.

Four Dover sole fillets are patted dry using paper towels.

Sauté The Veggies

Heat 2 teaspoons olive oil in a large skillet on Medium-Low heat (can use baking spray as a substitute, if desired). Add sliced zucchini, onion, green pepper, and minced garlic to the skillet once the oil is hot.

Cook the veggies on Medium-Low heat, stirring often, until they become crisp-tender (approx. 3-4 minutes).

Zucchini slices, onions, garlic and green peppers are cooked in olive oil.When the zucchini becomes crisp-tender, they are done cooking.

Prepare The Fish And Veggies For Baking

Transfer the zucchini mixture out of the skillet and place them in a 9″ x 13″ baking dish, spacing them evenly in a single layer.

Lay the fish fillets on top of the zucchini (again in a single layer) in the baking dish. Set the baking dish aside.

The zucchini mixture is placed in baking dish, in a single layer.Dover sole fillets are placed on top of the zucchini slices in pan.

Make A Mediterranean Topping For The Dover Sole

Now it’s time to make the topping for the fish! Place sliced kalamata olives, a can of diced tomatoes, capers, and fresh lemon juice in a small bowl, and stir to combine.

Evenly spoon the sauce on top of each of the Dover sole fillets in the baking dish. Cover the fish as much as possible with the sauce.

A sauce is made with diced tomatoes, olives, capers, sugar and lemon juice.Sauce is divided evenly over the top of each piece of fish in the baking dish.

Bake The Dover Sole Then Add Parmesan Cheese

Cover the pan tightly with aluminum foil and bake at 400°F. ( 204.4°C.) for 22-25 minutes, OR until the fish flakes easily with a fork. Remove the baking dish from the oven.

Discard the foil. Sprinkle the top of each of the fillets with finely grated Parmesan cheese, and put the pan back into the oven (uncovered) for 5 more minutes.

The Dover Sole Mediterranean Style is done cooking when the Parmesan cheese has fully melted. Remove the pan from the oven. 

Grated Parmesan cheese is sprinkled on top of the baked fish.The Parmesan has melted on top of the Dover Sole Mediterranean Style.

Time To Serve Dover Sole Mediterranean Style

Use a large slotted spatula to transfer the fish (and the zucchini mixture underneath each piece) to individual serving plates.

TIP: Quite a bit of liquid will cook out of the zucchini while baking. Using a slotted spatula to remove the fish and zucchini from the pan lets that extra liquid drip back into the pan!

Serve and enjoy the Dover Sole Mediterranean Style! It tastes delicious and we usually serve it alongside steamed rice!

One serving of Dove Sole Mediterranean Style on a plate, with rice on the side.

I hope you will give this delicious seafood recipe a try, and trust you’ll enjoy it as much as we do. It has a lot of flavor, and is fairly low in calories, too!

Thank you for stopping by, and I invite you to come back soon for more family-friendly recipes. Take care, may God bless you, and have a GREAT day!

Looking For More DOVER SOLE Recipes?

You can find ALL of my recipes in the Recipe Index, which is located at the top of the page. I have  some delicious recipes featuring Dover Sole, including:

Want More Recipes? Get My FREE Newsletter!

I publish a newsletter 2 times per month (1st and 15th) with lots of recipes, tips, etc..
Would you like to join our growing list of subscribers?

There is a Newsletter subscription box on the top right (or bottom) of each blog post, depending on the device you use.
You can submit your e-mail address there, to be added to my mailing list.

Find Me On Social Media:

Facebook page: The Grateful Girl Cooks!
Pinterest:
The Grateful Girl Cooks!
Instagram:
jbatthegratefulgirlcooks

Author's signature

Recipe adapted from: “The Essential 450 Best Mediterranean Diet Recipes” (Kindle edition), published in 2016 by TopFlight Cookbooks

↓↓ PRINTABLE RECIPE BELOW ↓↓

0 from 0 votes
Dover Sole Mediterranean Style
Prep Time
15 mins
Cook Time
30 mins
Total Time
45 mins
 

Dover Sole Mediterranean Style is a delicious dish with fillets baked on zucchini, and topped with tomatoes, capers, olives and Parmesan.

Category: Main Dish, Seafood
Cuisine: Mediterranean
Keyword: dover sole, Mediterranean
Servings: 4
Calories Per Serving: 257 kcal
Author: JB @ The Grateful Girl Cooks!
Ingredients
  • 2 teaspoons extra virgin olive oil
  • 2 medium zucchini cut in ½" thick, round slices
  • 2 Tablespoons green bell pepper (finely chopped)
  • 1 Tablespoon yellow onion (finely chopped)
  • 1 teaspoon minced garlic
  • 20 ounces Dover sole fillets (4 fillets about 5 oz. each)
  • 7 ounces diced tomatoes (canned)
  • 3 ounces sliced kalamata olives *approx. 25 pitted olives, sliced
  • 2 teaspoons capers drained/rinsed
  • ½ teaspoon granulated sugar
  • 1 teaspoon fresh lemon juice
  • ¾ cup freshly grated Parmesan cheese
Instructions
  1. Preheat oven to 400°F. ( 204.4°C.). Pat fish fillets dry using paper towels. Set aside.

  2. Heat olive oil in large skillet on Medium-Low heat. Add zucchini, onion, green pepper and garlic once oil is hot. Cook on Medium-Low heat, stirring often, until the veggies are crisp-tender (approx. 3-4 minutes).

  3. Transfer zucchini mixture out of skillet; lay them evenly in a 9" x 13" baking dish in a single layer. Lay the fish fillets on top of the zucchini (in single layer) in the baking dish. Set dish aside.

  4. Place olives, tomatoes, capers, and lemon juice in a small bowl; stir to combine. Spoon sauce on top of each fish fillet. Cover fish as much as possible with sauce.

  5. Cover dish tightly with aluminum foil. Bake at 400°F. ( 204.4°C.) for 22-25 minutes, OR until fish flakes easily with a fork. Remove from oven. Discard foil. Sprinkle each fillet with Parmesan cheese. Put pan back in oven (uncovered) for 5 more minutes, or until Parmesan has melted. Remove pan from the oven. 

  6. Use a large slotted spatula to transfer fillets (and zucchini mixture underneath) to plates. TIP: Liquid will cook out of the zucchini while baking. Using a slotted spatula to remove fish and zucchini from the pan lets extra liquid drip back into the pan! Serve hot, and enjoy.

Nutrition Facts
Dover Sole Mediterranean Style
Amount Per Serving (1 fillet with sauce)
Calories 257 Calories from Fat 126
% Daily Value*
Fat 14g22%
Saturated Fat 4g25%
Trans Fat 0.01g
Polyunsaturated Fat 1g
Monounsaturated Fat 6g
Cholesterol 80mg27%
Sodium 802mg35%
Potassium 636mg18%
Carbohydrates 9g3%
Fiber 2g8%
Sugar 5g6%
Protein 25g50%
Vitamin A 565IU11%
Vitamin C 27mg33%
Calcium 240mg24%
Iron 1mg6%
* Percent Daily Values are based on a 2000 calorie diet.

Here’s one more to pin on your Pinterest boards!Dover Sole Mediterranean Style is a delicious dish with fillets baked on zucchini, and topped with tomatoes, capers, olives and Parmesan.


Chewy Coconut Maple Cookies

Chewy Coconut Maple Coconut Cookies are easy to make yummy treats flavored with maple syrup, and filled with shredded coconut and pecans.

Today I want to share a simple cookie recipe that I found in one of my old cooking magazines 26 years ago! That’s right… it’s an “oldie but a goodie” recipe, and these cookies are fantastic!

This recipe is very straightforward. You will beat the “wet” ingredients, combine it with dry ingredients (including shredded coconut and nuts), and stir until a thick dough is created. 

The cookie dough is then dropped by Tablespoons onto baking sheets and the cookies are baked until done. See… I told you the chewy coconut maple cookies are easy to make! Here’s how to make them.

Scroll Down For A Printable Recipe Card At The Bottom Of The Page

Make The Cookie Dough

TIP: Before beginning, preheat your oven to 375°F. (or 190.5°C.). The cookie dough batter comes together quickly, so you will want your oven pre-heated and ready to go!

Now it’s time to make the cookie dough. Place vegetable shortening and packed brown sugar in a mixing bowl. Use an electric mixer to cream these ingredients until they’re fully combined and fluffy in texture.

Add an egg, pure maple syrup and maple extract to the mixing bowl, and beat these until incorporated into the batter. TIP: If you don’t have maple extract, you can substitute vanilla extract).

Vegetable shortening and brown sugar are creamed using an electric mixer.Egg, maple syrup and maple extract are beaten into the cookie batter.

Time For The Dry Ingredients

Whisk together all purpose flour, baking powder, and salt in a medium bowl. Add this to the creamed cookie batter and continue to beat until fully combined.

The cookie batter will be very smooth after wet ingredients are combined.Dry ingredients are added to the cookie batter in a bowl.

Stir in chopped pecans (or walnuts) until they’re incorporated into the cookie dough. The dough will be thick and “tacky” in texture.

Chopped pecans are stirred into the cookie dough.

Ready To Bake

Drop the cookie dough by Tablespoonfuls onto a sprayed (or silpat mat covered) large baking sheet. For a yield of about 3 dozen cookies, use “level” Tablespoons.

If you use “generous, rounded” Tablespoonfuls (shown below), you will end up with about 2 dozen, big chewy coconut maple cookies.

IMPORTANT: These cookies spread a LOT on the baking sheet, so leave at least 2″ minimum space between the cookies when positioning the dough on the baking sheets.

Dough is dropped onto prepared baking sheets for baking.

If you don’t leave enough space between the balls of cookie dough, the cookies will spread out so much they bake into each other. You can see this in the photo below (from the first time I made these cookies).

The cookies will still TASTE great, but you will have to cut them apart from each other (and that’s no fun at all). Trust me… give the cookies room to spread!

Cookies spread out so much they baked right into each other.

Bake The Chewy Coconut Maple Cookies

Bake the cookies at 375°F. for between 12-15 minutes. When done they will be golden brown in color, and the bottom edges will be browned and “set”.

Remove the cookies from the oven, and let them cool for 1-2 minutes on their baking sheets. Once they’ve cooled slightly, transfer them with a spatula to wire racks to finish cooling.

The chewy coconut maple cookies cool to room temperature on a wire rack.A cookie filled with shredded coconut and pecans, cooling on a wire rack.

The Chewy Coconut Maple Cookies Are Ready To Eat!

Once the chewy coconut maple cookies are at room temperature, they will have firmed up slightly, and are ready to be enjoyed.

These delicious cookies are wonderfully chewy in texture, filled with coconut and pecans, and have GREAT flavor! Store any leftover cookies in an airtight container for 4-5 days at room temperature.

They also freeze very well, when wrapped in plastic and stored in an airtight container. They will thaw rather quickly because they are flat and thin!

A green plate filled with chewy coconut maple cookies ready to be eaten.

I really hope you enjoy these yummy cookies as much as we do! Unfortunately, they don’t ever seem to last very long at our house when I make them… ha ha!

Thanks for stopping by, and I invite you to come back soon for more family-friendly recipes. Take care, may God bless you, and have a GREAT day!

Looking For More COOKIE Recipes?

You can find ALL of my recipes in the Recipe Index, which is located at the top of the page. I have lots of yummy cookie recipes to choose from, including:

Want More Recipes? Get My FREE Newsletter!

I publish a newsletter 2 times per month (1st and 15th) with lots of recipes, tips, etc..
Would you like to join our growing list of subscribers?

There is a Newsletter subscription box on the top right (or bottom) of each blog post, depending on the device you use.
You can submit your e-mail address there, to be added to my mailing list.

Find Me On Social Media:

Facebook page: The Grateful Girl Cooks!
Pinterest:
The Grateful Girl Cooks!
Instagram:
jbatthegratefulgirlcooks

Author's signature

Recipe adapted from: “Taste of Home” magazine, Feb/Mar 1998 edition, page 45, published by Reiman Publications

↓↓ PRINTABLE RECIPE BELOW ↓↓

0 from 0 votes
Chewy Coconut Maple Cookies
Prep Time
10 mins
Cook Time
12 mins
Total Time
22 mins
 

Chewy Coconut Maple Coconut Cookies are easy to make yummy treats flavored with maple syrup, and filled with shredded coconut and pecans.

Category: Dessert
Cuisine: American
Keyword: chewy coconut maple cookies
Servings: 36 cookies
Calories Per Serving: 111 kcal
Author: JB @ The Grateful Girl Cooks!
Ingredients
  • ½ cup vegetable shortening
  • 1 cup packed dark brown sugar
  • ½ cup pure maple syrup
  • 1 large egg
  • ¾ teaspoon maple extract (can substitute vanilla extract)
  • cups all purpose flour
  • 2 teaspoons baking powder
  • ½ teaspoon salt
  • cups shredded coconut
  • ½ cup chopped pecans (can substitute walnuts)
Instructions
  1. Preheat oven to 375°F. (or 190.5°C.). Spray baking sheet(s) with cooking spray or line with silpat mats.

  2. Put shortening and brown sugar in mixing bowl. Use electric mixer to cream them until fully combined and fluffy. Add egg, maple syrup and maple extract. Beat until incorporated into the batter.

  3. Whisk flour, baking powder, and salt in a medium bowl. Add to creamed cookie batter; beat until combined. STIR in pecans until incorporated into the dough. Dough will be thick and "tacky" in texture.

  4. Drop dough by Tablespoonfuls onto prepared baking sheets. For 3 dozen cookies, use "level" Tablespoons. If you use "generous, rounded" Tablespoonfuls, you will get about 2 dozen big cookies. IMPORTANT: These cookies spread a LOT on the baking sheet, so leave at least 2" minimum space between cookies.

  5. Bake at 375°F. for 12-15 minutes. When done they should be golden brown, and bottom edges will be browned and "set". Remove cookies from oven; let cool 1-2 minutes on baking sheets, then transfer them to wire racks to finish cooling.

  6. Once at room temp., serve and enjoy! Store leftover cookies in airtight container at room temperature. Cookies freeze well, when wrapped in plastic and stored in an airtight container. They thaw quickly because they are flat and thin.

Recipe Notes

NOTES: Caloric calculation is based on level Tablespoon of dough (a yield of approx. 36 cookies). **If using rounded, generous Tablespoons of dough (a yield of approx. 24 larger cookies), the caloric calculation would obviously end up being more per cookie.** 

Nutrition Facts
Chewy Coconut Maple Cookies
Amount Per Serving (1 cookie)
Calories 111 Calories from Fat 45
% Daily Value*
Fat 5g8%
Saturated Fat 2g13%
Trans Fat 0.4g
Polyunsaturated Fat 1g
Monounsaturated Fat 2g
Cholesterol 5mg2%
Sodium 47mg2%
Potassium 67mg2%
Carbohydrates 15g5%
Fiber 0.5g2%
Sugar 10g11%
Protein 1g2%
Vitamin A 8IU0%
Vitamin C 0.04mg0%
Calcium 23mg2%
Iron 0.4mg2%
* Percent Daily Values are based on a 2000 calorie diet.

Here’s one more to pin to your Pinterest boards!Chewy Coconut Maple Coconut Cookies are easy to make yummy treats flavored with maple syrup, and filled with shredded coconut and pecans.

Irish Colcannon With Bacon

Make Irish Colcannon with Bacon, a classic dish of cabbage and potatoes, originating in Ireland. It’s a delicious dish, any time of the year!
Make Irish Colcannon with Bacon, a classic dish of cabbage and potatoes, originating in Ireland. It's a delicious dish, any time of the year!

Have you ever eaten Colcannon before? It is a dish created by combining potatoes and cabbage (or kale) with onions, butter, cream, salt and pepper. In this version, crispy cooked bacon is also included, for even more flavor!

Here in the United States colcannon is “typically” considered a St. Patricks Day dish, eaten in the Spring (March 17th), to commemorate this Irish holiday.

Did you know that in Ireland colcannon is associated primarily with harvest time in the Fall? Apparently traditional colcannon is more likely to be enjoyed in Ireland for Halloween, to celebrate their Fall harvest. I think that’s a really interesting thing to learn, and it surprised me!

All I do know is that Irish colcannon with bacon is delicious any time of year, it’s simple to prepare, and it fills us up! Here’s how to make it.

Scroll Down For A Printable Recipe Card At The Bottom Of The Page

Cook The Bacon

Use kitchen scissors or a knife to cut the bacon into small pieces. NOTE: Cutting the bacon into small pieces lets it cook a lot faster, and saves time!

Cook the bacon until it is very crisp, then drain the bacon on paper towels. Set aside. Leave 1 Tablespoon of bacon grease remaining in the skillet!

Small pieces of bacon are cooked until very crispy in a large skillet.Grease is drained and the crispy bacon cools on paper towels.

Cook The Veggies

Melt 1 Tablespoon of butter on Medium in the large skillet you used to cook the bacon. The butter will cook with the bacon grease remaining in the skillet (for added flavor).

Once the butter melts, add chopped onion, and cook it for 3-4 minutes, stirring often, until it becomes tender and translucent. Add the chopped green cabbage, and stir it into the onion mixture until incorporated. 

Chopped onion is cooked in bacon drippings and melted butter in skillet.Chopped cabbage is added to the cooked onions and butter in skillet.

Continue to cook the onion and cabbage mixture for about 6-7 minutes on Medium heat, stirring often, to prevent burning.

Chopped onions, butter and cabbage are cooked until tender.

Cook The Potatoes

Peel potatoes, cut them into chunks, and cover them with lightly salted water in a large saucepan. Bring the water to a boil on Medium-High heat. TIP: If you begin cooking the potatoes while you are cooking the veggies, you will save time!

Once the water boils, turn the heat down to Low and let the potatoes cook/simmer for about 18-20 minutes.

When done, the potatoes should be tender enough for a butter knife to be inserted easily. Drain the potatoes very well, then put them back into the large saucepan.

Immediately add 2 Tablespoons butter and heavy cream to the potatoes. Put a lid on the pan, and allow the butter to melt (without opening the lid).

Peeled, chunky potatoes cook in salted, boiling water until tender.

Butter and whipping cream are added to very hot, drained potatoes in pan.

Time To Put This Dish Together

Remove the lid from the saucepan of potatoes. They should still be hot. Use a potato masher (or a fork) to mash the potatoes (leaving some very small pieces!).

Now add the cabbage and onion mixture plus HALF of the crumbled bacon to the potatoes. Stir to combine, then season it with salt and black pepper, to taste.

Potatoes are mashed, then cabbage, onion and bacon are added to pan.

Serve Irish Colcannon With Bacon

Transfer the Irish colcannon with bacon to a pretty serving bowl. Sprinkle the top with the remaining half of the crumbled bacon.

Make a tiny well in the center of the colcannon, and add the last Tablespoon of butter to the well. Serve the Irish colcannon with bacon immediately while hot, and enjoy this delicious side dish!

The colcannon is absolutely delicious and we think it is very filling, too! It is a great accompaniment to a variety of meats, including beef, pork,  fish or chicken!

Irish colcannon with bacon is served hot with pat of butter on top.Salmon fillet is served with the Irish colcannon with bacon on plate.

I hope you have the opportunity to make Irish colcannon with bacon. It’s really quite good (thank you, Ireland!), and I trust you’ll enjoy it as much as we do.

Thank you so much for stopping by today. I invite you to come back again soon for more family-friendly recipes. Take care, may God bless you, and have a GREAT day.

Looking For More Recipes For St. Patrick’s Day?

You can find ALL of my recipes in the Recipe Index, which is located at the top of the page. I have a variety of recipes for St. Patrick’s Day to choose from, including:

Want More Recipes? Get My FREE Newsletter!

I publish a newsletter 2 times per month (1st and 15th) with lots of recipes, tips, etc..
Would you like to join our growing list of subscribers?

There is a Newsletter subscription box on the top right (or bottom) of each blog post, depending on the device you use.
You can submit your e-mail address there, to be added to my mailing list.

Find Me On Social Media:

Facebook page: The Grateful Girl Cooks!
Pinterest:
The Grateful Girl Cooks!
Instagram:
jbatthegratefulgirlcooks

Author's signature

Recipe adapted from (and with thanks to): Beth Pierce, at smalltownwoman.com

↓↓ PRINTABLE RECIPE BELOW ↓↓

0 from 0 votes
Irish Colcannon With Bacon
Prep Time
10 mins
Cook Time
30 mins
Total Time
40 mins
 

Make Irish Colcannon with Bacon, a classic dish of cabbage and potatoes, originating in Ireland. It's a delicious dish, any time of the year!

Category: Holidays, Side Dish, Vegetable Dish
Cuisine: Irish
Keyword: Irish colcannon with bacon
Servings: 6
Calories Per Serving: 327 kcal
Author: JB @ The Grateful Girl Cooks!
Ingredients
  • 4 slices bacon cooked crispy, crumbled *DIVIDED USE**
  • 4 Tablespoons butter **DIVIDED USE**
  • ½ cup chopped yellow onion
  • 3 cups grated green cabbage
  • 5 medium russet potatoes peeled, cut in chunks
  • cup heavy whipping cream
  • salt and black pepper, to taste
Instructions
  1. Cut bacon into small pieces; cook in large skillet until very crisp. Transfer to paper towels. Set aside. Leave 1 Tablespoon bacon grease in skillet for later!

  2. Melt 1 Tablespoon butter on Medium heat in skillet you used to cook the bacon (with remaining bacon grease). Once butter melts, add onion; cook 3-4 minutes, stirring often, until tender/translucent. Add cabbage, and stir until combined. Continue cooking onion/cabbage 6-7 minutes on Medium heat, stirring often, to prevent burning.

  3. Peel potatoes, cut into chunks; put in large saucepan and cover with lightly salted water. Bring water to a boil on Medium-High heat. TIP: If you begin cooking potatoes while cooking the veggies, you'll save time! Once boiling, turn heat down to Low; let potatoes simmer for 18-20 minutes. When done, potatoes should be tender enough for a butter knife to be inserted easily. Drain potatoes very well, then put them back into the saucepan. Immediately add 2 Tablespoons butter and cream to the potatoes. Put a lid on the pan; allow butter to melt (before opening the lid).

  4. Remove lid from saucepan. Use a potato masher (or fork) to mash the potatoes (leave some small pieces). Add cabbage/onions plus HALF the crumbled bacon to the potatoes. Stir to combine, then season with salt/pepper, to taste.

  5. Transfer colcannon to a serving bowl. Sprinkle with remaining half of the crumbled bacon. Make a small well in the center; add the last Tablespoon of butter to the well. Serve immediately while hot, and enjoy!

Nutrition Facts
Irish Colcannon With Bacon
Amount Per Serving (1 (1/6th of total))
Calories 327 Calories from Fat 162
% Daily Value*
Fat 18g28%
Saturated Fat 10g63%
Trans Fat 0.3g
Polyunsaturated Fat 2g
Monounsaturated Fat 6g
Cholesterol 45mg15%
Sodium 176mg8%
Potassium 863mg25%
Carbohydrates 36g12%
Fiber 3g13%
Sugar 3g3%
Protein 7g14%
Vitamin A 469IU9%
Vitamin C 24mg29%
Calcium 52mg5%
Iron 2mg11%
* Percent Daily Values are based on a 2000 calorie diet.

Here’s one more to pin on your Pinterest boards!Make Irish Colcannon with Bacon, a classic dish of cabbage and potatoes, originating in Ireland. It's a delicious dish, any time of the year!

Taco-Spiced Cheese Crackers

Make Taco-Spiced Cheese Crackers as a delicious snack! Recipe makes 12 (½ cup) servings of baked cheese crackers coated with seasoning sauce.

If you’re looking for a yummy snack that is REALLY EASY to make, check out this recipe for Taco-Spiced Cheese Crackers!

These taco-spiced snacks are made with store-bought cheese crackers (i.e. Cheese-Its). They’re combined with and coated in a 4 ingredient sauce and then baked for one hour. That’s it!

The result is a crisp, wonderfully flavored munchie that I’m confident you and your family (and friends) will enjoy! This recipe will produce about 6 cups in total, and the finished crackers will last for quite awhile, if stored in airtight containers!

Here’s how to make Taco-Spiced Cheese Crackers. Hope you like them!

Scroll Down For A Printable Recipe Card At The Bottom Of The Page

Make The Seasoning Sauce

Melt a stick of butter (½ cup) in a medium-sized saucepan on low heat. Once it has melted, add taco seasoning mix, Worcestershire sauce and salt, and stir well, until combined.

A stick of butter i melted in a medium pan.Taco seasoning mix, Worcestershire sauce and seasoned salt added to butter.

Season The Cheese Crackers

This mixture is the seasoning sauce that gives the cheese crackers their flavor! It doesn’t look like much, but it is a powerhouse of flavor.

The seasoning sauce is now ready to flavor the cheese crackers.

Pour the cheese crackers into a large mixing bowl, and then pour the warm seasoning sauce over them.

Add all the sauce, and then gently stir this mixture until all the crackers have been covered with the seasoning sauce.

Seasoning mix is poured over the cheese crackers in a large white bowl.All the cheese crackers are now coated with the seasoning sauce.

Bake The Taco-Spiced Cheese Crackers

Lay the seasoned crackers out on a very large baking sheet (13″ or 15″ long) with rimmed edges. If you don’t have access to a LARGE baking sheet, try cooking them in batches or on two small baking sheets.

Spread the crackers out on the pan, trying to put the crackers in a single layer, as much as possible. This helps spread them out so the sauce bakes (and dries) on them evenly!

Taco-spiced cheese crackers bake in a single layer on large cookie sheet.

Bake the taco-spiced cheese crackers at 250°F. for 1 hour. Give them a good stir, then re-position them on the baking sheet every 15 minutes while they bake.

Cool Then Serve The Taco-Spiced Cheese Crackers

When the crackers are finished baking, transfer them off the baking sheet and onto a large sheet of parchment or wax paper. Spread them out, and let them cool to room temperature.

After baking, the taco-spiced cheese crackers cool on parchment paper.Give the taco-spiced cheese crackers as a gift, in a jar with ribbon.

I hope you have the chance to make these delicious snack crackers, and trust you will enjoy them as much as we do!

Thank you for stopping by, and I invite you to come back soon for more family-friendly recipes. Take care, may God bless you, and have a GREAT day!

Looking For More SNACK Recipes?

Yu can find ALL of my recipes in the Recipe Index, which is located at the top of the page. I have a nice variety of snack recipes to choose from, including:

Want More Recipes? Get My FREE Newsletter!

I publish a newsletter 2 times per month (1st and 15th) with lots of recipes, tips, etc..
Would you like to join our growing list of subscribers?

There is a Newsletter subscription box on the top right (or bottom) of each blog post, depending on the device you use.
You can submit your e-mail address there, to be added to my mailing list.

Find Me On Social Media:

Facebook page: The Grateful Girl Cooks!
Pinterest:
The Grateful Girl Cooks!
Instagram:
jbatthegratefulgirlcooks

Author's signature

Original recipe source: “The Spirit Of Christmas Cookbook”, page 158, published in 1996 by Leisure Arts, Inc.

↓↓ PRINTABLE RECIPE BELOW ↓↓

0 from 0 votes
Taco-Spiced Cheese Crackers
Prep Time
5 mins
Cook Time
1 hr
Total Time
1 hr 5 mins
 

Make Taco-Spiced Cheese Crackers as a delicious snack! Recipe makes 12 (½ cup) servings of baked cheese crackers coated with seasoning sauce.

Category: Appetizer/Snack
Cuisine: American
Keyword: taco-spiced cheese crackers
Servings: 12 (½ cup per serving)
Calories Per Serving: 223 kcal
Author: JB @ The Grateful Girl Cooks!
Ingredients
  • 6 cups cheese crackers (small) (i.e. Cheese-Its - a 12.4 oz. package)
  • ½ cup butter (1 stick) melted
  • 1 oz. taco seasoning mix = 1 pkg.
  • 1 Tablespoon Worcestershire sauce
  • ½ teaspoon seasoning salt
Instructions
  1. Preheat oven to 250℉ / 121℃.

  2. Melt butter in a medium-sized saucepan on low heat. Once melted, add taco seasoning mix, Worcestershire sauce and salt. Stir well, until combined.

  3. Put the cheese crackers in a large bowl; pour seasoning sauce over them. Add all the sauce; gently stir this mixture until all the crackers are covered with sauce.

  4. Spread crackers out in a single layer a on large baking sheet (13" or 15" long) with rimmed edges. Bake the taco-spiced cheese crackers at 250°F. (or 121℃) for 1 hour. Give them a good stir, then re-position them on the baking sheet every 15 minutes while they bake.

  5. When crackers finish baking, transfer them onto parchment or wax paper. Spread them out; let them cool to room temperature before serving. Store crackers in airtight container at room temperature. Enjoy!

Nutrition Facts
Taco-Spiced Cheese Crackers
Amount Per Serving (1 (½ cup per serving))
Calories 223 Calories from Fat 144
% Daily Value*
Fat 16g25%
Saturated Fat 5g31%
Trans Fat 0.3g
Polyunsaturated Fat 4g
Monounsaturated Fat 4g
Cholesterol 20mg7%
Sodium 597mg26%
Potassium 44mg1%
Carbohydrates 19g6%
Fiber 0.4g2%
Sugar 1g1%
Protein 0.1g0%
Vitamin A 459IU9%
Vitamin C 1mg1%
Calcium 34mg3%
Iron 1mg6%
* Percent Daily Values are based on a 2000 calorie diet.

Here’s one more to pin on your Pinterest boards!Make Taco-Spiced Cheese Crackers as a delicious snack! Recipe makes 12 (½ cup) servings of baked cheese crackers coated with seasoning sauce.

Simple Savory Pork Chops

Simple Savory Pork Chops are an easy one skillet dish! Bone-in pork chops are pan-seared, then simmered until tender in a simple, tasty sauce.

Today I want to share a recipe for simple savory pork chops. They are a CINCH to make, and they taste fantastic, thanks in part to the flavor-packed sauce they are cooked in!

I discovered the original recipe in one of my old food magazines, and tweaked it slightly to suit our taste. This is a great recipe for whipping up a delicious meal with minimal effort or time involved.

The pork chops (bone-in) are pan-seared to get nicely browned, then they simmer in a covered skillet in an amazing sauce. By the way, did I mention that all that is involved in making the sauce is to stir the ingredients together? YEP. It’s EASY!

The pork chops come out really tender, and are served with some of that yummy sauce spooned over the top. They’re delicious, and here’s how to make this dish.

Scroll Down For A Printable Recipe Card At The Bottom Of The Page

Make The Savory Sauce

Combine water, chopped onion, orange marmalade, mustard powder, soy sauce, ketchup and Dijon mustard in a medium bowl.

Use a fork or spoon to stir these ingredients together until they have been fully combined. This is the sauce for the pork chops!

See how easy that was? I told ya! Set the sauce aside while you prepare the pork chops for cooking.

Ingredients for the savory sauce are placed in a small bowl.A savory sauce is made by combining ingredients in a bowl.

Dredge The Pork Chops

Now you are going to make a seasoned flour mixture that you will use to coat the pork chops. It is really easy to do this, too!

Measure all purpose flour, mustard powder, seasoning salt and black pepper onto a dinner sized plate. Use a fork to combine these ingredients, then spread them out on the plate.

Flour and several spices are combined to make a coating for the pork chops.

Pat the pork chops dry with paper towels. Now you will “dredge” or pull the pork chops (one at a time) through the seasoned flour mixture to coat each chop.

Coat the pork chop on all sides, then place it on a baking sheet and repeat this process with the other pork chops.

Each pork chop is dredged in the flour mixture to coat all sides.Four pork chops, coated with flour and spices, ready to be pan-seared.

Pan-Sear The Chops

Heat vegetable oil on Medium heat in a large skillet (big enough to lay all 4 pork chops down in a single layer).

When the oil is really hot (but not smoking), carefully lay the pork chops in the hot oil in a single layer. Do not move them for about 4 minutes.

The hot oil will pan-sear or brown the bottom of the pork chops. After 4 minutes, carefully turn the pork chops to the other side, and continue cooking for another 4 minutes.

Both sides of the pork chops should be nicely browned. They will finish cooking all the way through during the next step.

The seasoned pork chops cook in hot oil in a large skillet.After browning one side, pork chops are turned over to brown the other side.

Add Sauce And Cook The Pork Chops

Pour all of the sauce over the top of the pork chops. Cover the skillet. If there are any steam vents in the skillet lid, plug them with foil (as shown in the 2nd photo below).

Reduce the heat to Low, and simmer the pork chops for 23-25 minutes OR until they are tender. Do not remove the lid on the skillet while they cook.

NOTE: If you are using really THICK pork chops, it may take a few more minutes of cooking to produce a tender pork chop because of the thickness!

There’s no need to stir the pork chops while they simmer… just keep that lid on the skillet! 

Sauce is poured over the browned pork chops in the skillet.Skillet is covered, then pork chops simmer for about 25 minutes until tender.

Serve The Simple Savory Pork Chops

When the simple savory pork chops have finished cooking, they are ready to be served and enjoyed! Transfer the pork chops to individual plates.

Spoon the remaining sauce in the skillet over the top of each pork chop, then serve immediately. We enjoy the pork chops served with our homegrown green beans and au gratin potatoes on the side. YUM!

The pork chops turn out very tender, and we can usually cut them with a butter knife. They’re a convenient (and delicious) main dish because they are so easy to prepare!

Simple savory pork chops served on a plate with green beans and potatoes.Green beans, au gratin potatoes on plate with simple savory pork chops.

I really hope you enjoy these simple savory pork chops! We love the faint taste of orange that the sauce provides, and how easy it is to make such a delicious dish.

Thank you for stopping by, and I invite you to come back soon for more family-friendly recipes. Take care, may God bless you, and have a GREAT day!

Looking For More PORK CHOP Recipes?

You can find ALL of my recipes in the Recipe Index, located at the top of the page. I have a wonderful variety of pork chop recipes for you to choose from, including:

Want More Recipes? Get My FREE Newsletter!

I publish a newsletter 2 times per month (1st and 15th) with lots of recipes, tips, etc..
Would you like to join our growing list of subscribers?

There is a Newsletter subscription box on the top right (or bottom) of each blog post, depending on the device you use.
You can submit your e-mail address there, to be added to my mailing list.

Find Me On Social Media:

Facebook page: The Grateful Girl Cooks!
Pinterest:
The Grateful Girl Cooks!
Instagram:
jbatthegratefulgirlcooks

Author's signature

Original recipe source: “Taste of Home Magazine”, April/May 2001 edition, page 41, published by Reiman Publications

↓↓ PRINTABLE RECIPE BELOW ↓↓

0 from 0 votes
Simple Savory Pork Chops
Prep Time
15 mins
Cook Time
25 mins
Total Time
40 mins
 

Simple Savory Pork Chops are an easy one skillet dish! Bone-in pork chops are pan-seared, then simmered until tender in a simple, tasty sauce.

Category: Main Dish
Cuisine: All Cuisines
Keyword: savory pork chops
Servings: 4
Calories Per Serving: 428 kcal
Author: JB @ The Grateful Girl Cooks!
Ingredients
For Pork Chops:
  • 4 pork chops, bone-in about ¾" thick
  • 3 Tablespoons all purpose flour
  • 1 Tablespoon ground mustard (powder)
  • 1 teaspoon seasoning salt
  • ¼ teaspoon black pepper
  • 2 Tablespoons vegetable oil
For Sauce:
  • 1 cup water
  • ½ cup chopped yellow onion
  • 2 Tablespoons orange marmalade
  • 2 Tablespoons ketchup
  • 1 Tablespoon soy sauce low sodium, if possible
  • 1 Tablespoon Dijon mustard
  • 2 teaspoons ground mustard (powder)
Instructions
  1. Combine water, onion, orange marmalade, mustard powder, soy sauce, ketchup and Dijon mustard in a medium bowl. Stir until combined. Set aside.

  2. Measure flour, mustard powder, seasoning salt and pepper onto a dinner plate. Use a fork to combine ingredients; spread them out on the plate.

  3. Pat pork chops dry with paper towels. Dredge or pull pork chops (one at a time) through flour mixture to coat each chop on all sides. Place it on baking sheet; repeat with remaining pork chops.

  4. Heat oil on Medium in a large skillet. When oil is really hot (but not smoking), lay pork chops in skillet in a single layer. Oil should sizzle when you add the chops. Do not move them. Cook for 4 minutes. Carefully turn the pork chops to the other side; continue cooking another 4 minutes. Both sides should be nicely browned.

  5. Pour sauce over pork chops. Cover the skillet. Reduce heat to Low; simmer for 23-25 minutes OR until chops are tender. Do not remove the lid while they cook. Note: If using really THICK pork chops, it may take a few more minutes cooking to produce a tender pork chop!

  6. To serve, transfer pork chops to individual plates. Spoon sauce over the top of each pork chop; serve immediately. Enjoy!

Nutrition Facts
Simple Savory Pork Chops
Amount Per Serving (1 chop + sauce)
Calories 428 Calories from Fat 207
% Daily Value*
Fat 23g35%
Saturated Fat 6g38%
Trans Fat 0.2g
Polyunsaturated Fat 6g
Monounsaturated Fat 8g
Cholesterol 117mg39%
Sodium 938mg41%
Potassium 683mg20%
Carbohydrates 16g5%
Fiber 1g4%
Sugar 9g10%
Protein 37g74%
Vitamin A 59IU1%
Vitamin C 2mg2%
Calcium 56mg6%
Iron 2mg11%
* Percent Daily Values are based on a 2000 calorie diet.

Here’s one more to pin on your Pinterest boards!Simple Savory Pork Chops are an easy one skillet dish! Bone-in pork chops are pan-seared, then simmered until tender in a simple, tasty sauce.

Lime Jalapeño Salad Dressing

Make delicious Lime Jalapeño Salad Dressing in only 3-4 minutes. It has 5 ingredients and adds a zesty, fresh pop of flavor to green salads.

I am always looking for new and exciting salad dressings that I can make from scratch at home. Usually it costs less in the long run to make homemade salad dressings, especially with the cost of groceries recently!

This recipe for Lime Jalapeño Salad Dressing is one I found in an old cookbook of mine and tweaked the recipe slightly, to suit our taste.

It is simple salad dressing to prepare, and is a fresh, flavorful addition to mixed green salads. The total amount of salad dressing (as written) is enough for a big green salad (4 servings).

If you want to have more on hand, the recipe can EASILY be doubled or tripled to meet your needs. Here’s how to make it.

Scroll Down For A Printable Recipe Card At The Bottom Of The Page

What Are The Ingredients I Will Need?

To make this salad dressing you will need 5 ingredients. They are fresh lime juice (from 1 lime), vegetable oil, a small jalapeño pepper, a clove of garlic, and a small piece of fresh ginger.

Fresh lime juice (from one lime) is needed for the salad dressing.

Prepping The Jalapeño

This recipe, as written, calls for using ¼ of a small jalapeño pepper. The photos below are representative only, to show you what must be removed.

Remove the seeds (they contain the heat so don’t rub your eyes after handling them!). and finely dice the jalapeño.

Finely minced jalapeño pepper is used, after seeds have been removed.

Prep The Fresh Ginger

Peel a very small “knob” of fresh ginger. Once peeled, mince the small piece very finely with a knife OR use a microplane (shown in photo below) to do the same thing.

The amount of fresh ginger needed is very small (but necessary for the flavor of the salad dressing). Did you know you can freeze the leftover ginger and continue to use it over and over? Here’s how to freeze ginger.

Peeled , finely minced fresh ginger is used to make the salad dressing.

Make The Lime Jalapeño Salad Dressing

Now that the ingredients are prepped, the Lime Jalapeño Salad Dressing will come together in only a brief minute! 

Place the lime juice, oil, minced jalapeño pepper, garlic, and ginger in a small bowl. Use a fork and whisk these ingredients together until they are fully combined.

Salad dressing ingredients are stirred together until fully combined.

Once the salad dressing is fully mixed, it can be used immediately OR you can cover and store it in the refrigerator.

If you choose to refrigerate it right when it’s done, you will need to re-stir the ingredients well once again before you use it.

The Lime Jalapeño Salad Dressing is mixed and ready to top a green salad.

Serve And Enjoy!

When ready to use, give it a quick stir, then add the lime jalapeno salad dressing to any of your favorite mixed green salads.

The salad shown below (first photo) is a kale and sweet potato salad, and this simple, but this flavor-packed dressing pairs really well with it.

The salad dressing also compliments green salads with fresh fruit, because it compliments the sweet fruit well.

Lime Jalapeño Salad Dressing is poured over a kale salad with sweet potatoes.A green salad with fresh fruit is complimented well with the salad dressing.

Hope you give this unique (but delicious) salad dressing a try, and trust you’ll enjoy it! It’s such a simple recipe, but it tastes really good on a cold, crisp green salad.

Thanks for stopping by, and please come back again soon for more family-friendly recipes. Take care, may God bless you, and have a GREAT day!

Looking For More SALAD DRESSING Recipes?

You can find ALL of my recipes in the Recipe Index, which is located at the top of the page. I have quite a few homemade salad dressing recipes to choose from, including:

Want More Recipes? Get My FREE Newsletter!

I publish a newsletter 2 times per month (1st and 15th) with lots of recipes, tips, etc..
Would you like to join our growing list of subscribers?

There is a Newsletter subscription box on the top right (or bottom) of each blog post, depending on the device you use.
You can submit your e-mail address there, to be added to my mailing list.

Find Me On Social Media:

Facebook page: The Grateful Girl Cooks!
Pinterest:
The Grateful Girl Cooks!
Instagram:
jbatthegratefulgirlcooks

Author's signature

Salad dressing recipe adapted from: “Year Round Fresh”, page 184, published by WW International, Inc. in 2018

↓↓ PRINTABLE RECIPE BELOW ↓↓

0 from 0 votes
Lime Jalapeño Salad Dressing
Prep Time
5 mins
Cook Time
0 mins
Total Time
5 mins
 

Make delicious Lime Jalapeño Salad Dressing in only 3-4 minutes. It has 5 ingredients and adds a zesty, fresh pop of flavor to green salads.

Category: Salad Dressing
Cuisine: All Cuisines
Keyword: lime jalapeño salad dressing
Servings: 4
Calories Per Serving: 27 kcal
Author: JB @ The Grateful Girl Cooks!
Ingredients
  • Tablespoons fresh lime juice
  • teaspoons vegetable oil or other neutral oil
  • ¼ teaspoon fresh minced ginger finely minced
  • ¼ small fresh jalapeño pepper seeded, finely minced
  • ½ small garlic clove finely minced
Instructions
  1. Place the lime juice, oil, minced jalapeño pepper, garlic, and ginger in a small bowl.

  2. Use a fork to whisk these ingredients together for about a minute until they're fully combined.

  3. Once fully mixed, it can be used immediately OR cover and store it in the refrigerator. If refrigerate it right when it's done, you will need to re-stir the ingredients well before you use it. Serve, and enjoy.

Nutrition Facts
Lime Jalapeño Salad Dressing
Amount Per Serving (1 (1/4 of total))
Calories 27 Calories from Fat 27
% Daily Value*
Fat 3g5%
Saturated Fat 0.4g3%
Trans Fat 0.02g
Polyunsaturated Fat 2g
Monounsaturated Fat 1g
Sodium 0.2mg0%
Potassium 11mg0%
Carbohydrates 1g0%
Fiber 0.1g0%
Sugar 0.1g0%
Protein 0.1g0%
Vitamin A 12IU0%
Vitamin C 3mg4%
Calcium 2mg0%
Iron 0.01mg0%
* Percent Daily Values are based on a 2000 calorie diet.

Here’s one more to pin on your Pinterest boards!Make delicious Lime Jalapeño Salad Dressing in only 3-4 minutes. It has 5 ingredients and adds a zesty, fresh pop of flavor to green salads.


Lemon Meltaway Cookies

Lemon Meltaway Cookies are delicious, light and fluffy cookies with creamy lemon frosting that melt in your mouth as you eat them!

Yum. Yum. Yum. That’s how I describe these cookies (in between my big bites, of course!). Lemon meltaway cookies are a great cure for the wintertime blues! They have a wonderful pop of bright citrus flavor packed into a feather soft cookie!

The best part is they’re simple to make, and I’m positive you will love them as much as we do! Here’s how to make these melt in your mouth cookies.

Scroll Down For A Printable Recipe Card At The Bottom Of The Page

Make The Cookie Dough

Place butter and powdered sugar in a mixing bowl, and cream them until this mixture becomes fluffy in texture. Add lemon juice, and beat until it’s incorporated in the dough.

Combine all purpose flour and cornstarch in a medium bowl, and slowly add this to the dough, a little at a time. Continue to beat the dough on low speed as you add it.

Soft butter and powdered sugar are beaten until fluffy.Lemon juice, flour and cornstarch are added to the butter mixture in bowl.

The dough will be very thick. Use your hands to bind it together into a large ball of dough, and place it on a large sheet of wax paper.

A soft, crumbly dough is formed in the mixing bowl.

A ball of dough for the lemon meltaway cookies is formed.

Cut And Roll Dough, Then Refrigerate

Divide the dough in half, then shape the two pieces into two rectangles, each about 8″ long and a couple inches wide.

Wrap each “log” tightly in plastic wrap, then place them on a baking sheet and refrigerate for 2 hours OR until the dough is very firm.

Cookie dough is cut in half, then rectangular logs of dough are rolled.The cookie dough logs are wrapped and refrigerated for 2 hours.

Slice And Bake

Preheat your oven to 350°F. (or 176.66°C.) before slicing the cookie dough.

Unwrap one dough “log” at a time after the dough is firm and well-chilled (keep the other in the refrigerator). Place the dough “log” on a cutting board and cut it into slices ¼” wide, using a sharp knife.

Position the slices 2″ apart on large, ungreased cookie sheets. Repeat with the other dough “log” until all dough is sliced, and ready for baking.

It’s okay to cook the lemon meltaway cookies in batches, but keep the remaining dough chilled while the other cookies bake.

Each chilled dough log is cut into thin slices.The cookies (which look like large French fries) are put on baking sheet.

Bake The Cookies

Bake the cookies at 350°F. (or 176.66°C.) for 8-12 minutes. Oven temps can vary, so check them at 8 minutes, then cook longer, if necessary. Mine usually take 10 minutes in our oven.

When they’re done, the cookies should be fairly firm to the touch, and should be pale in color (not browned).

Lemon Meltaway Cookies look like shortbread, but are actually quite delicate, so be gentle with them! Carefully transfer the cookies to a wire rack to cool completely before frosting.

After baking, the lemon meltaway cookies cool on a wire rack.

Make The Lemon Frosting

Make the lemon frosting while the cookies cool. Place soft butter, powdered sugar, lemon juice, grated lemon peel, and a few drops of yellow food coloring in a bowl.

NOTE: the food coloring is optional, but adds some nice color to the cookies, so I recommend it!

Use a spoon OR an electric mixer to combine the frosting ingredients until very smooth. Set the bowl aside until the cookies are completely cooled.

Carefully frost the cookies on top… remember they’re soft and fragile! Divide the frosting evenly so you have enough to cover all the cookies. Let the cookies rest for awhile to give the frosting time to become firm.

Yellow lemon frosting is made by mixing ingredients in a small bowl.

Lemon frosting is spread on the lemon meltaway cookies before serving.

Time To Serve The Lemon Meltaway Cookies!

When the frosting has firmed up, the lemon meltaway cookies are ready to be enjoyed! Take a bite and see why they are called “meltaway” cookies.

They are so soft they practically melt in your mouth, AND they have wonderful lemon flavor. I’m sure you (and those you love) will enjoy these unique cookies.

A white plate with several lemon meltaway cookies, ready for eating.

We love these lemon meltaway cookies, and hope you will, too! The way they melt in your mouth will probably surprise you, which is always fun!

Thanks for stopping by, and I invite you to come back soon for more family-friendly recipes. Take care, may God bless you, and have a GREAT day!

Looking For More COOKIE Recipes?

You can find ALL of my recipes in the Recipe Index, which is located at the top of the page. I have some delectable cookie recipes to choose from, including:

Want More Recipes? Get My FREE Newsletter!

I publish a newsletter 2 times per month (1st and 15th) with lots of recipes, tips, etc..
Would you like to join our growing list of subscribers?

There is a Newsletter subscription box on the top right (or bottom) of each blog post, depending on the device you use.
You can submit your e-mail address there, to be added to my mailing list.

Find Me On Social Media:

Facebook page: The Grateful Girl Cooks!
Pinterest:
The Grateful Girl Cooks!
Instagram:
jbatthegratefulgirlcooks

Author's signature

Recipe Adapted From: “Taste of Home Magazine” Feb./Mar. 2004 edition, page 10, published by Reiman Publications, Inc.

↓↓ PRINTABLE RECIPE BELOW ↓↓

0 from 0 votes
Lemon Meltaway Cookies
Prep Time
10 mins
Cook Time
10 mins
Refrigeration Time (inactive prep)
2 hrs
Total Time
2 hrs 20 mins
 

Lemon Meltaway Cookies are delicious, light and fluffy cookies with creamy lemon frosting that melt in your mouth as you eat them!

Category: Dessert
Cuisine: All Cuisines
Keyword: lemon meltaway cookies
Servings: 40 cookies
Calories Per Serving: 77 kcal
Author: JB @ The Grateful Girl Cooks!
Ingredients
For Cookie Dough:
  • ¾ cup butter (softened)
  • cup powdered sugar
  • 1 teaspoon fresh lemon juice
  • cups all purpose flour
  • ½ cup cornstarch
For Lemon Frosting:
  • ¼ cup butter (softened)
  • 1 cup Powdered sugar
  • teaspoons fresh lemon juice
  • teaspoons lemon zest finely grated yellow peel
  • 2-3 drops yellow food color optional, but pretty
Instructions
  1. Cream butter and powdered sugar in a mixing bowl, and until fluffy in texture. Add lemon juice; beat until incorporated.

  2. Combine flour and cornstarch in a bowl; add this to butter mixture, a little at a time. Continue to beat on low speed as you add it. Remove dough from bowl. Use hands to shape it into a firm ball of dough; place it on large sheet of wax paper.

  3. Divide dough in half; shape each piece into rectangle, 8" long and a couple inches wide. Seal each "log" in plastic wrap; place them on a baking sheet. Refrigerate for 2 hours OR until dough is very firm.

  4. Preheat oven to 350℉. ( or 176.66℃.).

  5. Unwrap 1 log at a time (keep the other in refrigerator). Place "log" on cutting board. Cut it into slices ¼" wide, using a sharp knife. Place slices 2" apart on large, ungreased cookie sheets. Repeat with remaining dough. If cooking in batches, keep remaining dough chilled while cookies bake.

  6. Bake at 350°F. (or 176.66°C.) for 8-12 minutes. Oven temps can vary, so check them at 8 minutes, then cook longer, if necessary. When done, cookies should be firm to the touch, and pale in color (not browned). Carefully transfer cookies (they're fragile) to a wire rack; cool completely before frosting.

  7. Make lemon frosting while cookies cool. Put soft butter, powdered sugar, lemon juice, grated lemon peel, and 2-3 drops of yellow food coloring in a bowl. Use a spoon OR mixer to combine frosting ingredients until smooth. Set bowl aside. Carefully frost cookies once cooled... remember they're soft and fragile! Let frosting firm up before serving. Enjoy!

Nutrition Facts
Lemon Meltaway Cookies
Amount Per Serving (1 frosted cookie)
Calories 77 Calories from Fat 45
% Daily Value*
Fat 5g8%
Saturated Fat 3g19%
Trans Fat 0.2g
Polyunsaturated Fat 0.2g
Monounsaturated Fat 1g
Cholesterol 12mg4%
Sodium 37mg2%
Potassium 6mg0%
Carbohydrates 8g3%
Fiber 0.1g0%
Sugar 4g4%
Protein 0.5g1%
Vitamin A 142IU3%
Vitamin C 0.2mg0%
Calcium 2mg0%
Iron 0.2mg1%
* Percent Daily Values are based on a 2000 calorie diet.

Here’s one more to pin on your Pinterest boards!

Lemon Meltaway Cookies are delicious, light and fluffy cookies with creamy lemon frosting that melt in your mouth as you eat them!


Chocolate Chip Bagels

Make homemade NY-style Chocolate Chip Bagels at home. They’re filled with mini chocolate chips, and are absolutely delicious! Recipe makes 8.
Make homemade NY-style Chocolate Chip Bagels at home. They're filled with mini chocolate chips, and are absolutely delicious! Recipe makes 8.

Do you enjoy bagels? We REALLY do, and over the years I have made quite a few varieties of them. I always make them NY style which means you boil the bagels first, BEFORE baking them.

This technique gives the bagels a wonderful, chewy texture, which is the trademark of a great bagel, in my opinion! Add lots of mini semi-sweet chocolate chips inside, and you’ve got yourself a fantastic bagel!

These chocolate chip bagels taste wonderful, and honestly, they are fairly simple to make, with only a few kitchen ingredients. Once you make a batch successfully, you may never go back to store-bought! Here’s how to make them.

Scroll Down For A Printable Recipe Card At The Bottom Of The Page

Make The Bagel Dough

Dissolve yeast and granulated sugar in ½ cup of very warm water (110°F / 43.33°C). If the water is too hot, it can “kill off” the yeast (and you do NOT want that!). Once dissolved, let the mixture rest for about 5 minutes.

After 5 minutes, you should see tiny bubbles forming on top, which indicate the yeast is “good and alive”. Hooray, because that is a GOOD thing!

In a large bowl (or a stand mixer bowl), combine all purpose flour and salt. Make a “deep well” in the center of the flour mixture, then slowly pour the yeast liquid into the “well”. Add the remaining ½ cup of water at this time, as well.

Yeast, sugar and water are combined for 5 minutes in a mixing bowl.Yeast mixture is added to the well of a flour and salt mixture.

Use an electric mixer with a dough hook (*see note below) to incorporate the yeast mixture and water into the flour mixture. The dough will be fairly sticky and thick when it has been combined.

*NOTE: If you don’t have a dough hook, no problem! Simply knead the dough by hand, incorporating the liquid into the dough until fully combined. Yes, it is a bit messy, but you’ll get it done.

STIR the mini chocolate chips in until they are evenly distributed in the dough. Transfer the dough from the bowl onto a floured work surface.

Mini chocolate chips are added and stirred into the bagel dough.The chocolate chip bagel dough is put on a floured surface to knead.

Knead, Then Let The Dough Rise 

Knead the dough, using the palms of your hands for 3-5 minutes, rotating the dough as you knead it. Sprinkle dough and/or surface with additional flour (if necessary) so it doesn’t stick.

When done, the dough should be soft and elastic, and shaped in a nice, round ball. Grease or spray a large bowl on the bottom and sides, and place the dough ball in it.

Flip the dough over so that both sides have some of the spray or grease on them. Cover the bowl with plastic wrap and place it in a warm place, free from drafts. 

After kneading, dough is placed in greased bowl and covered, to let rise.

Shape And Cut The Dough

Let the dough rise until it has doubled in size (about 1½ hours). Turn the dough out onto a lightly floured surface, and lightly sprinkle the top of the dough with flour, as well. Lightly shape the dough into a circle.

Use a sharp knife (or pizza cutter) to divide the dough into 8 portions (approx. the same size). It’s easy to cut them into equal-sized wedges before rolling them into a ball.

The risen dough is placed on a lightly floured surface to cut into 8 pieces.A knife is used to cut the dough into 8 equal-sized pieces.

Remove a piece and shape it into a ball, by pulling the edges of the dough to the underside of the dough, resulting in a smooth ball.

With floured hands, take both of your thumbs and press into the center of each dough ball. Form a hole, and stretch the hole slightly to form a bagel shape. You can even pick up the bagel and enlarge the hole from the bottom.

Place the bagels on parchment or wax paper once they’re formed. Repeat until all 8 bagels are done, then cover them with a dish towel, and let the dough rest for 30 minutes.

TIP: Keep the holes open in the dough. You may need to stretch the holes out as the dough rests and slightly rises.

Each piece of dough is formed into a bagel shape.

Boil The Bagels

While the dough rests, preheat your oven to 425°F / 218.33°C. Bring a large stockpot of water to a rolling boil.

Boil the bagels (3 at a time) for about 3 minutes, turning them over halfway after 1½ minutes. The bagels should float to the top of the water when done. 

When they finish boiling, transfer the bagels to a large, ungreased baking sheet, leaving space between each one. Repeat until all the bagels have been boiled.

Chocolate chip bagels are boiled, 3 at a time, before baking.

Bake The Chocolate Chip Bagels

Bake the chocolate chip bagels at 425°F. for 20-24 minutes, or until they’re cooked through and are nicely browned on top.

Boiled chocolate chip bagels on a baking sheet, ready for the oven.Eight chocolate chip bagels, straight from the oven after baking.

Serve The Chocolate Chip Bagels

Transfer the chocolate chip bagels from the baking sheet to a wire rack to cool down a bit, before slicing or serving.

A close up of one of the chocolate chip bagels on a wire rack.

Once sliced in half, you can clearly see all those yummy chocolate chips inside the bagels. We usually slice them in half and broil them in the oven, then slather them with soft cream cheese. YUM!

Cutting the bagels in half shows all the chocolate chips inside.Cream cheese was spread on two toasted bagel halves, and are ready to eat.

We absolutely love these chocolate chip bagels. They turn out looking like store bought bagels, and they are wonderfully chewy and delicious, wither plain or toasted!

A chocolate chip bagel, filled with cream cheese, ready to be eaten.

I hope you have the chance to make these scrumptious chocolate chip bagels. It sure costs less to make eight homemade bagels than it currently costs to buy them at a bakery!

Thank you for stopping by today, and I invite you to come back soon for more family-friendly recipes. Take care, may God bless you, and have a great day.

Looking For More BAGEL Recipes?

You can find ALL of my recipes in the Recipe Index, which is located at the top of the page. I have a great variety of bagel recipes to choose from, including:

Want More Recipes? Get My FREE Newsletter!

I publish a newsletter 2 times per month (1st and 15th) with lots of recipes, tips, etc..
Would you like to join our growing list of subscribers?

There is a Newsletter subscription box on the top right (or bottom) of each blog post, depending on the device you use.
You can submit your e-mail address there, to be added to my mailing list.

Find Me On Social Media:

Facebook page: The Grateful Girl Cooks!
Pinterest:
The Grateful Girl Cooks!
Instagram:
jbatthegratefulgirlcooks

Author's signature

↓↓ PRINTABLE RECIPE BELOW ↓↓

0 from 0 votes
Chocolate Chip Bagels
Prep Time
30 mins
Cook Time
22 mins
INACTIVE Prep Time (dough rising)
2 hrs
Total Time
2 hrs 52 mins
 

Make homemade NY-style Chocolate Chip Bagels at home. They're filled with mini chocolate chips, and are absolutely delicious!

Category: Bread, Breakfast, Snack
Cuisine: All Cuisines
Keyword: chocolate chip bagels
Servings: 8
Calories Per Serving: 342 kcal
Author: JB @ The Grateful Girl Cooks!
Ingredients
  • teaspoons active dry yeast = one 0.25 oz. pkg.
  • 2 Tablespoons granulated sugar
  • cups warm water (at 110℉), divided ** see NOTE below
  • cups all purpose flour
  • teaspoons salt
  • ¾ cup mini semi-sweet chocolate chips
Instructions
  1. Whisk yeast and granulated sugar in ½ cup of warm water (110°F / 43.33°C). Once dissolved, let rest for 5 minutes. You should see bubbles form on top, which indicate the yeast is alive.

  2. In a large bowl (or stand mixer bowl), combine flour and salt. Make a "deep well" in center of the flour; pour yeast liquid into the "well", then add remaining ½ cup warm water. Use electric mixer with a dough hook (* see NOTE below) to incorporate yeast mixture and water. Dough will be thick (and sticky). *NOTE: If you don't have a dough hook, knead the dough by hand, incorporating liquid into the dough until fully combined. STIR in chocolate chips until evenly distributed. Transfer dough onto a lightly floured surface.

  3. Knead the dough for 3-5 minutes, using palms of your hands, rotating dough as you knead. Sprinkle dough and/or surface with flour (if necessary) so it doesn't stick. When done, dough should be soft and elastic, and shaped in a nice, round ball. Grease / spray a large bowl on bottom and sides; place dough ball in it. Flip dough over so both sides have spray or grease. Cover bowl with plastic wrap; place bowl in a warm spot, free from drafts. 

  4. Let dough rise until doubled in size (about 1½ hours). Turn dough out onto a lightly floured surface; lightly sprinkle dough with flour, as well. Gently shape dough into a circle. Use knife (or pizza cutter) to divide into 8 equal size pieces.

  5. Shape each piece into a ball, by pulling the edges of the dough to the underside , resulting in a smooth ball. With floured hands, take both thumbs and press into the center of each dough ball. Form a hole, and stretch the hole slightly to form a bagel shape. You can pick up the bagel and enlarge the hole from the bottom. Place bagels on parchment or wax paper once formed. Repeat until all bagels are done. Cover them with a dish towel, and let rest for 30 minutes. TIP: Keep holes open in bagels. You may need to re-stretch holes as dough rests and slightly rises.

  6. While dough rests, preheat oven to 425°F / 218.33°C. Bring large stockpot of water to a rolling boil. Boil bagels (3 at a time) for a total of 3 minutes, flipping them over after 1½ minutes. Bagels should float to the top when done. Transfer boiled bagels to a large, ungreased baking sheet, leaving space between each.

  7. Bake at 425°F. for 20-24 minutes, or until cooked through and golden brown. Transfer bagels to wire rack to cool, before slicing or serving. Enjoy!

Nutrition Facts
Chocolate Chip Bagels
Amount Per Serving (1 bagel)
Calories 342 Calories from Fat 81
% Daily Value*
Fat 9g14%
Saturated Fat 5g31%
Trans Fat 0.02g
Polyunsaturated Fat 0.5g
Monounsaturated Fat 3g
Cholesterol 1mg0%
Sodium 442mg19%
Potassium 193mg6%
Carbohydrates 57g19%
Fiber 3g13%
Sugar 11g12%
Protein 7g14%
Vitamin A 11IU0%
Vitamin C 0.003mg0%
Calcium 24mg2%
Iron 4mg22%
* Percent Daily Values are based on a 2000 calorie diet.

Here’s one more to p[in on your Pinterest boards!Make homemade NY-style Chocolate Chip Bagels at home. They're filled with mini chocolate chips, and are absolutely delicious!


Szechuan Shrimp Stir-Fry

Szechuan Shrimp Stir-Fry is a delicious meal for four, featuring shrimp, a variety of fresh vegetables, cooked in an Asian-inspired sauce.

If you’re looking for an absolutely delicious Asian main dish, may I suggest this one for Szechuan Shrimp Stir-Fry? I use a sauce from another of my recipes, then added my own touch using lots of fresh veggies to make a delicious stir-fry.

Yes, the ingredient list is fairly long, but please don’t let that stop you from making this dish. Most of the ingredients are the variety of fresh veggies used and the ingredients for the sauce which gives everything its great flavor!

The recipe itself is very straightforward to make: You stir the sauce ingredients together (super-easy), cook veggies, cook shrimp, combine all, heat and serve.

Your prep work (chopping veggies, mostly) will result in an amazing Asian-inspired dinner I truly believe you’re gonna LOVE! Here’s how to make this yummy meal.

Scroll Down For A Printable Recipe Card At The Bottom Of The Page

Make The Szechuan Sauce

The homemade Szechuan sauce is the powerhouse flavor for this entire dish, and it is incredibly simple to make.

Stir dry sherry (or cooking sherry), soy sauce, sugar, salt, ketchup, sweet chili sauce, and red pepper flakes together in a bowl until the sugar dissolves. Set the bowl aside. That’s it… I told you it was EASY!

A Szechuan sauce is made by combining several ingredients in a bowl.

Cook The Vegetables

Heat olive oil on Medium-High heat in a large skillet or wok. Once the oil is really hot (but not smoking) add the vegetables.

For this recipe I use broccoli, celery, cauliflower, carrot, and red and yellow bell peppers. All of them are prepared ahead of time by separating into small florets, slicing and/or or chopping, which can be done ahead of time!

Stir-fry the veggies for 4-5 minutes, stirring often until they become crisp-tender. Once done, transfer them out of the pan and into a bowl. Set aside.

Don’t rinse off the pan (or wok). This is the same pan you will finish the entire stir-fry in, so keep it handy on the stove top.

A variety of chopped vegetables are stir-fried in hot oil in a pan.Stir-fried vegetables are cooked until slightly tender in pan.

About The Shrimp

I use frozen, tail-off, peeled and deveined pre-cooked large shrimp for this recipe, and thaw them. This is a very convenient way to save time and effort in preparing the shrimp!

Once the shrimp have thawed, drain off any accumulated liquid, then pat them dry with paper towels before proceeding with the recipe.

Frozen pre-cooked shrimp are thawed, then patted dry before cooking.

On Your Mark, Get Set… And Go!

Get all the ingredients ready to go before beginning to make the whole stir-fry. Once you’re at this point, the cooking will go very quickly, so it’s important to have everything ready to go!

All ingredient components are ready to make the Szechuan shrimp stir-fry.

Time To Make The Stir-Fry

Heat olive oil on Medium-High in the large skillet (or wok). Add the shrimp, green onions, and minced ginger and cook, stirring often for 2-3 minutes.

Add minced garlic to the shrimp, and continue to cook for another minute, stirring often so the garlic doesn’t burn and become bitter.

Now add the previously cooked veggies back into the skillet, and stir to combine these ingredients. Cook until heated through (1-2 minutes).

Shrimp are stir-fried with green onions, fresh ginger, and garlic.The cooked vegetables are added back into the stir-fried shrimp.

Pour the Szechuan sauce into the skillet, and stir, to fully coat all the shrimp and vegetables with sauce. Continue to cook for about 1-2 minutes, or until everything is fully heated through.

Once heated through, the Szechuan Shrimp Stir-Fry is ready to serve and be enjoyed!

Szechuan sauce is added to the vegetables and shrimp in pan.Once heated through, the Szechuan Shrimp Stir-Fry is ready to serve.

Serve The Szechuan Shrimp Stir-Fry

Serve the stir-fry over hot steamed rice OR cooked noodles, whichever you prefer. There is enough stir-fry for four servings, so divide it evenly between four bowls or plates.

OPTIONAL GARNISH: If desired, garnish each portion with white sesame seeds and/or additional sliced green onions before serving.

We enjoy Szechuan shrimp stir-fry served over steamed white rice. The well-seasoned stir-fry pairs well with bland white rice, which also soaks up some of the sauce!

A white bowl with white rice, topped with the Szechuan Shrimp Stir-Fry.

I really hope you enjoy this recipe… we sure do! It will keep for 1-2 days in the refrigerator after cooking, and can easily be reheated in a microwave.

Thank you for stopping by, and I invite you to come back soon for more family-friendly recipes. Take care, may God bless you, and have a GREAT day!

Looking For More SHRIMP Recipes?

You can find ALL of my recipes in the Recipe Index, located at the top of the page. I have a nice variety of recipes featuring shrimp, including:

Want More Recipes? Get My FREE Newsletter!

I publish a newsletter 2 times per month (1st and 15th) with lots of recipes, tips, etc..
Would you like to join our growing list of subscribers?

There is a Newsletter subscription box on the top right (or bottom) of each blog post, depending on the device you use.
You can submit your e-mail address there, to be added to my mailing list.

Find Me On Social Media:

Facebook page: The Grateful Girl Cooks!
Pinterest:
The Grateful Girl Cooks!
Instagram:
jbatthegratefulgirlcooks

Author's signature

↓↓ PRINTABLE RECIPE BELOW ↓↓

0 from 0 votes
Szechuan Shrimp Stir-Fry
Prep Time
15 mins
Cook Time
10 mins
Total Time
25 mins
 

Szechuan Shrimp Stir-Fry is a delicious meal for four, featuring shrimp, a variety of fresh vegetables, cooked in an Asian-inspired sauce.

Category: Main Dish, Seafood
Cuisine: Asian
Keyword: Szechuan shrimp stir-fry
Servings: 4
Calories Per Serving: 237 kcal
Author: JB @ The Grateful Girl Cooks!
Ingredients
For Szechuan Sauce:
  • 2 Tablespoons dry sherry or sherry cooking wine
  • 2 Tablespoons soy sauce
  • Tablespoons ketchup
  • 2 Tablespoons sweet chili sauce (i.e. Mae Ploy)
  • 2 teaspoons granulated sugar
  • 1 teaspoon red chili pepper flakes
  • ½ teaspoon salt
For Vegetables:
  • 1 Tablespoon olive oil
  • ¾ cup broccoli florets
  • ½ cup cauliflower florets
  • ½ cup sliced celery
  • 1 medium carrot peeled, thinly sliced
  • ½ red bell pepper chopped
  • ½ yellow bell pepper chopped
For Shrimp:
  • 1 pound large cooked shrimp peeled, deveined, tail off
  • 1 Tablespoon olive oil
  • ¼ cup sliced green onion (stem and bulb, thinly sliced)
  • 2 Tablespoons fresh minced ginger
  • 2 teaspoons minced garlic
For Optional Garnish: sesame seeds/ additional green onion slices
    Instructions
    1. Stir sherry, soy sauce, sugar, salt, ketchup, sweet chili sauce, and red pepper flakes together in a bowl until sugar dissolves. Set aside.

    2. Heat oil on Medium-High heat in large skillet or wok. Once hot (but not smoking) add vegetables. Stir-fry 4-5 minutes, stirring often until they're crisp-tender. Transfer veggies out of skillet into a bowl. Set aside. Don't rinse pan (or wok).

    3. Pat thawed, drained shrimp dry with paper towels.

    4. Heat oil on Medium-High in large skillet (or wok). Add shrimp, green onions, and minced ginger; cook, stirring often, for 2-3 minutes. Stir in minced garlic; continue to cook for 1 minute, stirring often so garlic doesn't burn. Add cooked veggies, stirring until combined. Cook until ingredients are heated through (1-2 minutes).

    5. Pour sauce into skillet and stir, to coat shrimp/vegetables with sauce. Continue to cook 1-2 minutes, or until everything is heated through. Remove from heat.

    6. Serve over hot rice OR cooked noodles. OPTIONAL: If desired, garnish each serving with sesame seeds and/or additional sliced green onions. Enjoy!

    Recipe Notes

    NOTE: Caloric calculation does not include rice or noodles, as the type or quantity you use may vary.

    Nutrition Facts
    Szechuan Shrimp Stir-Fry
    Amount Per Serving (1 (1/4 of total))
    Calories 237 Calories from Fat 72
    % Daily Value*
    Fat 8g12%
    Saturated Fat 1g6%
    Trans Fat 0.01g
    Polyunsaturated Fat 1g
    Monounsaturated Fat 5g
    Cholesterol 183mg61%
    Sodium 925mg40%
    Potassium 643mg18%
    Carbohydrates 17g6%
    Fiber 2g8%
    Sugar 10g11%
    Protein 25g50%
    Vitamin A 3465IU69%
    Vitamin C 71mg86%
    Calcium 110mg11%
    Iron 1mg6%
    * Percent Daily Values are based on a 2000 calorie diet.

    Here’s one more to pin on your Pinterest boards!Szechuan Shrimp Stir-Fry is a delicious meal for four, featuring shrimp, a variety of fresh vegetables, cooked in an Asian-inspired sauce.

    Chocolate Covered Krispie Hearts

    Make Chocolate Covered Krispie Hearts for Valentines Day or any time! Chewy treats covered in chocolate are a fun way to say “I Love You”.
    Make Chocolate Covered Krispie Hearts for Valentines Day or any time! Chewy treats covered in chocolate are a fun way to say "I Love You".

    It seems like most people still enjoy traditional Rice Krispy treats, right? These chewy, decadent little snacks have been around since my childhood, and they’re a classic treat kids of all ages enjoy!

    I decided to experiment and make a small amount in heart shapes for Valentines Day and cover them with chocolate. For fun, I made some hearts red-colored and some a traditional chocolate color!

    After making the treats, I cut them out with a heart-shaped cookie cutter and covered each heart with melted chocolate. The two types of chocolate I use are red chocolate candy melts and milk chocolate candy melts, which can be purchased at most large craft stores.

    Top the chocolate covered hearts with a few colorful sprinkles as garnish, and they’re done! These delicious treats stay chewy and crispy on the inside, with a festive, colorful outside coating! YUM! Here’s how to make chocolate covered krispie treats.

    Scroll Down For a Printable Recipe Card At The Bottom Of The Page

    Make The Marshmallow Topping

    Melt 1½ Tablespoons of butter on LOW heat in a large, non-stick saucepan. Add 3 cups of miniature marshmallows to the melted butter, and stir them in, covering them with butter.

    Butter is melted in a large non-stick saucepan on the stovetop.Miniature marshmallows are added to the melted butter.

    Stir the marshmallows constantly as they cook on LOW. They will begin to break down as they are heated, but keep stirring!

    When the marshmallows are almost completely melted (about 95%), remove the pan from the heat, so they don’t become scorched on the bottom. 

    The mini marshmallows begin to melt as they are cooked and stirred.When the marshmallows are 90% cooked, remove the pan from the stove.

    Add The Rice Cereal Then Shape The Mixture

    Immediately stir in 3 cups of crispy rice cereal. The mixture will be VERY thick, but keep stirring until all the cereal is coated.

    Fit a piece of parchment or wax paper in an 8″x8″ baking dish, leaving some paper hanging over the edges. Spray the paper with non-stick spray. Pour the hot marshmallow mixture into the dish, and shape the mixture into a square (about 1″ thick) in the dish.

    TIP: Use another piece of sprayed parchment/ wax paper to lightly press down and compact the mixture as you shape it. This lets you shape the square without hot marshmallow mixture sticking to your hands.

    Stir crispy rice cereal into the marshmallow/butter mixture until combined.Pour mixture onto parchment paper lined baking dish.

    Cut Out Hearts And Decorate!

    Lift the edges of the paper up and lift the square form up and out of the baking dish, and let this mixture cool, uncovered, for 10-12 minutes.

    After it cools, it’s time to cut out the heart shapes. Use a small heart-shaped cookie cutter to cut as many “hearts” out of the cereal mixture as possible.

    NOTE: I get 10-12 hearts with my cookie cutter, but the quantity you get will depend on the size cookie cutter YOU use. Re-shape mixture (if necessary) and continue to cut out more.

    Place the heart-shaped treats back onto the paper after cutting them out. Let them rest for 45 minutes, because they need to be very firm and hold their shape before covering them with chocolate. 

    Shape the crispy rice cereal mixture into a square and cool 15 minutes.Cut mixture into heart shapes using a heart-shaped cookie cutter.

    Cover The Krispie Hearts With Chocolate

    Melt the chocolate according to package instructions, adding a Tablespoon of vegetable shortening, because it helps thin the chocolate a bit.

    Red chocolate candy melts are melted in the microwave until smooth.

    Once the chocolate is melted and smooth, dip each heart, one at a time, covering it on all sides. Use a spoon to help cover it with chocolate, and let any excess chocolate drip back into the bowl.

    Place each heart back on the paper once chocolate-covered, and immediately add colored sprinkles to it while the chocolate is still warm before dipping the next heart.

    NOTE: You may need to re-warm the chocolate if it begins to thicken, because the hearts are easier to cover when the chocolate is fairly thin.

    After the chocolate hardens, take a small sharp knife and trim/clean up the heart around the bottom edges to remove any excess chocolate.

    Sprinkles are added to chocolate covered krispie treats right after dipping.

    Time To Enjoy Chocolate Covered Krispie Hearts

    The chocolate covered krispie treats are ready to be served and enjoyed, once the chocolate has hardened! Set them out on a platter, and let everyone dig in!

    They are delicious, and will keep for 2-3 days at room temperature covered with plastic wrap. What I mean is… they will keep 2-3 days IF they don’t all get gobbled up first!

    Milk chocolate and red chocolate candy melts are used to cover treats.One of the chocolate covered krispie treats is shown cut in half, on white plate.

    I hope you enjoy these unique little treats. While I made them specifically for Valentines Day, any time of year is a good time to share these cute heart-shaped desserts with those you love!

    Thanks so much for stopping by today, and I invite you to come back soon for more family-friendly recipes. Take care, may God bless you, and have a GREAT day!

    Looking For More Recipes For Valentines Day?

    You can find ALL of my recipes in the Recipe Index, which is located at the top of the page. I have a few recipes that would be wonderful for Valentines Day, including:

    Want More Recipes? Get My FREE Newsletter!

    I publish a newsletter 2 times per month (1st and 15th) with lots of recipes, tips, etc..
    Would you like to join our growing list of subscribers?

    There is a Newsletter subscription box on the top right (or bottom) of each blog post, depending on the device you use.
    You can submit your e-mail address there, to be added to my mailing list.

    Find Me On Social Media:

    Facebook page: The Grateful Girl Cooks!
    Pinterest:
    The Grateful Girl Cooks!
    Instagram:
    jbatthegratefulgirlcooks

    Author's signature

    ↓↓ PRINTABLE RECIPE BELOW ↓↓

    0 from 0 votes
    Chocolate Covered Krispie Hearts
    Prep Time
    20 mins
    Cook Time
    0 mins
    Inactive "Resting" Time
    1 hr
    Total Time
    1 hr 20 mins
     

    Make Chocolate Covered Krispie Hearts for Valentines Day or any time! Chewy treats, covered in chocolate are a fun way to say "I Love You".

    Category: Dessert
    Cuisine: American
    Keyword: chocolate covered krispie hearts
    Servings: 10 (approx. 10-12)
    Calories Per Serving: 348 kcal
    Author: JB @ The Grateful Girl Cooks!
    Ingredients
    • Tablespoons butter
    • 3 cups miniature marshmallows
    • 3 cups crisp rice cereal
    • 12 ounces chocolate candy melts* *see Note below
    • 1 Tablespoon vegetable shortening
    • colored candy sprinkles (optional, but a nice touch) as desired
    Instructions
    1. Melt butter on LOW heat in large, non-stick saucepan. Add marshmallows; stir well, to combine.

    2. Cook on LOW, stirring constantly, until marshmallows are almost completely melted (about 90%). Remove pan from heat. Immediately stir in rice cereal until coated. Mixture will be VERY thick.

    3. Fit parchment or wax paper in an 8"x8" baking dish, leaving paper hanging over edges. Lightly spray with non-stick spray. Pour hot marshmallow mixture into dish. Shape mixture into a square (approx.1" thick) in the dish. TIP: Use another sprayed piece of parchment/ wax paper to lightly press down and compact mixture. This helps form a square without hot marshmallow mixture sticking to your hands.

    4. Lift the edges of the paper up and out of the baking dish. Let mixture cool, uncovered, for 10 minutes. Use a heart-shaped cookie cutter to cut as many "hearts" out of mixture as possible. NOTE: I get 10-12 hearts with the cookie cutter I use, but the quantity you get will depend on the size cookie cutter YOU use. Place hearts back onto the paper to rest after cutting them out.

    5. Melt the chocolate candy melts according to package instructions, adding a Tablespoon of vegetable shortening, to thin the chocolate a bit.

    6. Dip hearts, one at a time, covering it on all sides. Use a spoon to help cover them with chocolate. Let excess chocolate drip back into bowl. Place heart back on the paper once covered. Immediately add colored sprinkles while chocolate is still warm, before dipping the next heart. NOTE: You may need to re-warm chocolate if it begins to harden or thicken, because the hearts are easier to cover when chocolate is fairly thin.

    7. Once chocolate has firmly set, take a sharp knife and trim (clean up) the hearts around bottom edges to remove any excess chocolate. Serve and enjoy!

    Recipe Notes

    Note: If using one color of chocolate melts only, it will take a 12 oz bag. If making red and chocolate colors, you will use approx. ½ bag of each color or variety.

    Nutrition Facts
    Chocolate Covered Krispie Hearts
    Amount Per Serving (1 g)
    Calories 348 Calories from Fat 153
    % Daily Value*
    Fat 17g26%
    Saturated Fat 15g94%
    Trans Fat 0.2g
    Polyunsaturated Fat 0.5g
    Monounsaturated Fat 1g
    Cholesterol 5mg2%
    Sodium 92mg4%
    Potassium 8mg0%
    Carbohydrates 47g16%
    Fiber 1g4%
    Sugar 36g40%
    Protein 3g6%
    Vitamin A 52IU1%
    Calcium 49mg5%
    Iron 2mg11%
    * Percent Daily Values are based on a 2000 calorie diet.

    Here’s one more to pin on your Pinterest boards!Make Chocolate Covered Krispie Hearts for Valentines Day or any time! Chewy treats covered in chocolate are a fun way to say "I Love You".