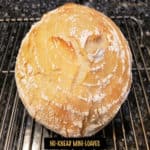
No-Knead Mini Loaves are crusty on the outside, soft on the inside and use only 4 ingredients! Makes enough for 5 small artisan bread loaves!

Today I want to share a fabulous recipe I found online a while back. The recipe is unique because you stir up dough in about 5 minutes, let it rise, and then refrigerate the dough until you want to bake a loaf or two of bread.
The recipe (as written) will yield 4 large (1 pound) loaves OR if you make them a tiny bit smaller, you can make 5 no knead mini loaves from the dough. My husband and I enjoy the smaller loaves, since they’re the perfect size for the two of us.
After the dough has risen, it can be kept (covered) in the refrigerator for up to 2 weeks. That means you can have hot baked bread often! Isn’t that awesome? Then, when you want to bake a small loaf for dinner, just pull some of the dough out of the fridge about 1½ hours before you want to eat it.
Shape the dough, let it rise for a short time, and then bake it FRESH! We love having enough dough in the fridge to make 5 mini loaves, because it’s so convenient! This amazing dough can also be used to make small dinner rolls, pizza dough, etc. Here’s how to make no knead mini loaves.
Scroll Down For A Printable Recipe Card At The Bottom Of The Page
Make The Dough
To make the dough for this bread, you need to heat water to 100° F. (or 37.7°C). The water needs to be at this temperature when you add the yeast in order to activate it. If the water is too hot, it can kill the yeast, and we don’t want that to happen!
You also want to ensure the yeast you are using is still fresh. If you’re not sure if it’s fresh or not, you can check its viability by doing this.

Place the 100°F. water in a very large bowl or food-safe container (about 2 gallons), and whisk or stir in the active dry yeast until combined. Now add flour and salt to the liquid mixture and stir WELL to combine.

This dough will be very thick and sticky but just keep stirring until all the ingredients have been successfully combined.

Let The Dough Rise
Cover the bowl with plastic wrap, then top the bowl with a kitchen dish towel. Place the bowl on the counter, in a warm place in your kitchen. Let the dough sit at room temperature, undisturbed for 2 hours.
After the dough has rested at room temperature for 2 hours, place the covered bowl into the refrigerator. Let the bread dough chill in the refrigerator overnight OR until 1½ hours before you want the baked bread to be ready! It should have doubled in size and be ready to go when you are!
I usually mix up the dough the night BEFORE I want to bake the bread. Then I pull out just enough dough to make a loaf or two, re-cover the remaining dough and pop it back in the fridge until I’m ready to make another fresh loaf.
This bread dough will keep (if covered) up to 2 weeks in the refrigerator, so it’s really convenient to have around.

Ready To Make No-Knead Mini Loaves!
Okay… so now you’ve let the bread dough refrigerate overnight and it’s about 1½ hours before you want a nice hot, fresh loaf of bread. Here’s how to make the mini-loaves out of that beautifully risen dough! Remove the plastic wrap from the bowl.
Flour a banneton proofing basket generously with flour for each loaf you will be making (rice flour or all purpose), then set it aside. NOTE: If you do not have access to a banneton proofing basket, place a large piece of parchment paper on the counter and lightly sprinkle it with flour.
Pull out a grapefruit sized portion of dough from the refrigerator (return remaining dough to fridge). With floured hands, shape it into a ball, by stretching out the dough and tucking the edges under the bottom of the dough ball.
You want it to be smooth on top, and the outer edges tucked under to form a tight, round dough ball. Pinch the dough together on the bottom to seal the edges together as much as possible. Place the dough ball, top side DOWN, into the prepared banneton.
NOTE: If using parchment paper (no banneton), place the dough ball, top side UP onto the parchment paper.


Time To Bake Some Bread!
Cover the bread with a dish towel, set the banneton or parchment on the counter, and let it sit and rise at room temp. for 40 minutes. Halfway through this rising time (about 20 minutes), preheat your oven to 425°. At the same time, place a Dutch oven into the oven, so it will preheat, as well.
Once the dough has risen for 40 minutes, if using a banneton, carefully turn the banneton over onto a large sheet of parchment paper. TIP: Place a large sheet of parchment on a baking sheet, then turn it over to cover the banneton (paper onto banneton with baking sheet on top).
Securely hold the baking sheet and banneton with both hands and carefully flip it over to release and invert the dough ball from the banneton onto the parchment paper.
Remove the hot Dutch oven from the preheated oven. Lift the parchment paper with the bread dough and lower the loaf carefully into the pan. Put the lid on the Dutch oven, place it back into the oven, and let it bake for 30 minutes.
Take the lid off and continue baking uncovered for about 5 minutes or so, until the loaf is a light golden-brown color on top.


Who Wants A Warm Slice Of Homemade Bread?
Remove the pan from the oven, and carefully (it’s HOT) transfer the bread to a wire rack to cool for about 5 minutes before attempting to slice it.
Once the no-knead mini loaves have cooled slightly, use a serrated knife to cut the warm bread into slices.
We usually get between 6-8 thin slices per loaf. Grab some butter, spread it on thick, and enjoy a slice or two of these absolutely delicious no-knead mini loaves!


I really hope you enjoy this delicious bread as much as we do! The first time I made an extra loaf for our son (who was sick), and took him some homemade hot soup and a fresh loaf of this bread.
He said it was one of the best loaves of bread he has ever had! I really think you’ll enjoy it, too. It is so handy to have the dough already made up and in the fridge for when you want fresh hot bread for dinner! YUM!
Thank you for stopping by today, and I invite you to come back again soon for more family-friendly recipes! Take care, may God bless you, and have a GREAT day!
Looking For More BREAD Recipes?
You can find ALL of my recipes in the Recipe Index, which is located at the top of the page. I have lots of delicious bread recipes, savory and sweet to choose from, including:
- Butter-Topped Homemade White Bread
- Sun-Dried Tomato Parmesan Bread
- Garlic Focaccia Bread
- Irish Soda Bread
- Classic Challah Bread
Want More Recipes? Get My FREE Newsletter!
I publish a newsletter 2 times per month (1st and 15th) with lots of recipes, tips, etc.
Would you like to join our growing list of subscribers?
There is a Newsletter subscription box on the top right (or bottom) of each blog post, depending on the device you use.
You can submit your e-mail address there, to be added to my mailing list.
Find Me On Social Media:
Facebook page: The Grateful Girl Cooks!
Pinterest: The Grateful Girl Cooks!
Instagram: jbatthegratefulgirlcooks

Original recipe source: With thanks to Carolyn Thomas, at: homesteadingfamily.com/no-knead-artisan-bread/
↓↓ PRINTABLE RECIPE BELOW ↓↓
No-Knead Mini Loaves are crusty on the outside, soft on the inside and use only 4 ingredients! Makes enough for 5 small artisan bread loaves!
- 3 cups water at 100°F. temperature
- 2 Tablespoons active dry yeast
- 6½ cups all purpose flour or combo of whole wheat/all purpose
- 1½ Tablespoons sea salt
Place the 100°F. water in a very large bowl or food-safe container (about 2 gallons), and whisk or stir in the active dry yeast until combined. Now add flour and salt to the liquid mixture and stir WELL to combine. This dough will be very thick and sticky, but just keep stirring until all the ingredients have been successfully combined.
Cover the bowl with plastic wrap, then top the bowl with a kitchen dish towel. Place the bowl on the counter, in a warm place in your kitchen. Let the dough sit at room temperature, undisturbed for 2 hours.
After the dough has rested at room temperature for 2 hours, place the covered bowl into the refrigerator. Let the bread dough chill in the refrigerator overnight OR until 1½ hours before you want the baked bread to be ready! It should have doubled in size.
Flour a banneton proofing basket (for each loaf) generously with flour; set aside. NOTE: If not using a banneton, place a large piece of parchment paper on the counter; sprinkle with flour.
Pull out a grapefruit-sized amount of dough from bowl (return remaining dough to fridge). With floured hands, shape it into a ball, by stretching out dough and tucking edges under the bottom. You want it smooth on top, and outer edges tucked under, forming a tight, round dough ball. Pinch dough edges together on the bottom to seal edges as much as possible. Place dough ball, top-side DOWN, into prepared banneton. NOTE: If using parchment paper (no banneton), place dough ball, top side UP onto prepared parchment paper.
Cover bread with a dish towel. Set banneton or parchment on counter; let it sit/rise at room temp. for 40 minutes. Halfway through rising time (20 minutes), preheat oven to 425°. Place Dutch oven into the oven, so it will preheat, as well.
Once dough has sat for 40 minutes, if using a banneton, carefully turn the banneton over onto a large sheet of parchment paper. TIP: Place a large sheet of parchment paper on a baking sheet, then turn it over on top of the banneton (paper onto banneton with baking sheet on top). Securely hold baking sheet and banneton with both hands; carefully flip it over to release and invert the dough ball from banneton onto parchment.
Remove Dutch oven from the preheated oven (it's HOT). Lift parchment paper with dough ball; lower loaf carefully into pan. Put the lid on Dutch oven; place back in oven; bake for 30 minutes. Remove lid; continue baking uncovered for about 5 minutes, until loaf is light golden brown in color.
Remove pan from oven. Carefully lift paper/bread loaf out; transfer bread to wire rack to cool 4-5 minutes before slicing with a serrated knife. Enjoy!
NOTE: Dough will keep, (covered in fridge) up to 2 weeks. Each time you want a fresh loaf, follow instructions above for making a new loaf!
Here’s one more to pin on your Pinterest boards! 
I have used this recipe five times now and no misfires yet. These mini loaves make great gifts for single people or a couple. I have AirBnB guests staying at my home and I will bake one of these small loaves and deliver it warm with homemade jam. What a hit!
I agree! When I take a freshly baked loaf to our grown son at his apartment, he says it’s the best homemade bread he’s had! Your guests must love that special gift… how thoughtful!