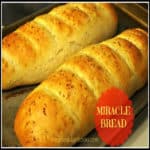
You’re gonna love this easy, homemade Miracle Bread. The recipe makes two loaves and is so easy, even my son can make it! That’s got to be some kind of MIRACLE!  Today I am sharing a recipe I’ve used for making homemade French bread loaves the last couple of years. It’s called “Miracle Bread” and it is DELICIOUS!
Scroll Down For A Printable Recipe Card At The Bottom Of The Page
I found the recipe for this easy, simple French bread on the internet, from Gina at Home Joys. I’ve made it at least 10 times since then, and can heartily recommend this, EVEN if you’ve never baked bread before!
The slices are fantastic toasted just as they are, or they can be used to make French Toast, also (YUM).

Miracle Bread Is So Easy To Make… It’s A Miracle!
I guess that’s the Miracle of it… even if you’ve NEVER made homemade bread before, you can make this delicious, and amazingly simple bread to enjoy!
The loaves are wonderful sliced and warm, with butter. The recipe makes two loaves, so you can eat one and give the other one away (or freeze for later), if you want!
I love to bake this bread, especially in the Fall. One year I baked 8 loaves and wrapped them up really nicely and surprised several neighbors on our street and some friends with a loaf of warm, freshly baked Miracle bread.

It’s So Easy To Make, Even Our Son Can Make It!
A couple years ago I taught our youngest son and his girlfriend how to make miracle bread! Some of the pictures shown below are from this fun morning! I sure hope you will try this recipe.
You’ll be surprised at just how easy it is to make fresh, homemade Miracle Bread! They each made a loaf, and they turned out fantastic!
Okay… we’ve mixed the dough all together. I guess now we have to wait for it to rise. YEP! I personally think they are really cute bread makers!

Okay… this dough has risen and is rolled out. Are you saying I’m now supposed to roll this dough thing up like a log?

Rolling the miracle bread dough up… like a boss!

Time To Bake The Miracle Bread!
Okay… the dough is rolled out, formed into loaves, and diagonal slits have been made on top of the loaves, and the dough has risen again. Time to bake!!!!
Bake the miracle bread at 425°F. for 15-20 minutes, and then it is DONE! The loaves should be beautifully golden-brown on top!

Hey- guess what? We just made homemade French bread… It’s a MIRACLE! Miracle Bread, that is!

Ready To EAT!
The golden-brown loaves of Miracle Bread sure look good, straight out of the oven! I sure could slice a piece right now, and gobble it up (with some butter, of course).

Time for a warm slice, with some butter! Isn’t it nice looking? Yay- we have Miracle Bread success!

Don’t be afraid to try this “no kneading necessary” miracle bread. If you can stir ingredients, and roll out dough, you CAN make this! Most of the prep time involved is really just the sitting around, waiting for the dough to rise.
Simply go ahead and get lots of other things accomplished while waiting… and STILL end up with two delicious loaves of home baked bread (and an incredible smelling home)! You’ll be the hero of the day when your family sits down and enjoys your freshly baked miracle bread! Enjoy!
Thanks for stopping by, and I invite you to come back again soon for more family-friendly recipes. Take care, may God bless you, and have a wonderful day.
Looking For More BREAD Recipes?
You can find ALL of my recipes in the Recipe Index, which is located at the top of the page. I have lots of delicious bread recipes, including:
Want More Recipes? Get My FREE Newsletter!
I publish a newsletter 2 times per month (1st and 15th) with lots of recipes, tips, etc.
Would you like to join our growing list of subscribers?
There is a Newsletter subscription box on the top right (or bottom) of each blog post, depending on the device you use.
You can submit your e-mail address there, to be added to my mailing list.
Find Me On Social Media:
Facebook page: The Grateful Girl Cooks!
Pinterest: The Grateful Girl Cooks!
Instagram: jbatthegratefulgirlcooks

Original Recipe Source: http://homejoys.blogspot.com/2011/01/miracle-bread.html
↓↓ PRINTABLE RECIPE BELOW ↓↓
- 1/2 cup warm water
- 2 Tablespoons active dry yeast
- 2 Tablespoons sugar (or honey)
- 2 cups warm water
- 2 Tablespoons melted butter
- 2 teaspoons table salt
- 6-7 cups all purpose flour (will use 6 cups plus more, if necessary)
- Non-stick spray (or a bit of oil)
- 1 egg
- 2 Tablespoons milk
- Sesame seeds , if desired, for garnish
- In a small bowl, mix together 1/2 cup warm water with the yeast and sugar (or honey). Stir until the yeast has fully dissolved. Let sit for a 3-4 minutes.
- In a large bowl, mix together 2 cups warm water, 2 Tablespoons melted butter, and the salt. When fully mixed, add the yeast/water mixture from the small bowl. Stir to combine well.
- Add 6 cups of all purpose flour to dough mixture. Stir well by hand until fully combined (or use a dough hook and stand mixer). If the dough is way too sticky, add a bit more flour a little at a time, until mixture is not sticky.
- Form the dough into a ball. Spray a large bowl with non stick spray, or lightly oil the bowl. Add the dough ball to the bowl; turn dough over, to coat sides with spray (or oil).
- Cover bowl with a tea towel, and let rise for 30-60 minutes in a warm place, free from drafts. The dough should double in size. Once doubled in size, divide the dough in half.
- Roll each half section of dough out (like making a pie!) on a very lightly floured work surface. Shape the dough into a 9-10 inch long rectanglular shape. Using your (clean) hands, roll up the dough, starting with the long edge of the dough and roll tightly up into a loaf shape. Tuck the edges in slightly and carefully place the "loaf" onto a greased or sprayed baking sheet (large enough for two loaves!). Repeat process with other half of dough and place a couple inches apart from other loaf on prepared baking sheet.
- Using a very sharp knife, make diagonal slits (about an inch deep) across the tops of each loaf. Cover the loaves with a tea towel and let the dough rise again, for one hour, or until dough loaves have doubled in size. Preheat your oven to 425 degrees during the last 15 minutes of rising time.
- In a small bowl, beat together the egg and 2 Tablespoons milk. Using a pastry brush, lightly brush this mixture over the top of each loaf. Sprinkle each loaf with sesame seeds (or can substitute poppy seeds, if desired).
- Bake bread at 425 degrees for 15-20 minutes, or until golden brown on top. Remove loaves to wire racks. Let bread cool slightly before slicing, for best results. Enjoy!
Here’s one more to pin on your Pinterest boards! 
is sugar better than honey or visa versa for the yeast
Good morning, Judith. You know what? I have ONLY used sugar to add to the yeast mixture my whole life! I have never ever tried honey for this, so I honestly do not know what the results would be. Sorry. Have a good day!
Hi JB, so happy I found this recipe. Since I left teaching I have gotten super involved in cooking, especially bread & jam making. I am going to try this recipe tomorrow. I have a bread proofing setting on y oven which is super helpful in proofing my dough.
Hi, Carol! So nice to hear from you. I hope you and Chuck enjoy the Miracle bread. You are very fortunate to have a bread proofing setting on your oven… that is awesome! Have a great day!
Can you use nut flours like almond, cashew or coconut?
Kathy… I have never used alternative flours for this recipe, so I’m sorry, but I don’t know how they would impact this recipe.
Tried this today and it went perfectly, from the beginning to the end. I have tried and failed many recipes, I almost gave up, until this one. It truly is a “ miracle “ bread.
Just made this bread. Soooooo. Good. I will never buy another loaf. Crazy easy. Love it. Thank you
WOW! WOW! And then WOW again!!!!! Fantastic, easy recipe! I added Everything Bagel with some extra garlic powder on the top. This is my go to recipe from now on. Thank you so much fir sharing with us!
Hi, Kim… thank you for writing! So glad you enjoyed the bread, I LOVE your ideas for additional ingredients. I will definitely need to try it that way. Have a great day.
Hi ….found this wonderful recipe this week and made the bread in bread pans. They turned out great !!! The pans
Corral the dough…..
I am leary to not use the pans for
fear I will end up with a flat bread 12 inch by 2 inches high.
What would keep it from getting flat? I do want to make it to look like your son’s looked.
Will using less salt change anything? I have to watch the sodium !
I tried this for the first time today… oh. my. gosh!!!! Incredibly easy, my kitchen smells amazing and I’m having to slap my hubby’s hands from digging into it! Lol
Being it’s winter time, I have no “warm place free of drafts”, so while I was mixing (by hand) I heated the oven – warm, turning it off when I covered the bowl and put it into the oven for 60 minutes. Perfecto!!!!! Thank you for this recipe!
Just came across this recipe and all I see is potential! I use my bread maker to do the initial work. Will be using this for garlic bread with pasta as well as creating ham and cheese buns, onion rolls etc. I love recipes that are flexible.Being diabetic, I will also be using whole grain flours.
Hello! I’ve made this bread a few times but I wanted to see if I could add herbs? I have a ton of thyme and wanted to throw some in if possible.
Thank you!
Hi, Ashley… thanks for writing. Absolutely! I have heard from quite a few people that add in their favorite seasonings in the amount of their choosing (to suit their personal taste). Have a great day.
Hi
I making this dough now and wanted to know can I put the whole dough rounded in a ditch oven?
Hi Wendy… just now catching up on tons of comments from the blog. I have never tried cooking all of the dough in a Dutch oven before- only use the dough to make the two loaves… not sure if that amount of dough would overflow the pot. Would love to hear how it turned out, if you did try to make it this way.
My Dutch oven is 12×5” and I was able to bake the whole dough at once with room to spare. I recommend preheating the Dutch oven well.
Awesome… thanks for the tip!
can you make this into loaf pans instead of rolling it
Hi, Doris… thank you for writing. I have never tried this particular recipe using loaf pans, but I suppose it could be done. Not sure just how many loaf pans it would make (perhaps 3??), but would love to hear if you try making the bread this way, and have success! Take care.
Does this bread come out crusty, or soft outside?
Hi, Debbie. Thank you for writing. Good question. There is a definite crust on the outside, but it is soft and not overly crusty. It is very easy to slice through. Hope that helps. Take care.
I have used this recipe for many years. I have made cinnamon rolls, pizza,Stromboli, soft pretzels. It is a fabulous recipe given to me by a pastor’s wife, she made small loaves for communion bread.
Made this yesterday to have with stew. Used 2 packets of yeast, bread flour instead of all-purpose and threw in an egg. Came out fantastic! With 2 adults and 3 college students in the house, the first loaf was eaten in a flash. Was able to keep everyone from the second loaf as we’re making lasagna for dinner tonight and wanted to save the other loaf for that. Will definitely make this again. It was so easy!
Good morning, Jean! Thank you for taking the time to write, and for the helpful tips! I admire your ability to keep all those hungry humans out of the second loaf of bread… that was quite a feat on your part… ha ha! Hope the lasagna tasted fantastic, too. Just made homemade lasagna a couple weeks ago, and it is the perfect comfort food! Have a great day.
I have rapid rise yeast do you think that will be a problem
Hi, Pat! Thanks for writing. I have not used rapid rise yeast for this recipe, so I cannot truthfully tell you how it will turn out. I do think it is definitely worth a try. I would love to know the results if you do make the bread with rapid rise yeast… that info. would be most helpful to myself and others. You are indeed fortunate to have yeast. I’ve been trying to get any kind of yeast for over a month now, with no luck. Oh well. Take care, and stay safe!
Well I tried your miracle bread last night for supper it was the best bread I ever made and I’ve made allot of them!! It was ever wonderful the next day nice and soft! Keep those great recipes coming!
So glad you enjoyed it, Janet! By the way… Janet is my first name, too.
Hi Pat, I just took 2 loaves out of the oven, I used Instant Rise and it is perfect!
Glad to hear this, Donna! Thanks for sharing your experience!
I only have instant yeast as well. When do you add it, just to the flour?
I made this today. I cut the recipe in half and made 2 smaller loaves. This recipe was so easy! I will add more seasoning next time like garlic powder, onion powder and oregano. Thank you so much for sharing!
Hi, Diane. Thanks for writing! Glad you found the recipe easy… that’s wonderful! I’m so glad you enjoyed the recipe, and your ideas for seasoning the loaves next time also sound terrific! Take care.
This bread was so fun and easy to make,, so with all my extra time right now this is the second time I’ve made the first loaf with the seeds on it is for my husband, and the second move is to make French toast with?
Good morning, Sandy! Thanks for taking the time to write, and I’m so glad you enjoyed this easy recipe! Take care, and have a good day.
This recipe is awesome! So easy and tastes great. I was curious…can you use gluten free flour to make this?
Hi, Jennifer! To be completely honest, I have never ever used gluten free flour before, so I can’t tell you with any authority if it would work or not. Hopefully someone else will see this comment thread and be able to help out. Take care.
Yesterday I made this wonderful and easy to make bread using my dough hook and what an easy recipe! I only used 1 envelope of yeast and had great results. I posted pictures on FB and got two orders from friends!? I gave one loaf away and used the other loaf for our spaghetti supper. This morning I cut a slice and made French toast. Did NOT disappoint! Today I’m making it again only this time I’m making 4 smaller loaves instead of 2 large loaves. I’ll try it again adding the spices and herbs to it.
Hi, Wendi! Wow… Sounds like you have become a bread-making machine! I am so happy you enjoy this easy to make bread. I cannot find yeast anywhere in our area right now, so I am out of luck. Oh well… that are a LOT of worse things than that going on right now, for sure. I will have to live vicariously through your bread baking adventures. Take care, and have a good day.
I’ve been reading all these wonderful comments and it makes me said to say my bread did not turn out. All was going well then my loaves just went flat. They taste good but they are not pretty round loaves like yours. Any idea what went wrong?
Hi, Cheryl… I really don’t know what could have happened, unless your yeast wasn’t still viable. It’s hard to know, because I have never had that happen in all the times I have made this bread. There’s nothing worse than putting time, energy and resources into something and have it not turn out like you expected. I really hope you will be able to try it again soon. Take care, and have a good day. Thank you for taking the time to write!
If they grew, then went flat, one of the reasons could be that it proofed too long.
My loaves went flat also. So sad. But they tasted good.
Hi, Virginia… so sorry to hear that. Might have been the yeast or the proofing time? Sure hope you will try the recipe again soon. Take care.
I tried a second time and it was perfect. I over proofed the bread.
Happy for your success, Virginia. Thanks for writing to let me know. Hope you enjoyed the bread.
I have found that if your bread rises too much before you cook it ,it will deflate, go flat. Still tastes good.
I’ve always been scared of yeast but want to try this. I live alone, space is limited so I’m wondering if I can half this recipe so I don’t have to store a large bag of flour. When I’m not baking, I prefer to keep flour in the fridge or freezer (in case of insects) and I only have a regular fridge/freezer – not a chest freezer – so again, space is a problem.
Hi, Elaine… thanks for writing! I don’t see why that wouldn’t be an option for you to half the recipe. If you look at the printable recipe card, you will see a box that indicates the number of servings. You can enter half of that amount, and the correct ingredients will automatically change to the amount required to make a half batch. Hope you have good luck with this… I have always made the whole batch, but I can appreciate and understand you might have limited space for flour. Take care, and have a good day.
I made this today and it turned out so good! It was easy and delicious! Thank you for sharing jt!
Hi, Mandy! Thanks so much for taking the time to write about your experience with this bread. I am so glad you enjoyed it, and that you were pleased with the results. HOORAY for homemade bread! Take care, stay safe, and hope you and those you love have a great weekend.
This is the best my dough has ever risen…..very good recipe!
Thanks for writing, Anne! I am so glad you had good luck with the recipe. We love this bread! Take care, and have a good day!
This bread looks super yummy. I have tried my hand at bread making. I had some success and some failures. I’m sending this recipe to my daughter whom just recently started baking.
Since I am home a lot more during this crisis, I have been seeking things to bake. This is a must do. Going to get on it now.
I am also interested in your newsletter. I couldn’t find the subscription area. I am very interested in receiving your monthly letters. I’m sure they have more wonderfulness in them. Can’t wait!
Tammy
Good morning, Tammy! Thank you for your kind words and for taking time out of your day to write. Hope you enjoy the bread. We sure do! Depending on what type of device you use, the signup for the newsletter is either on the right side of the page (desktop), or at the VERY BOTTOM (for mobile devices-tablets/phones). Hope that helps. Take care, and have a great day.
JB,
My daughter made this fabulous miracle bread. Was her first time and a huge success. She got a little confused about the egg and actually added it to the dough. It still turned out great. Her family ate it in a matter of minutes. I too have made the bread and as you promised it is the easiest homemade bread i have ever made. Thank you for sharing and thank you for taking your time to answer all your comments. Such a blessing in these crazy days.
Tammy Lynn
Good morning, Tammy Lynn! Thank you so much for taking time to write. I am so thrilled your daughter made this delicious bread, as well as yourself! Please take care of yourself and those you love.
my home is cool, where can i let my bread rise where its warm?
Hi, Judy! thanks for writing. Since I don’t know your exact situation, I would recommend placing the covered bowl of dough on the counter, away from any windows or drafts, and wrap it well in a bath towel or two, which would help insulate it and keep it warm. It should be just fine that way. Take care, and have a good day.
I preheat my oven to 200 degrees then shut it off. I put my bread dough in there covered with towel or Saran Wrap to raise as needed
Great tip, Dona! Thanks for contributing to the post! Have a great day.
This was fabulous! Yeast and I generally don’t get along too well and most of my attempts at bread flop. Not this time! The dough was easy to work with and baked up beautifully. This recipe makes nice chewy but soft bread and is awesome served warm with real butter. I could probably eat a whole loaf by myself! Thanks so much for sharing.
Good afternoon, Julie! Thanks for writing. Hope you and yours are doing well during this corona crisis. I am so glad you enjoyed the bread! Yes… the hardest part is NOT to eat a whole loaf by ourselves…
Can I use compressed yeast I would love to try the bread
Good afternoon, Elizabeth. Yes, I am sure you can. I must tell you, though, that I have NEVER ever used compressed yeast before, however. I did a bit of research online though, and there are LOTS of conversion charts available. Basically what I learned is this: 1/4 ounce (2.25 teaspoons or 7 grams) of dry active yeast is equal to 2/3 ounce (or 19 grams) of fresh compressed yeast. Since my recipe calls for 2 TABLESPOONS of dry active yeast, you will have to do some MATH (ugh) to use your compressed yeast. Hope it works well for you. Would love to have you post back on here what the amounts you used turned out to be, and how the bread turned out using it. Stay well, and have a great day.
Can I use whole wheat flour or half white, half white, I’m diabetic, need to stay away from white bread?
Good morning, Linda! Thank you for taking the time to write. I have baked this bread so many times I can’t count, but have never ever substituted whole wheat flour. I honestly don’t know how that would alter the bread density, and am truly sorry I don’t have the answer you need. I did find an article that talks about this very thing, and am posting it here in the hope that it might help you decide if making that substitution would work. https://food52.com/blog/24347-whole-wheat-vs-all-purpose-vs-50-50-flour
The miracle bread is a wonderful recipe. I have made it several times, and it’s always been a winner. I’ve made by also adding garlic powder and some dried rosemary. My family loves it. This recipe never disappoints, regardless of what you may add to it. Love it.
Good morning, Sara! So glad you have enjoyed this delicious bread! I think the addition of rosemary and garlic is a fantastic flavor twist! Thank you for taking the time to write… I hope you have a fantastic day!
Love love this recipe… I sell baked goods at flea market and I cannot wait to try it. Can I put finely chopped herbs in the dough or raisins/nuts or cheese?
Good morning, Shibu! I certainly don’t see any reason you could not! Hope you have great luck with that… sounds wonderful!
This is amazing! So simple and tastes great. Will be divine with my instant pot lasagna. Thanks
Hi, Pam! Thanks for taking time to write about your experience with this bread. So glad you enjoyed it… we love it! Have a wonderful day!
Can you use gluten free flour that is a one to one for substution for regular flour? I sure would like to make this bread but flour needs to be gluten free.
Hi, Beverly! Thanks for writing. Unfortunately I don’t have an answer to your question. I have never used gluten free flour, so I can’t speak with any authority on whether this particular bread recipe would turn out ok. I am really sorry I don’t know. Hopefully someone else will see your post and can help with some info.
I have tried to bake bread with gluten free flour and been disappointed. Part of what makes bread good is the gluten.? However most people who can not tolerate gluten can tolerate spelt. My cinnamon rolls turned out great when I substituted spelt for my gluten free friends.
Hi, Valorie… thanks for the tip for our gluten free friends. Take care.
made this yesterday.such an easy recipe. have no stove just counter top convection oven and only thing i did differently was cook for extra five minutes and turned down oven to 400 at that time
really great bread! and i only have seven teeth and was able to gum my way through. thanks againfor recipe
Thanks for writing! I am so glad you were able to enjoy the miracle bread! So impressive that you made it in a counter top convection oven! Bravo! Have a wonderful day.
You said to use 2 T. of yeast. How many packets is that?
Good morning! One packet of yeast is equal to 2¼ teaspoons. A Tablespoon is equal to 3 teaspoons, so since the recipe uses TWO TABLESPOONS, you would need 6 teaspoons total of yeast. This would require you to bust into 3 packets of yeast to get the correct measurement (with a little extra left over). Hope that helps. Have a great day!
Love this recipe and will make it to give to neighbours, just not today. Happy to see recipes that we have the ingredients in the house
Thanks
Hi, Barbara! Thank you for taking the time to write! I agree with you. It is always nice to find recipes that we already have the ingredients for. I hope you enjoy eating this bread, and love blessing your neighbors with it, as well! Have a wonderful day!
I have an egg allergy so need to omit the egg wash at the end. I’ve been trying just a butter wash on top, but was wondering if you have tried anything else. The herbs just don’t seem to stick as well without that egg binding.
Hi, Kristina! You know, I have never tried anything else for the egg wash. I think you’re on the right track with the butter. The ONLY thing I might consider trying is to use really SOFT butter (not melted), and brush that on top of the bread. Perhaps that might “bind” the herbs to the bread better? Hope you have success! Thank you for taking the time to write.
We have egg allergies in our house too. I have been able to remedy this using Duck eggs instead. Different species, no allergy. Works for us. Makes everything fluffier. Watch the size difference. Large chicken egg about 1/4 cup. Duck egg about 1/3 cup.
Good morning, Becky! Thanks for the tip… I am sure that will be very helpful information to my readers with egg allergies. Thanks for taking the time to write. Have a GREAT day!
4 tbs cold water
½ tsp cornflour
Whisk cornflour and water together in a small saucepan and heat till it begins to boil.
Lower heat to simmer and whisk constantly until thickened and opaque.
Brush on bread or rolls about 10 minutes before the baking time is up, and then again about 3 minutes before bread come out of the oven.
Awesome! Thanks for adding to the discussion, Philip! I appreciate the tip for Kristina! Have a great day, and thank you for taking the time to write!
I always spritz my Italian bread with water before I put it in the oven and again about 10 minutes into baking, it always browns nicely and makes a crusty crust. Do not know if that would work with this but it should.
Hi, Mary Ellen! Thank you for taking the time to write, and thank you for the tip! Hope you enjoy a wonderful weekend.
The cornflour water gel as I call it, is great if you are making crusty roll, and brushed as you put it in the oven.the egg wash browns plus has a soft shine to it.This is my experience.
Looks a great recipe. I make bread but not rolled like this. I’ll definately try it. Could you use whole meal bread flour or half and half? If so do you know how much extra liquid you’d need?
Many thanks
Hi, Victoria! You know, I have never used whole meal bread flour OR half and half to make this recipe, as many times as I’ve made it! I truly don’t know the answer to your question. Hopefully someone will see your comment, and can provide helpful information to you.
Can this be made as gluten free? I have gluten free flour which is 1 to 1.
Hi, Debbie! I have never made this miracle bread using gluten free flour, so I can’t answer your question, unfortunately. Hopefully someone else will see your question and be able to give you good feedback on your very good question.
This is a GREAT bread. I make many breads every week. I Iove to try new recipes and am always in search of a great bread recipe. This is it! I put some fresh ground herbs on the top with some fresh ground smoked sea salt. It was amazing. I cant wait to try it for French toast.
Good morning, Renee! Thanks so much for writing! I am so glad to hear that you enjoyed “miracle” bread. I absolutely LOVE your idea to put some fresh herbs and smoked sea salt on top. That would be amazing! Hope you have a fantastic day!
Can this bread be made in a bread machine?
Hi, Vickie! Thanks for taking time to write. I am pretty sure that you could make this bread up to the dough and first rise part in a standard size bread machine. HOWEVER… due to the volume of the flour used in the recipe to make TWO loaves, you would need to cut the recipe in half, for sure! It could get a little interesting trying to cut all the ingredients in half (like one egg), but in theory, I guess it could be done.
I have a bread machine, too, but I have ALWAYS made this bread by hand, so I cannot personally vouch for cutting recipe in half and making it the bread machine. Hope this helps in some way. Have a wonderful day.
I just put it all together in the bread machine and it never fully mixed. I was just using the dough cycle. It soaked up all of the water. I proofed more yeast and remixed with a hand mixer. Hoping it comes out since I need it today. I have made this by hand like 5 times now and it was always perfect.
Oh no… sounds like it needs a MIRACLE! I have always made this bread by hand, so I have never even tried it in my bread machine. I sure hope you can save it, with the help of your hand mixer. Glad you’ve been able to enjoy making it in the past. Good luck!
Thank you for this recipe. I made it this week, and it was a great success. There is more on the counter while the oven is heating up.
Oh, I am so glad you enjoyed the bread, Bonnie! It’s always fun when someone else enjoys a recipe like we do! Thank you for taking the time to write and let me know… I appreciate it! Have a fantastic weekend!
How do you prevent the tea towel from sticking to the dough during rising????is my warm spot to warm or is there a trick to it not sticking?It doesnt matter if I am making cinnamon rolls,bread or whatever my towels always stick to the dough.driving me crazy!!!
Good morning, Mama H.!
You know, I haven’t had that problem before when making bread or cinnamon rolls. I always use a very deep bowl (as I am sure you do, too). The dough always rises quite a bit, but doesn’t seem to ever stick to the tea towel covering it. I suppose you could very lightly flour the side of the towel that is turned towards the bread dough, which might help the dough not to stick. Can’t guarantee that, though, since I’ve never had this happen before, or tried it. On a positive note, though, you must have a WONDERFUL warm spot for bread to rise in your kitchen! Thank you for taking time to write. Hope you have a wonderful, blessed day!
My mom always had us use a damp towel..perhaps that might help. You put part of your folded clean tea towel under water for a bit..and ring it out so that water doesn’t drip.
That’s a GREAT tip, Joan! Thanks for writing, and hope you have a great day!
I use a plastic wrap and spray it with cooking spray. I can reuse the plastic wrap for my loaves as the bread rises in the pans
Hi, Peggy! Thanks for writing and for the great tip. Have a wonderful day.
Twhats the miracle looks like reg bread dough
Hi, Shari. I’m pretty sure the miracle is that our son who absolutely does not cook, was able to make this bread without any trouble at all. Have a great day!
Hey…I just from the Miracle Bread recipe and was wondering??? Do you have to roll out the dough or could I put it in 3-4 loaf pans or mini loaf pans??
Just wondering. Thank you for helping me!!!
Can’t wait to try this!!! ?
You know… I have never made this bread any other way in all the years I have been making it. It sure is worth the try, but I am not sure of the baking time for a smaller loaf using this dough in a pan. Hope you have success with it! It never hurts to try! Thanks for taking time to write a note, and have a great day!
The Miracle Bread looks so delicious! Is the yeast that you have used Active dry yeast?
Hi, Denise! Yes… I used active yeast. Guess I left that part out when I wrote the post. Oops. Thank you for asking, and taking time to write. Have a wonderful day!