Making stabilized whipped cream is easy! This sweetened cream will hold its shape for days- perfect for decorating pies, cheesecakes, etc.!

Ever baked a gorgeous pie or dessert, topped it with some piped whipped cream, only to see that whipped cream collapse or lose its shape after a few hours (or the next day)?
I have, and that’s why I make and decorate with STABILIZED whipped cream which holds its shape for days, just like the pretty pies at a bakery!
Did you know making stabilized whipped cream is EASY to make by adding a simple ingredient? Yep, that’s right! By adding unsweetened gelatin, you will be able to pipe gorgeous, whipped cream decorations onto your favorite desserts, and they will still look fantastic 3-4 days later!
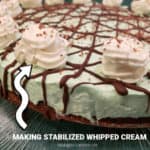
I’ve used stabilized whipped cream quite recently to decorate a Mint Brownie Pie (shown above), and on a Lemon Cream Cheese Tart. Here’s how to make it:
Scroll Down For A Printable Recipe Card At the Bottom Of The Page
Making Stabilized Whipped Cream
TIP: Before beginning, place a large mixing bowl and a whisk attachment (for stand mixer or electric mixer) in the freezer for 5 minutes to get them chilled. This will help the whipped cream to thicken a bit quicker when you make it!
Okay… here we go. Unflavored gelatin (or gelatin) is the secret ingredient! You can find this at most grocery stores in either the baking section or the Jello section. The way I buy it is in small envelopes (see photo below).
This recipe yields two cups of whipped cream, and will only use a TEASPOON of gelatin powder, which is less than one envelope of the powder, and this stuff will last a long time, so it’s a good investment.
Add 4 teaspoons of water to a small, microwave-safe bowl. Sprinkle the gelatin powder on top, and let it sit, undisturbed for 3-4 minutes. After that, place the bowl of gelatin in the microwave.
Cook on high for 10 seconds… just long enough to fully dissolve the gelatin! Give it a stir, then let the gelatin cool a little before adding it to the whipped cream (as shown below).


Preparing The Whipped Cream
Remove the bowl and whisk attachment from the freezer. It should be nice and COLD! Whip heavy whipping cream, powdered sugar, and vanilla extract on high speed until it starts to thicken a bit and soft peaks can be formed.

Slowly add the microwaved and cooled gelatin to the whipped cream while whipping on medium speed until stiff peaks form.
TIP: It’s important to not DUMP the gelatin all at once into the whipping cream mixture or else it might get clumpy, okay?


How Do I Know When It Is Ready To Use?
You can tell if the peaks are stiff enough by turning off the mixer and lifting the whisk attachment up from the whipping cream several times.
When “done”, stiff peaks of whipping cream will stand up firmly on their own, and they shouldn’t collapse or fall over in the bowl.
That is how you will know the stabilized whipped cream is ready! Transfer it to a pastry bag and refrigerate it until you are ready to decorate or serve your dessert.
You can store the stabilized whipped cream for several days in the pastry bag or in a sealed container. It will hold its shape for several days on a refrigerated dessert.


That’s it! See how easy it is? Pretty soon you can be making stabilized whipped cream, too! Your beautiful desserts with their nice, whipped cream decorations will thank you for it!
Thank you for stopping by, and I invite you to come back again soon for more family friendly recipes. Take care, may God bless you, and have a wonderful day.
Looking For More Kitchen TIPS?
You can find ALL of my recipes in the Recipe Index, which is located at the top of the page. I have some fun kitchen tips to choose from, including:
- Homemade Mayonnaise
- How To Cook Bacon In An Oven
- How To Freeze Ginger
- How To Make Lemon Curd
- How To Test Yeast For Viability
Want More Recipes? Get My FREE Newsletter!
I publish a newsletter 2 times per month (1st and 15th) with lots of recipes, tips, etc.
Would you like to join our growing list of subscribers?
There is a Newsletter subscription box on the top right (or bottom) of each blog post, depending on the device you use.
You can submit your e-mail address there, to be added to my mailing list.
Find Me On Social Media:
Facebook page: The Grateful Girl Cooks!
Pinterest: The Grateful Girl Cooks!
Instagram: jbatthegratefulgirlcooks

Original recipe source: Danielle, at livewellbakeoften.com.how-to-make-stabilized-whipped-cream/
↓↓ PRINTABLE RECIPE BELOW ↓↓
Making stabilized whipped cream is easy! This sweetened cream will hold it's shape for days- perfect for decorating pies, cheesecakes, etc.!
- 4 teaspoons water
- 1 teaspoon unflavored gelatin powder
- 1 cup heavy whipping cream
- ¼ cup powdered sugar (confectioner's)
- ½ teaspoon vanilla extract
Before beginning, place a large mixing bowl and a whisk attachment (for stand mixer or electric mixer) in the freezer for 5 minutes to get them cold. This helps whipped cream to thicken quicker!
Add 4 tsp. water to a small, microwave-safe bowl. Sprinkle gelatin on top; let it sit, undisturbed for 3-4 minutes. Place bowl of gelatin in microwave. Cook on high for 10 seconds... just long enough to dissolve gelatin! Stir, then let gelatin cool before adding to whipped cream
Remove bowl and whisk attachment from freezer. Beat whipping cream, powdered sugar, and vanilla (using whisk attachment) on HIGH until it begins thickening and soft peaks can be formed.
Slowly add cooled gelatin to whipped cream while whipping on LOW speed. Once combined, turn mixer to MEDIUM speed; beat until stiff peaks form. TIP: Don't dump gelatin all at once into whipping cream or it might clump.
You can tell if the peaks are stiff by turning off the mixer. Lift up the whisk attachment from the whipping cream several times. Stiff peaks of whipping cream will stand up firmly on their own, and won't collapse or fall over. Transfer whipped cream to a pastry bag to decorate. Store stabilized whipped cream for several days in pastry bag or sealed container. It will hold it's shape for several days on a refrigerated dessert.
NOTE: Caloric total is for the entire 2 cups of prepared whipped cream.
Here’s one more to pin on your Pinterest boards!