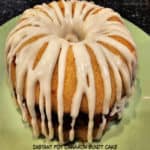
Make a delicious Air Fryer Banana Pecan Cake to serve as a dessert, coffeecake or an afternoon snack! Serve a slice with hot tea or coffee!

Today I want to share a delicious recipe that can serve a dual purpose! This yummy air fryer banana pecan cake can be enjoyed as a coffeecake OR as a dessert cake!
It is simple to make and tastes wonderful, with crunchy pecans and small pieces of banana distributed throughout each slice.
I really think you will enjoy this recipe, because it is perfect for hot summer days when you don’t want to heat up the kitchen by baking a cake for a long amount of time.
Here’s how to make this absolutely delicious air fryer banana pecan cake.
Scroll Down For A Printable Recipe Card At The Bottom Of The Page
Prepare The Bundt Pan
For this recipe you will need a 7″ bundt cake pan. This is a slightly smaller pan than a regular-sized bundt pan (I got it on Amazon), but it’s small enough to fit in my air fryer basket AND in my Instant Pot.
Spray the bottom, sides and center cylinder with non-stick baking spray. It’s important to spray the pan so the bundt cake won’t stick to the pan once done!
This will also make it easier for the bundt cake to separate from the pan when it’s turned upside down to remove the cake after it is finished cooking.

Prepare The Batter
Peel two very ripe bananas and place them in a medium bowl. It’s important to use ripe bananas with brown spots on them, because this means they will be sweeter!
Use a fork and mash the bananas up in the bowl. The mashed bananas do not have to be fully smooth! It’s perfectly okay to leave small little pieces of banana in there, but you really don’t want “big chunks” of bananas in the batter.


Add sour cream, vegetable oil and a large egg to the mashed banana mixture. Use a spoon or fork and stir to combine these ingredients.
NOTE: Use a spoon or fork- don’t use an electric mixer to combine the ingredients because you want small bits of banana to remain intact in the batter.

You can see in the photo below the small pieces of the banana in the batter. That is what you want! Set this mixture aside while you mix the dry ingredients in a separate bowl.

Add Banana Mixture To The Dry Ingredients
In a separate bowl, stir all-purpose flour, granulated sugar, baking soda and salt together until they’ve been combined.
Pour the banana mixture into these dry ingredients and stir only until they have been combined (don’t over-mix).
Add the chopped pecans and stir gently until they are dispersed and incorporated into the batter. You can easily substitute walnuts for the pecans, if desired.
If you do not want any nuts in the cake, simply leave them out! No problem!


Pour the batter into the greased bundt cake pan, making sure it is evenly dispersed in the pan. Preheat your air fryer to 310° F.

Cook The Cake In the Air Fryer
Cook the air fryer banana pecan cake in the preheated air fryer at 310°F. for 25-28 minutes OR until a skewer inserted deep into the middle of the cake comes out free of batter. Oven temps can vary widely, so please keep an eye on the cake.
The cake should look fairly brown in color when it’s done, but the most important thing is to make sure it is fully cooked through. Be sure and read my true story below!
True Story
The first time I made this I cooked the cake according to the directions. When I thought it was done, I inserted a toothpick into the middle, and it came out clean.
I went to flip the cake out of the pan, and it still had some wet batter deep down inside (my little 2″ long toothpick didn’t reach far enough down into the cake to detect not-fully cooked batter!).
Now I highly recommend using a long skewer (if you have one) so you can avoid this. By the way, I flipped that cake right back over (batter still oozing slightly out the bottom, threw it back in my air fryer and cooked it a few more minutes and it survived (thank goodness).
All that said, don’t make the same mistake I did because it was NOT fun!

Let the cake cool for about 5-10 minutes (still in the pan), after removing it from the air fryer. It should pull away slightly from the inside edges of the pan. The next step is to remove it from the pan by “inverting” the cake.
To do this, place a large plate (top side down) on top of the bundt pan. Holding both the plate and the bundt cake securely, flip the pan over.
The cake should easily release from the pan onto the plate. Move the air fryer banana pecan cake to a wire rack and let it cool completely.
TIP: The top of the cake may be very light in color compared to the other parts of the cake (it was upside down, remember?). If desired, you can put the cake on a rack about 4″-5″ away from your oven’s broiler and let it “brown” more for 1-2 minutes (keep a close eye on it). That’s not really necessary, but if you want it to be more browned on top for presentation, it is an option!

Serve And Enjoy The Air Fryer Banana Pecan Cake
This banana pecan cake tastes best when served at room temperature! It is moist, delicious and filled with absolutely wonderful banana flavor!

Cut a slice and serve this delicious air fryer banana pecan cake with a cold glass of milk or a steaming hot cup of coffee or tea.
I’m confident you’ll love this yummy treat, whether you enjoy it for breakfast, a little snack or served as dessert!

I hope you have the opportunity to make this delicious Air Fryer Banana pecan Cake for yourself and those you love. I’m positive you’ll enjoy this delicious cake (or coffeecake)!
Thank you for stopping by, and I invite you to come back again soon for more family-friendly recipes. take care, may God bless you, and have a wonderful day!
Looking For More Fun Air Fryer Recipes?
You can find ALL of my recipes in the Recipe Index, which is located at the top of the page. I have LOTS of air fryer recipes to choose from (sweet AND savory), including:
- Air-Fried Mozzarella Bites
- Blueberry French Toast Cups
- Air Fryer Cheddar Biscuits
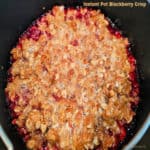
- Blackberry Air Fryer Handpies
- Air Fryer Italian Meatballs
Want More Recipes? Get My FREE Newsletter!
I publish a newsletter 2 times per month (1st and 15th) with lots of recipes, tips, etc.
Would you like to join our growing list of subscribers?
There is a Newsletter subscription box on the top right (or bottom) of each blog post, depending on the device you use.
You can submit your e-mail address there, to be added to my mailing list.
Find Me On Social Media:
Facebook page: The Grateful Girl Cooks!
Pinterest: The Grateful Girl Cooks!
Instagram: jbatthegratefulgirlcooks

Recipe source and with thanks to Justine, at: Easy Ninja Foodi Air Fryer Banana Bread Bundt Cake Recipe
↓↓ PRINTABLE RECIPE BELOW ↓↓

Make a delicious Air Fryer Banana Pecan Cake to serve as a dessert, coffeecake or an afternoon snack! Serve a slice with hot tea or coffee!
- non-stick baking spray to grease bundt pan
- 2 large VERY RIPE bananas with brown spots on peel if possible
- ¼ cup light sour cream
- ¼ cup vegetable oil
- 1 large egg
- ¾ cup all-purpose flour
- ½ cup granulated sugar
- ¼ teaspoon baking soda
- ¼ teaspoon salt
- 3 Tablespoons chopped pecans
Spray the bottom, sides and center cylinder of a 7" mini bundt pan with non-stick baking spray. It's important so the cake won't stick to the pan once done!
Peel bananas; put them in a medium bowl. TIP: use very ripe bananas with brown spots, because they're sweeter! Use a fork to mash bananas. NOTE: don't use an electric mixer; you want small bits of banana to remain intact in the batter. Add sour cream, vegetable oil and egg to banana mixture. Stir well, to combine.
In a separate bowl, stir flour, sugar, baking soda and salt together until combined. Pour banana mixture into these dry ingredients; stir only until they have been combined (don't over-mix). Add chopped pecans; stir gently until incorporated. Pour batter into greased bundt cake pan; evenly spread batter.
Preheat air fryer to 310° F.
Cook cake at 310°F. for 25-28 minutes OR until a skewer inserted deep into the middle of the cake comes out free of batter. Oven temps can vary widely, so keep an eye on the cake. The cake should look fairly brown in color when it's done, but the most important thing is to make sure it is fully cooked through.
Let cake cool for about 5 minutes (still in the pan), after removing it from the air fryer. It should pull away slightly from the edges of the pan. The next step is to remove it from the pan by "inverting" the cake. To do this, place a large plate (top side down) on top of the bundt pan. Holding both the plate and the bundt cake securely, flip the pan over. The cake should easily release from the pan onto the plate. Move the air fryer banana pecan cake to a wire rack and let it cool completely. *SEE NOTE BELOW*
Once cooled to room temperature, slice and serve this delicious cake! Enjoy!
NOTE: *The top of the cake may be very light in color compared to the other parts of the cake (it was upside down, remember?). If desired, put the cake on a rack about 4"-5" away from your oven's broiler and let it "brown" more for 1-2 minutes (keep a close eye on it). That's not really necessary, but if you want it to be more browned on top for presentation, it is an option!*
Here’s one more to pin on your Pinterest boards!