Chocolate Espresso Muffins are a cinch to make in an Air Fryer! These delicious breakfast or snack treats take 25 minutes, from start to finish!

Today I want to share a delicious recipe for yummy chocolate espresso muffins COOKED IN AN AIR FRYER! These muffins are ridiculously EASY to make, and taste really GOOD!
We are sure enjoying the air fryer I ordered last year using gift cards I was given for my birthday. In air fryers, highly heated air cooks all types of food, and gives it the “effect” of frying without having to use lots of cooking oil.
I’ve also included directions for preparing them in an oven (see recipe card below), in case you don’t have access to an air fryer.
I found this particular recipe in the cookbook that came along with the Cosori air fryer I got last year.
Scroll Down For A Printable Recipe Cad At the Bottom Of The Page
TRUE STORY OF MUFFIN FAILURE!
When I first got my air fryer last year, I’m embarrassed to tell you this, BUT I made these muffins without a muffin tin! I filled up paper liners (cause the cookbook said to fill up the muffin cups, and paper liners are KINDA muffin cups, right?), then cooked them. Probably one of the dumbest things I’ve ever done in the kitchen!
I had NO idea what I was doing with this newfangled air fryer thing of mine! BIG MISTAKE! They cooked all right but came out looking like hard chocolate hockey pucks! Ugh.
Seriously… the batter had spread and flattened way out in the paper liners (probably begging for mercy). True Story. I was mortified! Into the trash they went.
Moral of That Sad Story: Don’t Be Like ME. When making muffins in an air fryer, you will need to have muffin tins that fit in the basket of your air fryer. DUH. The End.
Once I figured it out, there have been no problems with them ever since! The ones I have hold 4 muffins each (I ordered them online). This recipe yields 8 muffins, so I cooked them in 2 batches!
Make The Batter
Measure all-purpose flour, sugar, cocoa powder, espresso powder (or instant coffee), baking powder, salt and baking soda into a medium sized bowl.
Whisk these “dry” ingredients together to fully combine them and then set the bowl aside.

In a separate bowl, whisk together the milk, egg, vanilla extract, oil and vinegar. Once combined, pour these “wet” ingredients into the bowl with the “dry” ingredients.
Whisk well, to fully incorporate all ingredients. THIS is your batter for the chocolate espresso muffins! EASY!


Cook Chocolate Espresso Muffins In Air Fryer
You will need muffin tins that are small enough to fit in your air fryer. Spray the muffin cups with non-stick cooking spray OR fill with paper liners and then lightly spray.
Divide the batter between 8 muffin cups. Each muffin cup should be about ¾ of the way full.

Cooking The Muffins In An Air Fryer
Preheat the air fryer to 300°F. Once the air fryer is preheated, quickly but carefully put your filled muffin tin into the basket. Be careful, because the air fryer is hot at this point!
Cook the chocolate espresso muffins at 300°F for 15 minutes. I recommend checking on them for “done ness” at the 13-minute mark.
Pause the machine and check by inserting a toothpick into the top center of a muffin. If the toothpick comes out clean (free of batter), the muffins are done but if they need more time, continue to cook until done.
This step is important because temperatures can vary between different brands of air fryers and the cooking time may vary slightly for your appliance.

This is how the muffins look like after cooking them in the air fryer. They can be a little wonky looking at times (this was my 3rd batch), but they are absolutely delicious!
Transfer the muffins from the pans to a wire rack to cool. Pop the remaining batch of muffins into the air fryer and then you’re done!

Ready To Enjoy These Muffins!
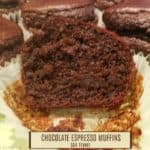
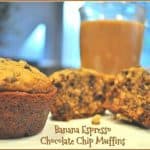
The photo below shows one of the chocolate espresso muffins, sliced in half. The inside is perfectly cooked! This was a fun way to make breakfast muffins in an air fryer. Who knew?


Can Chocolate Espresso Muffins Be Baked In An OVEN?
Yes! If you do not have access to an air fryer, these muffins can be baked in a traditional oven. They will only take a few minutes more to bake!
Prepare the batter using the instructions below (in the recipe card). Cook them in a 375°F oven for between 15 and 20 minutes. Insert a toothpick into the center of the muffin to check for doneness. If it comes out clean, they are ready!
I sincerely hope you and those you love will enjoy these delicious chocolate espresso muffins, whether you bake them or cook them in your air fryer!
Thank you for stopping by, and I invite you to come back again soon for more family friendly recipes. Take care, may God bless you, and have a wonderful day.
Looking For More AIR FRYER Recipes?
You can find ALL of my recipes in the Recipe Index, which is located at the top of the page. I have a nice variety of air fryer recipes to choose from, including:
- Air Fryer Chicken Parmesan
- Air Fryer Chicken Chimichangas
- Blackberry Air Fryer Handpies
- Crunchy Air Fryer French Toast
- Air Fryer Ratatouille
Want More Recipes? Get My FREE Newsletter!
I publish a newsletter 2 times per month (1st and 15th) with lots of recipes, tips, etc.
Would you like to join our growing list of subscribers?
There is a Newsletter subscription box on the top right (or bottom) of each blog post, depending on the device you use.
You can submit your e-mail address there, to be added to my mailing list.
Find Me On Social Media:
Facebook page: The Grateful Girl Cooks!
Pinterest: The Grateful Girl Cooks!
Instagram: jbatthegratefulgirlcooks

Original recipe source: “Cosori Air Fryer Recipes”, (this recipe booklet came with the purchase of my Cosori air fryer), page 108
↓↓ PRINTABLE RECIPE BELOW ↓↓
Chocolate Espresso Muffins are a cinch to make in an Air Fryer! These delicious breakfast or snack treats take 25 minutes, from start to finish!
- 1 cup all purpose flour
- ¾ cup light brown sugar
- ½ cup cocoa powder
- ½ teaspoon baking powder
- ½ teaspoon salt
- ½ teaspoon espresso powder *see Notes Section
- ½ teaspoon baking soda
- 1 large eggs
- ¾ cup milk
- 1 teaspoon vanilla extract
- 1 teaspoon apple cider vinegar
- ⅓ cup vegetable oil
- non stick cooking spray
Measure flour, sugar, cocoa powder, espresso powder (or instant coffee), baking powder, salt and baking soda into a medium sized bowl. Whisk together to fully combine.
In a separate bowl, whisk together milk, egg, vanilla, oil and vinegar. Once combined, pour into the bowl with the flour, cocoa powder, etc. Whisk well, to fully mix ingredients, and remove any lumps in the batter.
You will need muffin tins small enough to fit your air fryer basket. Spray muffin cups with non-stick cooking spray OR fill with paper liners, and then lightly spray. Divide batter between 8 muffin cups. Each muffin cup should be about 3/4 of the way full.
Preheat air fryer to 300°F. Once preheated, quickly but carefully place filled muffin tin into the basket. Be careful, because air fryer is hot! Cook at 300°F for 15 minutes. Check for "done-ness" at the 13 minute mark. Pause machine and check, by inserting a toothpick into center of a muffin. Continue to cook until done, and toothpick comes out clean. Transfer pan from air fryer basket to a wire rack to cool. Let cool for 5 minutes, before removing muffins from pan. Cook remaining batch of muffins, and enjoy, once cooled to room temperature!
Prepare muffins following instructions above. Cook muffins at 375°F for 15-20 minutes. Insert a toothpick into center of the muffin to check for doneness. If it comes out clean, they are ready! Let cool for 5 minutes before removing them from pan.
**No espresso powder? Substitute 3/4 teaspoon finely ground instant coffee granules!**
Here’s one more to pin on your Pinterest boards!


