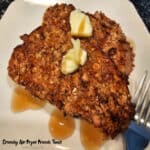
Crunchy Air Fryer French Toast is a decadent breakfast featuring sliced Challah bread coated in egg, cinnamon, vanilla and a crispy topping!

Last year my husband and I went out for breakfast for the first time in months. We went to a favorite local restaurant that had just begun offering breakfast and I was intrigued by a French Toast recipe that was on the menu.
The French toast had an Irish whiskey batter and a crunchy cereal topping, and they offered Irish whisky syrup to top it with, if desired. Well, I ordered the maple syrup instead and loved this strange new twist on French toast (see picture below).
I came home after enjoying this meal and decided to try and make it as a “family-friendly” breakfast months later. This recipe for Crunchy air Fryer French Toast is the result.
My biggest question was how to get that crunchy topping… and once I figured it out, I make some for myself and my husband. It tasted GREAT! So, here’s my version of how to make Crunchy Air Fryer French Toast (without the whiskey!).

Scroll Down For A Printable Recipe Card At The Bottom Of The Page
Prepare The Challah Bread
I use challah bread to make this recipe, but you can use French bread, Brioche or Texas Toast if desired. Slice FOUR 1″ thick slices from the loaf.
This recipe (as written below) will require 4 one-inch slices of bread, which will be enough for two servings (two slices per serving).
Challah bread can easily be found in most grocery stores, however if you are interested in making your own, check out my recipe for classic challah bread.
Once you cut the bread into slices, set the four pieces aside while you make the egg batter.

Make The Egg Batter
Place two large eggs, milk, ground cinnamon and vanilla extract in a medium-sized bowl. Make sure the bowl is large or wide enough to lay a piece of the challah bread in it flat.
Use a whisk or a fork to fully combine these four ingredients into a wet batter. You may find the cinnamon doesn’t fully incorporate. Simply keep it mixed in as you dredge the bread in it (later).
Once the wet batter is made, set it aside while you make the crunchy topping for the French toast.


Prepare The Crunchy Topping
The easiest way to make the topping is to place 1½ cups of Raisin Bran Crunch (REMOVE THE RAISINS) into a food processor and pulse it until you are left with much smaller flakes.
I discovered how the crunch from this type of cereal kept its crunch even after cooking and that is why I used it. NOTE: There may be other cereals that hold a crunch as well, but this is the one I will consistently use.
If you don’t have access to a food processor, place the cereal flakes in a large plastic storage bag. Seal the bag, then lightly pound on it with a rolling pin or meat mallet until you have “pounded” the flakes manually into much smaller pieces.


Coating The French Toast Slices
Place the two bowls (one with egg batter on the left and the other one with the crunch topping) on your kitchen counter side by side. This will be your French toast “dipping” station!

Using one slice of challah bread at a time, place it into the egg batter. Once the bottom side is coated, carefully flip the bread over to cover the other side with the egg batter.
Gently press the bread into the batter, to ensure it is fully covered. Lift the bread up and let any excess batter drip back down into the bowl.
Immediately place the batter-coated bread into the crunchy topping and repeat the process. Cover one side of the bread, then turn and cover the other side with the crunchy topping.
NOTE: The actual size/thickness of the bread you choose to use “may” require a bit more egg batter than called for. This has never been the case for me, but since there are so many different sizes of bread available nowadays, I add this as a tip!


Repeat this process until all slices are covered on both sides with batter and the topping. I find it helpful to lay each piece (once covered) on a piece of parchment paper or foil while coating the other slices.

Air Fry The French Toast
Preheat your air fryer as the manufacturer suggests. Place the four slices of French toast in the air fryer basket, making sure to leave a bit of space between each slice (for better hot air circulation).
Cook the French toast at 370°F. for 5 minutes, then check it. The French toast (once done) should be lightly browned on top, cooked through, and should also be very crispy on the outside.


Serve The Crunchy Air Fryer French Toast
Use a spatula to transfer the crunchy air fryer French toast out of the air fryer and onto serving plates. Serve immediately while the French toast is hot.
Top the French toast with your favorite toppings such as butter, maple syrup, powdered sugar, fruit, etc. Use whatever you would normally enjoy on your French toast!

All that is left to do is grab a fork and dig into this delicious breakfast treat! The topping is crispy and crunch, yet the inside is gloriously soft!
I am confident you and those you love are going to enjoy this yummy breakfast! For us, it is an occasional breakfast treat, not an “all the time” treat.
The recipe can be doubled or tripled to suit your needs, but you will need to prepare it in batches, so the air fryer basket isn’t overcrowded.

I hope you have the opportunity to make Crunch Air Fryer French Toast for your family or friends and trust you will enjoy it as much as we do.
Thanks for stopping by, and I invite you to come back again soon for more family-friendly recipes. Take care, may God bless you, and have a wonderful day.
Looking For More BREAKFAST Recipes?
You can find ALL of my recipes in the Recipe Index, which is located at the top of the page. I have a variety of delicious BREAKFAST recipes to choose from, including:
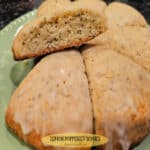
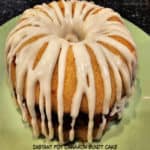
- Blueberry Crumble Muffins
- Pumpkin Chocolate Chip Pancakes
- Classic French Toast
- Florentine Eggs and Bacon
- Pecan Pie Baked Oatmeal
Want More Recipes? Get My FREE Newsletter!
I publish a newsletter 2 times per month (1st and 15th) with lots of recipes, tips, etc.
Would you like to join our growing list of subscribers?
There is a Newsletter subscription box on the top right (or bottom) of each blog post, depending on the device you use.
You can submit your e-mail address there, to be added to my mailing list.
Find Me On Social Media:
Facebook page: The Grateful Girl Cooks!
Pinterest: The Grateful Girl Cooks!
Instagram: jbatthegratefulgirlcooks

↓↓ PRINTABLE RECIPE BELOW ↓↓
Crunchy Air Fryer French Toast is a decadent breakfast featuring sliced Challah bread coated in egg, cinnamon, vanilla and a crispy topping!
- 4 slices Challah bread slices (each 1" thick)
- 1½ cups Raisin Bran Crunch cereal* REMOVE THE RAISINS (don't use)
- 2 large eggs
- ¼ cup low-fat milk (1%)
- 1 teaspoon vanilla extract
- ½ teaspoon ground cinnamon
Slice FOUR 1" thick slices of challah bread. Set slices aside.
Put eggs, milk, cinnamon and vanilla in a shallow bowl (large/wide enough to lay a bread slice in it flat. Use whisk or fork to mix into a wet batter. Set aside.
Put Raisin Bran Crunch (REMOVE RAISINS) in a food processor; pulse until they become much smaller flakes. No food processor? Put cereal in a large plastic storage bag. Seal bag, lightly pound cereal with rolling pin or meat mallet until flakes are crushed into smaller pieces.
Place bowls (egg batter on the left/crunchy topping on the right) on kitchen counter, side by side.
Place 1 bread slice into egg batter. Once bottom side is coated, flip bread over, coat other side. Gently press bread into the batter, to ensure it's fully covered. Lift bread up; let excess batter drip down into the bowl. Immediately place bread into the crunchy topping Cover one side of the bread; flip and cover other side with topping. Repeat until all slices are covered (both sides) with batter and topping. Lay slices on parchment paper (or wax paper) while coating other slices.
Preheat air fryer to 370℉. Lay bread slices in the inner basket in single layer, leaving space in between each slice (for best air circulation). Cook at 370°F. for 5 minutes. Once done (5-6 minutes) the French toast should be lightly browned on top, cooked through, and crispy on the outside.
Use a spatula to transfer French Toast out of the air fryer onto serving plates. Serve immediately, garnished with favorite toppings (butter, syrup, powdered sugar, fruit, etc.). Enjoy!
NOTE: The size/thickness of the bread you use "may" require more egg batter than called for, because there are so many different sizes of bread available nowadays!
Here’s one more to pin on your Pinterest boards!