Learn how to can apple pie filling for your pantry! Once canned, having homemade pie filling already made for pies, cobblers, etc. is a real time saver!

Okay, lets be honest. Making canned apple pie filling takes some time to pull off, but can I remind you that the results will be worth it, in time saved down the road? You will be able to pull a jar right out of your pantry and whip up a dessert in much less time! YEEHAW!
This “recipe” came straight out of my treasured canning book called “Ball Complete Book Of Home Preserving”, and it’s a real keeper! Once made, you can use this apple pie filling for pies, cobblers or crisps, turnovers, or even as a topping for PANCAKES!
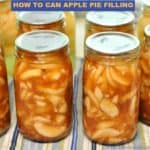
The recipe (as written below in the recipe card) will give you a yield of 3 quart jars (plus a pint) OR it will give you about 7 smaller pint jars of apple pie filling. **Please note that I DOUBLED the recipe, and made 7 QUART sized jars of pie filling (as shown in photos)!
Scroll Down for A Printable Recipe Card At The bottom Of The Page
Prepare Canning Equipment
Before canning apple pie filling, prepare quart (or pint) size canning jars, flat lids and screw bands, as well as a water bath canner, according to the manufacturer instructions, and USDA safe canning guidelines.
Prepare The Apples
There are several wonderful varieties of apples that are great for pie filling. A few that come to mind are Granny Smith, Honeycrisp, Jonathan, and my favorite, Gravensteins (shown below). I love to go pick them at local U-Pick Farms! It takes quite a few apples to make 7 quarts, as you can imagine! Basically, each quart sized jar will require approximately 3 pounds of apples!

Peel, remove the core, and slice the apples. Treat the apples with lemon juice, fruit fresh or follow my old-fashioned tip here, to keep the apples from darkening once exposed to air.
It will take about 3-40 minutes to peel, slice and treat all those apples. My suggestion is to get someone to help you, if possible! This is a GREAT way to get a friend or other family member involved, in order to save time! This is especially helpful if doubling the recipe!
Blanch The Apple Slices
You will need to blanch the apple slices (once they’re peeled , sliced and treated). Bring a large pot of water to a boil. Add 6 cups of sliced apples at a time to the boiling water. Cook for 1 minute, then remove and keep them warm while you finish blanching all the apples.

Prepare The Pie Filling
A lot of folks thicken pie fillings with flour or cornstarch. That’s fine for making a pie. However, when CANNING apple pie filling, these ingredients don’t hold up too well in storage, so a product called ClearJel (for cooking, not instant) is typically used. ClearJel is a type of cooking starch (approved for home canning) that can be ordered online from many retailers.
To make the pie filling, measure granulated sugar, ClearJel, water, apple juice, cinnamon and nutmeg into a LARGE stainless steel saucepan. Bring this to a boil on medium-high heat. Stir constantly, and continue to cook until it starts to bubble and thickens. Add the lemon juice, and cook for 1 more minute, continuing to stir constantly! Take off heat when done.

Add The Apple Slices To Pie Filling
Transfer the warm (drained) apple slices to this thickened pie filling in the large saucepan, and fold them into the mixture. Heat the apple pie filling just until heated through, before placing the filling into your hot, prepared jars.
Time To Can Apple Pie Filling!
Once heated through, ladle the hot pie filling into prepared canning jars, being sure to leave 1 inch of headspace in each jar. Use a plastic utensil to remove the air bubbles from the jars, making adjustments to the headspace if necessary, by adding or removing filling.
Wipe the jar rims clean with a wet cloth or paper towel, to help ensure a good seal. Place flat lid centered on top, and add the jar ring. Screw the band on until it is fingertip tight.
How To Can Apple Pie Filling
Place the hot jars on an elevated rack and lower into simmering water in canner. Make sure that the water completely covers the tops of the jars (by about an inch). Place lid on canner. Bring the water to a gentle rolling boil, and process the jars for 25 minutes AFTER it begins boiling. The processing time is the same for both pint and quart sized jars.

When processing time is finished, turn off heat, and carefully remove lid from the pan. Wait for 5-10 minutes, and then remove the HOT jars from the pan, using canning tongs. Transfer jars to a dish towel on counter. IMPORTANT NOTE: Don’t place hot jars directly onto your counter top, as temperature variances (hot jars vs. cold counter top) might cause jars to crack.

Let The Jars Cool Completely
Let the jars of apple pie filling cool completely (overnight or 12 hours) without disturbing. Once completely cooled, check to make sure jars sealed. The jar lids should have NO GIVE in them if properly sealed. If you find one has not sealed properly, it is not safe to store. Refrigerate it, and use it within a week.
Wipe the jars clean with a wet cloth, then label (with date canned), and place them in your pantry for long term storage. There you go… you just learned how to can apple pie filling!

Even though it is a labor-intensive process to make pie filling, the benefit comes later! It’s very convenient to make a pie, cobbler or dessert requiring apple pie filling by grabbing an “already made” jar right out of the pantry!
Looking For More CANNING Recipes?
You can find all of my canning recipes in the Recipe Index, located at the top of the page. I have recipes for a variety of foods and jams. They include:
- How To Can Peach Pie Filling
- How To Can Strawberry Jam
- How To Can Chocolate Raspberry Sundae Sauce
- How To Can Green Beans
Interested In More Recipes?
Thank you for visiting this website. I appreciate you using some of your valuable time to do so. If you’re interested, I publish a newsletter 2 times per month (1st and 15th) with all the latest recipes, and other fun info. I would be honored to have you join our growing list of subscribers, so you never miss a great recipe!
There is a Newsletter subscription box on the top right side (or bottom) of each blog post, depending on the device you use, where you can easily submit your e-mail address (only) to be included in my mailing list.
You Can Also Find Me On Social Media:
Facebook page: The Grateful Girl Cooks!
Pinterest: The Grateful Girl Cooks!
Instagram: jbatthegratefulgirlcooks

Original recipe source: my beloved “Ball Complete book Of Home Preserving”, published 2006, The Jarden Corporation, page 170.
Learn how to can apple pie filling for your pantry! Once canned, having homemade pie filling already made for pies, cobblers, etc. is a time saver!
- 12 cups apples , peeled, cored, sliced, treated to prevent browning
- 2¾ cups granulated sugar
- ¾ cup ClearJel
- 1¾ teaspoons ground cinnamon
- ½ teaspoon ground nutmeg
- 1¼ cups cold water
- 2½ cups unsweetened apple juice
- ½ cup lemon juice
Prepare quart (or pint) size canning jars, flat lids and screw bands, and water bath canner, according to the manufacturer instructions, and USDA safe canning guidelines.
Peel, remove the core, and slice the apples. Treat the apples with lemon juice (not from the ingredient list), fruit fresh or another method, to keep the apples from darkening once exposed to air. Once they're peeled , sliced and treated, blanch the slices . Bring a large pot of water to a boil. Add 6 cups of sliced apples at a time to the boiling water. Cook for 1 minute, then remove and keep them warm while you finish blanching all the apples.
To make the pie filling, measure granulated sugar, ClearJel, water, apple juice, cinnamon and nutmeg into a LARGE stainless steel saucepan. Bring this to a boil on medium-high heat. Stir constantly, and continue to cook until it bubbles and thickens. Add ½ cup lemon juice, and cook for 1 more minute, stirring constantly! Take off heat when done. Transfer warm (drained) apple slices into pie filling in large saucepan, and fold them into the mixture. Re-heat filling only until heated through, before placing the filling into hot, prepared jars.
Ladle hot pie filling into prepared canning jars, leaving 1 inch of headspace in each jar. Use a long utensil inserted several times into jars, to remove the air bubbles, making adjustments to the headspace if necessary, by adding or removing filling. Wipe jar rims clean, to help ensure a good seal. Place flat lid on top, and add the jar ring. Screw the band on until it is fingertip tight. Place the hot jars onto an elevated rack and lower rack and jars into simmering water in canner. Make sure the water completely covers the tops of the jars (by about an inch). Place lid on canner.
Bring the water to a gentle rolling boil, and process the jars for 25 minutes AFTER it begins boiling. When processing time is finished, turn off heat. Remove lid from pan. Wait 5-10 minutes, and then remove the VERY HOT jars from the pan, using canning tongs. Transfer jars to a dish towel on counter. IMPORTANT NOTE: Don't place hot jars directly onto your counter top, as temperature variances (boiling hot jars vs. cold counter top) might cause jars to crack. Let the jars of apple pie filling cool completely (overnight or 12 hours) without disturbing.
Once completely cooled, check to make sure jars sealed. The jar lids should have NO GIVE in them if properly sealed. If you find one has not sealed properly, it is not safe to store. Refrigerate it, and use it within a couple weeks. Wipe the jars clean with a wet cloth, then label (with date canned), and place them in your pantry for long term storage. Enjoy!
NOTE: If treating apples with lemon juice to prevent browning, you will need a couple extra lemons for this purpose.
Here’s one more to pin on your Pinterest boards!
Can you just use water instead of apple juice?
How much or many jars do you use for a pie?
Any other ideas like strudel?
Hi, Dawn… I typically use one quart jar for a regular (not deep dish) sized pie. Have a great day.
I had sifoning from my jars, outside of jars very sticky. They are sealed bur am wondering if it’s a true seal. Are they safe?
Why use apple juice and could I use fresh apple cider
Can you use the low pectin instead or surejel. I am a first timmer and have never seen surejel before. Thanks…
Hi, Kimberly… I am not sure at all about that, having never, ever used it to can fruit pie filling. Sorry I can’t be more help.
I canned 28 quarts of pie filling last week…..my first time also. I used a recipe from Google that stated to not use anything but clear jel…..not to be confused with sure jel, and to be sure to use the cooking kind of clear jel since there are 2 kinds out there. The recipe did state that at the time you open a jar to make a pie, use corn starch to thicken in a saucepan before adding to crust, if the filling isn’t as thick as you’d like but to NEVER add flour, starch, nor sure jel to the jars while canning them. Only use clear jel, the cooking type. Maybe that helps?
what caused apples to stay at top of jar? jar was full when i stared water bath
There are several reasons that could happen. Here’s a helpful resource: https://www.pickyourown.org/canning_floating_fruit.php
Hi Rita, apples….and other fruits contain a surprising amount of air. If they aren’t blanched or blanched long enough to remove most air, they will shrink and release the air in the jar and the result will be a loss of volume and the fruit will float to the top. If you blanched your apples you will probably remember seeing many, many tiny bubbles created by the fruit? That is the air escaping. It just is a good practice to blanch long enough to remove most of the air…..for me, about 2 minutes, after they start boiling, works. Hope that helps?