Make a delicious Classic Pumpkin Pie from scratch! Follow my step-by-step instructions to help you make this traditional, well-loved dessert!

I don’t know about you and your family, but mine grew up enjoying pumpkin pie every single Thanksgiving (and other times of the year, too).
My Mom didn’t buy them but always made our pumpkin pies from scratch and they were delicious!
Making classic pumpkin pie from scratch really isn’t difficult at all. Today I want to show how to make not only the pie filling, but an easy to prepare crust for the pie if you want to make your own.
Here’s how to make this traditional Thanksgiving dessert that will yield 8 slices of absolutely delicious PUMPKIN PIE!
Scroll Down For A Printable Recipe Card At The Bottom Of The Page
Make The Pie Crust Dough
I will show you how I make ONE pie crust, but feel free to use your own favorite recipe (for 9″ or 8″ pie crust! If it is more convenient to buy pre-made pie dough or a frozen pie crust, I recommend a deep-dish crust. Thaw frozen pie crusts according to package directions (if using) before filling them.
If you would like to make your own pie crust, here’s how I do it.
- Mix flour and salt in a medium-sized bowl. Cut in vegetable shortening using a pastry blender until the shortening is combined and reduced to about the size of peas.
- Sprinkle the dough with water and stir it until the dough comes together. Shape the dough into a ball that firmly holds together. Let it rest for 5 minutes.
- Place the dough ball on a floured surface and roll it out into a large circle (large enough to form a 1″ overhang on the pie pan you’re using). Tip: Place the pie pan upside down on the circle to determine an inch more overhang around the rim and then trim the dough.
- Carefully place the pie crust dough into the pie pan, with the dough overhanging the rim.

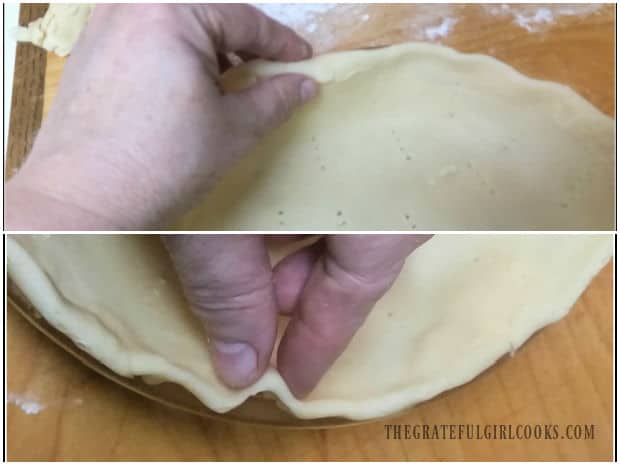
Make The Scalloped Crust
Fold the outside edges of the dough under the top crust slightly to the rim of the pie pan and pinch the dough tightly to seal.
Now the edge should be a thick “rim” the same height as the top rim of the pie pan. Form a crust by crimping the edges all around the pie pan to form a scalloped crust.
To do this, use one thumb to push the dough into a V-shape into your other thumb and forefinger. (sorry- my other thumb used to push the dough in was busy taking the second photo below!).
Continue all the way around the rim, creating a scalloped pie crust rim.
Use the tines of a fork to lightly prick the crust on the bottom and sides in several places. This will help the crust not puff up while it is baking.

Make The Pumpkin Pie Filling
You will need a bowl that is large enough to hold the pie filling. Add two large eggs to the bowl and lightly beat them with electric beaters.
If you don’t have access to an electric mixer, you can use a wire whisk.

Add canned pumpkin puree, granulated sugar, salt, ground cinnamon, ground ginger, ground cloves and a can of evaporated milk to the egg mixture.
Beat these ingredients together until they’ve been fully combined and the batter is smooth. This is the filling for the pumpkin pie.


At this point you should have a fully prepared (un-cooked) pie crust and a big bowl of pumpkin pie filling ready to go! OKAY- let’s make this thing!

Time To Bake The Pumpkin Pie
Carefully pour the pie filling into the prepared pie crust. If you are using a slightly smaller 8″ pie dish, you may not use all of the filling. NOTE: If you are purchasing a pre-made crust, then I recommend using a deep-dish crust.
CAREFULLY place the pie into a preheated 425°F. oven. There is a lot of liquid, so it can be challenging to not slosh it all over the place… simply go slow and be careful!
Bake the pie at 425°F. for 15 minutes, then reduce the temperature to 350°F. and continue baking it 45 more minutes OR until a knife inserted in the middle comes out clean.

How Do I Know When It Is Done?
When it’s finished cooking, the crust should be golden brown, and the pie should be “set” and cooked all the way through. Test for doneness by inserting a sharp knife into the middle of the pie.
If the pie is done, the knife should come out clean. If not, let the classic pumpkin pie cook a few more minutes, then test it again for doneness.
NOTE: The size of your pie (8″ or 9″ pie pan) will ultimately determine the total time necessary to bake the filling all the way through. Oven temps can also vary a bit, so keep an eye on your pie toward the end of the baking time.

Serve The Classic Pumpkin Pie
Let the pie cool on a wire rack, then refrigerate the pie for several hours until you are ready to serve it. When the pie is sufficiently chilled, slice it into 8 wedges and serve.
If desired, top each slice with a big dollop of whipped cream, whipped topping OR spray it generously (*wink, wink) with aerosol whipped cream.
We’ve all probably seen photos online of a HUGE MOUND of whipped cream with a little slice of pumpkin pie almost hidden underneath, right?
Serve the pie, grab a fork and dig in! Each bite is filled with that perfect pumpkin pie flavor and tastes so GOOD, thanks to a great combination of warm Fall spices (cinnamon, cloves, and ginger).
Any leftover pieces of classic pumpkin pie that don’t get gobbled up right away can be covered and stored in the refrigerator for several days (if they last that long)!


Enjoying a piece of pumpkin pie (surrounded by Christmas lights) is a well-loved tradition in our home! P. S.- don’t forget the whipped cream!

I hope you have the opportunity to make homemade classic pumpkin pie for the ones you love this holiday season. I’m confident everyone who tries it will love it!
Thank you for taking time out of your day to visit my blog. I invite you to come back again soon for more family-friendly recipes.
Take care, may God bless you, and have a wonderful Thanksgiving celebration. We have MUCH to be thankful for!
Looking For More PIE Recipes?
You can find ALL of my recipes in the Recipe Index, which is located at the top of the page. I have some wonderful, delicious pie recipes to choose from, including:
Want More Recipes? Get My FREE Newsletter!
I publish a newsletter 2 times per month (1st and 15th) with lots of recipes, tips, etc.
Would you like to join our growing list of subscribers?
There is a Newsletter subscription box on the top right (or bottom) of each blog post, depending on the device you use.
You can submit your e-mail address there, to be added to my mailing list.
Find Me On Social Media:
Facebook page: The Grateful Girl Cooks!
Pinterest: The Grateful Girl Cooks!
Instagram: jbatthegratefulgirlcooks

Recipe adapted from: Libby’s Pumpkin Pie recipe on can
↓↓ PRINTABLE RECIPE BELOW ↓↓

Make a delicious Classic Pumpkin Pie from scratch! Follow my step-by-step instructions to help you make this traditional, well-loved dessert!
- 1 cup all-purpose flour
- ½ teaspoon salt
- ⅓ cup vegetable shortening
- 3-4 Tablespoons cold water
- 2 large eggs slightly beaten
- 1½ cups canned pumpkin *purée *NOT pumpkin pie filling
- ¾ cup granulated sugar
- 1 teaspoon ground cinnamon
- ½ teaspoon ground ginger
- ½ teaspoon salt
- ¼ teaspoon ground cloves
- 12 ounces evaporated milk (canned)
Preheat oven to 425℉.
Mix flour and salt in a medium bowl. Cut in vegetable shortening using a pastry blender until the shortening is reduced to size of peas. Sprinkle dough with water; stir until dough comes together. Shape dough into a ball that holds together. Let it rest 5 minutes. Place dough ball on floured surface; roll it into a circle (large enough to form a 1" overhang on the pie pan you're using). Tip: Place pie pan upside down on the dough circle to determine an inch more around rim. Trim. Carefully place pie crust into pie pan, with dough overhanging the rim.
Fold overhanging dough behind crust to fit the rim of the pie pan; pinch dough tightly to seal in a thick "rim". Form crust by crimping edges all around the pie pan to form a scalloped crust. To do this, use one thumb to push the dough into a v-shape into your other thumb and forefinger. Continue around rim, Use the tines of a fork to prick the crust on the bottom and sides in several places.
Add eggs to a large bowl; lightly beat with electric beaters or a whisk. Add pumpkin purée, sugar, salt, cinnamon, ginger, cloves and evaporated milk. Beat until fully combined and batter is smooth. Pour filling into prepared pie crust. If using an 8" pie dish, you may not use all of the filling. If using a pre-made crust, I recommend a deep-dish crust. Place pie into preheated oven. There's a lot of liquid, so go slow and be careful not to slosh it all over the place!
Bake the pie at 425°F. for 15 minutes, then reduce the temperature to 350°F. Continue baking it 45 more minutes OR until a knife inserted in the middle comes out clean.
When it's finished cooking, crust should be golden brown, and filling should be "set" and cooked all the way through. Test for doneness by inserting a sharp knife into the middle of the pie. If the pie is done, the knife should come out clean. If not, let pie cook a few more minutes, then test again for doneness. NOTE: The size of your pie (8" or 9" pie pan) will ultimately determine total baking time. Oven temps can vary; keep an eye on the pie toward the end of baking time.
Let the pie cool on a wire rack, then refrigerate pie for several hours until ready to serve. Slice pie into 8 wedges and serve. If desired, top slices with whipped cream.
Here’s one more to pin on your Pinterest boards!