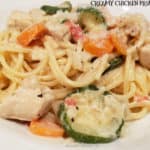
Creamy Chicken Primavera is an all in one dish, with chicken breasts, pasta, zucchini, carrots and onions in a velvety Parmesan cheese sauce.
Years ago I bought a cookbook in a used bookstore. This particular cookbook was over 600 recipes for chicken that were submitted by “celebrities” from around the world. The recipe for creamy chicken primavera was contributed by Connie Chung, a famous news anchor from NBC News (back in the day).
I made a few changes to her original recipe, and we enjoy this delicious, all in one chicken meal. How can you go wrong with pasta, chicken, veggies and cheese in a creamy sauce. Right? Anyways, the recipe is fairly straightforward and simple to prepare, but has great flavor! Today I want to share the recipe for this yummy meal with you. Here’s how to make it:
Scroll Down For A Printable Recipe Card At The Bottom Of The Page
Prepare The Chicken And Pasta
Cut three boneless, skinless chicken breasts into cubes, about 2″ each. Pat the chicken dry with paper towels, and set aside, while you begin cooking the pasta.

Cook the spaghetti noodles in a large saucepan in boiling water, according to the time given in the package instructions.

While the pasta is cooking, you can finish preparing the rest of the dish. Heat oil in a medium skillet until very hot, but not smoking. Add the chicken cubes and cook in the hot oil, turning to cook on all sides. the chicken is done when heated through and light golden brown in color. Stir in minced garlic and continue cooking, stirring often, for about 30 seconds.
Add white wine, onion, and sliced zucchini and carrots to the skillet. Cook only until the zucchini is tender (3-4 minutes). Remove from heat and keep warm until pasta is done cooking.


Time To Put This Dish All Together!
When the pasta is done cooking, drain the water off in a colander, but don’t rinse the pasta. Place the hot spaghetti back into the large saucepan, then add the chicken and veggie mixture from the skillet.
Top the pasta with grated Parmesan cheese, pimientos (optional), and half and half. Mix well using tongs, until all ingredients are evenly distributed and covered with the creamy sauce. Cook on low heat for 1-2 minutes, tossing often, only until heated through and cheese has melted. Season to taste with salt and pepper, and then it’s ready to serve.


Serve The Creamy Chicken Primavera
Place portions of the creamy chicken primavera into individual serving bowls. Top each portion with additional grated Parmesan cheese, if desired, for extra flavor. Serve the creamy pasta primavera immediately while hot!


Thanks for stopping by today. I hope you have the chance to make this delicious all in one dish, and trust you will enjoy it as much as we do. Take care, and have a wonderful day.
Looking For More CHICKEN Recipes?
You can find ALL of my recipes in the Recipe Index, which is located at the top of the page. I have LOTS of delicious chicken recipes you will enjoy, including:
- Mom’s Chicken Parmigiana
- Chicken Cutlets With Pecan Sauce
- Easy Baked BBQ Chicken
- Chicken And Veggie Stir-Fry
Interested In More Recipes?
Thank you for visiting this website. I appreciate you using some of your valuable time to do so. If you’re interested, I publish a newsletter 2 times per month (1st and 15th) with all the latest recipes, and other fun info. I would be honored to have you join our growing list of subscribers, so you never miss a great recipe!
There is a Newsletter subscription box on the top right side (or bottom) of each blog post, depending on the device you use, where you can easily submit your e-mail address (only) to be included in my mailing list.
You Can Also Find Me On Social Media:
Facebook page: The Grateful Girl Cooks!
Pinterest: The Grateful Girl Cooks!
Instagram: jbatthegratefulgirlcooks

Recipe adapted from the cookbook: “Celebrity Chicken”, page 177, contributed by Connie Chung, published by Celebrity Cuisine, 1987.
Creamy Chicken Primavera is an all in one dish, with chicken breasts, pasta, zucchini, carrots and onions in a velvety Parmesan cheese sauce.
- 3 medium chicken breasts (boneless/skinless) cut into 2" cubes
- 3 Tablespoons vegetable oil
- 1 clove garlic minced
- 3 Tablespoons white wine
- 1 medium zucchini thinly sliced
- 1 medium carrot peeled/thinly sliced
- 1 medium yellow onion peeled/chopped
- ¾ pound spaghetti pasta =12 ounces
- 1 cup half and half
- ½ cup grated Parmesan cheese + more for garnish, if desired
- ¼ cup diced pimiento (optional)
Cut chicken breasts into 2" cubes. Pat chicken dry with paper towels; set aside.
Cook pasta in boiling water in large saucepan, following package instructions.
While pasta cooks, prepare rest of the dish. Heat oil in a medium skillet until very hot, but not smoking. Add chicken; cook on all sides until chicken is cooked through and light golden brown. Stir in minced garlic; continue cooking, stirring often, for about 30 seconds. Add wine, onion, zucchini and carrots to skillet. Cook, stirring occasionally, only until zucchini is tender (3-4 minutes). Remove from heat; keep chicken warm until pasta is done cooking
When pasta is done cooking, drain in a colander, but don't rinse the pasta. Place hot pasta back into saucepan. Add chicken/veggie mixture. Top with Parmesan, pimientos (if using), and half and half. Mix well using tongs, until all ingredients are evenly distributed and covered with sauce. Cook on low heat for 1-2 minutes, tossing often, only until heated through and cheese has melted. Season to taste with salt and pepper.
To serve, place portions in individual bowls or on plates. Sprinkle each portion with additional Parmesan cheese, if desired. Serve immediately while hot!
Here’s one more to pin on your Pinterest boards!