Oven-Roasted Butternut Squash is a simple way to prepare and enjoy squash “as is”, or it can be added to salads, risotto and other dishes.

If you enjoy butternut squash (like we do), perhaps you’re wondering how to roast it! I remember many years ago buying my first butternut squash, bringing it home from the grocery store and not knowing how to COOK it! Ha Ha- that was a long time ago.
Nowadays we enjoy it roasted as a simple side dish. We also love it cooked in our air fryer. You really can’t hurt this delicious veggie, in my humble opinion.
Today I want to share how to make oven-roasted butternut squash through an easy photo tutorial. I hope it helps you, if you’re looking for a nice way to cook AND get depth of flavor out of this humble vegetable!
Scroll Down For A Printable Recipe Card At The Bottom Of The Page
We Grew Butternut Squash This Summer
We have a small raised-bed garden in our Oregon backyard. This summer we grew butternut squash in a small section of one of our garden containers. We planted them from a couple of seeds in May.
We ended up with about 8 beautiful butternut squash before the cold temperatures hit (and before the birds could demolish them), so we were so happy with that! Our largest one was 2 pounds in weight.
Some of the others were slightly smaller (I brought them in to finish ripening in October because we were having some very cold nights). I photographed this recipe using the 2-pound squash I grew, and it was lovely to see the fruits (vegetable) of my labor!

Prepare A Butternut Squash For Roasting
Before starting, be sure to preheat your oven to 425°F., so that it is preheated, hot and ready to go when the squash is ready for roasting!
Use a vegetable peeler to remove the peel from the butternut squash. Continue peeling it until the orange flesh appears and then discard the peels.


Carefully slice the butternut squash in half LENGTHWISE. Cut a thin slice off the stem end and a very thin slice off the bottom of the squash. Discard these as well.
Remove the seeds and stringy “pith” strands in the cavity of each squash half, by using a large spoon to get them out.


Slice And Then Cube The Squash
Now you should have two separate halves of squash with the “cavity” hollowed out! That’s perfect! Use a sharp knife to carefully slice each half into 1″ wide “crescent” strips by cutting across the width of each piece.
After that, cut each slice into bite-sized chunks and toss all the butternut squash chunks into a big mixing bowl.


Lightly Season The Butternut Squash
Once you have all the butternut squash cubes in the mixing bowl, it’s time to lightly season them before you roast them.
Lightly drizzle them with a Tablespoon of extra virgin olive oil, then stir or toss them well to coat the pieces evenly with the oil.


Cooking Oven-Roasted Butternut Squash
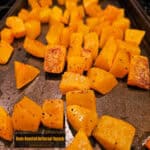
Season the squash pieces lightly with salt and black pepper (to taste) and stir to evenly season them. Lay the seasoned squash in a SINGLE LAYER on a large baking sheet.

Bake the oven-roasted butternut squash at 425°F. for 20-25 minutes, being sure to flip the squash pieces over HALFWAY through the cooking time.
If you use a spatula, you can turn many pieces at one time! When you flip them over, you will notice that the squash has caramelized slightly on the outside and is lightly browned. that is great!
To know if they’re done, the squash should have a slight brown caramelization AND you should be able to insert a butter knife very easily into the tender squash.

How To Use Roasted Butternut Squash
There are many ways to use the squash once it has been roasted. First and foremost is to simply enjoy them, AS IS! Roasted butternut squash is awesome just as it is, hot form the oven.
You can enjoy it as a side dish (as is), or you can add melted butter, or brown sugar and cinnamon (yum!). I’ve even heard some people like to mash the squash AFTER roasting for a delicious depth of flavor (I’ve not tried that yet).
One of my personal favorite ways to enjoy the squash is in risotto OR to use as a topping for salads. The delicious salad shown below is one we make throughout the year but especially on Thanksgiving. I call it our Thanksgiving Salad (a link to my salad)!

Whichever way you choose to enjoy oven-roasted butternut squash, I’m confident you’ll enjoy the great flavor and will be grateful for how simple it is to make.
Thanks for stopping by, and I invite you to come back again soon for more family-friendly recipes. Take care, may God bless you, and have a wonderful day.
Looking For More VEGETABLE Recipes?
You can find ALL of my recipes in the Recipe Index, which is located at the top of the page. I have a variety of delicious veggie recipes to choose from, including:
- Asparagus in Cream Sauce
- Green Beans and Red Potatoes For 2
- Broccoli Salad
- Creamy Garlic Mashed Cauliflower
- Air Fryer Glazed Butternut Squash
Want More Recipes? Get My FREE Newsletter!
I publish a newsletter 2 times per month (1st and 15th) with lots of recipes, tips, etc.
Would you like to join our growing list of subscribers?
There is a Newsletter subscription box on the top right (or bottom) of each blog post, depending on the device you use.
You can submit your e-mail address there, to be added to my mailing list.
Find Me On Social Media:
Facebook page: The Grateful Girl Cooks!
Pinterest: The Grateful Girl Cooks!
Instagram: jbatthegratefulgirlcooks

↓↓ PRINTABLE RECIPE BELOW ↓↓
Oven-Roasted Butternut Squash is a simple way to prepare and enjoy squash "as is", or it can be added to salads, risotto and other dishes.
- 2 pounds butternut squash approx. 1 large
- 1 Tablespoon extra virgin olive oil
- salt and black pepper to lightly season (to taste)
Preheat oven to 425°F.
Peel the butternut squash. Continue peeling until orange flesh appears; discard the peels. Carefully slice squash in half LENGTHWISE. Cut a thin slice off the stem end and a thin slice off the bottom. Discard them. Remove seeds and stringy "pith" strands in each half, using a spoon.
Slice each squash half into 1" wide "crescent" strips by cutting across the width. After that, cut each slice into bite-sized chunks and put them into a big bowl.
Lightly drizzle squash with olive oil; toss well to coat them evenly. Season the squash lightly with salt and black pepper (to taste). Lay the seasoned squash in a SINGLE LAYER on a rimmed baking sheet.
Bake at 425°F. for 20-25 minutes, flipping the squash over HALFWAY through the cooking time. If you use a spatula, you can turn several pieces at a time. When you flip them over, you'll notice the squash has caramelized slightly on the outside. If done, the squash should have light brown caramelization AND be tender enough to insert a knife easily into the squash. Serve and enjoy!
Here’s one more to pin on your Pinterest boards! 
 - The Grateful Girl Cooks!")
 - The Grateful Girl Cooks!")
 - The Grateful Girl Cooks!")
 - The Grateful Girl Cooks!")
 - The Grateful Girl Cooks!")
 - The Grateful Girl Cooks!")
 - The Grateful Girl Cooks!")
 - The Grateful Girl Cooks!")
 - The Grateful Girl Cooks!")
 - The Grateful Girl Cooks!")

 - The Grateful Girl Cooks!")