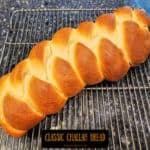
Cheddar Chive No-Knead Bread is a large, no-knead savory loaf filled and flavored with chives and sharp cheddar cheese. It is delicious!

Today I want to share with you a delicious recipe for cheddar chive no-knead bread. I modified a couple recipes I use for no-knead bread and added cheese and chives to try this flavor combination.
The result is a great loaf of bread! Crispy and golden-brown on the outside and soft and delicious on the inside, just the way we love it!
I am confident you are going to love it, too. Here’s how to make a beautiful loaf of cheddar chive no-knead bread.
Make The Bread Dough
Combine flour, salt and instant yeast in a large mixing bowl. Add lukewarm water (about 80°F.) to the dry ingredients and then stir very well, until it comes together and forms a “shaggy” mound of dough.

When the dough has come together, add grated sharp cheddar cheese and chopped chives and stir well to fully incorporate them into the dough.

Let The Dough Rise
Cover the bowl tightly with plastic wrap; let the dough rest in a warm place (free from drafts) at room temperature for 8-12 hours. I usually let mine sit about 12 hours (overnight).

This lengthy rising time helps develop a nice sourdough flavor for the bread. After this rising time, the “tacky” dough should have doubled in size.

Shape the Dough Into A Loaf
Lay a large piece of parchment paper on a large baking sheet and sprinkle it with flour. Turn the dough out of the bowl onto the floured parchment paper.
NOTE: The parchment paper should be larger than the loaf on ALL sides, to make it easier to lift the loaf out of the pan after baking.
Gently shape the dough into a round loaf, sprinkling the dough with additional flour, if necessary, to prevent sticking. In the first photo below, I shaped the loaf on a floured surface, then transferred the loaf to parchment paper for baking (both methods work).
Cover the dough loosely (again) with plastic wrap. Let it rest in a warm place while you pre-heat the pan used to bake the bread.

Preheat Dutch Oven And Then Bake Bread
Place a Dutch oven (with oven-safe lid and handles) in your oven on a middle rack. Turn the heat to 450°F. and let the oven pre-heat (with the pan in there the entire time).
Once the oven has reached 450°F., keep the covered Dutch oven in there for 30 more minutes.
After the additional 30 minutes of pre-heating, pick up the loaf using the parchment paper to lift it up and place it in the VERY HOT Dutch oven. Make sure all the parchment paper is INSIDE the pan, then put the cover back on the Dutch oven
Bake the cheddar chive no-knead bread for 30 minutes (at 450°F.). After 30 minutes, remove the lid from the pan and continue baking for 5 more minutes (uncovered).

Remove the pan from the oven and carefully lift the parchment paper and the loaf up and out of the HOT pan. Place the hot bread on a wire rack to cool.
The cheddar chive no-knead bread should be beautifully golden browned on all sides and should smell really good!

Slice And Serve Cheddar Chive No-Knead Bread
This bread will slice the easiest when the bread has had the chance to cool a bit. While it cools, use a pastry brush to remove any excess flour from the bread.

Use a serrated knife to slice the cheddar chive no-knead bread into thin slices and serve warm with soft butter for a de3licious treat!
You can see in the photo below the cheddar cheese and chives distributed throughout each slice. We always love a warm slice with melted butter on it. YUM!

The bread can also be broiled (or toasted) for a nice crispy slice, too! Shown below is a broiled piece of cheddar chive no-knead bread, served with BBQ ribs and baked beans!

I hope you have the opportunity to make a loaf of this tasty no-knead bread and trust you (and those you love) will enjoy it as much as we do!
Thanks for stopping by, and I invite you to come back again soon for more family-friendly recipes. Take care, may God bless you, and have a wonderful day.
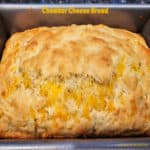
Looking for More BREAD Recipes?
You can find ALL of my recipes in the Recipe Index, which is located at the top of the page. I have lots of bread recipes (savory and sweet) to choose from, including:
- Classic Challah Bread
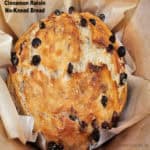
- Cinnamon Raisin No-Knead Bread
- Garlic Butter Naan Bread
- Date Nut Bread
- Pineapple Walnut Bread
Want More Recipes? Get My FREE Newsletter!
I publish a newsletter 2 times per month (1st and 15th) with lots of recipes, tips, etc.
Would you like to join our growing list of subscribers?
There is a Newsletter subscription box on the top right (or bottom) of each blog post, depending on the device you use.
You can submit your e-mail address there, to be added to my mailing list.
Find Me On Social Media:
Facebook page: The Grateful Girl Cooks!
Pinterest: The Grateful Girl Cooks!
Instagram: jbatthegratefulgirlcooks

↓↓ PRINTABLE RECIPE BELOW ↓↓
Cheddar Chive No-Knead Bread is a large, no-knead savory loaf filled and flavored with chives and sharp cheddar cheese. It is delicious!
- 4½ cups all-purpose flour + more for dusting
- 1½ teaspoons salt
- ½ teaspoon instant yeast* *or same amount of active dry yeast
- 2 cups lukewarm water (about 80℉.)
- 1 cup sharp cheddar cheese (grated)
- ⅓ cup chopped chives
Combine flour, salt and instant yeast in a large mixing bowl. Add lukewarm water to the dry ingredients and then stir very well, until it comes together and forms a "shaggy" mound of dough. Add grated cheese and chopped chives and stir well, to incorporate them into the dough.
Cover the bowl with plastic wrap; let the dough rest in a warm place (free from drafts) at room temperature for 8-12 hours. The dough should double in size.
Lay a large piece of parchment paper on a large baking sheet. The paper should be larger than the loaf on all sides. Lightly dust the paper with additional flour, then turn the dough out of the bowl onto the floured paper. Gently shape the dough into a round loaf, dusting with extra flour, if necessary, to prevent sticking. Cover the bread dough loosely with plastic wrap.
Place a Dutch oven (with oven-safe lid/handles) in the oven. Set the heat for 450℉. Once the oven reaches the temperature (450℉.), keep the Dutch oven in there for 30 more minutes before adding the bread.
Carefully pick up the parchment paper (with loaf) and place it into the VERY HOT DUTCH OVEN. Make sure all the parchment paper fits inside the Dutch oven and put the lid back on. Bake the bread at 450℉. for 30 minutes. After 30 minutes, remove the lid and continue baking 5 more minutes (uncovered).
Remove the pan from the oven. Carefully lift paper (and loaf) out of the hot pan and onto a wire rack to cool. Use a pastry brush to dust off any excess flour remaining on loaf. Cheddar Chive No-Knead Bread slices best when it has cooled a bit before cutting and serving. TIP: Try slicing it in thin slices, then cut each large piece in half for the most servings. Enjoy.
Here’s one more to pin on your Pinterest boards!