Mom’s pie crust is a family favorite! Here’s a step-by-step tutorial on how to make a delicious, flaky pie crust from scratch in about 10 minutes!
A few days ago I made a Dutch Crumb Apple Pie. It dawned on me that I should post my “tried and true” pie crust recipe. This recipe came from my Mom over 40 years ago and I’ve been using it ever since! A good pie crust always makes a pie exceptional!
I actually think I can make a homemade, flaky pie crust in less time than it takes to drive to the grocery store, buy a pre-made one, then drive home, AND it’s a great pie crust!
Scroll Down For A Printable Recipe Card At The Bottom Of The Page
Mom’s Pie Crust Is My “Go To”!
This recipe has been used for all my pies, including Toll House Pie, Strawberry Rhubarb Pie, Old-Fashioned Banana Cream Pie, and my Dutch Crumb Apple Pie, as well as many other pies and tarts. I’m posting pics of the way I make Mom’s pie crust, just in case you are remotely interested in SEEING the process.
Note: For 38 of the last 40 years, I mixed up the dough by using a hand held pastry blender (works great). My sister in law gave me her really old food processor a couple years ago, and now I use that (just an FYI-this crust can be made both ways!). Anyhow… here’s how I whip up a pie crust:
How To Make Mom’s Pie Crust
Measure the flour, salt, and shortening into a food processor. Pulse until shortening is about the size of peas. Drizzle ice cold water into the mixture, and process until fully combined. Note: This can ALL be done by hand with a pastry blender if you do not have a food processor.

Once fully combined, the dough will come together into a ball. Gather all the little pieces up into the dough and shape this mixture into a nice, round ball.

Time To Roll Out The Dough
Place the dough ball onto a lightly floured work surface. Roll it out to a large circle that is bigger than your pie plate.

Take the pie pan you will be using and invert it onto the dough. Cut around it with a knife, leaving an extra inch around the outside.

If you want (this is optional), you can add leftover pieces of dough to spots where pie crust has cracks around the outside edge Press firmly to make sure dough bonds together.

Transfer Mom’s Pie Crust To Pan
Carefully fold the crust circle in half like this: Don’t worry if there are still a couple cracks in the outside edges, because they can all be patched.

Gently lift up the dough and place it into your pie pan like this:

Carefully unfold the dough. Prick the dough on the bottom and the sides with the tines of a fork. Do this because it helps prevent the pie crust from puffing up while baking.

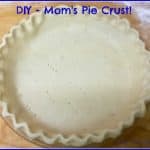
Fold any excess dough under the edges (towards the back – kind of doubling it up) and press the dough together firmly to form a bonded, thicker edge. This should be higher than the edge of your pie pan.

Time To “Crimp” The Crust
Now it’s time to “crimp the crust”. Use your non-dominant hand like this (shown below). Use the thumb of your dominant hand to insert dough between your two fingers to form the crimped crust all the way around the pie. (sorry- I had to use my right hand to take the picture. Use your imagination for my huge right thumb).

When you have gone around the entire edge of the pie, it should look like this:

Fill With Your Favorite Pie Filling And Bake
Fill Mom’s pie crust with your pie filling of choice, and bake as directed. I’ve also used this crust for my Toll House Pie, Strawberry Pie, and Peach Pie, to name a few!
**If you are making a pie that requires a top crust, hope you remembered to double this recipe. Lay the top crust over the pie filling, THEN fold the top edge over the bottom edge, and crimp the edges together to seal around the edges of pie, etc.. Remember to cut a couple slits in the top of the pie crust (if using a top crust) to “vent”**.

I know that’s a lot of pictures, but really… once you get the technique down, a homemade pie crust can be made from scratch in about 10 minutes! Hope you’ll give this one a try. I’ve used Mom’s Pie Crust recipe literally hundreds of times over the years, and have never been disappointed.
Thank you for stopping by today, and I hope you come back again soon. Be sure to check out ALL of my recipes in the Recipe Index, located at the top of the page. Have a great day.
Interested In More Recipes?
Thank you for visiting this website. I appreciate you using some of your valuable time to do so. If you’re interested, I publish a newsletter 2 times per month (1st and 15th) with all the latest recipes, and other fun info. I would be honored to have you join our growing list of subscribers, so you never miss a great recipe!
There is a Newsletter subscription box on the top right side (or bottom) of each blog post, depending on the device you use, where you can easily submit your e-mail address (only) to be included in my mailing list.
You Can Also Find Me On Social Media:
Facebook page: The Grateful Girl Cooks!
Pinterest: The Grateful Girl Cooks!
Instagram: jbatthegratefulgirlcooks
Have a GREAT day!
 Recipe Source: My Mom
Mom's pie crust is a family favorite! Here's a step-by-step tutorial on how to make a delicious, flaky pie crust from scratch in about 10 minutes!
- 1 cup unsifted all purpose flour
- 1/2 teaspoon salt
- 1/3 cup vegetable shortening
- 3-4 Tablespoons ice cold water
- 2 cups unsifted all purpose flour
- 1 teaspoon salt
- 2/3 cup vegetable shortening
- 5-7 Tablespoons ice cold water
Place flour, salt and shortening in food processor (or large bowl, if mixing by hand). Cut in shortening: Pulse in food processor. Use a pastry blender (if mixing by hand).
- Drizzle in ice cold water. Mix/process until well combined and mixture can be formed into a ball. (Start with the least amount of water and add more, if necessary).
- Place dough ball onto lightly floured surface. Roll out dough. Cut to fit. Place crust into pie pan. Pierce pie dough with tines of fork on bottom and sides of dough in pan. Form crimped edge.
Fill with pie filling of your choice. Bake, according to your favorite pie recipe's instructions.
Here’s one more to pin on your Pinterest boards!