Month: April 2025

Mediterranean Butternut Squash

Mediterranean Butternut Squash is a flavorful side dish with roasted squash topped with tahini dressing, feta cheese, mint, and pistachios!

If you’re looking for a unique and flavorful vegetable side dish, I hope you’ll check out this recipe for Mediterranean butternut squash! I found the original recipe in a cookbook I own that features all Mediterranean-inspired recipes, made a few small changes, and really enjoy this vegetable dish.

There are several unique ingredients used in this recipe which add some flavorful “zing” to “plain-old butternut squash”. I love roasted butternut squash, but the addition of Mediterranean-inspired toppings really takes this recipe up a notch or two and that’s awesome!

I truly hope you enjoy this absolutely delicious and colorful winter squash recipe. Here’s how to make Mediterranean butternut squash, step by step.

Scroll Down For A Printable Recipe Card At The Bottom Of The Page

Prepare The Butternut Squash

Slice the stem end and the very bottom end off of a 1½ pound butternut squash. Use a vegetable peeler or sharp knife to remove the peel. Peel enough of the outer skin until the orange flesh (not white) of the squash is showing.

Slice the squash in half from top to bottom, then remove and discard the seeds and “stringy pith” from the cavity of each piece. Turn the squash over and place the squash cut side down. Slice each half into ½” thick “half-moon” shaped pieces. Repeat with the other half of the squash.

A 4-photo collage showing the peeling and slicing of a butternut squash for this recipe.

Place the squash slices in a large bowl and drizzle them with 1½ Tablespoons of olive oil, then season lightly with salt and pepper. Toss the slices until they’re evenly coated with the olive oil, then set the bowl aside.

Butternut squash slices are tossed with olive oil, salt and pepper in a bowl.

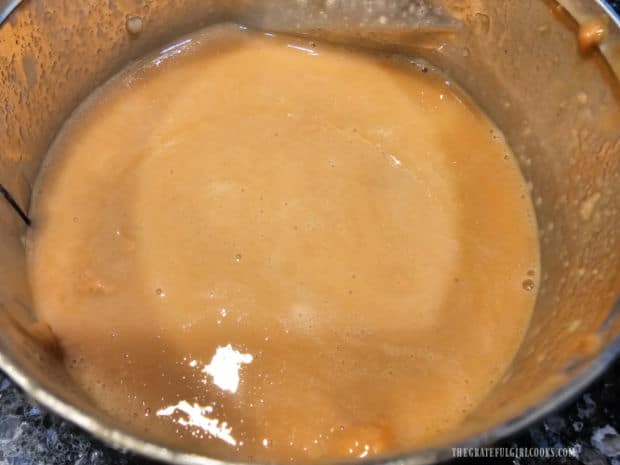
Make The Tahini Dressing

One of the primary ingredients for the dressing is tahini, which is a roasted sesame seed purée. It is thick in texture and must be stirred very well before using. Tahini looks a bit like peanut butter and can be found in most grocery stores nowadays.

A jar of tahini paste which is used for this recipe is shown.

In a small bowl, use a whisk to fully combine the tahini, fresh lemon juice, honey, 2 teaspoons of additional extra virgin olive oil, and a small pinch of salt.

Tahini is whisked with lemon juice, honey, olive oil, and salt to make a creamy dressing.

Once the butternut squash has been roasted, you’ll drizzle this tahini dressing over the squash, then garnish it with toasted pistachio seeds, crumbled feta cheese and chopped fresh mint.

I like to get these toppings prepped and ready to go, so it’s really quick and easy to add them to the hot squash as soon as the slices come out of the oven.

Pistachios, crumbled feta, chopped mint and tahini dressing ready to garnish baked squash.

Time To Roast The Butternut Squash

Lay the squash in a single layer on an ungreased baking sheet and roast (on a middle rack) for 20 minutes. Rotate the baking sheet in the oven and continue to cook for 6-10 more minutes.

The butternut squash slices in a single layer on baking sheet, ready for oven.

Remove the pan from the oven and use a spatula to carefully turn each slice over. Put the pan back in the oven and bake 10 more minutes, or until the squash is very tender.

When done, both sides of the squash will be nicely browned, and a knife can easily be inserted into the squash without meeting any resistance.

After baking, squash slices are well-browned on both sides.

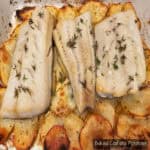
Prepare The Baked Squash For Serving

Arrange the hot squash slices on a serving plate or platter however you wish. I usually layer or “shingle” them in a single line on the serving dish so each slice gets some of the toppings.

Roasted squash slices are "shingled" and arranged on a serving platter before garnishing.

Drizzle the tahini dressing over the Mediterranean butternut squash, ensuring each slice gets a bit of the creamy dressing on top!

Tahini dressing is drizzled over the top of baked butternut squash slices on platter.

Garnish And Serve Mediterranean Butternut Squash

Sprinkle crumbled feta cheese, pistachios and chopped, fresh mint leaves on top of the tahini dressing and squash slices. Distribute them evenly over the surface to bring a pop of color and crunch to every piece of squash.

Mediterranean butternut squash is garnished with feta cheese, mint, and toasted pistachios.

Serve this yummy side dish immediately after garnishing, to ensure the squash remains hot for serving. We enjoyed our Mediterranean butternut squash served as a side dish, with wild rice and salmon! Everything was absolutely delicious!

The butternut squash is so creamy and delicious, the tahini dressing provides great flavor, and the feta cheese, mint, and crunchy pistachios make it taste amazing!

 A white plate with a piece of salmon, wild rice and Mediterranean butternut squash is served.

I really hope you give this unique and yummy recipe a try, and trust you’ll enjoy it, too! We enjoy the fresh flavors and texture this Mediterranean-style recipe adds to a common winter squash!

Thank you for stopping by today, and I invite you to come back again soon for more family-friendly recipes. Take care, may God bless you, and have a wonderful day!

Looking For More VEGETABLE Recipes?

You can find ALL of my recipes in the Recipe Index, which is located at the top of the page. I have lots of delicious veggie recipes you may want to check out, including:

Want More Recipes? Get My FREE Newsletter!

I publish a newsletter 2 times per month (1st and 15th) with lots of recipes, tips, etc..
Would you like to join our growing list of subscribers?

There is a Newsletter subscription box on the top right (or bottom) of each blog post, depending on the device you use.
You can submit your e-mail address there, to be added to my mailing list.

Find Me On Social Media:

Facebook page: The Grateful Girl Cooks!
Pinterest:
The Grateful Girl Cooks!
Instagram:
jbatthegratefulgirlcooks

Author's signature

Recipe adapted from “The Complete Mediterranean Cookbook”, page 227, published by the editors at America’s Test Kitchen in 2016

↓↓ PRINTABLE RECIPE BELOW ↓↓

0 from 0 votes
Mediterranean Butternut Squash
Prep Time
15 mins
Cook Time
31 mins
Total Time
46 mins
 

Mediterranean Butternut Squash is a flavorful side dish with roasted squash topped with tahini dressing, feta cheese, mint, and pistachios!

Category: Side Dish, Vegetable Dish
Cuisine: Mediterranean
Keyword: Mediterranean Butternut Squash
Servings: 4
Calories Per Serving: 239 kcal
Author: JB @ The Grateful Girl Cooks!
Ingredients
  • pounds butternut squash
  • Tablespoons extra virgin olive oil
  • ½ teaspoon salt
  • ½ teaspoon black pepper
For Tahini Dressing:
  • 1 Tablespoon tahini
  • 2 teaspoons extra virgin olive oil
  • teaspoons fresh lemon juice
  • 1 teaspoon honey
  • 1 pinch salt
For Garnish:
  • ¼ cup feta cheese crumbled
  • ¼ cup toasted pistachios shelled
  • 2 Tablespoons fresh mint chopped
Instructions
  1. Preheat oven to 425℉ (or 218.33℃).

  2. Slice stem end and bottom off of squash. Peel squash until the orange flesh (no white) is showing. Slice squash in half from top to bottom. Remove/discard seeds and "stringy pith". Place a squash half, cut side down, on cutting board. Slice into ½" thick "half-moon" shaped pieces. Repeat with remaining half.

  3. Place squash slices in a large bowl; drizzle with 1½ Tbsp. olive oil; season with salt/pepper. Toss until evenly coated with olive oil; set bowl aside.

  4. In a small bowl, use a whisk to combine tahini, lemon juice, honey, 2 teaspoons of olive oil, and a small pinch of salt. Set aside.

  5. Lay squash in a single layer on a baking sheet. Bake at 425℉ on a lower rack for 20 minutes. Rotate baking sheet; continue to cook 6-10 more minutes. Remove pan from oven; use spatula to turn each slice over. Put pan back in oven; bake 10 more minutes, or until squash is very tender and well-browned.

  6. Layer or "shingle" squash slices in a single line on a serving platter. Drizzle with tahini dressing, ensuring each slice gets some! Sprinkle crumbled feta, pistachios and chopped mint leaves evenly on top. Serve hot and enjoy!

Nutrition Facts
Mediterranean Butternut Squash
Amount Per Serving (1 (1/4 of total))
Calories 239 Calories from Fat 135
% Daily Value*
Fat 15g23%
Saturated Fat 3g19%
Polyunsaturated Fat 3g
Monounsaturated Fat 8g
Cholesterol 8mg3%
Sodium 417mg18%
Potassium 721mg21%
Carbohydrates 25g8%
Fiber 5g21%
Sugar 6g7%
Protein 5g10%
Vitamin A 18263IU365%
Vitamin C 38mg46%
Calcium 149mg15%
Iron 2mg11%
* Percent Daily Values are based on a 2000 calorie diet.

Here’s one more to pin on your Pinterest boards!Mediterranean Butternut Squash is a flavorful side dish with roasted squash topped with tahini dressing, feta cheese, mint, and pistachios!


Chocolate Swirl Cookies

Chocolate Swirl Cookies are easy to make, yummy treats with a ribbon of melted chocolate swirled through the batter! Recipe makes 2 dozen.

Today I want to share a delicious recipe for chocolate swirl cookies! I finally got around to photographing the preparation so I could put it here on the blog so other people can enjoy them, too!

The original recipe came from a cookie cookbook I’ve owned for over 25 years which has a lot of great recipes in it. This recipe will make a fairly small batch of 24 cookies but can easily be doubled or tripled to meet your needs.

Chocolate swirl cookies taste wonderful, they’re nice and soft and simple to prepare, and I’m confident you’re going to love them. Here’s how to make them!

Scroll Down For A Printable Recipe Card At The Bottom Of The Page

Prepare The Batter

Measure all-purpose flour, baking powder and salt into a medium-sized bowl. Use a whisk to combine these ingredients, then set the bowl aside.

All-purpose flour, baking powder and salt are whisked together until combined.

In a separate large bowl, use an electric mixer to beat brown sugar (light or dark) with granulated sugar on MEDIUM speed. Beat the two sugars until they’re combined.

Add a stick of soft butter to the sugar mixture and beat (on medium) until the butter is fully incorporated and the mixture has a grainy texture similar to wet sand.

Brown and granulated sugars are mixed together, than a stick of soft butter is beaten in.Add one large raw egg, light sour cream and vanilla extract to the sugar mixture. On Medium speed, beat these ingredients into the sugar mixture until the batter is fully combined and fluffy.

Sour cream, one egg and vanilla extract are mixed into cookie batter until incorporated.

Combine “Wet” And “Dry” Ingredients

Once you’re done mixing the eggs, vanilla and sour cream in, be sure to scrape down the batter off the sides of the bowl. Grab the reserved bowl you set aside that contains the flour mixture (the “dry” ingredients).

Add the flour mixture to the batter. Use your electric mixer on LOW speed to incorporate the flour mixture only until it is just combined. Be careful to not OVER-MIX the batter. The cookie batter will be fairly thick. Now you are ready for the final step!

Flour mixture is beaten into the cookie batter only until it is barely combined.Cookie dough batter is thick and well-combined in a large bowl.

Melt The Chocolate For SWIRLING!

Now it’s time to melt the chocolate chips! There are TWO ways you can do this, either in a double boiler OR in the microwave. I prefer the microwave because it is fairly quick and simple, so I will show you this method below.

Whichever method you choose, it is really IMPORTANT to not get water or moisture of any kind in the chocolate or it will “seize up” and get hard, and you DO NOT want that. Here’s how to melt the chocolate chips in a microwave.

Place 1 cup of the semi-sweet chocolate chips in a completely dry microwave-safe bowl or container. Heat on HIGH power for 30 seconds. Remove bowl and stir. Repeat this process in 30 second rounds (HIGH heat), removing the bowl after each round to stir the chocolate.

The chocolate will take about 4-5 rounds of 30 seconds of heating/stirring to fully melt the chocolate until it is fully smooth after stirring. You can see below 4 stages of the chocolate melting. It is important to melt it in small 30 second bursts so the chocolate doesn’t get overheated and burn.

A photo of 4 stages of melting chocolate chips for the cookies in a microwave.

Once the chocolate has fully melted, let it cool for one minute, then pour it on top of the cookie dough. Now it’s time to “marble” the cookie dough with chocolate!

Melted chocolate cools slightly then is added to the cookie dough.

Swirl In The Chocolate

Use a wooden spoon or spatula to gently swirl the chocolate through the plain batter. Do not completely mix in the chocolate, simply swirl it through the thick batter to give it a nice, marbled look.

Once the chocolate is dispersed, the cookie dough is ready to drop on the baking sheet and head to the oven for baking.

A wooden spoon is used to gently swirl the chocolate through the batter until "marbled".

Time to Bake Some Cookies!

Drop the cookie batter by Tablespoons onto an UNGREASED cookie sheet (or sheets). There should be enough cookie dough to make 2 dozen cookies. Leave about 2 inches between each mound of cookie dough, to give the cookies room to spread.

Bake them at 300°F. for 20-22 minutes. When done, the cookies will be “set” around the bottom edges, and the cookies will be light brown in appearance. The cookies will be fairly soft, so place the baking sheets on a wire rack and let the cookies cool for a couple minutes before attempting to remove them from the pan.

Tablespoons of cookie dough are placed on cookie sheets about 2" apart for baking.Some chocolate swirl cookies cool on the baking sheet after they have finished cooking.

Serve And Enjoy Chocolate Swirl Cookies

After the cookies have rested 1-2 minutes and firmed up slightly, use a spatula to transfer them off the baking sheet and onto a wire rack to finish cooling. We feel like these chocolate swirl cookies taste best when served at room temperature!

The chocolate swirl cookies should have a marbled appearance showing the plain batter and the chocolate swirled batter which produce a pretty good-looking cookie!

Two dozen chocolate swirl cookies cool completely on a wire rack after baking.

When the cookies are at room temperature, transfer them to a serving platter and dig in. The cookies are soft and have wonderful chocolate flavor throughout, so watch how quickly they will disappear!

If you have any leftovers you want to keep longer, these chocolate swirl cookies can definitely be frozen. Wrap them in plastic wrap then store in the freezer in an airtight container or freezer bag, then you can pull out a few decadent cookies to enjoy another day!

One of the chocolate swirl cookies being held over the wire rack full of the remaining cookies.

I hope you have the opportunity to try these cookies and trust that everyone you share them with enjoy them as much as we do! They’re really good (and they also freeze very well).

Thank you for taking time out of your busy day to stop by, and I invite you to come back again soon for more family friendly recipes. Take care, may God bless you, and have a wonderful day!

Looking For More COOKIE Recipes?

You can find ALL of my recipes in the Recipe Index, which is located at the top of the page. I have lots of delicious cookie recipes to check out, including:

Want More Recipes? Get My FREE Newsletter!

I publish a newsletter 2 times per month (1st and 15th) with lots of recipes, tips, etc..
Would you like to join our growing list of subscribers?

There is a Newsletter subscription box on the top right (or bottom) of each blog post, depending on the device you use.
You can submit your e-mail address there, to be added to my mailing list.

Find Me On Social Media:

Facebook page: The Grateful Girl Cooks!
Pinterest:
The Grateful Girl Cooks!
Instagram:
jbatthegratefulgirlcooks

Author's signature

Original recipe source: “Mrs. Fields Best Ever Cookie Book!”, by Debbi Fields, page 32, published in 1998 by Time-Life Books

↓↓ PRINTABLE RECIPE BELOW ↓↓

0 from 0 votes
Chocolate Swirl Cookies
Prep Time
15 mins
Cook Time
20 mins
Total Time
35 mins
 

Chocolate Swirl Cookies are easy to make, yummy treats with a ribbon of melted chocolate swirled through the batter! Recipe makes 2 dozen.

Category: Dessert, Snack
Cuisine: All Cuisines
Keyword: chocolate swirl cookies
Servings: 24 cookies
Calories Per Serving: 159 kcal
Author: JB @ The Grateful Girl Cooks!
Ingredients
  • 2 cups all-purpose flour
  • ½ teaspoon baking powder
  • ¼ teaspoon salt
  • ½ cup brown sugar (packed) light or dark
  • ½ cup granulated sugar
  • ½ cup butter softened (equals 1 stick)
  • 1 large egg
  • ½ cup light sour cream
  • 1⅛ teaspoons vanilla extract
  • 1 cup semi-sweet chocolate chips
Instructions
  1. Preheat oven to 300℉. (or 148.88℃.)

  2. Measure flour, baking powder and salt into a medium bowl. Use a whisk to combine; set bowl aside.

  3. In separate large bowl, use electric mixer to beat brown sugar with granulated sugar on MEDIUM speed until combined. Add soft butter; beat until fully incorporated and mixture has a texture similar to wet sand. Add egg, sour cream and vanilla. Beat on medium speed until fully incorporated and batter is fluffy.

  4. Scrape batter down from the sides of the bowl. Add reserved flour mixture; beat on LOW speed to incorporate flour only until batter is thick and just barely combined. Be careful not to OVER-MIX the batter.

  5. Melt chocolate-it's IMPORTANT to not get water or moisture in the chocolate or it will "seize up" and get hard; Here's how to melt chocolate chips in a microwave. Place chocolate chips in a dry microwave-safe container. Heat on HIGH for 30 seconds. Remove bowl; stir. Repeat in 30 second pops of power (HIGH heat) and remove after each one to stir chocolate. Important- Only melt it in 30 second bursts so chocolate doesn't burn. It takes about 4-5 rounds of 30 seconds of heating/stirring to fully melt chocolate.

  6. Let fully melted chocolate cool for 1 minute, then pour it onto the dough. Use a wooden spoon or spatula to swirl chocolate through the batter. Do NOT completely mix in the chocolate, simply swirl it through for a nice, marbled look.

  7. Drop dough by Tablespoons 2" apart onto UNGREASED cookie sheet(s). Bake at 300°F. for 20-22 minutes. When done, cookies will be "set" around edges and light brown in appearance. Place baking sheets on a wire rack; let soft cookies cool 2 minutes (to firm up slightly) before removing them from the pan.

  8. Use a spatula to transfer cookies from baking sheet onto a wire rack to finish cooling. Serve at room temperature and enjoy!

Recipe Notes

Note: Light sour cream was used in this recipe and the caloric calculation, but regular (full fat) sour cream may be substituted, if desired.

Nutrition Facts
Chocolate Swirl Cookies
Amount Per Serving (1 cookie)
Calories 159 Calories from Fat 72
% Daily Value*
Fat 8g12%
Saturated Fat 4g25%
Trans Fat 0.2g
Polyunsaturated Fat 0.3g
Monounsaturated Fat 2g
Cholesterol 20mg7%
Sodium 64mg3%
Potassium 83mg2%
Carbohydrates 21g7%
Fiber 1g4%
Sugar 11g12%
Protein 2g4%
Vitamin A 149IU3%
Vitamin C 0.04mg0%
Calcium 23mg2%
Iron 1mg6%
* Percent Daily Values are based on a 2000 calorie diet.

Here’s one more to pin on your Pinterest boards!Chocolate Swirl Cookies are easy to make, yummy treats with a ribbon of melted chocolate swirled through the batter! Recipe makes 2 dozen.

Asian BBQ-Glazed Chicken

You’ll enjoy Asian BBQ-Glazed Chicken, a delicious, easy dish featuring chicken thighs and legs coated in Asian-style BBQ sauce and baked!
You'll enjoy Asian BBQ-Glazed Chicken, a delicious, easy dish featuring chicken thighs and legs coated in Asian-style BBQ sauce and baked!

Today I’m sharing a simple recipe for delicious BBQ chicken (with an Asian twist) and hope you will find it interesting enough to make it and enjoy with those you love.

The chicken’s flavor is enhanced by a very easy to make Asian-inspired barbeque sauce which is added to the chicken in two stages while baking. The chicken itself is simply seasoned with a few common spices (salt, pepper, garlic and onion powders) and the finished dish is garnished with sesame seeds and sliced green onions.

All in all, this dish is easy to prepare and tastes great, especially when served with steamed rice on the side. I think you’re going to like it, so here’s how to make Asian BBQ-Glazed Chicken.

Scroll Down For A Printable Recipe Card At The Bottom Of The Page

Make The Asian BBQ Sauce

The ingredients you’ll need to make the Asian-Style BBQ sauce are ketchup, soy sauce (regular or low-sodium), hoisin sauce, rice vinegar, red chili flakes, fresh ginger, and toasted sesame oil.

All of these ingredients for the sauce can easily be found in most grocery stores. Hoisin sauce, sesame sauce, and sesame oil can typically be located in the Asian food section.

The ingredients are ready to make the Asian-style BBQ sauce for the chicken.

Measure all the sauce ingredients into a small saucepan and stir very well to combine them. Turn the heat to LOW, and simmer the sauce, for 3-4 minutes.

Asian-style BBQ sauce ingredients are measured into a saucepan, then stirred to combine.

Stir occasionally as the sauce simmers. After 3-4 minutes, the sauce will thicken slightly. Remove the saucepan from the heat source and set aside.

After simmering a few minutes, the Asian BBQ sauce is ready to be used on the chicken.

Prepare The Chicken

Pat the pieces of chicken dry using paper towels, then place each piece on a parchment paper-lined rimmed baking sheet. Leave a small amount of space between each piece of chicken.

Lightly season both sides of each piece of chicken with salt, pepper, garlic powder and onion powder. NOTE: The recipe (as written below) calls for 4 thighs and 4 legs (to serve 4 people), however when I photographed this, I only used 3 thighs and 3 legs (just an FYI).

chicken thighs and legs are seasoned with salt, pepper, garlic and onion powder.

Use a pastry brush to THINLY brush some of the BBQ sauce on both sides of each piece of chicken. Add only enough sauce to barely cover the chicken pieces on all sides for the first half of the baking time. 

You should have plenty of sauce left over for later when you will thickly apply it halfway through the baking time!

A THIN coating of the BBQ sauce is brushed on all sides of the chicken pieces.

Bake The Chicken

Place the Asian BBQ-Glazed chicken on a middle rack in your preheated oven. Bake it at 400°F. for 20 minutes, then carefully remove the pan of chicken from the oven.

Using your pastry brush, apply a THICK coating of BBQ sauce to each piece of chicken, using up the remaining BBQ sauce to do this. Now the chicken is ready to finish baking!

Chicken is baked for 20 minutes, then a THICK coating of Asian BBQ sauce is brushed on.Asian BBQ-Glazed Chicken goes back into the oven for 20 more minutes.

Put the chicken back into the oven and continue to bake it for 20 more minutes OR until the chicken reaches a safe internal temperature of 165°F. You can check the inner temperature of the chicken by inserting a meat thermometer into the thickest part.

Once the chicken is done, remove it from the oven and let it rest for a minute, then transfer the chicken pieces to a serving plate. Garnish the Asian BBQ-Glazed Chicken with sliced green onions and sesame seeds, if desired.

Baked Asian BBQ-Glazed chicken is garnished with green onions and sesame seeds.

Serve The Asian BBQ-Glazed Chicken

When the chicken has been garnished, it is ready to be served and enjoyed! The outside of the chicken will be really darkened and browned, and the skin should be moderately crispy.

A white platter with six pieces of Asian BBQ-Glazed chicken on it, ready to be enjoyed.

We always enjoy having steamed rice served with the chicken and I added steamed broccoli this time to go along with it. The chicken tastes amazing and is juicy on the inside and a bit crisp on the outside.

Rice and broccoli are served along with 2 pieces of Asian BBQ-glazed chicken.

I hope you have the chance to try this delicious Asian-inspired chicken, and trust you’ll enjoy it, too! It’s a simple meal to prepare without a lot of work which makes it a “good choice” in my book.

Thank you for taking time to visit here today, and I invite you to come back again soon for more family-friendly recipes. Take care, may God bless you, and have a wonderful day!

Looking For More CHICKEN Recipes?

You can find ALL of my recipes in the Recipe Index, which is located at the top of the page. I have LOTS of fabulous chicken recipes to choose from, including:

Want More Recipes? Get My FREE Newsletter!

I publish a newsletter 2 times per month (1st and 15th) with lots of recipes, tips, etc..
Would you like to join our growing list of subscribers?

There is a Newsletter subscription box on the top right (or bottom) of each blog post, depending on the device you use.
You can submit your e-mail address there, to be added to my mailing list.

Find Me On Social Media:

Facebook page: The Grateful Girl Cooks!
Pinterest:
The Grateful Girl Cooks!
Instagram:
jbatthegratefulgirlcooks

Author's signature

↓↓ PRINTABLE RECIPE BELOW ↓↓

0 from 0 votes
Asian BBQ-Glazed Chicken
Prep Time
10 mins
Cook Time
35 mins
Total Time
45 mins
 

You'll enjoy Asian BBQ-Glazed Chicken, a delicious, easy dish featuring chicken thighs and legs coated in Asian-style BBQ sauce and baked!

Category: Main Dish
Cuisine: Asian
Keyword: Asian BBQ-glazed Chicken
Servings: 4 (one thigh + one leg per serving)
Calories Per Serving: 684 kcal
Author: JB @ The Grateful Girl Cooks!
Ingredients
Asian-Style BBQ Sauce:
  • ¼ cup ketchup
  • ¼ cup Hoisin sauce
  • 2 Tbsp. rice vinegar
  • 1 Tbsp. toasted sesame oil
  • 1 Tbsp. soy sauce
  • 1 Tbsp. finely grated fresh ginger
  • 2 teaspoons water
  • 1 pinch red chili flakes
Chicken: Season chicken lightly (both sides) with salt, pepper, garlic powder and onion powder
  • 4 medium chicken thighs (bone in-skin on)
  • 4 medium chicken legs (bone in-skin on)
For Garnish: Sesame seeds and/or sliced green onions (optional)
    Instructions
    1. Preheat oven to 400℉ (or 204.44℃). Line a baking sheet with parchment paper.

    2. Measure sauce ingredients into a small saucepan; stir well to combine. Simmer on LOW heat for 3-4 minutes, stirring occasionally. After 3-4 minutes, sauce will thicken slightly. Remove pan from heat source; set aside.

    3. Pat chicken dry with paper towels; place each piece on prepared baking sheet, leaving space between each piece. Lightly season both sides of chicken pieces with salt, pepper, garlic powder and onion powder.

    4. Use a pastry brush to THINLY brush BBQ sauce to chicken on both sides, adding only enough sauce to barely cover the chicken (remaining sauce is for later).

    5. Bake chicken (on a middle rack) at 400°F. for 20 minutes, then remove pan from oven. Brush a THICK coating of BBQ sauce on each piece of chicken, using all the remaining BBQ sauce. Put chicken back in oven; bake it for 15-20 more minutes (time will depend on size of chicken pieces) OR until chicken reaches a safe internal temp. of 165°F. Insert meat thermometer into thickest part to check.

    6. When chicken is done, let it rest a minute, then transfer pieces to a serving plate. Garnish chicken with sliced green onions and sesame seeds. Serve and enjoy!

    Recipe Notes

    NOTE: The caloric calculation for the chicken is an estimate only using a software tracker, because the weight/size of the chicken pieces will vary per user. It is also based on each person consuming one chicken thigh AND one chicken leg (this amount or combination of pieces eaten may also vary per your needs). The ingredients used for the sauce may vary calorically as well, depending on the brands used.

    Nutrition Facts
    Asian BBQ-Glazed Chicken
    Amount Per Serving (1 (leg + thigh))
    Calories 684 Calories from Fat 441
    % Daily Value*
    Fat 49g75%
    Saturated Fat 13g81%
    Trans Fat 0.2g
    Polyunsaturated Fat 11g
    Monounsaturated Fat 20g
    Cholesterol 262mg87%
    Sodium 768mg33%
    Potassium 649mg19%
    Carbohydrates 13g4%
    Fiber 1g4%
    Sugar 8g9%
    Protein 46g92%
    Vitamin A 317IU6%
    Vitamin C 1mg1%
    Calcium 33mg3%
    Iron 2mg11%
    * Percent Daily Values are based on a 2000 calorie diet.

    Here’s one more to pin on your Pinterest boards!You'll enjoy Asian BBQ-Glazed Chicken, a delicious, easy dish featuring chicken thighs and legs coated in Asian-style BBQ sauce and baked!


    Roasted Red Pepper Hummus

    Roasted Red Pepper Hummus is a yummy appetizer that’s so easy to make! Serve with crackers, pita chips, or an assortment of fresh veggies!
    Roasted Red Pepper Hummus is a yummy appetizer that's so easy to make! Serve with crackers, pita chips, or an assortment of fresh veggies!

    When I first tried hummus many years ago, I didn’t know what to expect. I thought I might not like it, but it turns out it’s DELICIOUS! A few years later I finally make homemade hummus for the first time (and have made it many times in the years since then).

    My husband occasionally buys red pepper hummus at the grocery store, and I started wondering why I hadn’t made this type of hummus before. I always have the ingredients for hummus on hand and also had a jar of roasted red peppers in our pantry, so I made some and it tasted GREAT!

    Don’t really know why it took so long to photograph it and finally post the recipe, but I’m doing that now! Here’s how SIMPLE it is to make roasted red pepper hummus for a wonderfully delicious appetizer or snack.

    Scroll Down For A Printable Recipe Card At The Bottom Of The Page

    What Do I Need To Make This Hummus?

    To make the hummus you’ll need a can of garbanzo beans (chickpeas), sesame tahini paste, roasted red peppers, olive oil, garlic and fresh lemon juice.

    If you’re not familiar with tahini paste, it can be found in most grocery stores nowadays. It is a creamy paste made by finely grinding sesame seeds and resembles natural-style peanut butter in consistency.

    A photo of the ingredients used to make roasted red pepper hummus.

    A Little Prep!

    This recipe only takes a couple minutes of prep. First, rinse and then drain a 15 oz. can of garbanzo beans (also known as chickpeas). Garbanzo beans are a GREAT source of fiber and protein!

    A can of garbanzo beans (chickpeas) is rinsed and drained before making hummus.

    Open the jar or can of tahini paste and give it a good stir to combine the oil that has separated from the paste. You should end up with a thick paste that resembles a light-colored peanut butter.

    A can of tahini sesame paste is stirred well to create a creamy consistency.

    Remove some roasted red peppers from the jar, then finely chop them. Continue cutting until you have enough to make 4 Tablespoons of chopped peppers. Remove 1 teaspoon of the chopped peppers and set them aside for later, to “garnish” the finished hummus.

    Roasted red peppers are chopped finely after removing them from the jar.

    Let’s Make Some Hummus!

    Place drained garbanzo beans, tahini paste, the remaining chopped red peppers, fresh squeezed lemon juice and minced garlic into a food processor.

    Ingredients go into a food processor and processed by pulsing several times.

    Pulse these ingredients several times until the mixture becomes thick and slightly chunky, as shown below.

    After pulsing a few times in a food processor, the mixture is still chunky in texture.

    Add 2 Tablespoons extra virgin olive oil to the hummus a little bit at a time while the food processor is running. When you add the oil to the top “dispenser”, it allows the oil to drip through very slowly, which is what you want!

    Continue processing the roasted red pepper hummus until all the olive oil is added and the hummus is smooth and creamy. Transfer the hummus out of the food processor and into a serving bowl.

    Extra virgin olive oil is added a little at a time and the hummus is processed until smooth and creamy.

    Serve And Enjoy Roasted Red Pepper Hummus

    Drizzle the reserved ½ Tablespoon of olive oil over the top of the hummus right before serving. Sprinkle the reserved chopped roasted red peppers on top, to add a pop of color. You can also top the hummus with sesame seeds, if desired (not shown).

    Place the roasted red pepper hummus dish on a serving platter and surround it with colorful fresh veggies, crackers and/or pita bread wedges or pita chips for dipping. Serve and enjoy this delicious appetizer!

    Roasted red pepper hummus is topped with olive oil and more roasted red peppers for garnish.The hummus is served with crackers, and fresh chopped veggies.

    Veggies (like the celery shown below) are the perfect scoopers for the creamy roasted red pepper hummus. They also add a wonderful crunch that goes so well with creamy hummus!

    Set out a plate of roasted red pepper hummus for your next get together and watch how fast it disappears! It’s a great party or potluck dish and the recipe can EASILY be doubled or tripled to suit your needs.

    A piece of crunchy celery is used to scoop the roasted red pepper hummus.

    I hope you really enjoy making your very own roasted red pepper hummus, and trust you’ll enjoy it as much as we do! It’s a great way to get kids to eat their veggies! In our home it is always a welcome treat and seems to disappear in a couple of days.

    Thanks so much for stopping by today, and I invite you to come back again soon for more family-friendly recipes. Take care, may God bless you, and have a wonderful day!

    Looking For More APPETIZER Recipes?

    You can find ALL of my recipes in the Recipe Index, which is located at the top of the page. I have lots of delicious appetizer recipes you might enjoy, including:

    Want More Recipes? Get My FREE Newsletter!

    I publish a newsletter 2 times per month (1st and 15th) with lots of recipes, tips, etc..
    Would you like to join our growing list of subscribers?

    There is a Newsletter subscription box on the top right (or bottom) of each blog post, depending on the device you use.
    You can submit your e-mail address there, to be added to my mailing list.

    Find Me On Social Media:

    Facebook page: The Grateful Girl Cooks!
    Pinterest:
    The Grateful Girl Cooks!
    Instagram:
    jbatthegratefulgirlcooks

    Author's signature

    ↓↓ PRINTABLE RECIPE BELOW ↓↓

    0 from 0 votes
    Roasted Red Pepper Hummus
    Prep Time
    10 mins
    Cook Time
    0 mins
    Total Time
    10 mins
     

    Roasted Red Pepper Hummus is a yummy appetizer that's so easy to make! Serve with crackers, pita chips, or an assortment of fresh veggies!

    Category: Appetizer/Snack
    Cuisine: Middle Eastern
    Keyword: roasted red pepper hummus
    Servings: 6
    Calories Per Serving: 155 kcal
    Author: JB @ The Grateful Girl Cooks!
    Ingredients
    • 15 ounces canned chickpeas (garbanzo beans) =1 can, rinsed and drained
    • 4 Tablespoons chopped roasted red peppers * divided use
    • Tablespoons extra virgin olive oil * divided use
    • Tablespoons tahini paste stirred well
    • Tablespoons fresh lemon juice
    • teaspoons minced garlic
    • salt and pepper, to taste
    Instructions
    1. Rinse and drain garbanzo beans. Stir tahini paste well, to incorporate the oil that has separated from the paste.

    2. Finely chop 4 Tablespoons of canned red peppers. Remove 1 teaspoon of the peppers; set aside for later, to "garnish" finished hummus.

    3. Place garbanzo beans, tahini paste, remaining chopped red peppers, lemon juice and garlic into a food processor. Pulse several times until mixture is thick/chunky.

    4. Add 2 Tablespoons olive oil to the hummus a little at a time while the food processor is running. Add the oil to the top "dispenser", allowing the oil to drip through very slowly. Continue processing hummus until the olive oil is added and hummus is smooth and creamy. Transfer hummus into a serving bowl.

    5. To Serve- Drizzle reserved ½ Tablespoon olive oil over the top of the hummus. Sprinkle with reserved red peppers. Put hummus dish on a serving plate; surround it with fresh veggies, crackers, pita bread wedges or pita chips. Enjoy!

    Nutrition Facts
    Roasted Red Pepper Hummus
    Amount Per Serving (1 (1/6 of total))
    Calories 155 Calories from Fat 99
    % Daily Value*
    Fat 11g17%
    Saturated Fat 1g6%
    Polyunsaturated Fat 3g
    Monounsaturated Fat 6g
    Sodium 464mg20%
    Potassium 152mg4%
    Carbohydrates 12g4%
    Fiber 4g17%
    Sugar 0.1g0%
    Protein 5g10%
    Vitamin A 66IU1%
    Vitamin C 7mg8%
    Calcium 39mg4%
    Iron 1mg6%
    * Percent Daily Values are based on a 2000 calorie diet.

    Here’s one more to pin on your Pinterest boards!Roasted Red Pepper Hummus is a yummy appetizer that's so easy to make! Serve with crackers, pita chips, or an assortment of fresh veggies!

    Cheesy Chicken Rice Casserole (Instant Pot)

    Use an Instant Pot to make a delicious Cheesy Chicken Rice Casserole! Filled with chicken, cheese, rice and broccoli, this meal serves 6.
    Use an Instant Pot to make a delicious Cheesy Chicken Rice Casserole! Filled with chicken, cheese, rice and broccoli, this meal serves 6.

    About a year and a half ago our oldest son moved to Portugal after getting married (his wife is Portuguese). He gifted me with the Instant Pot that he purchased while living in his own apartment here in Oregon. On a trip back home to visit last year, he stayed with us, and I made this cheesy chicken rice casserole for dinner one night.

    We all really liked it, and it was fun to show him I had learned how to use my Instant Pot because he’d given it to me without any instructions, recipes or instruction manual! Ha Ha!

    Since that time, I’ve made quite a variety of Instant Pot recipes (Butter Chicken, Rice Pudding, Ground Beef Stroganoff , Macaroni and Cheese and others) using this convenient appliance. These and all of my recipes can be found in the Recipe Index, located at the top of each blog post.

    I adapted this recipe slightly from an original recipe I found on YouTube from “Six Sisters Stuff”. It’s easy to make and is a delicious casserole (with chicken, veggies and rice) that yields about 6 servings! Here’s how to make it.

    Scroll Down For A Printable Recipe Card At The Bottom Of The Page

    Prepare The Chicken

    Pat 1½ pounds of boneless, skinless chicken breasts dry with paper towels. Cut the chicken into bite-sized chunks, then set them aside.

    Boneless skinless chicken breast is patted dry, then cut into bite-sized cubes.

    Press the Sauté button on the Instant Pot, and heat 2 Tablespoon of extra virgin olive oil in it. Once the oil is heated (but not smoking), add the chicken pieces to the Instant Pot.

    Stir in chopped onion, curry powder, salt, pepper and minced garlic. Continue to stir as it cooks in the hot oil, so the garlic doesn’t burn, because it will become bitter if burnt.

    Olive oil is heated in Instant Pot and chicken chunks are added.Chopped onion, garlic and spices are sautéed with the chicken in the Instant Pot.

    Cook, stirring often until the chicken is no longer pink and is mostly cooked through. It will finish cooking once pressure-cooked later. Press the CANCEL button to stop sautéing.

    The chicken is cooked until almost done and will finish cooking later.

    Time To Add More Ingredients

    Add rice, cream of chicken soup, low-sodium chicken broth, water, and raw broccoli florets to the Instant Pot. The broccoli will break apart a little as it is pressure-canned, so don’t make the pieces too small.

    Once all these ingredients have been added, stir the mixture until they are all incorporated and fully combined. Now it’s time to cook it all together in your Instant Pot.

    Broccoli, chicken broth, water, rice and cream of chicken soup is added to Instant Pot.

    Ready To COOK!

    Lock the lid of your Instant Pot in place. Flip the steam release valve to SEALING. Press the MANUAL button and set the timer for 6 minutes. The Instant Pot will take about 10 minutes or so to come to full internal pressure (the pressure button will pop up indicating full pressure), and the cooking program/timer will begin.

    When the 6-minute cooking program ends and timer indicates it’s done, flip the steam release valve to VENTING to allow a quick release of the steam inside. Once all the steam pressure has been released the pressure valve will drop back down, indicating it is safe to open the lid.

    Instant Pot is set to Manual to cook the cheesy chicken rice casserole for 6 minutes.

    Carefully unlock and remove the lid of the Instant Pot and give the mixture inside a very quick stir.

    After cooking, the casserole is given a quick stir in the Instant Pot.

    Sprinkle a cup of grated cheddar cheese on top of the casserole and stir it in well, until the cheese has melted and is fully mixed in.

    Grated cheddar cheese is stirred into the chicken mixture.

    Serve The Cheesy Chicken Rice Casserole

    To serve the cheesy chicken rice casserole, transfer the mixture out of the inner pot and spread it out evenly in a 2-quart baking dish. If desired, add a bit more grated cheddar cheese on top (optional, but GOOD!). 

    TIP: If adding cheese on top, put the casserole in a microwave; heat 30-45 seconds to fully melt the cheese. You do not have to do this because the heat of the casserole will slightly melt the cheese. However, if you want the cheese fully melted, use your microwave to help it along!

    Serve the casserole immediately, and enjoy this delicious, filling one dish meal, full of chicken, rice and broccoli! There’s enough for 6 servings, and leftovers can be reheated in a microwave. Store any leftovers in an airtight container in the refrigerator.

    Cheesy chicken rice casserole is transferred to baking dish and topped with more cheese.The hot cheesy chicken rice casserole is ready to be served and enjoyed.

    I hope you enjoy Instant Pot Cheesy Chicken Rice Casserole because it’s a very satisfying meal that’s simple and budget friendly to make. I am confident your friends and family will enjoy it, too!

    Thank you for stopping by, and I invite you to come back soon for more family-friendly recipes. Take care, may God bless you, and have a GREAT day!

    Looking For More CHICKEN CASSEROLE Recipes?

    You can find ALL of my recipes in the Recipe Index, which is located at the top of the page. I have a nice variety of chicken casseroles (not Instant Pot) you might enjoy, including:

    Want More Recipes? Get My FREE Newsletter!

    I publish a newsletter 2 times per month (1st and 15th) with lots of recipes, tips, etc..
    Would you like to join our growing list of subscribers?

    There is a Newsletter subscription box on the top right (or bottom) of each blog post, depending on the device you use.
    You can submit your e-mail address there, to be added to my mailing list.

    Find Me On Social Media:

    Facebook page: The Grateful Girl Cooks!
    Pinterest:
    The Grateful Girl Cooks!
    Instagram:
    jbatthegratefulgirlcooks

    Author's signature

    Recipe adapted from a: “Six Sisters Stuff” Instant Pot video I saw on YouTube

    ↓↓ PRINTABLE RECIPE BELOW ↓↓

    0 from 0 votes
    Cheesy Chicken Rice Casserole (Instant Pot)
    Prep Time
    20 mins
    Cook Time
    6 mins
    Includes Pressurization time (Instant Pot)
    10 mins
    Total Time
    36 mins
     

    Use an Instant Pot to make a delicious Cheesy Chicken Rice Casserole! Filled with chicken, cheese, rice and broccoli, this meal serves 6.

    Category: Casserole
    Cuisine: All Cuisines
    Keyword: cheesy chicken rice casserole, Instant pot
    Servings: 6
    Calories Per Serving: 548 kcal
    Author: JB @ The Grateful Girl Cooks!
    Ingredients
    • pounds boneless skinless chicken breast
    • 2 Tablespoons extra virgin olive oil
    • 1 medium yellow onion peeled, diced
    • 2 teaspoons minced garlic
    • 1 teaspoon salt
    • 1 teaspoon black pepper
    • ½ teaspoon curry powder
    • 2 cups long grain white rice
    • 2 cups low-sodium chicken broth
    • 10.5 ounces cream of chicken soup = 1 regular sized can
    • ½ cup water
    • cups raw broccoli florets
    • 1 cup grated cheddar cheese + more for topping casserole, if desired
    Instructions
    1. Pat chicken dry with paper towels. Cut into bite-sized chunks; set aside.

    2. Press SAUTÉ button on Instant Pot; heat olive oil in inner pot. Once oil is hot, add chicken. Stir in onion, curry powder, salt, pepper and garlic. Continue to stir so garlic doesn't burn. Cook until chicken is no longer pink (mostly cooked) It will finish cooking later. Press CANCEL button to stop sautéing.

    3. Add rice, cream of chicken soup, chicken broth, water, and broccoli florets. Stir the mixture until ingredients are fully combined.

    4. Lock the lid of the Instant Pot. Flip the steam release valve to SEALING. Press the MANUAL button; set the timer for 6 minutes. The Instant Pot will take about 10 minutes to come to full pressure (pressure button will pop up indicating full pressure), then cooking program begins. When cooking program ends and timer indicates it's done, flip the steam release valve to VENTING to allow a quick release of the steam inside. When all pressure has been released, pressure button will drop back down, indicating it is safe to open the lid.

    5. Carefully remove Instant Pot lid; give mixture inside a quick stir. Sprinkle 1 cup of grated cheddar on top; stir well, until cheese melts and is mixed in.

    6. Transfer mixture to a 2-quart baking dish and spread evenly in dish. OPTIONAL: Add more grated cheese on top. TIP: If adding cheese on top, put casserole in microwave; heat 30-45 seconds to melt cheese. This is not a must, but if you'd prefer the cheese fully melted, use a microwave to help it along! Serve and enjoy!

    Nutrition Facts
    Cheesy Chicken Rice Casserole (Instant Pot)
    Amount Per Serving (1 (1/6 of total))
    Calories 548 Calories from Fat 162
    % Daily Value*
    Fat 18g28%
    Saturated Fat 6g38%
    Trans Fat 0.01g
    Polyunsaturated Fat 2g
    Monounsaturated Fat 7g
    Cholesterol 95mg32%
    Sodium 1027mg45%
    Potassium 707mg20%
    Carbohydrates 58g19%
    Fiber 2g8%
    Sugar 2g2%
    Protein 37g74%
    Vitamin A 459IU9%
    Vitamin C 23mg28%
    Calcium 186mg19%
    Iron 2mg11%
    * Percent Daily Values are based on a 2000 calorie diet.

    Here’s one more to pin on your Pinterest boards!Use an Instant Pot to make a delicious Cheesy Chicken Rice Casserole! Filled with chicken, cheese, rice and broccoli, this meal serves 6.

    Roasted Golden Potatoes

    Roasted Golden Potatoes are a SIMPLE delicious dish with butter, Parmesan cheese and spices. It only takes 5-7 minutes to prep, then bake!
    Roasted Golden Potatoes are a SIMPLE delicious dish with butter, Parmesan cheese and spices. It only takes 5-7 minutes to prep, then bake!

    If you’re looking for a new and simple way to serve potatoes, I hope you’ll check out this recipe for Roasted Golden Potatoes. I wrote the original recipe down many years ago on a 3″ x 5″ card but failed to make note of where I got it!

    The recipe card has been sitting in an old recipe box of mine for years and years, so I had forgotten about it and how ridiculously easy it is to prepare! It hardly takes any effort to make this delicious side dish because you use canned whole potatoes, butter, Parmesan and a couple common spices!

    Honestly… it takes longer to preheat our oven than it does to get these potatoes ready! Here’s how to make enough roasted golden potatoes for 6 small servings.

    Scroll Down For A Printable Recipe Card At The Bottom Of The Page

    What Kind Of Potatoes To Use

    This dish uses two 15-ounce cans of whole white potatoes, also known as “new” potatoes. They can be found in most grocery stores and are simply peeled whole small potatoes in a water base.

    The potatoes are pre-cooked during the manufacturer’s canning process, so they come right out of the can ready to party!

    Two cans of whole white potatoes are used for this recipe.

    Here We Go!

    The first thing you will need to do is preheat your oven to 350°F. because it only takes a few minutes to get the potatoes seasoned and ready! Drain the potatoes very well, then place the whole potatoes in the (ungreased) baking dish in a single layer.

    Drained whole potatoes are placed in baking dish in a single layer.

    Season The Potatoes

    Melt 4 Tablespoons of butter (equal to half a stick of butter), then drizzle it all over the potatoes. Carefully turn over and rotate the potatoes to make sure all sides get some of the melted butter on them.

    Melted butter is drizzled over all the potatoes, then they're tossed to coat.

    Sprinkle the top of the potatoes with seasoning salt and garlic powder. After that, lightly sprinkle the potatoes with grated Parmesan cheese. TIP: Don’t have seasoning salt? You can make your own with my recipe here.

    NOTE: You can use either fresh, finely shredded Parmesan cheese OR the kind you find in the pasta section in a shaker can. Either variety works well! Use whatever type of Parmesan you prefer or have available.

    In the 2nd photo below, I have shown the potatoes topped with Kraft parmesan cheese. I always have both types of parmesan on hand but realize many people may only have the type in the can, so I used that for the photos.

    Seasoning salt and garlic powder are sprinkled on the butter-covered potatoes.Grated parmesan cheese (fresh or canned) is sprinkled on top of the potatoes.

    The last step before baking is to lightly sprinkle the potatoes with paprika and then top them with fresh chopped parsley. The parsley will provide a “pop” of color to this dish and adds a bit of flavor, as well! 

    Paprika is sprinkled on top of the potatoes, then chopped parsley is added.

    Bake And Serve The Roasted Golden Potatoes

    When your oven has fully preheated, bake the roasted golden potatoes (uncovered) on the middle oven rack at 350°F. for 25 minutes.

    The roasted golden potatoes after they are done cooking.

    When the potatoes are done cooking, remove the baking dish from the oven. The roasted golden potatoes should be fully heated through, and have a beautiful “golden” color on top!

    Each of the roasted whole potatoes is golden in color once done.

    Serve the roasted golden potatoes immediately while hot! We enjoyed this this time served with ham and a broccoli cashew stir-fry, and we really enjoyed them ALL!

    Note: Canned whole potatoes are fairly small, yet the sizes can vary with each can. We typically use about 3 potatoes per serving, but of course that number may vary slightly depending on your needs or the portion size desired.

    A plate with roasted golden potatoes, ham slices and a broccoli stir-fry.

    I hope you have the opportunity to make this simple, but tasty vegetable side dish and trust you will enjoy it, too! It’s so simple to prepare and is a great side dish to “throw together” on a busy evening!

    Thank you so much for stopping by and I invite you to come back again soon for more family-friendly recipes. Take care, may God bless you, and have a wonderful day!

    Looking For More Recipes Featuring POTATOES?

    You can find ALL of my recipes in the Recipe Index, which is located at the top of the page. I have many delicious recipes that feature potatoes, including:

    Want More Recipes? Get My FREE Newsletter!

    I publish a newsletter 2 times per month (1st and 15th) with lots of recipes, tips, etc..
    Would you like to join our growing list of subscribers?

    There is a Newsletter subscription box on the top right (or bottom) of each blog post, depending on the device you use.
    You can submit your e-mail address there, to be added to my mailing list.

    Find Me On Social Media:

    Facebook page: The Grateful Girl Cooks!
    Pinterest:
    The Grateful Girl Cooks!
    Instagram:
    jbatthegratefulgirlcooks

    Author's signature

    Original recipe source unknown

    ↓↓ PRINTABLE RECIPE BELOW ↓↓

    0 from 0 votes
    Roasted Golden Potatoes
    Prep Time
    7 mins
    Cook Time
    25 mins
    Total Time
    32 mins
     

    Roasted Golden Potatoes are a SIMPLE delicious dish with butter, Parmesan cheese and spices. It only takes 5-7 minutes to prep, then bake!

    Category: Side Dish, Vegetable Dish
    Cuisine: All Cuisines
    Keyword: roasted golden potatoes
    Servings: 6 (approx. 3+ per serving)
    Calories Per Serving: 203 kcal
    Author: JB @ The Grateful Girl Cooks!
    Ingredients
    • 30 ounces whole white potatoes (canned) =two 15 oz. cans, drained
    • ¼ cup butter, melted = 4 Tbsp. or ½ stick
    • ½ tsp. seasoning salt
    • ¼ tsp. garlic powder
    • 3 Tbsp. grated Parmesan cheese
    • ¼ tsp. paprika
    • 1 Tbsp. fresh parsley (chopped)
    Instructions
    1. Preheat oven to 350°F.

    2. Drain canned potatoes well, then place them in a single layer in an (ungreased) 8" or 9" square baking dish. Drizzle melted butter over all the potatoes, then turn to coat all sides.

    3. Sprinkle the buttered potatoes with seasoning salt and garlic powder. After that, sprinkle with grated Parmesan cheese. Lightly sprinkle potatoes with paprika then top them with chopped parsley.

    4. When oven is fully preheated, bake the roasted golden potatoes (uncovered) on the middle oven rack at 350°F. for 25 minutes. Potatoes should be fully heated through and golden in color on top!

    5. Serve immediately while hot and enjoy!

    Nutrition Facts
    Roasted Golden Potatoes
    Amount Per Serving (1 approx. 3 potatoes)
    Calories 203 Calories from Fat 90
    % Daily Value*
    Fat 10g15%
    Saturated Fat 6g38%
    Trans Fat 0.3g
    Polyunsaturated Fat 0.5g
    Monounsaturated Fat 2g
    Cholesterol 27mg9%
    Sodium 359mg16%
    Potassium 594mg17%
    Carbohydrates 24g8%
    Fiber 3g13%
    Sugar 1g1%
    Protein 5g10%
    Vitamin A 612IU12%
    Vitamin C 29mg35%
    Calcium 88mg9%
    Iron 1mg6%
    * Percent Daily Values are based on a 2000 calorie diet.

    Here’s one more to pin on your Pinterest boards!Roasted Golden Potatoes are a SIMPLE delicious dish with butter, Parmesan cheese and spices. It only takes 5-7 minutes to prep, then bake!

    Broccoli Cashew Stir-Fry

    Broccoli Cashew Stir-Fry is an easy to make, pan-seared dish with broccoli, cashews, red bell peppers, onions and sauce. Makes 3 servings.
    Broccoli Cashew Stir-Fry is an easy to make, pan-seared dish with broccoli, cashews, red bell peppers, onions and sauce. Makes 3 servings.

    If you’re looking for a new way to cook vegetables, may I suggest trying this recipe for broccoli cashew stir-fry? It is a fantastic recipe we really enjoy and is full of taste, crunch and color!

    I found the original recipe years ago in an old cookbook of mine (from 1995) and made a few adjustments to suit our tastebuds. We love this side dish, and it’s very compatible with lots of main dishes.

    The best part is that it doesn’t require a lot of time to prepare and is a colorful and delicious addition to any meal. Here’s how to make this broccoli cashew stir-fry.

    Scroll Down For A Printable Recipe Card At The Bottom Of The Page

    Make The Sauce

    The first thing you need to do is make the sauce that will be added to the cooked vegetables later. It’s EASY! Measure water, Balsamic vinegar, cornstarch and chicken bouillon powder into a small bowl.

    Water, balsamic vinegar, chicken bouillon powder and cornstarch are combined in a small bowl.

    Use a fork or small whisk to combine the sauce ingredients because the cornstarch tends to thicken and “clump up” when added to the liquid. Continue to mix the sauce together until all lumps are removed, and the sauce is smooth. Set the sauce aside.

    After whisking, the lumps have been blended in, and the sauce is ready to go.

    Prep the Veggies

    Slice ¼ cup of yellow onion and ¼ cup red bell peppers into thin slices vertically (if the bell pepper is really big, cut each slice in half cross-wise). Separate the layers of onion slices.

    Cut ¾ pound of fresh broccoli into florets. Cut off the tough, very bottom ends of the broccoli stems (and discard). Use a vegetable peeler or knife to gently peel the remaining stems on each piece of broccoli, removing only the outer green part (discard the peels).

    Cut off the peeled stems, to separate them from the florets. Slice the peeled stems into thin slices. Add them to the other prepped vegetables.

    You can see in the photo below the remaining florets of broccoli and the thinly sliced stems right above them. The thin peeled stems cook right along with the other veggies and have lots of good flavor, too!

    Broccoli florets, stems, sliced red bell peppers and onions are prepped before cooking.

    Sauté The Vegetables

    Heat 2 teaspoons of extra virgin olive oil (or vegetable oil) on medium heat in a large skillet. Once the oil is very hot (but not smoking), add the broccoli florets, sliced broccoli stems, red peppers and onions to the skillet.

    The vegetables are cooked in hot oil in a large skillet.

    Sauté the vegetables for 4-5 minutes, stirring constantly until the veggies begin to brown slightly and the broccoli becomes crisp tender. During the last minute of cooking, stir in 1 teaspoon of minced garlic.

    Continue to cook 1 more minute, stirring the vegetables constantly so the garlic doesn’t burn (or it will become bitter).

    Minced garlic is added to the cooked vegetables in the skillet and cooked for 1 minute.

    Add the Sauce

    Whisk the sauce again to re-combine the ingredients, then pour it over the veggies in the skillet. Stir to combine the veggies and sauce and quickly bring the sauce to a boil. Cook and stir constantly for 1 more minute.

    Sauce is poured into the skillet full of cooked broccoli, onions and red bell peppers.Sauce is cooked until thickened, coating the veggies in the skillet.

    Stir In The Cashews

    Add 3 Tablespoons of chopped cashews to the veggies and sauce. NOTE: We use roasted salted cashews when we make this dish, but feel free to substitute toasted chopped walnuts, pecans or chopped roasted peanuts.

    Stir the cashews into the broccoli cashew stir-fry, until they’re combined with all the veggies and sauce. Heat through (about 1 minute) and then this delicious dish is ready to be enjoyed!

    Chopped roasted cashews are added to the broccoli cashew stir-fry right before serving.

    Serve The Broccoli Cashew Stir-Fry

    Transfer the broccoli cashew stir-fry to a pretty serving dish and serve immediately while the vegetables are hot. This recipe will yield enough for 3 servings of this yummy and colorful stir-fry.

    The broccoli cashew stir-fry has really good flavor thanks to the sauce, peppers and onions, and the roasted cashews provide a nice crunch in each bite. It’s delicious!

    A serving dish with the broccoli cashew stir-fry on it, ready for serving.

    One of the nice features of this simple side dish is it pairs well with chicken, fish, beef or pork! We enjoyed it this time, served with ham slices and Roasted Golden Potatoes.

    A white plate with broccoli cashew stir-fry, and ham and potatoes in the background.

    I hope you have the chance to make this broccoli cashew stir-fry for yourself and those you love. The recipe can easily be doubled if you require more servings!

    Thank you for stopping by, and I invite you to come back again soon for more family-friendly recipes. Take care, may God bless you, and have a wonderful day.

    Looking For More VEGETABLE Recipes?

    You can find ALL of my recipes in the Recipe Index, which is located at the top of the page. I have lots of wonderful vegetable recipes to choose from, including:

    Want More Recipes? Get My FREE Newsletter!

    I publish a newsletter 2 times per month (1st and 15th) with lots of recipes, tips, etc..
    Would you like to join our growing list of subscribers?

    There is a Newsletter subscription box on the top right (or bottom) of each blog post, depending on the device you use.
    You can submit your e-mail address there, to be added to my mailing list.

    Find Me On Social Media:

    Facebook page: The Grateful Girl Cooks!
    Pinterest:
    The Grateful Girl Cooks!
    Instagram:
    jbatthegratefulgirlcooks

    Author's signature

    Recipe adapted from:  Edith Askins, via “Southern Living 1995 Annual Recipes”, page 52, published 1995, by Oxmoor House, Inc.

    ↓↓ PRINTABLE RECIPE BELOW ↓↓

    0 from 0 votes
    Broccoli Cashew Stir-Fry
    Prep Time
    12 mins
    Cook Time
    6 mins
    Total Time
    18 mins
     

    Broccoli Cashew Stir-Fry is an easy to make, pan-seared dish with broccoli, cashews, red bell peppers, onions and sauce. Makes 3 servings.

    Category: Side Dish, Vegetable Dish
    Cuisine: All Cuisines
    Keyword: broccoli cashew stir-fry
    Servings: 3
    Calories Per Serving: 165 kcal
    Author: JB @ The Grateful Girl Cooks!
    Ingredients
    For Sauce:
    • ¼ cup water
    • 1 Tablespoon balsamic vinegar
    • 1 teaspoon cornstarch
    • ½ teaspoon chicken bouillon powder
    For Stir-Fry:
    • 2 teaspoons extra virgin olive oil or vegetable oil
    • ¾ pound fresh broccoli
    • ¼ cup red bell pepper slices sliced thin vertically
    • ¼ cup yellow onion slices sliced thin vertically
    • 1 teaspoon minced garlic
    • 3 Tablespoons chopped roasted cashews or roasted walnuts, pecans or peanuts
    Instructions
    1. Whisk water, balsamic vinegar, cornstarch and chicken bouillon powder in a small bowl until lumps are gone, and sauce is smooth. Set aside.

    2. Cut red pepper and onion in thin slices vertically (if red pepper is big, cut slices in half cross-wise). Cut broccoli into florets. Remove tough ends of stems (discard). Peel remaining stems on each piece of broccoli, removing only the outer green part. Cut peeled stems into thin slices; add then to other veggies.

    3. Heat oil on medium in a large skillet. Once oil is very hot (but not smoking), add broccoli florets, sliced broccoli stems, red pepper and onions to skillet. Sauté 4-5 minutes, stirring constantly until veggies begin to brown and broccoli is crisp tender. During last minute, stir in minced garlic. Continue to cook 1 more minute, stirring constantly so garlic doesn't burn and become bitter.

    4. Whisk sauce again until combined, then pour over veggies in skillet. Stir to combine; quickly bring sauce to a boil. Cook 1 more minute, stirring constantly.

    5. Stir in chopped cashews until combined. Heat through (about 1 minute). Remove from heat. Serve immediately while hot. Enjoy!

    Nutrition Facts
    Broccoli Cashew Stir-Fry
    Amount Per Serving (1 (1/3 of total))
    Calories 165 Calories from Fat 90
    % Daily Value*
    Fat 10g15%
    Saturated Fat 2g13%
    Polyunsaturated Fat 2g
    Monounsaturated Fat 6g
    Cholesterol 0.04mg0%
    Sodium 215mg9%
    Potassium 499mg14%
    Carbohydrates 16g5%
    Fiber 4g17%
    Sugar 5g6%
    Protein 6g12%
    Vitamin A 1096IU22%
    Vitamin C 118mg143%
    Calcium 68mg7%
    Iron 2mg11%
    * Percent Daily Values are based on a 2000 calorie diet.

    Here’s one more to pin on your Pinterest boards!Broccoli Cashew Stir-Fry is an easy to make, pan-seared dish with broccoli, cashews, red bell peppers, onions and sauce. Makes 3 servings.

    Baked Cod and Potatoes

    Baked Cod and Potatoes is a simple, delicious dish featuring cod fillets roasted on top of buttery, crispy, well-seasoned potato slices.
    Baked Cod and Potatoes is a simple, delicious dish featuring cod fillets roasted on top of buttery, crispy, well-seasoned potato slices.

    Today I would like to share an easy to prepare seafood main dish with you that I found online a while ago. The main ingredients are cod fillets and russet potatoes (along with butter, olive oil and spices). It’s a fairly simple recipe that will serve 3 people.

    There are two cooking methods used to make the dish. Potatoes are roasted in the oven; the fish is added on top (same dish), then everything finishes cooking under the broiler in the oven. It’s a really nice tasting meal, and here is how to make it.

    Scroll Down For A Printable Recipe Card At The Bottom Of The Page

    Prepare The Potatoes

    Wash 2 large russet potatoes (or 3 medium- about 1 pound total), then remove the peels. Once they’re peeled, slice the potatoes into 1/8″ thick rounds (width-wise) using a sharp knife or a mandoline slicer. Place the potato slices in a medium bowl.

    Russet potatoes are washed before they are peeled.

    Combine 2 Tablespoons of melted butter and 2 Tablespoons of extra virgin olive oil in a separate bowl. Remove 1 Tablespoon of this mixture and set it aside (to drizzle on the fish later).

    Pour the remaining 3 Tablespoons of the butter and olive oil mixture over the potatoes and toss them well, until the potato slices have been coated on all sides. 

    Melted butter and extra virgin olive oil are combined in a small bowl.

    Grease a 9″ square baking dish with non-stick spray, then spread the coated potato slices evenly in the dish, keeping them in a single layer. Season the potatoes generously with salt, pepper, garlic powder and paprika. 

    Potato slices are covered in melted butter/oil, seasoned with spices and layered in baking dish.

    Bake The Seasoned Potato Slices

    Bake the potato slices at 400°F. for 35-40 minutes until the slices have softened and are light golden brown in color. Flip the potatoes over halfway through the baking time, then re-spread them in the dish and continue baking. TIP: I encourage you to check on the potatoes a couple of times while they bake to ensure they don’t get too crispy.

    Remove the pan from the oven once the potatoes are finished cooking. Turn on the BROILER for the oven, and make sure the oven rack is moved to about 6 inches from the heat source for the final step.

    Potatoes are roasted in baking dish and flipped over, halfway through the baking time.After being turned over, the potatoes continue roasting until light brown and slightly crisp.

    Add The Cod Fillets

    Now it’s time to add the cod fillets and finish cooking this dish! Place three 1″ thick cod fillets (with or without skin on the bottom) on top of the potato slices, leaving a small amount of space in between each one.

    We used cod fillets with skin on (this time), then removed the skin once everything was ready, but this is your choice, however you prefer it. Drizzle or brush the reserved melted butter and olive oil mixture over the top of the fillets. Lightly season the fish with additional salt (if desired), then sprinkle them with fresh thyme leaves. 

    Cod fillets are drizzled with butter/oil and thyme and placed on top of roasted potato slices.

    Time For The Broiler

    When the broiler is hot and the oven rack is in place, put the baking dish back in the oven, about 6″ away from the direct heat of the broiler. Broil the fish for 7-10 minutes OR until the fish is cooked through, and the potatoes are crispy and browned. 

    Ours usually takes the full 10 minutes, but the time may vary depending on the thickness of the fish. Keep an eye on the fish while it broils. If you notice the potatoes begin to get too browned or start to burn slightly, simply move the dish further away from the broiler!

    The baked cod and potatoes are done when the potatoes are browned and crispy, and the cod flakes easily with a fork and is cooked all the way through.

    Baked cod and potatoes are cooked through and ready to be served.

    Serve The Baked Cod And Potatoes

    Remove the baking dish from the oven and serve the baked cod and potatoes immediately. Serve the fish on top of the potatoes or serve the cod with the potatoes on the side.

    Sprinkle more fresh thyme leaves on top of the fish before serving (if desired). We enjoy serving the baked cod and potatoes with a salad or a green veggie on the side.

    A white plate with baked cod and potatoes, served with a green salad on the side.

    I hope you have the opportunity to try this delicious seafood recipe and trust you will find it enjoyable. It’s a really uncomplicated recipe to make and has good flavors.

    Thanks so much for stopping by and please come back again soon for more family-friendly recipes. Take care, may God bless you, and have a wonderful day.

    Looking For More COD Recipes?

    You can find ALL of my recipes in the Recipe Index, which is located at the top of the page. I have many delicious recipes featuring cod you can check out, including:

    Want More Recipes? Get My FREE Newsletter!

    I publish a newsletter 2 times per month (1st and 15th) with lots of recipes, tips, etc..
    Would you like to join our growing list of subscribers?

    There is a Newsletter subscription box on the top right (or bottom) of each blog post, depending on the device you use.
    You can submit your e-mail address there, to be added to my mailing list.

    Find Me On Social Media:

    Facebook page: The Grateful Girl Cooks!
    Pinterest:
    The Grateful Girl Cooks!
    Instagram:
    jbatthegratefulgirlcooks

    Author's signature

    Recipe adapted from Mark Bittman via New York Times Cooking at: Roasted Cod and Potatoes Recipe

    ↓↓ PRINTABLE RECIPE BELOW ↓↓

    0 from 0 votes
    Baked Cod and Potatoes
    Prep Time
    15 mins
    Cook Time
    45 mins
    Total Time
    1 hr
     

    Baked Cod and Potatoes is a simple, delicious dish featuring cod fillets roasted on top of buttery, crispy, well-seasoned potato slices.

    Category: Main Dish
    Cuisine: All Cuisines
    Keyword: baked cod and potatoes
    Servings: 3
    Calories Per Serving: 366 kcal
    Author: JB @ The Grateful Girl Cooks!
    Ingredients
    • 2 large russet potatoes (about 1 pound) or 3 medium
    • ¼ medium yellow onion thinly sliced
    • 2 Tablespoons butter melted
    • 2 Tablespoons extra virgin olive oil
    • salt and pepper to generously season potatoes
    • garlic powder to generously season potatoes
    • paprika to generously season potatoes
    • ¾ pound cod fillets (3 fillets) approx. 1" thick and 4 oz. each
    • fresh thyme leaves (chopped) to lightly season fish
    • additional salt (optional) to lightly season fish
    Instructions
    1. Preheat oven to 400℉. Grease or spray bottom of a 9" square baking dish.

    2. Wash and peel potatoes. Slice potatoes into 1/8" thick rounds using a knife or mandoline. Place potato slices in a bowl.

    3. Combine melted butter and olive oil in a separate bowl. Remove 1 Tablespoon of mixture; set aside (to drizzle on fish later). Pour remaining butter/oil mixture on potatoes; toss well until potatoes are coated. Spread potatoes in prepared dish, in a single layer. Season generously with salt, pepper, garlic powder and paprika.

    4. Bake the potatoes at 400°F. for 35-40 minutes until softened and light golden brown in color. Flip slices over halfway through baking time, then re-spread them in the dish; continue baking. TIP: Check on potatoes 2-3 times while they bake so they don't get too crispy.

    5. Remove potatoes from oven. Turn on the BROILER: move oven rack to 6" below broiler heat source. Place cod fillets on top of potatoes. Drizzle reserved butter/oil mixture over the fish. Lightly sprinkle fish with additional salt (if desired), then sprinkle with fresh thyme leaves.

    6. Put baking dish under broiler (6" away from heat source). Broil 7-10 minutes OR until fish is cooked through (flakes easily with a fork), and potatoes are crispy/browned. Time may vary depending on thickness of fish. TIP: Keep an eye on everything as it broils. If potatoes begin to burn, move baking dish further away from the broiler!

    7. Remove from oven; serve immediately. Serve fish on top of the potatoes or with potatoes on the side. Enjoy!

    Nutrition Facts
    Baked Cod and Potatoes
    Amount Per Serving (1 1 fillet + potatoes)
    Calories 366 Calories from Fat 162
    % Daily Value*
    Fat 18g28%
    Saturated Fat 6g38%
    Trans Fat 0.3g
    Polyunsaturated Fat 2g
    Monounsaturated Fat 9g
    Cholesterol 69mg23%
    Sodium 129mg6%
    Potassium 1115mg32%
    Carbohydrates 28g9%
    Fiber 2g8%
    Sugar 1g1%
    Protein 24g48%
    Vitamin A 280IU6%
    Vitamin C 10mg12%
    Calcium 42mg4%
    Iron 2mg11%
    * Percent Daily Values are based on a 2000 calorie diet.

    Here’s one more to pin on your Pinterest boards!Baked Cod and Potatoes is a simple, delicious dish featuring cod fillets roasted on top of buttery, crispy, well-seasoned potato slices.