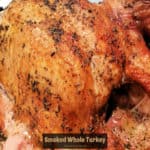
Make a delicious 20 lb. smoked whole turkey (with butter and a variety of dried spices) in about 6 hours, using a pellet grill or smoker.

The first time I ever cooked a whole turkey was a LONG TIME ago (I was 20 years old and newly married). I won’t bore you with the details, but I’ll just say my husband and I had some single friends over for Thanksgiving and it wasn’t pretty!
It ended with a turkey that was cooked and pretty on the “outside”, but the middle/insides of that bird were an entirely different story. UGH.
True story- and we all ended up having a good time and lived to tell the tale… ha ha! After that disaster I learned how to perfectly roast a turkey in our oven, and have never had a problem since, thank goodness.
My husband and I received a FREE 20 lb. turkey last Christmas, and decided to smoke it on our pellet grill, and this is the “recipe” we used. The finished turkey, covered with melted butter and lots of spices, had great seasoning and smoky flavor!
Here’s how we make a smoked whole turkey on our pellet grill. We enjoy making smoked turkey outside, because it doesn’t heat up our kitchen cooking it all day, especially during our summer heat!
Scroll Down For A Printable Recipe Card At The Bottom Of The Page
Preheat The Smoker
The prep time to get the turkey ready to cook is minimal, so the first thing you need to do is preheat your smoker or pellet grill according to the manufacturer’s instructions.
Once preheated, set the temperature for 250°F. This is the temperature you will smoke the turkey at for the first half of the cooking time (low and slow!).
While the smoker preheats, make the spice mix and prep the turkey (it only takes a few minutes). You can use whatever type smoker pellets you prefer, but we love using mesquite or applewood.
Make The Spice Mix For the Turkey
The ingredients for the seasoning mix are simple to prepare. Measure dried Cajun seasoning, Italian seasoning, basil, oregano, rosemary, salt, pepper, rosemary, celery seed and garlic powder in a small bowl. Stir to combine these ingredients, and your spice mix is done. See how easy that is?
Melt a stick of butter in a saucepan and then stir in the seasoning mix until completely combined. Remove the pan from the heat.


Remove the giblets from the inside cavity of the turkey. Pat the turkey dry on all sides, using paper towels to absorb the moisture, then set it on a small wire rack (to slightly elevate the turkey) in a large roasting pan.
Brush the butter seasoning mixture over the entire surface of the turkey, including inside the turkey cavity. Try to get some seasoning under the skin of the breast, as well. Use ALL of the seasoning mixture on the turkey.


Time To Smoke The Turkey!
Once the smoker grill has reached 250°F. and the turkey has been seasoned, it’s ready to cook! Place the roasting pan in the smoker, then insert a temperature probe into the thickest part of the turkey.
Let the turkey cook UNCOVERED until it reaches an internal temperature of 100 – 110°F. Once it begins cooking, don’t open the grill… just be patient, and let it smoke away.
It typically takes about 3 hours to reach this temperature for a turkey this size, but keep an eye on the temp, because we know the temps in various smokers can vary quite a bit!


Halfway Point
Once the turkey reaches an internal temp of 100 – 110°F., remove the turkey pan from the grill. Baste the turkey with any accumulated juice on the bottom of the pan. Add 3 Tablespoons of additional butter to the pan. Cover the pan with aluminum foil, then place the pan back on the grill.
TURN THE HEAT UP TO 300°F. and continue cooking the turkey (covered) for another 2-3 hours, OR until the internal temperature reaches 165°F. We have found that on our smoker (a Traeger), this second half of the cooking time usually takes somewhere between 2½ – 3 hours.
Obviously if you are cooking a much smaller weight turkey, your cooking time will be considerably less. Remember- your cooking time might vary, depending on the size turkey you’re using, model of smoker you’re using (and other conditions), so keep an eye on that internal temperature! The temperature probe is your friend!


Serving The Smoked Whole Turkey
Once the turkey is done, remove it from the smoker, and let it rest (covered) for 25-30 minutes before carving. The turkey will continue to cook slightly as it rests.
This resting time allows the juices time to redistribute inside the turkey. After the turkey has rested, baste it again with the accumulated juices from the bottom of the pan, then slice and serve.
We enjoyed the smoky flavor of the well-seasoned meat and served our turkey slices with steamed broccoli and a delicious Sweet Potato Apple Bake, which complimented the meat well.


I hope you have the opportunity to make a smoked whole turkey for yourself and those you love. We really enjoy having lots of leftovers when we cook a large turkey, which we use for sandwiches, Turkey Fiesta Casserole, Turkey Mulligatawny Soup and Turkey Tortilla Soup (and others)!
Thank you for stopping by, and I invite you to come back soon for more family-friendly recipes. Take care, may God bless you, and have a wonderful day!
Looking For More SMOKER GRILL Recipes?
You can find ALL of my recipes in the Recipe Index, located at the top of the page. I have a variety of Smoker Grill Recipes, including:
- Traeger Roasted Chicken
- Grilled Asparagus with Lemon and Parmesan
- Traeger Grilled Chocolate Lava Cake
- Traeger Grill Smoked Trout
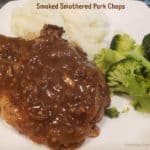
- Smoked Smothered Pork Chops
Want More Recipes? Get My FREE Newsletter!
I publish a newsletter 2 times per month (1st and 15th) with lots of recipes, tips, etc.
Would you like to join our growing list of subscribers?
There is a Newsletter subscription box on the top right (or bottom) of each blog post, depending on the device you use.
You can submit your e-mail address there, to be added to my mailing list.
Find Me On Social Media:
Facebook page: The Grateful Girl Cooks!
Pinterest: The Grateful Girl Cooks!
Instagram: jbatthegratefulgirlcooks

Recipe adapted from: https://anaffairfromtheheart.com
↓↓ PRINTABLE RECIPE BELOW ↓↓
Make a delicious 20 lb. Smoked Whole Turkey (with butter and a variety of dried spices) in about 6 hours, using a pellet grill or smoker.
- 20 pound turkey giblets removed
- ½ cup butter = ½ cup or 8 T.
- 2 teaspoons Cajun seasoning or Creole seasoning
- 1½ teaspoons salt
- 1 teaspoon dried basil
- 1 teaspoon dried rosemary
- 1 teaspoon dried oregano
- 1 teaspoon Italian seasoning
- 1 teaspoon celery seed
- ½ teaspoon black pepper
- ½ teaspoon garlic powder
- 3 Tablespoons butter additional to be added later
Preheat smoker or pellet grill according to manufacturer instructions. Once preheated, set temperature for 250°F.
Combine Cajun seasoning, salt, basil, rosemary, oregano, Italian seasoning, celery seed, black pepper, and garlic powder in a small bowl. Melt a stick of butter in saucepan; add seasoning mix; stir until combined. Remove pan from heat.
Pat turkey dry, using paper towels. Set turkey on small wire rack (to slightly elevate turkey) in a large roasting pan. Brush butter mixture over surface of turkey (all sides), including turkey cavity. Put some seasoning under skin of the breast, as well. Use ALL of the seasoning mixture.
Place roasting pan in smoker; insert temperature probe into thickest part of turkey. Cook UNCOVERED until it reaches an internal temp. of 100° - 110°F. It typically takes about 3 hours to reach temperature. Keep an eye on the temp, because smoker temps can vary! When turkey reaches an internal temp of 100° - 110°F., remove pan from grill. Baste turkey with any accumulated juices in bottom of the pan. Add 3 Tablespoons more butter to the pan. Cover pan with aluminum foil; place pan back on the grill.
TURN THE HEAT UP TO 300°F. and continue cooking turkey (covered) another 2-3 hours, OR until internal temp. reaches 165°F. Remember- your cooking time might vary, depending on the model of smoker (and other conditions), so keep an eye on that internal temperature!
Once done, remove pan from the smoker; let turkey rest (covered) for 25-30 minutes before carving. Turkey will continue to cook slightly as it rests. Resting time allows juices to redistribute in turkey. After resting, baste turkey again with juices from pan, then slice and serve.
NOTE: A 20 pound turkey will yield approximately 8½ - 9 pounds of white and dark meat after cooking. The caloric calculation listed is an approximation that uses both dark and white meat in the total per serving. Your caloric amount will vary depending on portion size, and type of turkey meat consumed (white or dark meat).
Here’s one more to pin on your Pinterest boards!


