Roasted Parmesan Acorn Squash is a tasty veggie side dish! Squash is seasoned with butter, spices, and Parmesan, and it’s ready in 30 minutes!

Tender and seasoned well with butter, spices and Parmesan cheese, this simple acorn squash recipe is delicious, and I think you’ll enjoy it!
I’ve been experimenting with acorn squash recipes for the past couple of years and have really enjoyed the process!
I’ve already posted delicious “sweet” recipes for Apple Pecan Stuffed Acorn Squash and Baked Praline Acorn Squash on my blog. Now it’s time for a “SAVORY” recipe for this versatile winter squash!
It is ready in 30 minutes from start to finish, so you can’t go wrong with this recipe! Here’s how easy it is to make Roasted Parmesan Acorn Squash:
Scroll Down For A Printable Recipe Card At The Bottom Of The Page
Prepare The Acorn Squash For Baking
Before beginning, remember to preheat your oven to 400°F. Okay- here we go: Start with a 1½ to 2 pound acorn squash. This is considered a medium sized squash, since they can get as large as 5 pounds!
Carefully slice the squash in half through the middle (NOT stem to bottom!) then scoop out and discard the seeds and pulp from each half.

 Place the squash, cut side down, and slice each half into 1″ wide slices, creating a half-moon-shaped slice. Place all the squash slices into a large mixing bowl and set aside.

This is what the “half-moon” squash slices will look like after they have been cut.

Seasoning The Acorn Squash
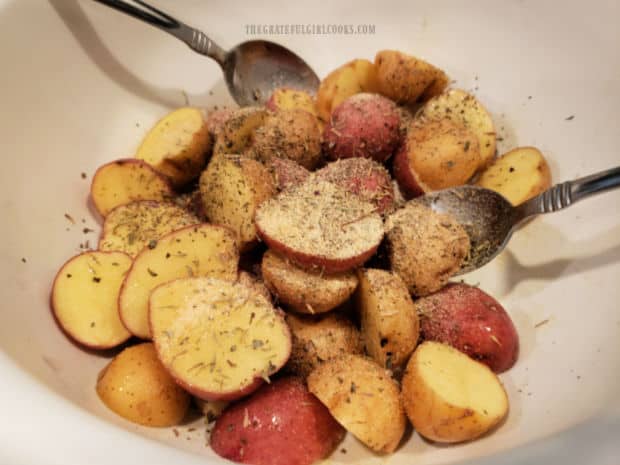
Now it’s time to make the seasoning sauce for the squash. Melt butter in a small saucepan. When melted, add garlic powder, oregano, thyme, salt and pepper, and stir to combine.
Pour the sauce over the acorn squash slices, and toss gently, until the squash is covered on all sides with the buttery spice mixture.


Bake The Acorn Squash
Lay the seasoned acorn squash slices in a single layer on a large baking sheet. Sprinkle each slice on top with a little grated Parmesan cheese (either fresh grated or the kind you get in a green shaker can).
Bake the acorn squash slices at 400°F. for 20 minutes, or until the squash is tender. You can test the squash for doneness by inserting a knife into the middle of a slice.
The knife should glide in smoothly, indicating the squash is tender. Remove the pan from the oven, and serve the roasted Parmesan acorn squash while hot.

Serve The Roasted Parmesan Acorn Squash
To serve, arrange the roasted Parmesan acorn squash slices on a serving platter or onto individual plates. Garnish with fresh parsley, if desired.
Serve immediately and enjoy this savory vegetable side dish. A butter knife can easily be used to separate (cut away) the tender squash from the peel.


I hope you have the opportunity to try this easy to prepare side dish and trust you and those you love will enjoy it as much as we do.
Thank you for stopping by, and I invite you to come back again soon for more family-friendly recipes. Take care, may God bless you, and have a GREAT day!
Looking For More VEGGIE SIDE DISH Recipes?
You can find ALL of my recipes in the Recipe Index, which is located at the top of the page. I have LOTS of delicious vegetable side dish recipes to choose from, including:
- Loaded Grilled Cauliflower
- Orange Glazed Carrots
- Sweet Potato Apple Bake
- Southwestern Skillet Corn
- Instant Pot Green Beans
Want More Recipes? Get My FREE Newsletter!
I publish a newsletter 2 times per month (1st and 15th) with lots of recipes, tips, etc.
Would you like to join our growing list of subscribers?
There is a Newsletter subscription box on the top right (or bottom) of each blog post, depending on the device you use.
You can submit your e-mail address there, to be added to my mailing list.
Find Me On Social Media:
Facebook page: The Grateful Girl Cooks!
Pinterest: The Grateful Girl Cooks!
Instagram: jbatthegratefulgirlcooks

↓↓ PRINTABLE RECIPE BELOW ↓↓

Roasted Parmesan Acorn Squash is a tasty veggie side dish! Squash is seasoned with butter, spices, and Parmesan, and it's ready in 30 minutes!
- 1 medium acorn squash between 1½-2 pounds
- 3 Tablespoons butter
- ¼ teaspoon garlic powder
- ¼ teaspoon oregano
- ¼ teaspoon thyme
- ¼ teaspoon salt
- ¼ teaspoon black pepper
- 3 Tablespoons grated Parmesan cheese fresh or shaker container
- fresh parsley (optional for garnish)
Preheat oven to 400°F.
Carefully slice squash in half through the middle (NOT stem to bottom!). Scoop out/discard seeds and pulp. Place squash cut side down, and slice each half into 1" wide slices, creating half moon-shaped slices. Place into large bowl; set aside.
Melt butter in a small saucepan. Add garlic powder, oregano, thyme, salt and pepper; stir to combine. Pour sauce over acorn squash; toss gently, until squash is covered on all sides with sauce. Lay slices in single layer on large baking sheet. Sprinkle slices with grated Parmesan (fresh grated or green shaker can type).
Bake at 400°F. for 20 minutes, or until the squash is fork-tender. Test for doneness by inserting knife into the middle of a slice. It should glide in smoothly. Remove from the oven; serve roasted Parmesan acorn squash immediately, garnishing with fresh parsley, if desired.
Here’s one more to pin on your Pinterest boards!


