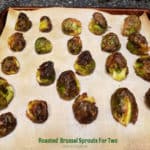
It’s simple to make Roasted Brussel Sprouts For Two! This delicious, baked vegetable side dish only requires a few common ingredients.
Have you ever roasted Brussel sprouts in the oven? They turn out DELICIOUS! After roasting, they look a bit “charred” and crispy looking on the outside but are soft and tender on the inside!
The recipe I am sharing today is ideal for two servings, but can EASILY be doubled, tripled or multiplied into the quantity you need.
TIP: You can enter the # of servings you need into the printable recipe card at the bottom of the page (in the box by SERVINGS). The software will then re-calculate the quantity of ingredients you will need.
I think you’ll be surprised at how really EASY it is to make delicious, roasted Brussel sprouts for two people. Here’s how to make them!
Scroll Down For A Printable Recipe Card At The Bottom Of The Page
Prepare The Brussel Sprouts
Preheat your oven to 425°F. For this recipe as written (for two servings), you will need about ¾ pound of fresh Brussel sprouts. Typically, this will be about 10-12 whole Brussel sprouts, depending on their size.
Trim off the stem ends (seen in the 2nd photo below). Some of the small outer leaves may fall off, but don’t worry! That is to be expected.
Once the stem end has been trimmed off, slice each Brussel sprout in half lengthwise. Discard the stem and any of the outer leaves that have fallen off.


Place the Brussel sprout halves in a medium sized bowl. Drizzle 1½ Tablespoons of olive oil over them, and gently toss, to coat them with the oil.

A Little Seasoning
Once coated with the olive oil, sprinkle the Brussel sprouts with salt, pepper, garlic powder and a bit of onion powder. Stir gently to evenly distribute the seasoning over the veggies.

Bake The Brussel Sprouts
Place the seasoned Brussel sprouts, cut side down, on a parchment paper-lined baking sheet. This will also help to create less mess to clean up!
However, if you don’t have access to parchment paper, place the Brussel sprouts directly on a baking sheet, leaving a small space between each one.
NOTE: I don’t recommend using a Silpat or a silicon mat, because you want the charring that occurs on the sprouts when in contact with parchment paper or a metal baking sheet.

Bake the Brussel sprouts at 425°F. for 23-25 minutes. When done, the Brussel sprouts will be slightly “charred” and crispy on the outside, but very tender on the inside!


Serve The Roasted Brussel Sprouts For Two
Use a spatula to transfer the roasted Brussel sprouts for two onto a platter or individual serving plates. See how browned they are?
We enjoy them this way, but if you prefer them less browned on the outside, simply peel off the outer leaf before serving or remove from the oven a bit early.
The flavor is quite nice as well, thanks to the simple seasoning on them. They may look browned on the outside, but they cut easily, because they’re quite soft inside.
This Brussel sprout side dish can be served with a variety of main dish meats. We enjoyed them (this time), served alongside pork chops and sweet potatoes. YUM!

I hope you have the chance to try this simple recipe for Roasted Brussel Sprouts For Two. You can easily change the amount of the servings in the printable recipe below, if necessary.
Thank you for stopping by, and I hope you’ll come back again soon for more family-friendly recipes. Take care, may God bless you, and have a GREAT day!
Looking For More VEGGIE Recipes?
You can find ALL of my recipes in the Recipe Index, which is located at the top of the page. I have LOTS of yummy vegetable recipes to choose from, including:
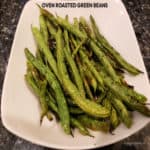
- Crispy Green Bean Fries
- Maple Butternut Squash with Pecans and Cranberries
- Brussel Sprout Casserole For Two
- Orange Glazed Carrots
- Garlic Butter Red Potatoes
Want More Recipes? Get My FREE Newsletter!
I publish a newsletter 2 times per month (1st and 15th) with lots of recipes, tips, etc.
Would you like to join our growing list of subscribers?
There is a Newsletter subscription box on the top right (or bottom) of each blog post, depending on the device you use.
You can submit your e-mail address there, to be added to my mailing list.
Find Me On Social Media:
Facebook page: The Grateful Girl Cooks!
Pinterest: The Grateful Girl Cooks!
Instagram: jbatthegratefulgirlcooks

↓↓ PRINTABLE RECIPE BELOW ↓↓
It's simple to make Roasted Brussel Sprouts For Two! This delicious, baked vegetable side dish only requires a few common ingredients.
- ¾ pound fresh Brussel sprouts (about 10-12)
- 1½ Tablespoons olive oil
- ½ teaspoon salt
- ½ teaspoon ground black pepper
- ½ teaspoon garlic powder
- ⅛ teaspoon onion powder
Preheat oven to 425°F. Line a baking sheet with parchment paper (optional).
Trim off stem ends of Brussel sprouts. Some outer leaves may fall off, that's okay. Slice each Brussel sprout in half length-wise. Discard stem/leaves that fell off.
Place Brussel sprout halves in a medium bowl. Drizzle with olive oil; gently toss, to coat with oil. Sprinkle sprouts with salt, pepper, garlic powder and onion powder. Stir gently, to evenly distribute seasoning.
Put Brussel sprouts, cut side down, on parchment paper-lined baking sheet (or directly on baking sheet), leaving space between each one. NOTE: It is NOT recommended to use silpat or silicone mats to roast the Brussel sprouts.
Bake at 425°F. for 23-25 minutes. When done, Brussel sprouts will be slightly "charred"/crispy on the outside, but tender on the inside! Serve and enjoy!
Here’s one more to pin on your Pinterest boards!