Looking for a quick dinner? Make Broiled Honey Dijon Salmon in 10 minutes! Coated in honey Dijon sauce and broiled, it’s easy and delicious!

Today I want to share a delicious dinner recipe featuring skinless salmon fillets! You know those nights when you need to get something good on the table for dinner, but it’s been a CRAZY busy day?
That’s when this recipe will come in handy. It’s as simple as whipping up a super easy sauce in under a minute, basting it on salmon fillets and cooking it under an oven broiler until done. That’s it!
How easy is that? The whole thing is typically on the table in about 10 minutes, from start to finish and has wonderful flavor. It’s EASY, it’s QUICK, and it’s GOOD!
Here’s how to make Broiled Honey Dijon Salmon.
Scroll Down For A Printable Recipe Card At The Bottom Of The Page
Make the Honey Dijon Sauce
The only other ingredients you’ll need besides the salmon fillets are the ones used to make the delicious seasoning sauce. They are sea salt, chili powder, apple cider vinegar, cayenne pepper, honey, Dijon mustard and ground black pepper.

Combine all the sauce ingredients in a small bowl and stir well, until they are fully combined. This mixture is what you will use to bring additional flavor to the salmon.

Prepare The Salmon
Pat boneless, skinless salmon fillet dry by blotting them well using a paper towel to remove excess moisture.

The salmon I used this time were fairly thin (about ¾” thick), which means less cooking time, because thinner fillets take less time to cook through (approx. 6-7 minutes).
I normally use fillets that are 1″-1¾” thick, but either size is perfectly fine for this recipe, and both will yield good results if you simply keep an eye on them as they cook.
Place the fillets on parchment paper or aluminum foil and then place them on a rimmed baking sheet before seasoning the salmon.

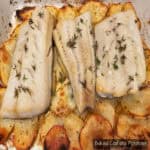
Here’s a photo of two thicker salmon fillets. If using fillets this size (about 1″-1¾” thick) it will usually take about 8-9 minutes to fully finish cooking them through.

Add The Honey Dijon Sauce And Then Broil
Use a pastry brush to fully coat each salmon fillet with the honey Dijon sauce. Put the sauce on thick and use it all to cover the top and sides of each piece.

Turn your oven setting to BROIL. Place the baking sheet about 5″-6″ away from the heat source. Broil the salmon for 7-10 minutes, depending on the thickness of the fillets you are using.
Rotate the pan once during the broiling time to ensure even cooking. Keep an eye on the salmon as it cooks, to make sure it doesn’t “overcook” and dry out.
The salmon, when done, should be cooked to a safe internal temperature of 145° and should flake easily with a fork.

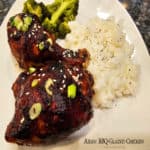
Serve the broiled honey Dijon salmon with some of your favorite sides and enjoy this quick and easy seafood meal!

Steamed white rice and some crisp-tender steamed asparagus were the side dishes that were enjoyed with the salmon.
Both pieces of the broiled honey Dijon salmon are shown on the plate in the photo below. It was all quite delicious!

I hope you have the opportunity to try broiled honey Dijon salmon and trust you will enjoy it as much as we do! It is such a quick prep for a really delicious dinner.
Thanks for stopping by, and I invite you to come back again soon for more family-friendly recipes. Take care, may God bless you, and have a wonderful day, friend.
Looking For More SALMON Recipes?
You can find ALL of my recipes in the Recipe Index, which is located at the top of the page. I have lots of delicious salmon recipes to choose from, including:
- Broiled Salmon with Pineapple Salsa
- Salmon In Spinach Cream Sauce
- Garlic Lime Baked Salmon
- Cedar Plank Grilled Salmon
- Sweet Spicy Salmon
Want More Recipes? Get My FREE Newsletter!
I publish a newsletter 2 times per month (1st and 15th) with lots of recipes, tips, etc.
Would you like to join our growing list of subscribers?
There is a Newsletter subscription box on the top right (or bottom) of each blog post, depending on the device you use.
You can submit your e-mail address there, to be added to my mailing list.
Find Me On Social Media:
Facebook page: The Grateful Girl Cooks!
Pinterest: The Grateful Girl Cooks!
Instagram: jbatthegratefulgirlcooks

Original recipe source: unknown
↓↓ PRINTABLE RECIPE BELOW ↓↓

Looking for a quick dinner? Make Broiled Honey Dijon Salmon in 10 minutes! Coated in honey Dijon sauce and broiled, it's easy and delicious!
- 2 (4-5 oz.) skinless salmon fillets approx. 1" thick
- 1 Tablespoon honey
- 1 Tablespoon Dijon mustard
- 1 Tablespoon apple cider vinegar
- ½ teaspoon chili powder
- ¼ teaspoon sea salt
- 1 pinch ground black pepper
- 1 pinch cayenne pepper
Turn oven to BROILER setting to preheat. Cover a baking sheet with parchment paper or aluminum foil.
Combine all sauce ingredients in a small bowl; stir until fully combined.
Blot salmon fillets dry using a paper towel. Place fillets on prepared baking sheet. Use a pastry brush to fully coat each salmon fillet (top and sides) with sauce.
Place baking sheet 5"-6" away from the heat source. Broil salmon for 7-10 minutes, depending on the thickness of the fillets. Rotate the pan once during broiling to ensure even cooking. Keep an eye on the salmon as it cooks, so it doesn't "overcook" and dry out. The salmon should be cooked to a safe internal temperature of 145° and flake easily with a fork when done.
Serve and enjoy!
Here’s one more to pin on your Pinterest boards!