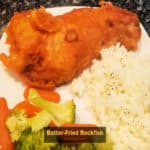
Batter-Fried Rockfish for two is a simple, yet delicious dish! Fresh rockfish fillets are coated with beer batter, then cooked until crispy!

Over the past several years, my husband and I have tried to eat more seafood, especially when we can find it on sale! Today I want to share a simple recipe for batter-fried rockfish.
I try to keep this mild-flavored fish in our freezer, because it is so versatile and can be grilled, fried, baked, used in chowders and it even makes great fish tacos!
My Inspiration For This Recipe
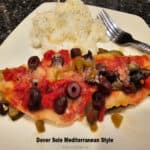
Our family was very fortunate to be able to cruise the British Isles last summer, and my husband and I loved sampling the beer-battered fish we found everywhere in England, Scotland and Ireland! The photos below were from meals we enjoyed in England and Scotland.
The fish and chips there are typically made using cod or haddock and they taste amazing, so I thought “why not try to make it using rockfish?”
I’ve previously posted a recipe for beer battered fish and chips and really liked the batter used. Because I really wanted to make a seafood recipe using rockfish, I tried it, and guess what? Rockfish fillets are wonderful prepared in this way (beer-battered and fried), as well!


Okay… But What Is Rockfish?
Rockfish is also known as red snapper, striped bass, or Rock Cod throughout North America. It is a mild-flavored fish typically found in the Pacific Ocean off the northern coast.
Rockfish is also a great source of lean protein, because a serving of 5 ounces provides almost 2/3 of the daily protein requirements for adults. It’s also very low calorie, which is awesome!
Over the years I’ve cooked rockfish many different ways, and we have enjoyed them all. Here’s how to make THIS recipe for batter-fried rockfish.
Scroll Down For A Printable Recipe Card At The Bottom Of The Page
Prepare The Rockfish
This recipe is tailored to create two servings of batter-fried rockfish. You will need two rockfish fillets (no skin), about 5 ounces each.
Pat the pieces of rockfish dry with paper towels to remove any excess moisture. Set aside.

Make The Batter For The Fish
In a medium sized bowl, whisk flour, baking powder, milk, beer (or club soda) and olive oil together until combined and lump-free.
This batter will end up being about the consistency of slightly thinned yogurt. Set the batter aside.

Combine flour, salt and pepper together on a large dinner plate. These dry ingredients will be used as part of the battering process.
Place the plate on the kitchen counter, then put the wet batter mixture right next to it.
You need the plate and bowl close together, because you will be dipping fish fillets in each one, and don’t want to “drip” all over the kitchen!

Time To Batter The Rockfish
Dip the fish fillets, one at a time into the flour mixture on the plate. Turn to coat all sides with the seasoned flour, then shake off any excess flour.
Place the fish on a piece of wax paper or baking sheet and then repeat the process with the other fillet.


Now dip each piece of floured fish in the wet batter, one at a time and turn, to fully coat the fish with the wet batter. Let any of the excess liquid drip back into the bowl.
Immediately roll this piece of fish back in the flour mixture and set back on the baking sheet (or wax paper).
Repeat this with the other fillet. Once they have been coated with flour/wet batter/flour, they’re ready to be fried.

Fry The Battered Rockfish
Heat oil (about an inch deep) in an electric skillet or large skillet on Medium-High heat until it is very hot (but not smoking!).
Check the temp with a digital food thermometer if you have one. The oil temperature should be right at 350°F. for best frying temperature.
Place each of the batter-coated fillets into the hot oil. The oil should bubble and sizzle when you add them. Be very careful when adding the fish to the oil, because it is very HOT!
TIP: If you are making a larger quantity, be sure to not overcrowd the fillets in the skillet. You may need to cook the fish in batches for the best results.

Cook the fish without disturbing them for 4 minutes, and then carefully turn the rockfish over to the other side.
Continue cooking for another 3-4 minutes, or until fully cooked through. NOTE: The cooking time may vary slightly depending on the thickness of the fish fillets you are using.
When done, the fish should be cooked all the way through and be golden brown and crispy on both sides.


Drain And Serve Batter-Fried Rockfish
Transfer the batter-fried rockfish to paper towels, to help absorb any excess oil remaining on the outside of the fish.
Serve the batter-fried rockfish immediately with your favorite side dishes and enjoy this crispy dish. Add a slice of lemon to each piece of fish, to squeeze the juice on top, if desired!
The fish can also be served with tartar sauce and/or malt vinegar on the side, for added flavor, to suit your taste. Enjoy!


I hope you enjoy this meal for two and trust you’ll enjoy the batter-fried rockfish as much as we do! In reality, it’s such a simple recipe, but it is really quite delicious.
Thanks for stopping by, and I invite you to come back again soon for more family friendly recipes. Take care, may God bless you, and have a GREAT day!
Looking For More ROCKFISH Recipes?
You can find ALL of my recipes in the Recipe Index, which is located at the top of the page. I have a great variety of delicious rockfish recipes for you to choose from, including:
- Southwestern Fried Rockfish
- Pan-Seared Rockfish with Fresh Herbs
- Panko Crusted Rockfish
- Krispy Rockfish Fillets
- Garlic Parmesan Rockfish
Want More Recipes? Get My FREE Newsletter!
I publish a newsletter 2 times per month (1st and 15th) with lots of recipes, tips, etc.
Would you like to join our growing list of subscribers?
There is a Newsletter subscription box on the top right (or bottom) of each blog post, depending on the device you use.
You can submit your e-mail address there, to be added to my mailing list.
Find Me On Social Media:
Facebook page: The Grateful Girl Cooks!
Pinterest: The Grateful Girl Cooks!
Instagram: jbatthegratefulgirlcooks

↓↓ PRINTABLE RECIPE BELOW ↓↓
Batter-Fried Rockfish for two is a simple, yet delicious dish! Fresh rockfish fillets are coated with beer batter, then cooked until crispy!
- 10 ounces rockfish fillets = 2 fillets, about 5 oz. each
- ½ cup all purpose flour
- ½ teaspoon salt
- ½ teaspoon pepper
- ½ cup all purpose flour
- ¾ teaspoon baking powder
- 4 Tablespoons beer (can substitute club soda)
- 3½ Tablespoons low-fat milk (1%)
- ¼ teaspoon extra virgin olive oil
- vegetable oil for frying about 1" deep in skillet
Pat rockfish fillets dry with paper towels to remove excess moisture. Set aside.
Whisk flour, baking powder, milk, beer (or club soda), olive oil in medium bowl until combined/lump-free. Batter will be consistency of thin yogurt. Set aside.
Combine then spread flour, salt and pepper on large dinner plate. Set plate on kitchen counter, with bowl of wet batter mixture next to it.
Dip fish fillets (1 at a time) into the flour mixture on plate. Turn to coat all sides. Place fish on wax paper or baking sheet; repeat with other fillet.
Dip floured fillets in wet batter in bowl (1 at a time). Turn to fully coat all sides. Let any excess batter drip back into the bowl. Immediately roll battered fillet back in flour mixture then put back on baking sheet (or wax paper). Repeat with other fillet. Once coated with flour/wet batter/flour, they're ready to be fried.
Heat oil (1" deep) in an electric skillet (350℉) or a large skillet on Medium-High until very hot (but not smoking). Check oil temp with food thermometer. Oil temp. should be 350°F. for best frying conditions. Place batter-coated fillets into hot oil. Oil should bubble/sizzle when fish is added (it's HOT!).
Cook fish (without disturbing) for 4 minutes; carefully flip fillet to the other side. Continue cooking another 3-4 minutes, or until fully cooked through. NOTE: Cooking time may vary slightly depending on thickness of fillets you use. When done, fish should be cooked all the way through and golden brown on all sides.
Drain fish on paper towels, then serve immediately with lemon slices, tartar sauce and/or malt vinegar on the side, if desired. Enjoy!
NOTE: The oil used to fry the fish in is not calculated in the caloric calculation, because the amount used may vary depending on the size skillet used.
Here’s one more to pin on your Pinterest boards!