Simple Lemon Pepper Salmon is a tasty seafood dish to make in a flash! Fillets are covered with a lemon/olive oil sauce, then skillet-cooked!

Looking for a quick main dish that is easy to make, tastes good, and is ready in under 15 minutes? How about this recipe for Simple Lemon Pepper Salmon?
Boneless, skinless salmon pieces are brushed with a simple lemon sauce, then cooked in a skillet for 7-8 minutes until done. That’s it!
The lemon sauce is super easy to make and only has 4 ingredients: olive oil, fresh lemon juice, lemon pepper and garlic powder. How’s that for simple?
This easy to fix dish is perfect for busy days when all you want to do is get food on the table quickly and with minimal fuss! Here’s how to make 4 servings of simple lemon pepper salmon.
Scroll Down For A Printable Recipe Card At The Bottom Of The Page
Make The Lemon Pepper Sauce
Measure extra virgin olive oil, fresh lemon juice, lemon pepper, garlic powder into a small bowl. Use a whisk to fully blend and incorporate these ingredients.
This is the sauce you will use to baste the salmon for cooking. Set it aside while you prep the salmon pieces, then give it another good whisk before brushing it onto the fish.


Prepare The Salmon
You can use boneless, skinless salmon fillets for this dish OR you whatever cut of boneless, skinless salmon pieces you have available.
Pat the fish dry with paper towels, then brush the sauce (use about ½ of the total amount) over the top of each piece until it is covered. You will add the remaining sauce to the other side later while cooking.


Cook The Simple Lemon Pepper Salmon
Heat a large skillet on medium heat until very hot but not smoking. When the skillet is hot, place the salmon pieces LEMON SAUCE SIDE DOWN in the skillet.
Immediately brush the remaining sauce over the top of each piece, until it is covered, as well. Let the salmon cook, undisturbed (don’t move it) for 4-5 minutes, or until it is about 70% cooked through.
Carefully turn each piece of salmon over in the skillet. Cook the other side for 2-3 more minutes, or until the salmon is cooked through and flakes easily.
The salmon should be lightly browned on all sides. TIP: If you have a meat thermometer, the internal temperature of fully cooked salmon should be145°F.


Serve The Salmon
Once the salmon is finished cooking, transfer it out of the skillet carefully, using a spatula. Serve the fish immediately, while it is hot.

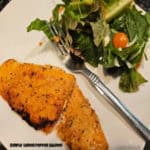
Serve the simple lemon pepper salmon with a favorite side dish. We enjoy it with steamed rice on the side, but when my husband and I want to go light on calories, we serve it with a mixed green salad.
This is such an easy dish to fix! I hope you enjoy this simple salmon recipe, because it’s so quick to prepare, and the cooked salmon has good flavor!
Thank you for stopping by, and I invite you to come back soon for more family-friendly recipes. Take care, may God bless you, and have a wonderful day!
Looking For More SALMON Recipes?
You can find ALL of my recipes in the Recipe Index, which is located at the top of the page. I have lots of delicious recipes featuring salmon to choose from, including:
- Orange and Rosemary Glazed Salmon
- Salmon in Spinach Cream Sauce
- Broiled Salmon with Pineapple Salsa
- Cedar Plank Grilled Salmon
- Garlic Lime Baked Salmon
Want More Recipes? Get My FREE Newsletter!
I publish a newsletter 2 times per month (1st and 15th) with lots of recipes, tips, etc.
Would you like to join our growing list of subscribers?
There is a Newsletter subscription box on the top right (or bottom) of each blog post, depending on the device you use.
You can submit your e-mail address there, to be added to my mailing list.
Find Me On Social Media:
Facebook page: The Grateful Girl Cooks!
Pinterest: The Grateful Girl Cooks!
Instagram: jbatthegratefulgirlcooks

Recipe adapted from: Kelly Shaban via the “Costco Connection Magazine”, July 2024 edition
↓↓ PRINTABLE RECIPE BELOW ↓↓
Simple Lemon Pepper Salmon is a tasty seafood dish to make in a flash! Fillets are covered with a lemon/olive oil sauce, then skillet-cooked!
- 3 Tablespoons extra virgin olive oil
- 3 Tablespoons fresh lemon juice
- 2 teaspoons lemon pepper
- ¼ teaspoon garlic powder
- 4 salmon fillets, boneless and skinless about 5 ounces each-("½-¾" thick)
Place olive oil, fresh lemon juice, lemon pepper, & garlic powder in a small bowl. Use a whisk to fully blend and incorporate these ingredients. Set aside.
Pat salmon dry with paper towels, then brush lemon sauce (use about ½ of the total amount) over the top of each piece until covered. (Remaining half of sauce will be added to the other side while cooking).
Heat a large skillet on Medium heat until very hot, but not smoking. Place salmon pieces SAUCE SIDE DOWN in the skillet. Brush remaining sauce over the top of each piece, until covered. Let salmon cook undisturbed (don't move it) for 4-5 minutes, or until it's about 70% cooked through.
Carefully turn each piece of salmon over. Cook the other side 2-3 more minutes, or until the salmon is cooked through and flakes easily. Salmon should be lightly browned on all sides. Internal temp. of fully cooked salmon should be 145°F.
Serve the simple lemon pepper salmon with a favorite side dish. Enjoy!
Here’s one more to pin on your Pinterest boards!