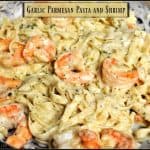
Category: Seafood

Cod with Hoisin Glaze

Cod With Hoisin Glaze is a delicious, Asian-inspired Weight Watchers recipe that is easy to make, and low in calories (2 Smart Points per serving).Cod With Hoisin Glaze is a delicious, Asian-inspired Weight Watchers recipe that is easy to make, and low in calories (2 Smart Points per serving).

Looking for a new seafood dish that is full of flavor, yet low in calories and is easy to make? Well this recipe for Cod with Hoisin Glaze may be just what you’re looking for!

I found the recipe on the Weight Watchers website, and decided to try it (to use up some frozen cod in my freezer).  The original recipe made 4 servings, but since I was only feeding my hubby and myself, I adapted the recipe to make 2 servings (which is reflected in the printable recipe below).

I’m really glad I tried this cod recipe, because it had lots of great Asian flavors thanks to the hoisin sauce! The fish was also really low in calories, or if you’re a WW member, it only had 2 Smart Points. Here’s how simple it is to make this delicious seafood dish:

Scroll Down for A Printable Recipe Card At The Bottom Of The Page

How To Make Cod With Hoisin Glaze

Preheat your oven to 425 degrees F. Rinse the pieces of fish, then pat them dry with paper towels. Set them aside while you make the hoisin glaze.

Pieces of cod on plate are patted dry before coating with sauce.

Make Hoisin Glaze For The Cod

In a medium sized bowl, mix together hoisin sauce, sesame oil, finely grated fresh ginger, and garlic chili paste. Stir these ingredients, until the sauce becomes smooth. NOTE: By the way, if you need hoisin sauce, be sure and try my recipe for Homemade Hoisin Sauce, and make your own!

The ingredients for the hoisin glaze for the cod are mixed in a small bowl.

Add the cod to the bowl of sauce, one piece at a time. Gently turn fish over and coat both sides of the cod with the hoisin glaze, covering all the exposed areas.

Each piece of cod with hoisin glaze are covered in sauce.

Once the cod is completely covered with hoisin glaze, it is ready to bake.

Bake The Cod With Hoisin Glaze

Spray a baking pan with some non-stick baking spray. Place the cod pieces in the dish, in a single layer. Bake the fish at 425 degrees between 8-12 minutes, until the cod with hoisin glaze is cooked through. When done, the fish should no longer be translucent looking in the very center.

NOTE: The baking times will vary, based on the thickness of the cod you’re using, so check them at 8 minutes, and keep an eye on it until they’re cooked through.

Cod with hoisin glaze is baked in a single layer in baking dish.

Once the cod with hoisin glaze is done baking, remove the pan from oven. Transfer the cod onto individual serving plates. Drizzle the fish with additional hoisin glaze, if desired, then garnish with chopped fresh cilantro and sprinkle with sesame seeds. Serve, and enjoy!

When cod with hoisin glaze is done baking, it's topped with cilantro and sesame seeds and served.

See how quick and easy that was?  You can have delicious, healthy cod with hoisin glaze on the table in just about 20 minutes from start to finish!

I really hope you enjoy this simple, yet wonderful tasting Cod with Hoisin Glaze! The recipe is so easy to make, and better yet, it’s very low in calories!  Have a great day!

Looking For More Recipes Using COD?

You can find all of my recipes in the Recipe Index, located at the top of the page. If you are looking for more cod recipes, may I suggest a few recipes:

Interested In More Recipes?

Thank you for visiting this website. I appreciate you using some of your valuable time to do soIf you’re interested, I publish a newsletter 2 times per month (1st and 15th) with all the latest recipes, and other fun info. I would be honored to have you join our growing list of subscribers, so you never miss a great recipe!
There is a Newsletter subscription box on the top right side (or bottom) of each blog post, depending on the device you use, where you can easily submit your e-mail address (only) to be included in my mailing list.

You Can Also Find Me On Social Media:

Facebook page: The Grateful Girl Cooks!
Pinterest:
The Grateful Girl Cooks!
Instagram:
jbatthegratefulgirlcooks

Author's signature

Recipe Adapted From:  https://www.weightwatchers.com/us/recipe/cod-with-hoisin-glaze/5626a63af79cf9120df3b2c3

0 from 0 votes
Cod with Hoisin Glaze
Prep Time
5 mins
Cook Time
12 mins
Total Time
17 mins
 

Cod With Hoisin Glaze is a delicious, Asian-inspired Weight Watchers recipe that is easy to make, and low in calories (2 Smart Points per serving).

Category: Entree-Seafood
Cuisine: Asian
Keyword: cod with hoisin glaze
Servings: 2 servings
Calories Per Serving: 171 kcal
Author: JB @ The Grateful Girl Cooks!
Ingredients
  • 2 ling cod fillets , uncooked, rinsed and patted dry (each approx. 4 ounces)
Sauce:
  • 1 Tablespoon hoisin sauce
  • 1 teaspoon freshly grated ginger
  • 1/2 teaspoon sesame oil
  • 1/4 teaspoon garlic chili paste (or hot sauce)
Garnish:
  • 1 teaspoon fresh cilantro
  • 3/4 teaspoon sesame seeds
Instructions
  1. Preheat oven to 425 degrees F. Rinse fish, pat dry with paper towels. Set aside.
  2. In a medium sized bowl, mix together hoisin sauce, sesame oil, finely grated fresh ginger, and garlic chili paste. Stir until sauce is smooth. Add cod, one piece at a time to the bowl of sauce. Gently turn fish over and coat both sides with sauce, covering all exposed areas.

  3. Spray a baking pan with non-stick spray. Place fish in dish, single layer. Bake at 425 degrees between 8-12 minutes, until fish is cooked through and is no longer translucent looking in the very center. Baking times will vary based on the thickness of the fish you are using, so check it at 8 minutes, then keep an eye on it until finished cooking through.
  4. Remove dish from oven. Place fish on serving plates, then garnish with chopped fresh cilantro and sprinkle with sesame seeds. Serve, and enjoy!
Recipe Notes

On Weight Watchers? When prepared as written, one serving has a Smarts Points value of 2 points.

Nutrition Facts
Cod with Hoisin Glaze
Amount Per Serving (1 piece)
Calories 171 Calories from Fat 18
% Daily Value*
Fat 2g3%
Cholesterol 73mg24%
Sodium 221mg10%
Potassium 702mg20%
Carbohydrates 4g1%
Sugar 2g2%
Protein 30g60%
Vitamin A 70IU1%
Vitamin C 1.7mg2%
Calcium 35mg4%
Iron 0.8mg4%
* Percent Daily Values are based on a 2000 calorie diet.

Here’s one more to pin on your Pinterest boards!Cod With Hoisin Glaze is a delicious, Asian-inspired Weight Watchers recipe that is easy to make, and low in calories (2 Smart Points per serving).

Save

Save

Save

Save

Save

Save

Shrimp Scampi

You’re gonna love shrimp scampi, a classic Italian dish, featuring shrimp cooked in a simple lemon, butter and garlic sauce, and served on pasta!You're gonna love shrimp scampi, a classic Italian dish, featuring shrimp cooked in a simple lemon, butter and garlic sauce, and served on pasta!
Large shrimp cooked with olive oil, butter, lemon juice and lots of garlic, and served with pasta… does that sound good to you? If it does, then you will LOVE this recipe for Shrimp Scampi!

Did you know that in the United States we have “National Shrimp Scampi Day”? It is celebrated each year on April 29th. Who knew?  I recently found this recipe from celebrity chef Ina Garten and decided to try it with some shrimp I had pulled out of our freezer.

I’d made shrimp scampi many times before, using a different recipe, but decided this one was the winning ticket, so I wanted to share on my blog! It is light… and DELICIOUS!!!! Did I mention that it’s really easy to make?  Here’s how:

Scroll Down For A Printable Recipe Card At The Bottom Of The Page

How To Make Shrimp Scampi

Place a little bit of vegetable oil into a large pot of boiling water.  Add the pasta and 1 Tablespoon salt. Cook per package instructions. While pasta is cooking, cook the shrimp.

Pasta cooking in large pot, in order to serve with the shrimp scampi.

To prepare the shrimp, melt butter and olive oil in large skillet over medium-low heat. Add the minced garlic and cook for 1 minute, stirring often to prevent the garlic from burning.

Butter, garlic and olive oil are heated in skillet before adding shrimp.

Cook The Shrimp

Add all of the shrimp, plus 1½ teaspoons salt, and ground black pepper to the skillet.

Seasoned shrimp are added to the butter and lemon shrimp scampi sauce.

Cook the shrimp scampi, stirring often, and cooking both sides. Continue to cook the shrimp for a total of about 5-6 minutes, until the shrimp turn pink in color.

 All of the seasoned shrimp are cooking in skillet.

Add chopped parsley, lemon zest, lemon slices, lemon juice, and red pepper flakes to the shrimp scampi. Stir well, to fully combine all the ingredients. Sorry the photo below is a bit blurry. I must have been in a hurry to eat!

Cooking the shrimp scampi with lemons, lemon zest and parsley in a skillet.

By now the pasta should be done cooking. Drain the cooked pasta, then place it back into the pot.  Add the shrimp scampi and the sauce to the pasta.  Mix the ingredients well, so that all the pasta is coated with sauce.

Serve The Shrimp Scampi

Serve the shrimp scampi at once, while hot, and enjoy the wonderful flavors of this classic Italian seafood dish! The recipe as written makes 3 large servings or 4 slightly smaller servings.

A portion of shrimp scampi is garnished with fresh parsley and lemon slices, to serve.

The shrimp scampi meal is served, and is ready in about 30 minutes!

The shrimp scampi tastes wonderful, due in part to the freshly squeezed lemon juice and zest, plus the flavorful minced garlic! I have a hunch you will absolutely LOVE this meal!

My husband and I had the leftovers the next day for lunch, and they tasted just as good as the night before!  Hope you will consider giving this recipe a try. It’s quick, easy and so incredibly good! Have a great day, and come back again soon.

Looking For More SHRIMP Recipes?

You can find ALL my recipes in the Recipe Index, located at the top of the page. I have some delicious shrimp recipes, including:

Interested In More Recipes?

Thank you for visiting this website. I appreciate you using some of your valuable time to do soIf you’re interested, I publish a newsletter 2 times per month (1st and 15th) with all the latest recipes, and other fun info. I would be honored to have you join our growing list of subscribers, so you never miss a great recipe!
There is a Newsletter subscription box on the top right side (or bottom) of each blog post, depending on the device you use, where you can easily submit your e-mail address (only) to be included in my mailing list.

You Can Also Find Me On Social Media:
Facebook page: The Grateful Girl Cooks!
Pinterest: The Grateful Girl Cooks!
Instagram: jbatthegratefulgirlcooks

Author's signature

Recipe Source:  http://www.foodnetwork.com/recipes/ina-garten/linguine-with-shrimp-scampi-recipe3-1916619

0 from 0 votes
Shrimp Scampi
Prep Time
15 mins
Cook Time
10 mins
Total Time
25 mins
 

You're gonna love shrimp scampi, a classic Italian dish, featuring shrimp cooked in a simple lemon, butter and garlic sauce, and served on pasta!

Category: Entree
Cuisine: Italian
Keyword: shrimp scampi
Servings: 3 servings
Calories Per Serving: 652 kcal
Author: JB @ The Grateful Girl Cooks!
Ingredients
  • 1 teaspoon Vegetable oil
  • 2 teaspoons salt (divided)
  • 1/2 pound linguini or spaghetti
  • 3 Tablespoons butter
  • Tablespoons olive oil
  • Tablespoons minced garlic (approx 4 large cloves)
  • 1 pound large shrimp , peeled and deveined
  • 1/4 teaspoon ground black pepper
  • 1/3 cup chopped fresh parsley leaves
  • Grated zest from 1/2 large lemon
  • 1/3 cup fresh squeezed lemon juice (approx. 2-3 lemons)
  • 1/4 lemon , thinly sliced into rounds
  • 1/8 teaspoon hot red pepper flakes
Instructions
  1. Place a teaspoon of vegetable oil and teaspoon of salt into a large pot of boiling water. Add the pasta. Cook per package instructions. While pasta is cooking, cook the shrimp.

  2. To prepare shrimp, melt butter and olive oil in large skillet on medium-low heat. Add the minced garlic and cook for 1 minute, stirring often to prevent the garlic from burning.
  3. Add shrimp; season with 1 teaspoon salt, and ground black pepper to the skillet. Cook, stirring often (and cooking both sides), for a total of about 5 minutes, until the shrimp turn pink in color. Remove skillet from the heat. Add chopped parsley, lemon juice, lemon slices, lemon zest, and the red pepper flakes. Stir well, to fully combine ingredients.

  4. By now the pasta should be done cooking. Drain pasta, then place pasta back into the pot. Add the shrimp and sauce to the pasta right away. Toss ingredients well, so that pasta is coated with sauce. Serve hot, and enjoy!
Nutrition Facts
Shrimp Scampi
Amount Per Serving (1 serving)
Calories 652 Calories from Fat 234
% Daily Value*
Fat 26g40%
Saturated Fat 9g56%
Cholesterol 411mg137%
Sodium 2060mg90%
Potassium 382mg11%
Carbohydrates 61g20%
Fiber 2g8%
Sugar 3g3%
Protein 41g82%
Vitamin A 935IU19%
Vitamin C 31.6mg38%
Calcium 255mg26%
Iron 4.8mg27%
* Percent Daily Values are based on a 2000 calorie diet.

Here’s one more to pin on your Pinterest boards!You're gonna love shrimp scampi, a classic Italian dish, featuring shrimp cooked in a simple lemon, butter and garlic sauce, and served on pasta!

Save

Save

Save

Save

Save

Save

Save

Save

Save

Pan Seared Salmon with Cilantro Lime Sauce

Pan seared salmon tastes fantastic when paired with a creamy cilantro lime sauce, and this delicious seafood dish can be ready in about 10 minutes!Pan seared salmon tastes fantastic when paired with a creamy cilantro lime sauce, and this delicious seafood dish can be ready in about 10 minutes!
On my never-ending quest to find great salmon recipes, I recently stumbled upon this super simple and wonderfully delicious recipe for Pan-Seared Salmon with Cilantro Lime Sauce. We really enjoyed the flavors, and I appreciated how easy the salmon was to prepare!

The recipe is as simple as pan-searing seasoned salmon fillets, then drizzling the cooked salmon with a creamy cilantro lime sauce… that’s it! (I told you it was EASY!). The entire recipe can be ready and on the table in just about 10 minutes! How’s THAT for convenience?  Here’s how to make this delicious main course:

Scroll Down for A Printable Recipe Card At The Bottom Of The Page

Make The Cilantro Lime Sauce For The Pan Seared Salmon

Take salmon fillets out from refrigeration and let them sit (at room temp.) while you make the cilantro lime sauce. The sauce hardly takes any time at all to prepare.

To make the sauce, place sour cream, chopped green onions, cilantro, garlic, lime juice, sliced garlic, and salt into a food processor or blender. Process the sauce until the cilantro leaves are finely chopped or minced. Set sauce aside while cooking salmon.

The cilantro lime sauce to drizzle on the salmon is easy to make.

Make The Spice Rub For The Salmon Fillets

Place cumin, coriander, cayenne pepper, salt and pepper in a small bowl, and mix well, to combine the spices.

The spices for the pan seared salmon in a small white bowl, ready to mix.

Pat all sides of salmon fillets dry, using a paper towel. Sprinkle spice mixture evenly over both sides of salmon, lightly rubbing spices into the fish as you go. Use all the spice mix.

Salmon fillets are rubbed with the dry spice mix before cooking.

Cooking The Salmon Fillets

Heat olive oil in a large non-stick skillet on medium-high heat. Once oil is hot, place the salmon fillets gently into the hot skillet (with the top side down).  Cook 4 minutes, without moving the salmon. After 4 minutes, the bottom of the salmon should be crispy and golden brown. Carefully turn salmon to other side, and cook for 2-3 minutes (or until cooked through).

The seasoned salmon fillets are pan seared.

Serving Pan Seared Salmon with Cilantro Lime Sauce

Remove the salmon from skillet and transfer to individual serving plates. Drizzle the cilantro lime sauce over the top of the salmon.

The pan seared salmon is drizzled with cilantro lime sauce, to serve.

Garnish each piece of salmon with a sprig of cilantro.  Serve and enjoy the wonderful taste of the fish! See how very easy, quick, and effortless it is to make this tasty main dish?

Cilantro lime sauce and fresh cilantro garnish the pan-seared salmon.

This would be a great way to serve a healthy meal on a busy evening or after a long day at work… in no time at all. Hope you’ll give this recipe a try. I’m confident you will enjoy it! Thanks for stopping by, and I hope you have a great day. Come back soon for more recipes.

Looking for More SALMON Recipes?

You can find all my recipes in the Recipe Index, located at the top of the page. I have several salmon recipes, including:

Interested In More Recipes?

Thank you for visiting this website. I appreciate you using some of your valuable time to do soIf you’re interested, I publish a newsletter 2 times per month (1st and 15th) with all the latest recipes, and other fun info. I would be honored to have you join our growing list of subscribers, so you never miss a great recipe!
There is a Newsletter subscription box on the top right side (or bottom) of each blog post, depending on the device you use, where you can easily submit your e-mail address (only) to be included in my mailing list.

You Can Also Find Me On Social Media:
Facebook page: The Grateful Girl Cooks!
Pinterest: The Grateful Girl Cooks!
Instagram: jbatthegratefulgirlcooks

Author's signature

Recipe Source: http://www.cookingclassy.com/skillet-seared-salmon-with-creamy-cilantro-lime-sauce/

0 from 0 votes
Pan Seared Salmon with Cilantro Lime Sauce
Prep Time
5 mins
Cook Time
7 mins
Total Time
12 mins
 

Pan seared salmon tastes fantastic when paired with a creamy cilantro lime sauce, and this delicious seafood dish can be ready in about 10 minutes!

Category: Entree
Cuisine: Southwestern
Keyword: pan seared salmon
Servings: 4 servings
Calories Per Serving: 350 kcal
Author: JB @ The Grateful Girl Cooks!
Ingredients
For salmon:
  • 2 Tablespoons olive oil
  • 4 (6 ounce) skinless salmon fillets (1" thick)
  • 1 teaspoon ground cumin
  • 1/2 teaspoon ground coriander
  • 1/8-1/4 teaspoon cayenne pepper (to taste)
  • 1/2 teaspoon salt
  • 1/2 teaspoon black pepper
For Cilantro Lime Sauce:
  • 1/2 cup sour cream
  • 2 green onions , roughly chopped
  • 1/2 cup packed cilantro (mostly leaves)
  • Tablespoons fresh squeezed lime juice
  • 1 clove garlic , peeled/sliced thinly
  • 1/4 teaspoon salt
Instructions
  1. Take salmon fillets out from refrigeration and let them sit (at room temp.) while you make cilantro lime sauce. To make the sauce, place sour cream, chopped green onions, cilantro, garlic, lime juice, sliced garlic, and salt in a food processor or blender. Process the sauce until the cilantro leaves are finely chopped or minced. Set sauce aside while cooking salmon.
  2. Place cumin, coriander, cayenne pepper, salt and pepper in a small bowl, and mix well, to combine spices. Pat all sides of salmon fillets dry, using a paper towel. Sprinkle spice mixture evenly over both sides of salmon, lightly rubbing spices into the fish as you go. Use all the spice mix.
  3. Heat 2 Tablespoons olive oil in a large non-stick skillet on medium-high heat. Once oil is hot, place the salmon fillets gently into hot skillet (with top side down). Cook 4 minutes, without moving the salmon. After 4 minutes, the bottom of the salmon should be crispy and golden brown. Carefully turn salmon to other side, and cook for 2-3 minutes (or until cooked through).
  4. Remove salmon from skillet and transfer to individual serving plates. Drizzle the cilantro lime sauce over the top of the salmon. Garnish each piece of salmon with a sprig of cilantro. Serve, and enjoy!
Nutrition Facts
Pan Seared Salmon with Cilantro Lime Sauce
Amount Per Serving (1 g)
Calories 350 Calories from Fat 180
% Daily Value*
Fat 20g31%
Saturated Fat 4g25%
Cholesterol 103mg34%
Sodium 534mg23%
Potassium 930mg27%
Carbohydrates 3g1%
Protein 35g70%
Vitamin A 385IU8%
Vitamin C 3.9mg5%
Calcium 70mg7%
Iron 1.8mg10%
* Percent Daily Values are based on a 2000 calorie diet.

Here’s one more to pin to your Pinterest boards!Pan seared salmon tastes fantastic when paired with a creamy cilantro lime sauce, and this delicious seafood dish can be ready in about 10 minutes!

Save

Save

Save

Save

Save

Save

Save

Save

Save

Save

Save

Save

Save

Pineapple Coconut Shrimp Kabobs

Pineapple coconut shrimp kabobs (marinated in coconut milk and citrus sauce), are grilled on skewers and taste fantastic!Pineapple Coconut Shrimp Kabobs / The Grateful Girl Cooks!
I recently made Pineapple Coconut Shrimp Kabobs to serve alongside some grilled tri-tip we had for dinner!  Hooray for homemade surf and turf! The large shrimp (marinated in a coconut milk and citrus sauce), pineapple chunks, and red and green bell peppers are cooked on skewers on the BBQ grill and taste fantastic!

The “recipe” is very easy to prepare. The shrimp will need to marinate in a coconut milk citrus sauce for at least 1-2 hours. I made the citrus sauce (marinade) up early in the day, and let the shrimp marinate in the refrigerator until I was ready for dinner.

When ready to cook, all you will need to do is thread the skewers and cook the dish.  The pineapple coconut shrimp kabobs only take about 10 minutes to assemble, and 5 minutes to cook on the grill.

Scroll Down For A Printable Recipe Card At The Bottom Of The Page

How To Make Pineapple Coconut Shrimp Kabobs

Here’s how to make these delicious kabobs: Place the canned coconut milk (stir it well), Tabasco sauce, soy sauce, orange juice and lime juice in a medium-sized bowl. Stir to combine. TIP: Reserve a little bit of the citrus sauce in a separate cup to brush on the kabobs while grilling, if desired)

Add the peeled and deveined shrimp; turn to completely coat shrimp with sauce. Cover and refrigerate for 1-2 hours (or more), turning shrimp occasionally. I cut the recipe in half since it was only for my husband and I, so my photos will reflect that.

Shrimp for kabobs dipped into coconut milk citrus marinade
Pan-Sear The Bell Peppers

Tip – I pan-seared the bell pepper pieces in a medium-high heat “dry” skillet (no oil) before threading them onto the skewers. This an optional step (only took 3-4 minutes).

Because the shrimp cook so very quickly once added to the grill, I like to have the peppers cooked just a bit BEFORE they go on to the grill. This helps helps  the bell peppers get cooked through so they are not totally crispy when served.

Red and green bell pepper chunks are pan-seared for kabobs

You can use metal skewers for the kabobs, but if you will be using wooden skewers, be sure to soak them in water for at least half an hour. Soak them before threading the shrimp, fruit, veggies, etc., so they won’t catch fire on the grill.

Assemble And Grill The Kabobs

Remove the shrimp from the marinade , and thread the skewers. Alternate the shrimp with red and green bell peppers and pineapple chunks for nice colorful kabobs. 

Heat BBQ grill up to a medium-high heat. Brush the grill grate with a little oil, then put the kabobs directly onto the hot grill.  Cook the kabobs for 3 minutes, brushing with the reserved sauce, if desired.

Shrimp, pineapple and peppers on skewers on BBQ
Turn the skewers over and cook the other side of the kabobs for 2-3 minutes, until shrimp turn pink and are cooked through.

Pineapple Coconut Shrimp Kabobs grilling on BBQ

Serve The Pineapple Coconut Shrimp Kabobs

When the shrimp are done, remove skewers from grill and place onto serving plate. If desired, garnish the serving plate with chopped fresh cilantro leaves and sliced green onions.

Pineapple Coconut Shrimp Kabobs served on plate with cilantro garnish.

Close up of shrimp kabobs with pineapple, coconut and peppers on plate

Serve with the shrimp still on the skewers, or remove food from skewer (your choice) and serve while hot.

Pineapple coconut shrimp kabobs on plate, with rice on side

These pineapple coconut shrimp kabobs are extremely easy to prepare. They are also light in calories, colorful on the plate, and taste really, really good! I hope you will consider trying this recipe, and trust you will enjoy it, as we did!

Looking For More KABOB Recipes?

You can find ALL my recipes in the Recipe Index, located at the top of the page. I have some wonderful kabob recipes you’ll enjoy, including:

Interested In More Recipes?

Thank you for visiting this website. I appreciate you using some of your valuable time to do soIf you’re interested, I publish a newsletter 2 times per month (1st and 15th) with all the latest recipes, and other fun info. I would be honored to have you join our growing list of subscribers, so you never miss a great recipe!
There is a Newsletter subscription box on the top right side (or bottom) of each blog post, depending on the device you use, where you can easily submit your e-mail address (only) to be included in my mailing list.

You Can Also Find Me On Social Media:
Facebook page: The Grateful Girl Cooks!
Pinterest: The Grateful Girl Cooks!
Instagram: jbatthegratefulgirlcooks

Author's signature

Recipe Source: http://www.wellplated.com/coconut-pineapple-shrimp-skewers/

0 from 0 votes
Pineapple Coconut Shrimp Kabobs
Prep Time
20 mins
Cook Time
5 mins
Total Time
25 mins
 
Pineapple coconut shrimp kabobs (marinated in coconut milk and citrus sauce), are grilled on skewers and taste fantastic!
Category: Dinner, Entree
Cuisine: American
Keyword: pineapple coconut shrimp kabobs
Servings: 4 Servings (1 skewer each)
Calories Per Serving: 229 kcal
Author: JB @ The Grateful Girl Cooks!
Ingredients
For Citrus Marinade:
  • 1/2 cup coconut milk
  • 4 teaspoons Tabasco Original Red Sauce
  • 2 teaspoons soy sauce
  • 1/4 cup fresh squeezed orange juice
  • 1/4 cup fresh squeezed lime juice (approx. 2 limes)
For Kabobs:
  • 1 pound large (31-40 count) shrimp, peeled/deveined (fresh or frozen)
  • 3/4 pound 1 inch pineapple chunks (fresh or canned)
  • Red and green bell peppers (seeded, cut into 1-2 inch chunks)
  • Oil , for grilling
  • Fresh chopped green onion , for garnish
  • Fresh chopped cilantro , for garnish
Instructions
  1. Place canned coconut milk (stir it well), Tabasco sauce, soy sauce, orange juice and lime juice in a medium-sized bowl. Stir well, to combine. Reserve a little bit of the citrus marinade in separate cup to brush on the kabobs while grilling.
  2. Add peeled and deveined shrimp to medium bowl with marinade; turn to completely coat. Cover and refrigerate for 1-2 hours (or more, if desired), turning the shrimp occasionally.
  3. If desired, pan-sear bell pepper pieces in a medium-high heat "dry" skillet (no oil) before threading them onto the skewers (optional - cook about 3 minutes). It helps to do this BEFORE the peppers go on the grill, to ensure they are cooked through, since the shrimp cook so quickly.
  4. Remove shrimp from marinade and thread the skewers, alternating the shrimp with red and green bell peppers and pineapple chunks. Heat BBQ grill to a medium-high heat level. Lightly brush the grill with oil, then put the kabobs onto the grill. Cook the kabobs for 3 minutes, brushing with the reserved sauce. Turn the skewers over and cook the other side of the kabobs for 2-3 minutes, until shrimp turn pink and are cooked through. When the shrimp are done, remove skewers from grill and place onto serving platter. Garnish the serving platter with sliced green onions and chopped fresh cilantro leaves. Serve kabobs still on the skewers, OR remove/slide food from skewers onto individual plates and serve while hot. Enjoy!
Recipe Notes

I used metal skewers for the kabobs, but if you will be using wooden skewers, be sure to soak them in water for at least half an hour before threading the shrimp, fruit, veggies, etc., so they won't catch fire on the grill.
Note: If using canned coconut milk (as I did), you will have some extra. It freezes well, so you can save it to use on another recipe or the next time you make THIS recipe!

Nutrition Facts
Pineapple Coconut Shrimp Kabobs
Amount Per Serving (1 skewer)
Calories 229 Calories from Fat 63
% Daily Value*
Fat 7g11%
Saturated Fat 5g31%
Cholesterol 285mg95%
Sodium 1160mg50%
Potassium 325mg9%
Carbohydrates 16g5%
Fiber 1g4%
Sugar 10g11%
Protein 24g48%
Vitamin A 560IU11%
Vitamin C 80.1mg97%
Calcium 181mg18%
Iron 3.7mg21%
* Percent Daily Values are based on a 2000 calorie diet.

Here’s one more to pin on your Pinterest boards!Shrimp (marinated in coconut milk and citrus sauce), pineapple chunks, and red and green bell peppers are grilled on skewers and taste fantastic!

Save

Save

Save

Save

Save

Save

Save

Save

Save

Save

Save

Save

Save

Save

Save

Swordfish In Lemon Garlic Sauce

Swordfish fillets in lemon garlic sauce are pan-seared, then baked fish fillets. They’re served, glazed with an easy lemon garlic sauce!
Swordfish fillets in lemon garlic sauce are pan-seared, then baked fish fillets. They're served, glazed with an easy lemon garlic sauce!
Looking for an easy and flavorful way to cook swordfish that doesn’t involve an outdoor BBQ grill?  Here’s a very simple way to make Swordfish In Lemon Garlic Sauce! This seafood dish is really quite simple to prepare, and tastes wonderful with the addition of the yummy butter, wine, garlic and lemon sauce on top! Here’s how to make this simple dish:

Scroll Down For A Printable Recipe Card At The Bottom Of The Page

Pan-Sear Swordfish Fillets

Preheat your oven to 400 degrees.  Heat olive oil in a large, OVEN-PROOF skillet until very hot (but not smoking). Add lightly seasoned swordfish fillets (at room temperature) to the hot oil. Cook the fish for 2-3 minutes, until golden brown on bottom. Turn the swordfish fillets over and cook the other side for 2-3 minutes.

A swordfish fillet is being pan-seared in oil in a large skillet.

Swordfish fillets are turned after pan-searing in olive oil.

Bake The Pan-Seared Swordfish

Place the ovenproof skillet and swordfish into a preheated oven. Continue to bake the fish for 7-12 minutes (time will vary based on thickness of swordfish). Begin checking on the fish after 6 minutes have passed. Once the fish flakes easily with a fork,  it is ready.  TIP: While the fish is baking, prepare the easy lemon garlic sauce.

Make The Lemon Garlic Sauce

While the swordfish is in oven, make the lemon garlic sauce. Place butter and olive oil in a small skillet. Heat over low heat until the butter is melted. Add the minced garlic and red pepper flakes. Stir and cook this on very low heat for about 1 minute (being careful NOT to burn the garlic).

Minced garlic and red pepper flakes are cooked in melted butter.

Add the white wine to the skillet, and using medium heat, bring the liquid to a simmer.  Cook the lemon garlic sauce for 3 minutes, stirring often.  The liquid will reduce a bit in volume, and the alcohol will cook off during this time.

White wine is added to lemon garlic sauce in pan.

Remove the skillet from the heat.  Add lemon juice and finely grated fresh lemon zest, and stir to combine.  The lemon garlic sauce will smell really good at this point.

Lemon zest and juice are added to the sauce for the swordfish.

Time To Serve The Swordfish In Lemon Garlic Sauce!

Transfer the baked swordfish out of the skillet and onto serving plates. Spoon the lemon garlic sauce over the top of the fish, and serve it, garnished with parsley, (if desired).  Grab a fork and dive into this delicious swordfish in lemon garlic sauce!

Swordfish with lemon garlic sauce, on plate with orzo and asparagus.

I love seafood grilled outdoors on our BBQ, but as is the case often here in Oregon, the rain prevents that many times. It’s nice to have this simple alternative cooking method for enjoying a wonderful piece of swordfish cooked right in the ol’ kitchen!  Have a great day.

Looking For More SEAFOOD Recipes?

You can find all of my seafood recipes in the Recipe Index, located at the top of the page. I have quite a few, including:

Interested In More Recipes?

Thank you for visiting this website. I appreciate you using some of your valuable time to do soIf you’re interested, I publish a newsletter 2 times per month (1st and 15th) with all the latest recipes, and other fun info. I would be honored to have you join our growing list of subscribers, so you never miss a great recipe!
There is a Newsletter subscription box on the top right side (or bottom) of each blog post, depending on the device you use, where you can easily submit your e-mail address (only) to be included in my mailing list.

You Can Also Find Me On Social Media:
Facebook page: The Grateful Girl Cooks!
Pinterest: The Grateful Girl Cooks!
Instagram: jbatthegratefulgirlcooks

Author's signature

Recipe Source: www.superseafoodrecipes.com/swordfish-recipe-with-lemon-garlic-sauce.html

↓↓ PRINTABLE RECIPE BELOW ↓↓

0 from 0 votes
Swordfish In Lemon Garlic Sauce
Prep Time
5 mins
Cook Time
15 mins
Total Time
20 mins
 

Swordfish fillets are pan-seared, then finish cooking in an oven. They're served, glazed with an easy to make, delicious lemon garlic sauce!

Category: Entree
Cuisine: American
Keyword: swordfish
Servings: 2 servings (5 ounces each)
Calories Per Serving: 537 kcal
Author: JB @ The Grateful Girl Cooks!
Ingredients
  • 10 ounces swordfish steaks (2- 5 ounce pieces at least 1 inch thick)
  • 3 Tablespoons olive oil
  • Salt and black pepper
For Lemon Garlic Sauce:
  • 2 Tablespoons butter
  • 2 Tablespoons olive oil
  • 8 cloves garlic , minced
  • 1/4 teaspoon red pepper flakes
  • 1/2 cup dry white wine
  • Grated zest from 1 large lemon
  • 2 Tablespoons fresh squeezed lemon juice
  • 2 Tablespoons chopped parsley (for garnish-optional)
Instructions
  1. Preheat oven to 400 degrees. Let swordfish come to room temperature for 30 minutes before cooking. Pat fish really dry with a paper towel, then lightly season with salt and pepper.
  2. Heat olive oil in a large, OVEN-PROOF skillet until very hot (but not smoking). Carefully add swordfish fillets to skillet. Cook for 2-3 minutes, until golden brown on bottom. Turn fish over and cook the other side 2-3 minutes, as well. Place skillet (and swordfish) into hot oven. Bake swordfish for between 7 and 12 minutes (time will vary based on thickness of swordfish). Begin checking fish after 6 minutes have passed. Once the fish flakes easily with a fork, it will be ready.

  3. While swordfish is baking, make the lemon garlic sauce. Place butter and olive oil in a small skillet. Cook on low heat until butter is melted. Add minced garlic and red pepper flakes. Stir and cook mixture on very low heat for about a minute (being careful NOT to burn the garlic).
  4. Add white wine to the skillet, and using medium heat, bring the liquid to a simmer. Cook the sauce for 3 minutes, stirring often. The liquid will reduce a bit in volume as it cooks.
  5. Remove sauce from heat. Add lemon juice and finely grated fresh lemon zest. Stir to combine.
  6. Transfer cooked swordfish to serving plate. Spoon the lemon garlic sauce over the top of the fish, and garnish with parsley, if desired.
Nutrition Facts
Swordfish In Lemon Garlic Sauce
Amount Per Serving (1 5 ounce piece)
Calories 537 Calories from Fat 342
% Daily Value*
Fat 38g58%
Saturated Fat 11g69%
Cholesterol 123mg41%
Sodium 246mg11%
Potassium 705mg20%
Carbohydrates 7g2%
Sugar 1g1%
Protein 29g58%
Vitamin A 930IU19%
Vitamin C 18.7mg23%
Calcium 40mg4%
Iron 1.2mg7%
* Percent Daily Values are based on a 2000 calorie diet.

Here’s one more to pin on your Pinterest boards!Swordfish fillets in lemon garlic sauce are pan-seared, then baked fish fillets. They're served, glazed with an easy lemon garlic sauce!

Save

Save

Save

Save

Save

Save

Save

Save

Save

Save

Save

Save

Garlic & Herb Baked Salmon

Garlic Herb Baked Salmon is a delicious, quick and easy recipe featuring boneless, skinless salmon fillets topped with a seasoned lemon butter sauce.Garlic Herb Baked Salmon is a delicious, quick and easy recipe featuring boneless, skinless salmon fillets topped with a seasoned lemon butter sauce.
My husband and I really love salmon! In my never ending quest to find new recipes, I stumbled upon this simple one for garlic herb baked salmon, and it did not disappoint!

Scroll Down For A Printable Recipe Card At The Bottom Of The Page

This Is One EASY Recipe!

The process for making this salmon dish is extremely SIMPLE. A garlic, butter, lemon juice and herb mixture is prepared, and then salmon fillets are topped with it. Salmon goes into the oven where it is baked, and then it is DONE!  How’s THAT for EASY??? It’s quick and it tastes GOOD. From start to finish, it took under 20 minutes, which is perfect for crazy busy days!

How To Make Garlic Herb Baked Salmon

Preheat your oven to 400 degrees F.  Place the melted butter, garlic, parsley, salt, cayenne pepper, lemon juice and black pepper in a small bowl. Give it a good stir to fully combine ingredients. Now the sauce is READY! Hope you didn’t break a sweat doing all that hard work- wink, wink!

Butter, lemon juice, herbs and spices make up a sauce for the seafood.

Place the salmon fillets onto a parchment paper-lined baking sheet, leaving a bit of space between each fillet. The parchment paper helps cut down on the cleanup once the salmon is done. Use a spoon and divide the garlic herb sauce evenly between salmon fillets, covering the top and sides of the fish.

Salmon fillets are covered with the lemon butter herb sauce before baking.

 Time To Finish The Garlic Herb Baked Salmon

Bake the salmon in a preheated 400 degree oven for 12 minutes. Remove the baking sheet from oven, once done, and transfer fillets to individual plates.

Garlic Herb Baked Salmon only takes 12 minutes to cook in the oven!

Garnish And Serve The Garlic Herb Baked Salmon

Garnish each piece of salmon with a lemon wedge and serve immediately with your favorite side dish.  I served my garlic herb baked salmon on a bed of cooked sesame ginger slaw,  with green beans (from our garden) and steamed rice.

If you want, you can also drizzle the salmon with any leftover garlic herb mixture that remains on the baking sheet. Just spoon it up, and drizzle it on the fish.

The salmon on a bed of ginger slaw, with green beans and rice on side.

A lemon wedge garnishes a serving of the baked salmon.

This salmon recipe is really SO EASY!!! It really has a great flavor, as well. As always, I sure hope you will consider making this for yourself, your family or others you love!

Looking For More SALMON Recipes?

You can find all of my recipes in the Recipe Index, located at the top of the page. I have quite a few salmon recipes, including:

Interested In More Recipes?

Thank you for visiting this website. I appreciate you using some of your valuable time to do soIf you’re interested, I publish a newsletter 2 times per month (1st and 15th) with all the latest recipes, and other fun info. I would be honored to have you join our growing list of subscribers, so you never miss a great recipe!
There is a Newsletter subscription box on the top right side (or bottom) of each blog post, depending on the device you use, where you can easily submit your e-mail address (only) to be included in my mailing list.

You Can Also Find Me On Social Media:
Facebook page: The Grateful Girl Cooks!
Pinterest: The Grateful Girl Cooks!
Instagram: jbatthegratefulgirlcooks

Author's signatureRecipe Source:  http://rasamalaysia.com/garlic-herb-roasted-salmon/

0 from 0 votes
Garlic Herb Baked Salmon
Prep Time
5 mins
Cook Time
12 mins
Total Time
17 mins
 

Garlic Herb Baked Salmon is a delicious, quick and easy recipe featuring boneless, skinless salmon fillets topped with a seasoned lemon butter sauce.

Category: Entree
Cuisine: American
Keyword: garlic herb baked salmon
Servings: 2 servings
Calories Per Serving: 364 kcal
Author: JB @ The Grateful Girl Cooks!
Ingredients
  • 2 6 ounce each salmon fillets
  • 2 Tablespoons melted butter
  • 3 cloves garlic , minced
  • 1 Tablespoon fresh Italian parsley , chopped
  • 1/8 teaspoon salt
  • 1 Pinch cayenne pepper
  • 1 teaspoon lemon juice
  • 3 dashes ground black pepper
  • 4 Lemon wedges (for garnish-optional)
Instructions
  1. Before beginning, preheat oven to 400 degrees F. Line a baking sheet with parchment paper.
  2. In a small bowl, stir together the melted butter, minced garlic, parsley, salt, cayenne pepper, lemon juice and black pepper until fully combined.
  3. Place salmon fillets onto parchment paper lined baking sheet, leaving space in between each fillet. Spoon the garlic and herb sauce evenly over the top and sides of the salmon (to cover).

  4. Bake salmon at 400 degrees F. for 12 minutes. Remove from oven. Serve immediately with lemon wedges for garnish, if desired. Enjoy!

Nutrition Facts
Garlic Herb Baked Salmon
Amount Per Serving (1 g)
Calories 364 Calories from Fat 198
% Daily Value*
Fat 22g34%
Saturated Fat 8g50%
Cholesterol 123mg41%
Sodium 323mg14%
Potassium 921mg26%
Carbohydrates 6g2%
Fiber 1g4%
Sugar 1g1%
Protein 34g68%
Vitamin A 585IU12%
Vitamin C 24.1mg29%
Calcium 45mg5%
Iron 1.9mg11%
* Percent Daily Values are based on a 2000 calorie diet.

Here’s one more to pin on your Pinterest boards!Garlic Herb Baked Salmon is a delicious, quick and easy recipe featuring boneless, skinless salmon fillets topped with a seasoned lemon butter sauce.

Save

Save

Save

Save

Save

Save

Save

Save

Save

Save

Save

Orange And Rosemary Glazed Salmon

This EASY recipe for orange rosemary glazed salmon (inspired by Cooking Light) is topped with a fresh citrus glaze, and is ready in about 20 minutes!This EASY recipe for orange rosemary glazed salmon (inspired by Cooking Light) is topped with a fresh citrus glaze, and is ready in about 20 minutes!
I tried a new recipe for Orange Rosemary Glazed Salmon the other evening for our dinner. Whoa! It tasted absolutely fantastic, so I want to share the recipe on my blog today. Hopefully you will be inspired to make this salmon for your own dinner… you won’t regret it!

My husband and I love salmon, so I am constantly on the search for new ways to prepare it. I found this recipe on Pinterest, and it is now quite possibly one of my favorite recipes for  salmon.  It’s SOOOO good!

The original recipe was inspired by Cooking Light, and features pan-seared salmon fillets covered with a fresh, thickened citrus glaze. It’s delicious, and so very easy to prepare!  The recipe makes 4 servings.

Scroll Down For A Printable Recipe Card At the Bottom Of The Page

How To Prepare Orange Rosemary Glazed Salmon

I only cooked 2 salmon fillets since only two of us were eating, but I kept the sauce amount the same as written (and saved the extra sauce for another time).  Here’s how to make this delicious orange rosemary glazed salmon:

Heat olive oil on medium-high heat in a large non-stick skillet. Salt and pepper salmon fillets on both sides. When olive oil is really hot (but not smoking), add the salmon to skillet (it should sizzle when it hits the pan).

Two salmon fillets searing in copper skillet

Cook the salmon fillets for 3-4 minutes, then carefully turn salmon over and cook the other side for 3-4 minutes until fully cooked.

When done and golden brown, remove the browned salmon from the skillet (leaving the hot oil in the skillet). Keep the cooked salmon warm.

Two golden brown seared salmon fillets in skillet

Make The Sauce For Orange Rosemary Glazed Salmon

Turn the heat under the skillet to medium-low. Add the minced garlic and rosemary, and cook, stirring often, for about 20-30 seconds.

Minced garlic and rosemary cooking in copper skillet

Pour 1/4 cup (4 Tablespoons) of chicken broth to the skillet. Stir the ingredients, to combine. Cook this on a low simmer until most of the liquid has reduced in volume.

Chicken broth being poured into orange glaze sauce in skillet

The next thing to do is to add the orange zest, lemon juice, honey and orange juice to the skillet. Stir to combine.

Now the orange sauce will begin to smell wonderful!

Orange juice being added to skillet for glaze

In small cup, stir together the remaining Tablespoon of chicken broth with the cornstarch until smooth. 

Pour this mixture into the skillet, stirring well, as it is added.  Season the sauce with salt and pepper, to taste.

Cornstarch and broth being added to orange sauce in pan

Bring the orange sauce to a boil. Boil it for one minute, stirring constantly. The sauce will thicken as it cooks.

Cooking sauce for orange rosemary glazed salmon.

Serve The Orange Rosemary Glazed Salmon

Return the cooked salmon back into the skillet with the sauce. Spoon some of the sauce over each piece to cover the salmon.

Two pieces of salmon with orange slices in skillet with sauce

Carefully remove the orange rosemary glazed salmon from the pan, and transfer to serving plates.  Spoon additional sauce over each piece, if desired (it’s good- highly recommend).

Garnish each orange rosemary glazed salmon fillet with a fresh rosemary sprig, and fresh orange slice, if desired. Serve, and enjoy this wonderful dinner!

Orange rosemary glazed salmon, green beans and rice on a beige plate.

A orange rosemary glazed salmon fillet on plate, with green beans and rice.

I really hope you will try this recipe for orange rosemary glazed salmon. The fresh citrus glaze tastes absolutely delicious on the salmon, and really enhances it. 

We said “this is REALLY good” several times while eating it, and I’m confident you will enjoy it, as well! Have a wonderful day.

Looking For More SALMON Recipes?

You can find all of my salmon recipes in the Recipe Index, located at the top of the page. I have lots of delicious recipes using salmon, including:

Interested In More Recipes?

Thank you for visiting this website. I appreciate you using some of your valuable time to do soIf you’re interested, I publish a newsletter 2 times per month (1st and 15th) with all the latest recipes, and other fun info. I would be honored to have you join our growing list of subscribers, so you never miss a great recipe!
There is a Newsletter subscription box on the top right side (or bottom) of each blog post, depending on the device you use, where you can easily submit your e-mail address (only) to be included in my mailing list.

You Can Also Find Me On Social Media:
Facebook page: The Grateful Girl Cooks!
Pinterest: The Grateful Girl Cooks!
Instagram: jbatthegratefulgirlcooks

Author's signature

Recipe Source:  http://www.cookingclassy.com/orange-rosemary-glazed-salmon/

0 from 0 votes
Orange And Rosemary Glazed Salmon
Prep Time
5 mins
Cook Time
15 mins
Total Time
20 mins
 
This EASY recipe for orange rosemary glazed salmon (inspired by Cooking Light) is topped with a fresh citrus glaze, and is ready in about 20 minutes!
Category: Entree-Seafood
Cuisine: American
Keyword: orange rosemary glazed salmon
Servings: 4 servings
Calories Per Serving: 336 kcal
Author: JB @ The Grateful Girl Cooks!
Ingredients
  • 2 teaspoons olive oil
  • 4 (6 ounce) skinless salmon fillets (about 1 inch thick)
  • Salt and ground black pepper
  • 2 cloves garlic , minced
  • teaspoons minced fresh rosemary
  • 5 Tablespoons chicken broth (divided-4 T. in one cup, 1 T. in another))
  • teaspoons orange zest
  • 2 teaspoons lemon juice
  • Tablespoons honey
  • 2/3 cup fresh squeezed orange juice
  • teaspoons cornstarch
  • 2 Oranges (thinly sliced) and sprigs of fresh rosemary for garnish (if desired)
Instructions
  1. Heat olive oil on medium-high heat in large non-stick skillet. Salt and pepper salmon fillets on both sides. When olive oil is hot (but not smoking), add salmon to skillet (it should sizzle when it hits the pan). Cook salmon for 3-4 minutes, then carefully turn salmon over and cook other side for 3-4 minutes, until fully cooked. When done and golden brown, remove salmon from skillet (leaving hot oil in the skillet). Keep salmon warm.
  2. Turn heat under skillet to medium-low. Add minced garlic and rosemary; stir and cook for about 20 seconds. Add 1/4 cup chicken broth (4 Tablespoons of the original 5). Stir well. Cook on a low simmer until most of liquid has reduced. Add orange zest, lemon juice, honey and orange juice to skillet. Stir.
  3. In small cup, stir together remaining Tablespoon of chicken broth with cornstarch. Pour into skillet, stirring as you add it. Add salt and pepper to taste.
  4. Bring mixture to a boil. Boil for one minute, stirring constantly. The sauce will thicken as it cooks. Return cooked salmon to skillet. Spoon sauce over each piece to cover. Garnish each fillet with a thin orange slice, and a sprig of fresh rosemary (if desired). Carefully remove salmon and transfer to individual serving plates. Spoon additional sauce over each piece. Serve and enjoy!
Nutrition Facts
Orange And Rosemary Glazed Salmon
Amount Per Serving (1 g)
Calories 336 Calories from Fat 108
% Daily Value*
Fat 12g18%
Saturated Fat 1g6%
Cholesterol 93mg31%
Sodium 144mg6%
Potassium 1020mg29%
Carbohydrates 19g6%
Fiber 2g8%
Sugar 15g17%
Protein 34g68%
Vitamin A 285IU6%
Vitamin C 53.6mg65%
Calcium 61mg6%
Iron 1.4mg8%
* Percent Daily Values are based on a 2000 calorie diet.

Here’s one more to pin on your Pinterest boards!This EASY recipe for orange rosemary glazed salmon (inspired by Cooking Light) is topped with a fresh citrus glaze, and is ready in about 20 minutes!


Save

Save

Save

Save

Save

Save

Save

Save

Save

Save

Save

Save

Save

Save

Save

Save

Trout In Lemon Garlic Butter Sauce

Fresh trout fillets are pan-seared and served with a light lemon, garlic, butter, and wine sauce for a delicious main course!Fresh trout fillets are pan-seared and served with a light lemon, garlic, butter, and wine sauce for a delicious main course!
If you or someone in your family had a great day fishing and you’re looking for a new recipe to cook all that fish, why not try this recipe for Trout In Lemon Garlic Butter Sauce?!

There are so many ways to cook trout. I decided to try this recipe I found on Pinterest, after my hubby bought a few trout at Costco. Ha Ha!  No fishing for him, except to fish through the seafood section, looking for fresh seafood.

Once home, he had to fillet the fish, debone them and chop their little heads off for me— ugh. There are just some things I will NOT do. Ha Ha! The method for preparing this recipe is simple. Here’s how to make the trout:

Scroll Down For A Printable Recipe Card At The Bottom Of The Page

Prepare The Trout

  NOTE: You will want to use boneless trout fillets (with the skin on one side) for this recipe. With the skin side down, lightly season the trout with salt and Italian seasoning (only on one side). 

Cook The Trout Fillets

Heat olive oil on medium heat in a LARGE skillet until hot, but not smoking.  Add the trout fillets, skin side UP to the hot oil.

The fish fillets are lightly seasoned before cooking.

Cook the trout for 4-5 minutes on medium heat, then carefully flip the fillets over to skin side DOWN. You might need to add a little bit more oil before turning them over, because you don’t want them to stick to skillet.  Cook an additional 3-4 minutes.

Let The Cooked Fish “Rest”

Once the fish is cooked, remove your skillet from the heat source. Cover the skillet with a lid, and let the cooked trout “rest” for 5-10 minutes. Leave the lid on the skillet.

Once the fish is done resting, carefully lift up each piece of trout and remove the skin from the bottom. It should peel off nicely. 

Discard skin, and carefully place fillets on a piece of foil and keep warm.  Do not clean out the skillet, because you want all the little tidbits and oils left in there!

Cooking the trout in oil, in a large skillet.

The fish fillets are turned over, halfway through cooking time.

Make A Lemon Garlic Butter Sauce For The Trout

To the oils left in the skillet, add minced garlic, fresh lemon juice and white wine. Cook this liquid for 1 minute on medium-low heat, stirring occasionally. Turn off the heat.

Add the butter and chopped fresh parsley to the skillet. Stir well, to combine, and continue cooking on low heat until the butter has melted.

Garlic, lemon juice and white wine are added to skillet to make sauce for the fish.

Butter and fresh parsley is added to the sauce in skillet.

Add The Cooked Trout To The Lemon Butter Garlic Sauce

Once the butter has melted and the sauce is creamy, gently add the trout fillets back into the skillet.  Spoon sauce over the top of the fish.

If necessary, reheat on low, just until fish reaches serving temperature.

Trout In Lemon Garlic Butter Sauce cooking in skillet.

Serve The Trout In Lemon Garlic Butter Sauce

Place the cooked trout onto individual serving plates.  Spoon a bit more of the sauce over each piece of fish. Sprinkle with the remaining chopped parsley for garnish… and serve!

A piece of Trout In Lemon Garlic Butter Sauce on a plate, with peas.

That’s it!  So now, whether you are fishing some of the great lakes in the United States OR fishing the seafood counter at a grocery store, you have a new way to prepare trout in lemon garlic butter sauce! 

If you have a smoker or Traeger grill, be sure to check out my recipe for Traeger Grill Smoked Trout. You might also enjoy my recipe for Pan-Seared Steelhead Trout, because it is delicious, too!

Thanks for stopping by today. I invite you to come back soon for more yummy recipes. Have a great day!

Looking For More SEAFOOD Recipes?

You can find all of my recipes in the Recipe Index, located at the top of the page. I have many recipes, including:

Interested In More Recipes?

Thank you for visiting this website. I appreciate you using some of your valuable time to do soIf you’re interested, I publish a newsletter 2 times per month (1st and 15th) with all the latest recipes, and other fun info. I would be honored to have you join our growing list of subscribers, so you never miss a great recipe!
There is a Newsletter subscription box on the top right side (or bottom) of each blog post, depending on the device you use, where you can easily submit your e-mail address (only) to be included in my mailing list.

You Can Also Find Me On Social Media:
Facebook page: The Grateful Girl Cooks!
Pinterest: The Grateful Girl Cooks!
Instagram: jbatthegratefulgirlcooks

Author's signature

Recipe Source: http://juliasalbum.com/2015/10/trout-with-garlic-lemon-butter-herb-sauce/

↓↓ PRINTABLE RECIPE BELOW ↓↓

0 from 0 votes
Trout In Lemon Garlic Butter Sauce
Prep Time
10 mins
Cook Time
20 mins
Total Time
30 mins
 

Fresh trout fillets are pan-seared and served with a light lemon, garlic, butter, and wine sauce for a delicious main course!

Category: Entree
Cuisine: American
Keyword: trout
Servings: 4 servings
Calories Per Serving: 379 kcal
Author: JB @ The Grateful Girl Cooks!
Ingredients
  • 3-4 Trout fillets (3-4 medium sized fillets, with skin on bottom or 2 LARGE)
  • 2 Tablespoons olive oil
  • Salt (to generously season fish)
  • teaspoons Italian seasoning
  • 4 cloves garlic , minced
  • 3 Tablespoons fresh squeezed lemon juice
  • 2-3 Tablespoons white wine
  • 2 Tablespoons butter (room temp)
  • 2 Tablespoons parsley (finely chopped), divided
Instructions
  1. With skin side down, lightly season the trout with salt and Italian seasoning (only on one side). Heat olive oil on medium heat in a LARGE skillet until hot, but not smoking. Add trout fillets, skin side UP, flesh side DOWN to hot oil. Cook for 4-5 minutes on medium, then carefully flip fillets over to skin side DOWN. You might need to add a little bit more oil before turning them over (you don't want them to stick to skillet). Cook an additional 3-4 minutes. Once fish is cooked, remove skillet from the heat source, cover the skillet with a lid, and let trout rest for 5-10 minutes (leaving cover on).
  2. Once the fish is done resting, carefully lift up each piece of fish and remove the skin from the bottom of the fish. It should peel off easily. Discard skin, and carefully place fillets on a piece of foil and keep warm. Do not clean out the skillet (you want all the little tidbits and oils left in there!)
  3. To the oils left in the skillet, add minced garlic, fresh lemon juice and white wine. Cook this for 1 minute on medium-low heat, stirring occasionally. Turn off heat. Add butter and 1 Tablespoon chopped fresh parsley. Stir to combine, and continue cooking on low until butter has melted.
  4. Once the butter has melted and the sauce is creamy, gently add trout fillets back into skillet. Spoon sauce over the top of fish. If necessary, reheat in skillet, until fish reaches serving temp (on low).
  5. Place trout onto individual serving plates. Spoon a bit more sauce over fish, sprinkle with remaining chopped parsley for garnish... and serve!
Nutrition Facts
Trout In Lemon Garlic Butter Sauce
Amount Per Serving (1 serving)
Calories 379 Calories from Fat 216
% Daily Value*
Fat 24g37%
Saturated Fat 6g38%
Cholesterol 113mg38%
Sodium 150mg7%
Potassium 657mg19%
Carbohydrates 2g1%
Protein 35g70%
Vitamin A 455IU9%
Vitamin C 8.8mg11%
Calcium 93mg9%
Iron 3mg17%
* Percent Daily Values are based on a 2000 calorie diet.

Here’s one more to pin on your Pinterest boards!Fresh trout fillets are pan-seared and served with a light lemon, garlic, butter, and wine sauce for a delicious main course!


Save

Save

Save

Save

Save

Save

Save

Save

Save

Save

Save

Pecan-Crusted Halibut With Lemon Wine Sauce

You’re going to enjoy pecan crusted halibut featuring pan-seared seafood fillets covered w/ pecan panko crumbs, and cooked in a lemon wine sauce.You're going to enjoy pecan crusted halibut featuring pan-seared seafood fillets covered w/ pecan panko crumbs, and cooked in a lemon wine sauce.

My husband and I ushered in the New Year with a home cooked dinner, featuring Pecan Crusted Halibut With Lemon Wine Sauce.  It was just the two of us this year, enjoying a delicious meal, a great movie (“Sully”) and a glass of champagne together.  What a great start to the year!!!

We don’t buy halibut too often (it can be a bit pricey), but my husband found a fillet on sale for $14 and we got 3½ servings out of it! It ended up actually costing less per serving than a fast food meal! I found a recipe online that sounded wonderful, so I made it for us, and WE LOVED IT!!!! 

The halibut is baked, with an amazing Panko breadcrumb/pecan/Parmesan crust on it. Once cooked, a lemon wine sauce is drizzled over the halibut, then served.

If you make the lemon wine sauce while the halibut is baking, this dish can be made in 30 minutes! (*Note: I cut recipe in half so my photos reflect that): Here’s how to make pecan crusted halibut:

Scroll Down for A Printable Recipe Card At The Bottom Of The Page

How To Make Pecan Crusted Halibut

First things first… make sure to preheat your oven to 425 degrees. While it is preheating, cover a cookie sheet with aluminum foil and give it a good coating of non-stick spray.

Pat the pieces of halibut dry with a paper towel, lightly season with salt and pepper, then place halibut pieces onto the baking sheet. Keep pieces about 1/2-1 inch apart. Set aside.

Halibut fillets are blotted dry, then seasoned before cooking.

Prepare The Pecan/Crumb Topping For The Halibut

In a separate bowl, combine Panko breadcrumbs, chopped pecans, and freshly grated Parmesan cheese. Stir to combine. Add melted butter, horseradish, Dijon mustard, chopped parsley, dill, and lemon zest.

Mix these ingredients together with a fork until the mixture is fully combined.  It will be crumbly and look like the photo below. This is the pecan crusted halibut topping!

The pecan crumb topping for the fish is mixed together in a blue bowl.

.

Bake The Pecan Crusted Halibut

Now use a spoon and/or your clean hands and divide the mixture evenly on top of each piece of halibut. Cover the top completely, lightly pressing the crumbs onto the fish to get them to “stick”.

Scoop crumbs up that fall off fish and press them back onto fish. When all the halibut pieces are coated, drizzle each piece with a bit of olive oil.

Place the pecan crusted halibut into a preheated oven.  Bake the fish at 425 degrees for 12-15 minutes, until cooked through and the crust is golden brown (mine took 15).

Crumb topping is covering the halibut fillets before baking.

While The Halibut Bakes, Make The Lemon Wine Sauce

While the halibut is baking, make the lemon wine sauce. Heat olive oil in a saucepan on medium heat.

Once the oil is hot (but not smoking), add finely chopped shallots. Stir and cook for 2-3 minutes, until the shallots are cooked and slightly softened.

Shallots are cooked in oil for the lemon wine sauce that will be drizzled onto the pecan crusted halibut.

Turn the heat up to High. Pour in the wine and lemon juice. Bring to a boil, and continue to cook for 6-8 minutes (or 5-6 minutes if making a half recipe), until the liquid has reduced slightly.

White wine and lemon juice is added to the sauce for the pecan crusted halibut.

Turn heat down to Low, and add the butter. Stir until the butter has melted and is incorporated into the sauce.

Butter is added to the lemon wine sauce in skillet.

Remove the pan from the heat. Add fresh (or dried) chopped dill. Season with salt and pepper, to taste.

You will drizzle some of this delicious lemon wine sauce over the finished pecan crusted halibut!

Fresh dill and salt and pepper are added to the lemon wine sauce which is drizzled on pecan crusted halibut.

Serve The Pecan Crusted Halibut

When the halibut is done baking, the crust will be a gorgeous golden brown color. The fish should be cooked through, and it will look like this:

The pecan crusted halibut fillets are nicely browned after baking.

Use a spatula to place the pecan crusted halibut onto individual serving plates. Drizzle some of that delicious lemon wine sauce over each piece, then serve and enjoy!  I served the pecan crusted halibut with some rice, and a fresh vegetable medley on the side.

The fish flaked so easily, and the crumb topping with the drizzled lemon wine sauce was out of this world good. REALLY good.

The pecan crusted halibut is drizzled with lemon wine sauce and served.

I sure hope you will consider giving this recipe for pecan crusted halibut with lemon wine sauce a try. We felt like we had a gourmet meal for a fraction of the cost of ordering halibut at a restaurant… and it was absolutely delicious!

Hope you are looking forward to the New Year ahead with great anticipation for new adventures, making new friends, new (yummy) recipes to fix for the ones you love. May you find joy in serving others, and know the peace that comes from knowing how much God loves YOU… just as you are.

Looking For More SEAFOOD Recipes?

You can find all of my recipes in the Recipe Index, located at the top of the page. I have LOTS of seafood recipes! A few of my seafood recipes you might enjoy include:

Want More Recipes? Get My FREE Newsletter!

I publish a newsletter 2 times per month (1st and 15th) with lots of recipes, tips, etc..
Would you like to join our growing list of subscribers?

There is a Newsletter subscription box on the top right (or bottom) of each blog post, depending on the device you use.
You can submit your e-mail address there, to be added to my mailing list.

Find Me On Social Media:

Facebook page: The Grateful Girl Cooks!
Pinterest:
The Grateful Girl Cooks!
Instagram:
jbatthegratefulgirlcooks

Author's signature

Recipe Source:  http://www.bitememore.com/feedme/125/walnut-crusted-halibut-recipe#

↓↓ PRINTABLE RECIPE BELOW ↓↓

5 from 2 votes
Pecan Crusted Halibut With Lemon Wine Sauce
Prep Time
15 mins
Cook Time
15 mins
Total Time
30 mins
 

You're going to enjoy pecan crusted halibut featuring pan-seared seafood fillets covered w/ pecan panko crumbs, and cooked in a lemon wine sauce.

Category: Entree, Entree-Seafood
Cuisine: American
Keyword: pecan crusted halibut
Servings: 6 servings
Calories Per Serving: 508 kcal
Author: JB @ The Grateful Girl Cooks!
Ingredients
  • 6 (6-8 ounces each) halibut fillets, skin removed
  • 1/2 teaspoon salt
  • 1/4 teaspoon ground black pepper
For The Pecan Crust:
  • cups Panko (Japanese breadcrumbs)
  • 1 cup chopped pecans (can substitute walnuts)
  • 1/2 cup freshly grated Parmesan cheese
  • 2 Tablespoons melted butter
  • 1 Tablespoon creamy horseradish
  • 1 Tablespoon Dijon mustard
  • 1 Tablespoon chopped fresh flat-leaf parsley (can substitute dried parsley)
  • 1 Tablespoon chopped fresh dill (can substitute dried dill weed)
  • 1 teaspoon lemon zest
  • 1 Tablespoon olive oil
For The Lemon Wine Sauce:
  • 1 teaspoon olive oil
  • 2 Tablespoons finely chopped shallots
  • 1 cup dry white wine
  • 2 Tablespoons fresh lemon juice
  • 2 Tablespoons butter
  • 2 Tablespoons chopped fresh dill (can substitute dried dill weed)
  • Salt and black pepper , to taste
Instructions
  1. Preheat oven to 425 degrees. Cover a cookie sheet with aluminum foil; give it a good coating of non-stick spray. Pat the pieces of halibut dry with a paper towel, lightly season with salt and pepper, then place onto prepared baking sheet. Keep pieces about 1/2-1 inch apart.

  2. In a separate bowl place Panko breadcrumbs, pecans, and Parmesan cheese. Stir to combine. Add melted butter, horseradish, Dijon mustard, chopped parsley, dill, and lemon zest. Mix with a fork until mixture is crumbly.

  3. Using a spoon and/or your hands, divide crumb mixture evenly on top of each fillet. Cover the top completely, pressing crumbs onto fish to get them to "stick". Scoop crumbs up that fall off fish; gently press them back onto fish. When all halibut pieces are coated, drizzle olive oil on top. Bake (uncovered) at 425° F for 12-15 minutes, until cooked through and crust is golden brown.

  4. While halibut bakes, make lemon wine sauce. Heat olive oil in saucepan on medium. When hot, add shallots. Stir and cook for 2-3 minutes, until shallots are slightly soft. Turn heat to High. Pour in wine and lemon juice. Bring to a boil; stir and continue to cook for 6-8 minutes (or 5-6 minutes if making half recipe), until the liquid has reduced slightly. Turn heat back to Low. Add butter. Stir until butter has melted and is incorporated into sauce. Remove pan from heat. Stir in fresh (or dried) dill. Taste sauce; season with salt and pepper.

  5. When halibut is done, crust will be a gorgeous golden brown color, and fish should be cooked through. Use a spatula to place halibut onto individual serving plates. Drizzle with lemon wine sauce. Serve, and enjoy!

Recipe Notes

Caloric calculation based on using 6 ounce halibut fillet per serving.

Nutrition Facts
Pecan Crusted Halibut With Lemon Wine Sauce
Amount Per Serving (1 serving)
Calories 508 Calories from Fat 261
% Daily Value*
Fat 29g45%
Saturated Fat 8g50%
Cholesterol 110mg37%
Sodium 655mg28%
Potassium 899mg26%
Carbohydrates 16g5%
Fiber 2g8%
Sugar 2g2%
Protein 38g76%
Vitamin A 495IU10%
Vitamin C 4.4mg5%
Calcium 148mg15%
Iron 1.8mg10%
* Percent Daily Values are based on a 2000 calorie diet.

Here’s one more to pin on your Pinterest boards!You're going to enjoy pecan crusted halibut featuring pan-seared seafood fillets covered w/ pecan panko crumbs, and cooked in a lemon wine sauce.


Save

Save

Save

Save

Save

Save

Save

Save

Save

Save

Save

Save

Save

Save

Save

Save

Save

Save

Save

Shrimp And Penne Pasta Alfredo

Shrimp Penne Pasta Alfredo features lightly seasoned, pan-seared shrimp served on a bed of pasta in a creamy Parmesan alfredo sauce. This dish is easy and delicious!Shrimp Penne Pasta Alfredo features lightly seasoned, pan-seared shrimp served on a bed of pasta in a creamy Parmesan alfredo sauce. Easy and delicious!
We really love this shrimp pasta meal!  It tastes WONDERFUL! Guess what? Shrimp and Penne Pasta Alfredo is not only delicious to eat, it’s EASY to prepare in UNDER 30 minutes!! Over 30 years ago a friend in Southern California named Lona told me how to make a quick alfredo sauce. I’ve made alfredo sauce that exact same way ever since.

This recipe for shrimp penne pasta alfredo, (w/ penne pasta AND pan-seared shrimp) is just one of the variations I have made through the years.  The shrimp in this dish is lightly sprinkled with Cajun spices, but you can easily substitute your own Italian spices, if desired.

The alfredo sauce takes only minutes to prepare while the pasta is cooking, so the entire dish can be ready to go in under 30 minutes! Trust me- shrimp penne pasta alfredo is EASY to prepare, and is quite yummy.

Scroll Down For A Printable Recipe Card At The Bottom Of The Page

How To Make Shrimp Penne Pasta Alfredo

Bring large pot of water to boil. Cook the penne pasta according to the package directions. While the pasta is cooking, lightly sprinkle Cajun seasoning onto peeled, deveined large shrimp (21-25 per pound). NOTE: You can substitute seasoning of your choice, such as garlic powder, Italian seasoning, etc., if you want.

In a large skillet, heat the olive oil on medium heat.  Once oil is hot (but not smoking), add shrimp. Cook the shrimp about 2 minutes per side, until pink and fully cooked. When done, remove shrimp from skillet and keep it warm.

Shrimp is pan-seared in skillet for Shrimp Penne Pasta Alfredo.

Making The Alfredo Sauce

To save time, make the alfredo sauce while the pasta is cooking. Start the sauce by melting a stick of butter (1/2 cup) in a large skillet.

Butter is melted to make sauce for Shrimp Penne Pasta Alfredo.

Add 1½ cups heavy whipping cream to the melted butter. Stir to combine the butter and whipping cream. Grate 1½ cups of fresh Parmesan cheese directly into the sauce (you can add more Parmesan, if desired).

Whisk the sauce well to combine ingredients.  Cook the alfredo sauce on medium-low heat (stirring constantly) until the Parmesan cheese has melted, sauce has thickened, and is hot. Do not let sauce come to a boil. Taste test the sauce; season with a tiny bit of garlic powder, salt and pepper, if desired. 

Grated, fresh Parmesan cheese is added to sauce for Shrimp Penne Pasta Alfredo.

Add Cooked Pasta To The Alfredo Sauce

When the penne pasta is finished cooking, drain it well, and then add it to the skillet with the thickened, hot Alfredo sauce.

Hot, cooked pasta is added to sauce for Shrimp Penne Pasta Alfredo.

Stir again, to fully mix pasta and sauce. Heat on low until the sauce and pasta are hot and fully mixed together.

Penne pasta is coated with Alfredo sauce before adding shrimp.

Serve Shrimp Penne Pasta Alfredo

Place a portion of the hot penne pasta alfredo onto each individual serving plate. Top each portion with several of the pan-seared shrimp. Garnish the dish with dried parsley and additional grated Parmesan cheese (if desired). Serve the shrimp penne pasta alfredo immediately, while hot.

Shrimp Penne Pasta Alfredo is served on plate, with green salad.

See how easy it is to make this meal? In hardly any time at all, you’ve made a delicious shrimp penne pasta alfredo dinner! Hope you will consider making this delicious meal for yourself and those you love!  Blessings~

Looking For More Shrimp Recipes?

You can find all my shrimp recipes in the Recipe Index, located at the top of the page. A few favorites include:

Interested In More Recipes?

Thank you for visiting this website. I appreciate you using some of your valuable time to do soIf you’re interested, I publish a newsletter 2 times per month (1st and 15th) with all the latest recipes, and other fun info. I would be honored to have you join our growing list of subscribers, so you never miss a great recipe!
There is a Newsletter subscription box on the top right side (or bottom) of each blog post, depending on the device you use, where you can easily submit your e-mail address (only) to be included in my mailing list.

You Can Also Find Me On Social Media:

Facebook page: The Grateful Girl Cooks!
Pinterest:
The Grateful Girl Cooks!
Instagram:
jbatthegratefulgirlcooks

Author's signature

5 from 1 vote
Shrimp And Penne Pasta Alfredo
Prep Time
10 mins
Cook Time
15 mins
Total Time
25 mins
 
Shrimp Penne Pasta Alfredo features lightly seasoned, pan-seared shrimp served on a bed of pasta in a creamy Parmesan alfredo sauce. Easy and delicious!
Category: Entree
Cuisine: Italian
Keyword: shrimp penne pasta alfredo
Servings: 4 servings
Calories Per Serving: 664 kcal
Author: JB @ The Grateful Girl Cooks!
Ingredients
  • 1 pound shrimp (21-25 count per pound), shelled/deveined
  • Cajun seasoning (or seasoning of your choice: garlic powder, Italian seasoning, etc.)
  • 1 Tablespoon olive oil
  • 1 stick butter (1/2 cup)
  • cups heavy whipping cream
  • Approximately 1½ cups grated Parmesan cheese (add more to taste, if desired)
  • Season lightly with garlic powder , salt & black pepper, to taste
  • 1/2 pound penne pasta , cooked per package instructions
  • Dried parsley and/or additional grated Parmesan cheese for garnish (if desired)
Instructions
  1. Prepare penne pasta according to package instructions. While pasta is cooking, prepare the sauce and the shrimp.
To Make Alfredo Sauce:
  1. Melt butter in medium skillet. Once melted, pour in heavy whipping cream. Stir to combine. Cook on medium-low until heated through (but not boiling). Add grated Parmesan cheese to saucepan. Stir well, to combine. Continue cooking until cheese melts, and mixture thickens (but is NOT boiling). Taste and add additional Parmesan cheese (you can't get too much!) for thicker sauce and additional flavor. Season very lightly with garlic powder, salt and pepper. Keep sauce warm while you prepare the shrimp (or can cook both at the same time if multi-tasking).
To cook shrimp:
  1. Heat olive oil on medium-high heat in large skillet.
  2. Lightly sprinkle shelled/deveined shrimp with Cajun seasoning. Stir to combine. When oil in skillet is hot, add shrimp. Cook shrimp for about 2 minutes per side, until pink and cooked through. Set aside and keep warm.
To Serve:
  1. When pasta is done, drain. Add drained penne to skillet with hot Alfredo sauce , and mix well to fully coat pasta with sauce. Place a serving of hot pasta on individual plates. Top with 4-5 cooked shrimp.
  2. Garnish with dried parsley and additional Parmesan cheese, if desired. Serve and enjoy!
Recipe Notes

Fresh grated Parmesan is the best choice, but if all you have available is the "Green Container" shaker can of Parmesan cheese, by all means use it!

Nutrition Facts
Shrimp And Penne Pasta Alfredo
Amount Per Serving (1 serving)
Calories 664 Calories from Fat 351
% Daily Value*
Fat 39g60%
Saturated Fat 21g131%
Cholesterol 408mg136%
Sodium 920mg40%
Potassium 284mg8%
Carbohydrates 44g15%
Fiber 1g4%
Sugar 1g1%
Protein 32g64%
Vitamin A 1310IU26%
Vitamin C 5.2mg6%
Calcium 234mg23%
Iron 3.2mg18%
* Percent Daily Values are based on a 2000 calorie diet.

Here’s one more to pin on your Pinterest boards!Shrimp Penne Pasta Alfredo features lightly seasoned, pan-seared shrimp served on a bed of pasta in a creamy Parmesan alfredo sauce. Easy and delicious!


Save

Save

Save

Save

Save

Save

Save

Save

Save

Save

Save

Save

Save

Save

Save

Save

Save

Save

Save

Save

Save

Save

Save

Save