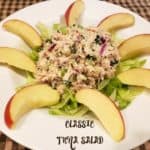
Classic Tuna Salad is a filling, healthy, delicious entree salad that’s Weight Watchers friendly (ZERO points Freestyle), and is ready in 10 minutes!

Do you enjoy tuna salad? We sure do, but typically we enjoy it on sandwiches. My husband likes to add hard boiled eggs and mayo to drained tuna, and that’s about it!
Recently I stumbled upon a recipe for classic tuna salad that can be served as a quick lunch or dinner main course and decided to give it a try! The entire salad took under 10 minutes to make (including chopping and slicing the veggies).
The tuna salad is so delicious (even as leftovers the next day) I thought I would share it with you today. This recipe was adapted by a Weight Watchers member from a cookbook recipe she had.
Even if you are not following a WW plan, this is a very filling, low calorie and delicious salad. This tuna salad recipes calls for non-fat Greek yogurt instead of mayonnaise to cut out fat calories and make it compatible with a Weight Watchers Freestyle eating plan.
That small change made this salad have ZERO Freestyle points (for those of you who follow a WW plan and know the over 200 foods that have a zero points value). Here’s how to make it.
Scroll Down For A Printable Recipe Card At The Bottom Of The Page
How To Make This Classic Tuna Salad
Truthfully, there is nothing even remotely difficult involved in making this delicious tuna salad. Simply prep all of the veggies by cutting, chopping and slicing them.
Seen below are the chopped dill pickles, celery, fresh parsley and chives (from our garden), and red onion.

Once you’ve “prepped” the veggies, place them in a medium sized bowl with drained albacore tuna, spices, lemon juice, and non-fat Greek yogurt.

Combine all the ingredients, adding a little bit more Greek yogurt, if necessary to reach the consistency you prefer. I started with 3 Tablespoons, then added just a smidge more.


Time To Enjoy A Classic Tuna Salad
Once everything is combined, you are ready to enjoy this wonderful ZERO-point, flavor-packed classic tuna salad for a meal OR as a snack spread on crackers.
It is often said you eat with your eyes first, so I serve it on a bed of chopped iceberg lettuce and surround this classic tuna salad with a sliced Gala apple!
The salad LOOKED good served this way and the crunchy sweetness of the apple tasted GREAT alongside this delicious salad!

There you have it! A healthy, and quite filling entree salad that has ZERO Freestyle points if you follow a WW plan. That works for me!
Cover and refrigerate any leftovers. By the way, I had the exact same lunch the very next day, as well! It really is a great tasting lunch, dinner or snack.

I really hope you will consider trying this delicious classic tuna salad recipe! Even if you are not following a Weight Watchers plan, I am confident you will really enjoy this delicious salad.
Thanks for stopping by, and I invite you to come back again soon for more family friendly recipes. Take care, may God bless you, and have a wonderful day.
Looking For More MAIN COURSE SALAD Recipes?
You can find ALL of my recipes in the Recipe Index, which is located at the top of the page. I have a nice variety of main dish salad recipes to choose from, including:
- Chicken Salad
- Tuna Pasta Salad
- Chopped Greek Chicken Salad (a WW recipe)
- Grilled Ham Salad with Peaches & Goat Cheese
- Creole Salmon Caesar Salad
Want More Recipes? Get My FREE Newsletter!
I publish a newsletter 2 times per month (1st and 15th) with lots of recipes, tips, etc.
Would you like to join our growing list of subscribers?
There is a Newsletter subscription box on the top right (or bottom) of each blog post, depending on the device you use.
You can submit your e-mail address there, to be added to my mailing list.
Find Me On Social Media:
Facebook page: The Grateful Girl Cooks!
Pinterest: The Grateful Girl Cooks!
Instagram: jbatthegratefulgirlcooks

Recipe Adapted From: The Cookbook “Well Fed 2: More Paleo Recipes For People Who Love To Eat”, by Melissa Joulwan, published by Smudge Publishing.
Recipe was adapted by a WW member, then posted in WW connect community.
↓↓ PRINTABLE RECIPE BELOW ↓↓
Classic Tuna Salad is a filling, healthy, delicious entree salad that's Weight Watchers friendly (ZERO points Freestyle), and is ready in 10 minutes!
- 2 cans albacore tuna (in water) , drained (7 oz. per can)
- 1/4 cup red onion , finely chopped
- 1 rib celery , finely diced
- 1/4 cup dill pickle , finely diced
- 1/4 cup fresh parsley , chopped
- 2 Tablespoons chives , finely chopped (fresh or dried)
- 1/2 Tablespoon lemon juice , freshly squeezed
- 1/4 teaspoon black pepper
- 1/8 teaspoon salt
- 1 dash cayenne pepper
- 3-4 Tablespoons non fat, plain Greek yogurt
Drain tuna, and cut, chop or slice the veggies.
Combine all ingredients in a medium sized bowl, and stir well, to fully mix all the veggies and spices with the tuna and non-fat Greek yogurt. Cover and refrigerate until ready to serve (can also be eaten immediately).
To serve, place a rounded large scoop on a bed of chopped lettuce, or make into a sandwich, whichever way you want to enjoy this classic tuna salad. Cover and refrigerate any leftovers. Enjoy!
Here is one more to pin on your Pinterest boards!


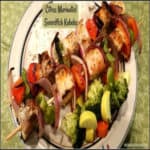
 is a simple, delicious Asian-inspired meal that can be ready in about 30 minutes! / The Grateful Girl Cooks!")


 is a simple, delicious Asian-inspired meal that can be ready in about 30 minutes! / The Grateful Girl Cooks!")


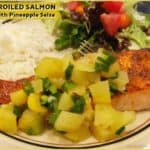


 meal, with seasoned pan-seared fish topped with light, fresh salsa! / The Grateful Girl Cooks!")


 meal, with seasoned pan-seared fish topped with light, fresh salsa! / The Grateful Girl Cooks!")


