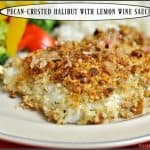
Category: Seafood

Cedar Plank Grilled Salmon

Cedar Plank Grilled Salmon with butter, lemon and spices is a simple, easy way to BBQ outside on hot, summer days! Cedar Plank Grilled Salmon with butter, lemon and spices is a simple, easy way to BBQ outside on hot, summer days!
We’ve been enjoying much warmer than normal temperatures (can you say HOT???) in the Pacific Northwest this summer. Hot temps (in the high 90’s) have meant that I don’t use my oven as much to fix meals, so I don’t add to the heat in our home, PLUS it has meant more time outside on the deck, bonding with our Weber BBQ at dinner time. This Cedar Plank Grilled Salmon was our dinner last night.

Scroll Down For A Printable Recipe Card At The Bottom Of The Page

Last night my hubby (the “Grill-Meister”) grilled a salmon fillet on a cedar plank on our BBQ, and man oh man, it was so good! I typically pan-sear or bake salmon inside, in my kitchen, but there’s just something about grilled salmon in the summer, with the smokey smell from the BBQ and the cedar plank that you cook it on, that makes everything right with the world.

I had to remind my husband to put the lighter fluid on the charcoal briquets and NOT in his glass of wine, but after we got that sorted out, he took over the grilling duties! We cooked the salmon on our Weber BBQ on medium heat (lid closed, top vent open);  if you are using a gas grill, be sure the flames don’t reach the cedar plank or you might catch it on fire!

Cook, getting ready to grill salmon on cedar plank on BBQ
Have you ever grilled salmon fillets on cedar planks on your BBQ? Yum. It’s SO easy. First you buy a package of cedar planks at the grocery store (most stores carry them by the fish counter). They look like this, and usually a package contains 3-4 planks.

How To Prepare Cedar Plank So It Won’t Burn

You will need to soak the plank you are going to use in water for at least 30-40 minutes before putting on the grill. (I weigh mine down with filled pans of water in the sink, then cover board completely with water).

The wood plank needs to be soaked this long, so it doesn’t catch fire on the grill. As the fish cooks, the cedar board smokes and infuses flavor into the seafood. Makes sense, right?

Cedar plank used to grill salmon on BBQTime To Cook the Salmon

Once it is done “soaking”, you place a fresh salmon fillet on it  SKIN SIDE DOWN (we used one of two wild sockeye salmon fillets we bought at good old Costco).

Use a pastry brush to spread melted butter all over the top of the salmon. Sprinkle with salt, pepper, and garlic powder. Squeeze a bit of lemon juice over the top, also. I like to “garnish” the salmon fillet with thin slices of lemon while it cooks.

Once you have that done, you simply put the entire plank on the hot BBQ grill (with the top little vent open). Put the lid on the BBQ, and let it cook covered for about 35 minutes, until salmon is done (flaky). That’s it! No need to mess with it at all.

Cedar plank with salmon and lemon slices on grill
This is what it should look like when it is done. See? The soaked cedar plank didn’t burn up!

Grilled salmon is done cooking on cedar plank
Serving Cedar Plank Grilled Salmon

Remove the entire plank from the BBQ, take it inside, and cut salmon (not the cutting board!) into serving pieces (4-5 out of this piece of salmon). See how easy that is? When you realize how much 4-5 servings of cedar plank grilled salmon would cost in a restaurant, it REALLY is an inexpensive and easy way to make it yourself!!! Why not?

I served the salmon with some grilled mixed veggies (including yellow squash and peas from our garden), and we had a wonderful, healthy dinner that was incredibly delicious! AND we have a couple extra pieces of salmon for leftovers, too!

We really enjoy cedar plank grilled salmon; I have several other delicious recipes for this fish on my blog! You might want to check out the recipes for Salmon in a Lemon Butter Herb Sauce, Orange and Rosemary Glazed Salmon, or Pan-Seared Salmon with Cilantro Lime Sauce, to name a few. There are additional salmon recipes which you can find in the Recipe Index at the top of the page. YUM!

Grilled salmon served with mixed vegetables
Hope you will give this easy cedar plank grilled salmon a try this summer! Throw it on the grill, sit back and relax with a refreshing beverage, and let your BBQ do almost all the work for you!  Don’t forget to check out my Recipe Index, to see ALL my recipes. It’s located at the top of the page. Have a great week!

Interested In More Recipes?

Thank you for visiting this website. I appreciate you using some of your valuable time to do soIf you’re interested, I publish a newsletter 2 times per month (1st and 15th) with all the latest recipes, and other fun info. I would be honored to have you join our growing list of subscribers, so you never miss a great recipe!
There is a Newsletter subscription box on the top right side (or bottom) of each blog post, depending on the device you use, where you can easily submit your e-mail address (only) to be included in my mailing list.

You Can Also Find Me On Social Media:

Facebook page: The Grateful Girl Cooks!
Pinterest:
The Grateful Girl Cooks!
Instagram:
jbatthegratefulgirlcooks

Author's signature

↓↓ PRINTABLE RECIPE BELOW ↓↓

0 from 0 votes
Cedar Plank Grilled Salmon
Prep Time
30 mins
Cook Time
35 mins
Total Time
1 hr 5 mins
 
Cedar Plank Grilled Salmon with butter, lemon and spices is a simple, easy way to BBQ outside on hot, summer days! The smell from the cedar on the grill infuses smoky flavor into the fish for an amazing meal!
Category: Dinner
Cuisine: American
Keyword: cedar plank grilled salmon
Servings: 5 servings
Calories Per Serving: 301 kcal
Author: JB @ The Grateful Girl Cooks!
Ingredients
  • 2 pounds fresh salmon fillet (with skin on bottom)
  • 2 Tablespoons butter (melted)
  • 1/4 teaspoon salt
  • 1/4 teaspoon black pepper
  • 1/4 teaspoon garlic powder
  • 1/2 lemon (juice of)
  • 5 slices lemon (thinly sliced)
Instructions
  1. Soak the cedar plank you are going to use in water for at least 30-40 minutes before putting on the grill. (I weigh mine down with filled pans of water in the sink, then cover board completely with water). The wood plank needs to be soaked this long, so it doesn't catch fire on the grill. As the fish cooks, the cedar board smokes and infuses flavor into the seafood.

  2. Once it is done "soaking", remove from water. Place a fresh salmon fillet on it  SKIN SIDE DOWN.  Use a pastry brush to spread melted butter all over the top of the salmon. Sprinkle with salt, pepper, and garlic powder. Squeeze some lemon juice over the top, also. Garnish the salmon fillet with thin slices of lemon.

  3. Once BBQ is hot and ready, place wood plank directly onto BBQ rack. Cook salmon on medium heat (on our Weber grill we cooked it with lid closed, top vent open);  if you are using a gas grill, be sure the flames are set low enough to not reach the cedar plank directly or you might catch it on fire! Cook salmon (with lid on BBQ) for about 35 minutes, until done and fish flakes easily.

  4. Remove the entire plank from the BBQ, take it inside, and cut salmon (not the cutting board!) into serving pieces... serve, and enjoy! 

Nutrition Facts
Cedar Plank Grilled Salmon
Amount Per Serving (1 piece)
Calories 301 Calories from Fat 144
% Daily Value*
Fat 16g25%
Saturated Fat 4g25%
Cholesterol 111mg37%
Sodium 236mg10%
Potassium 898mg26%
Carbohydrates 1g0%
Protein 36g72%
Vitamin A 215IU4%
Vitamin C 4.9mg6%
Calcium 22mg2%
Iron 1.5mg8%
* Percent Daily Values are based on a 2000 calorie diet.

Here’s one more to pin on your Pinterest boards!Cedar Plank Grilled Salmon with butter, lemon and spices is a simple, easy way to BBQ outside on hot, summer days!

Save

Quick and Easy Open Faced Tuna Melts

It’s been unusually HOT in the Pacific Northwest for the past several weeks. Temps are supposed to hover near 100 degrees this coming weekend, which is “not the norm” for late June in Oregon. We want quick  and easy meals (don’t want to heat up the kitchen cooking). Enter our “go-to” standby… Quick and Easy Open Faced Tuna Melts!!!!Quick and Easy Open Faced Tuna Melts / The Grateful Girl Cooks!
These open faced tuna melts are ridiculously easy… so easy in fact, that I’m not even gonna post the “recipe”. They actually are delicious, and are very quick to prepare!

First you toast some English muffins. I used sourdough (delicious!). Allow for one half or two halves per serving. Once toasted, place some cheese (gruyere, smoky gouda, or cheddar) on top of the muffin. (I have used all of these cheeses in the past. Pictures are with Smoky Gouda.

Quick and Easy Open Faced Tuna Melts / The Grateful Girl Cooks!
Put some tuna on top to cover the muffin. (Use the tuna you prefer, mixed up with whatever you like in your tuna salad). All I used for mine was one can (one can is enough for 4 half muffins) of albacore tuna, mixed with mayonnaise. That’s it!  But for goodness sake, make your tuna the way you like it!

Quick and Easy Open Faced Tuna Melts / The Grateful Girl Cooks!
Slice some really good ripe tomatoes and put a slice on top of each muffin. Sprinkle with a pinch of salt, pepper, dried parsley and dried basil. Just a touch.

Quick and Easy Open Faced Tuna Melts / The Grateful Girl Cooks!
Put the english muffins on a wire rack and place under a broiler. DO NOT put them directly under the broiler. Put them on the middle rack of your oven.

It will take a few minutes to broil them, but by putting them on the middle rack, instead of directly under the broiler, all the ingredients will have a chance to get hot, and that cheese on the bottom will melt.

Remove from broiler when cheese is bubbly and the tuna has just started to lightly turn golden.

Quick and Easy Open Faced Tuna Melts / The Grateful Girl Cooks!
Remove tuna melts from wire rack with a spatula. Place on serving plates. I like to put some red leaf lettuce leaves under the tuna melts just for some added color, to make it look good, but that is totally optional.

You can either pick them up and eat them or cut them with knife and fork… whatever suits you! They’re really delicious! Sure hope you’ll give ’em a try. Good for a quick, filling lunch, or dinner on a really HOT evening! Been making these for years and years, and have never been disappointed!

Quick and Easy Open Faced Tuna Melts / The Grateful Girl Cooks!Have a wonderful week… may you feel gratitude for all you experience this week, and above all else…may you deeply know just how much God loves you!

Interested In More Recipes?

Thank you for visiting this website. I appreciate you using some of your valuable time to do soIf you’re interested, I publish a newsletter 2 times per month (1st and 15th) with all the latest recipes, and other fun info. I would be honored to have you join our growing list of subscribers, so you never miss a great recipe!

There is a Newsletter subscription box on the top right side (or bottom) of each blog post, depending on the device you use, where you can easily submit your e-mail address (only) to be included in my mailing list.

You Can Also Find Me On Social Media:
Facebook page: The Grateful Girl Cooks!
Pinterest: The Grateful Girl Cooks!
Instagram: jbatthegratefulgirlcooks

Quick and Easy Open Faced Tuna Melts / The Grateful Girl Cooks!


Here’s one more to pin on your Pinterest boards!Quick and Easy Open Faced Tuna Melts / The Grateful Girl Cooks!

Save

Save

Stir Fry Asian Glazed Shrimp & Veggies

Asian Glazed Shrimp is coated in sauce, and stir-fried with veggies (broccoli/peppers/onion). This flavorful dish is ready to eat in 30 minutes.Asian Glazed Shrimp is coated in sauce, and stir-fried with veggies (broccoli/peppers/onion). This flavorful dish is ready to eat in 30 minutes.
My husband and I just got home after a 5 day trip to Southern CA to attend a music reunion with friends of over 40 years. We had a blast, but came home exhausted, and facing a mountain of work for my husband’s company. So, that being said, today’s recipe for this tasty “Stir Fry Asian Glazed Shrimp & Veggies” will be short and sweet, so I can get to work!

Scroll Down For A Printable Recipe Card At The Bottom Of The Page

How I Came Up With This Recipe

Recently I was trying to figure out what to make my husband and I for dinner. I had some frozen large shrimp, some fresh veggies, and a good idea for turning it into a stir fry meal. Small amounts of meat, and LOTS of veggies make for a pretty tasty dinner.

I remembered a sauce I used last year for some Asian Lemon Chicken Strips, and decided to make a shrimp stir fry using the same sauce. Boy, was it good! I will post the recipe as I made it , but remember, with a stir fry, you can add any kind of veggies that you like or have available.

This stir fry is so easy. The sauce takes about 15 minutes to cook. While it is cooking, you can stir fry the veggies and shrimp. Combine it all, heat through, and serve. It’s THAT easy, and it only takes about 30 minutes, from start to finish. And it’s really delicious, too! Sure hope you’ll give this one a try! Here’s how to make Asian Glazed Shrimp and Veggies:

Make The Asian-Inspired Sauce

Here’s what I did:  First I made the sauce. Easy. Combine all ingredients in saucepan and cook for about 15 minutes.

Asian inspired sauce is made to coat shrimp and assorted stir-fried veggies.Prepare The Veggies

Steam the veggies for about 5 minutes. Usually I just stir fry them in a bit of olive oil (5-6 minutes) in a skillet. This time I steamed them a bit just to get them softened up a bit, then stir fried them. Don’t know what came over me.

If you stir fry the veggies, take them out of skillet when done. Add a bit more olive oil and you can stir fry the shrimp in same skillet.

Broccoli, orange and red bell peppers, and red onions are cooked for this dish.
Cook The Shrimp

Stir fry the shrimp in a small amount of olive oil, turning them over to cook both sides. This only takes a 3-4 minutes. The shrimp are done once they turn “pinkish” on all sides.

Shrimp is quickly cooked in olive oil.Finish Cooking The Asian Glazed Shrimp and Veggies

Transfer the cooked veggies back into the skillet to hang out with the shrimp. Now it’s starting to look good!

Steamed veggies are added to the skillet of cooked shrimp.
Pour enough of the sauce into the skillet to coat everything (you may have a bit of the sauce left over). No worries… the sauce freezes well!

Asian glazed shrimp and veggies cooking in sauce.
Give everything a good stir to combine and coat everything with the sauce, then heat through completely.

The Asian glazed shrimp and veggies are heated through in the sauce.Time To EAT!

When ready to serve, spoon out the shrimp, veggies and sauce. We love it served on top of white rice! Spoon some of the extra sauce over the top, serve, and enjoy!

Stir-fried Asian glazed shrimp and veggies, served on a bed of white rice.
Quick and easy… and on your plate in about 30 minutes… just the way I like it!  Hope you have a great day!

Looking For More SHRIMP Recipes?

You can find all of my seafood recipes in the Recipe Index, located at the top of the page. I have many shrimp recipes, including:

Interested In More Recipes?

Thank you for visiting this website. I appreciate you using some of your valuable time to do soIf you’re interested, I publish a newsletter 2 times per month (1st and 15th) with all the latest recipes, and other fun info. I would be honored to have you join our growing list of subscribers, so you never miss a great recipe!
There is a Newsletter subscription box on the top right side (or bottom) of each blog post, depending on the device you use, where you can easily submit your e-mail address (only) to be included in my mailing list.

You Can Also Find Me On Social Media:

Facebook page: The Grateful Girl Cooks!
Pinterest:
The Grateful Girl Cooks!
Instagram:
jbatthegratefulgirlcooks

Author's signature

0 from 0 votes
Stir Fry Asian Glazed Shrimp and Veggies
Prep Time
10 mins
Cook Time
20 mins
Total Time
30 mins
 

Asian Glazed Shrimp is coated in sauce, and stir-fried with veggies (broccoli/peppers/onion). This flavorful dish is ready to eat in 30 minutes.

Category: Entree
Cuisine: Asian
Keyword: Asian glazed shrimp
Servings: 2 servings
Calories Per Serving: 602 kcal
Author: JB @ The Grateful Girl Cooks!
Ingredients
For The Stir Fry:
  • 1/2 pound medium or large shrimp , peeled, deveined (Approx. 6-7 shrimp per serving)
  • 2 cups Broccoli florets (approx. 2 cups of florets)
  • 2 slices Red onion (as much as you like. I used about 2 round slices, cut in half)
  • 1 cup Red, orange, or yellow bell pepper slices (any combo works- 1 cup slices total)
  • 3 Tablespoons olive oil (divided)
For the Sauce:
  • 1/2 cup honey
  • 1/3 cup soy sauce
  • 1/4 cup pineapple juice
  • 1/4 cup brown sugar , packed
  • Juice & zest of 1 lemon
  • 2 Tablespoons apple cider vinegar
  • 2 Tablespoons olive oil
  • 1 teaspoon ground black pepper
  • 1/2 teaspoon garlic powder
Instructions
  1. Prepare sauce: Place all sauce ingredients into a medium sized saucepan. Stir well, to combine. Bring mixture to a rolling boil over medium heat; once at a rolling boil, reduce heat, and simmer for approx. 15-20 minutes. Stir occasionally. Sauce will thicken slightly as it cooks.

  2. While sauce is cooking, heat 1 ½ Tablespoons of olive oil in a skillet. When oil is hot, add broccoli florets, sliced red onion, and sliced red, yellow and orange bell peppers. Stir fry veggies, stirring constantly, for 5 minutes. Remove veggies from pan to a plate. Set aside.

  3. Add remaining 1 ½ Tablespoons olive oil back into the skillet. Heat oil again. When it is good and hot, add shrimp. Cook shrimp on both sides for 3-4 minutes or until shrimp has turned pink on all sides. When done, add veggies back into the skillet.

  4. Add enough sauce to completely coat shrimp and veggies. Stir to combine well. Heat shrimp, veggies and sauce until fully heated through (only takes a minute or two).

  5. Serve, with a side of rice, or on top of a bed of rice. Drizzle extra sauce from the skillet over the shrimp. (You can freeze any leftover sauce; cover it tightly. It freezes well.) Enjoy.

Recipe Notes

This recipe was created for two people, but is ridiculously easy to double, triple, etc. You will have some sauce leftover, as you won't need it all, when cooking for two servings. The calorie count includes all of the sauce ingredients.

Nutrition Facts
Stir Fry Asian Glazed Shrimp and Veggies
Amount Per Serving (1 g)
Calories 602 Calories from Fat 180
% Daily Value*
Fat 20g31%
Saturated Fat 3g19%
Cholesterol 286mg95%
Sodium 1989mg86%
Potassium 710mg20%
Carbohydrates 82g27%
Fiber 5g21%
Sugar 70g78%
Protein 29g58%
Vitamin A 2900IU58%
Vitamin C 185mg224%
Calcium 241mg24%
Iron 4.6mg26%
* Percent Daily Values are based on a 2000 calorie diet.

Here’s one more to pin on your Pinterest boards!Asian Glazed Shrimp is coated in sauce, and stir-fried with veggies (broccoli/peppers/onion). This flavorful dish is ready to eat in 30 minutes.


Save

Save

Save

Chili, Lime & Cumin Cod

Southwest-inspired Chili Lime Cumin Cod is baked, seasoned fish, topped with a lime, cumin & butter sauce, and is ready in less than 15 minutes!Southwest-inspired Chili Lime Cumin Cod is baked, seasoned fish, topped with a lime, cumin & butter sauce, and is ready in less than 15 minutes!

About a month ago I found a recipe on Pinterest for Chili, Lime Cumin Cod. The flavor combination sounded interesting to me (a bit Southwestern), AND I had a few pieces of cod hanging out in the back of my freezer. So… I decided to give this easy sounding seafood recipe a try.

The entire recipe took less than 15 minutes to prepare, so I would consider this a truly easy, quick, and flavorful seafood entree! I think the quick, flavorful lime cumin butter sauce would also taste great on grilled halibut, swordfish, tilapia or mahi-mahi, as well.

The recipe is so simple, I really don’t think it’s possible to mess this one up! Chili Lime Cumin Cod for the win! This quick and simple, healthy seafood dish is perfect for busy nights where you just want something “good for you”, to eat!

Scroll Down For A Printable Recipe Card At The Bottom Of The Page 

How To Make Chili Lime Cumin Cod

Preheat your oven to 450 degrees. Spray an oven-safe baking pan with non-stick spray (or coat pan with oil).

In a small bowl, combine the chili powder, oregano and salt, until fully blended. This is your spice mixture for the fish. Sprinkle spices on top of each of the pieces of cod. Press the spices slightly into the fish to adhere them to the surface of the fish.

Place the pieces of seasoned cod into the prepared baking pan. Bake at 450 degrees for about 10 minutes, or until fish is done and opaque in color.

Cod fillets are seasoned with spices before baking.
Make The Sauce To Top Baked Chili Lime Cumin Cod

While the fish is baking, make the sauce to top the cooked fish. Melt the butter in a small skillet.

Butter, melting in skillet for making sauce to top chili lime cumin cod.
Add cumin powder and the juice of one lime to the melted butter in skillet.

Lime juice and cumin powder added to the sauce for chili lime cumin cod.
Give the sauce a good stir to combine ingredients. Cook the sauce for one more minute, then remove the skillet from the heat.

The buttery lime sauce is ready to add drizzle over the baked chili lime cumin cod.
Serve The Baked Chili Lime Cumin Cod

Once the fish is done, remove the pan from the oven. Transfer the pieces of baked chili lime cumin cod fish onto individual serving plates. Drizzle each piece of fish with the warm butter lime and cumin sauce.

Serve the chili lime cumin cod while it is hot, and enjoy! THAT’S IT! I served the fish with steamed broccoli and some rice on the side. The fish flaked very easily, and the simple butter lime sauce was the perfect finishing touch for the seasoned cod!

Chili Lime Cumin Cod is topped with sauce, then served (with broccoli and rice on the side).

I really hope you enjoy this incredibly SIMPLE seafood dish!  We really enjoyed the chili lime cumin cod, and trust you will, too! Have a GREAT day!

Looking For More COD Recipes?

You can find all of my recipes in the Recipe Index, located at the top of the page.  A few of our favorite seafood recipes featuring cod include:

Interested In More Recipes?

Thank you for visiting this website. I appreciate you using some of your valuable time to do soIf you’re interested, I publish a newsletter 2 times per month (1st and 15th) with all the latest recipes, and other fun info. I would be honored to have you join our growing list of subscribers, so you never miss a great recipe!
There is a Newsletter subscription box on the top right side (or bottom) of each blog post, depending on the device you use, where you can easily submit your e-mail address (only) to be included in my mailing list.

You Can Also Find Me On Social Media:

Facebook page: The Grateful Girl Cooks!
Pinterest:
The Grateful Girl Cooks!
Instagram:
jbatthegratefulgirlcooks

Author's signatureRecipe Source: http://cocinandoconalena.blogspot.com/2010/12/chili-lime-cumin-cod.html

0 from 0 votes
Chili Lime Cumin Cod
Prep Time
5 mins
Cook Time
10 mins
Total Time
15 mins
 
Southwest-inspired Chili Lime Cumin Cod is baked, seasoned fish, topped with a lime, cumin & butter sauce, and is ready in less than 15 minutes!
Category: Entree-Seafood
Cuisine: Southwestern
Keyword: chili lime cumin cod
Servings: 4 servings
Calories Per Serving: 197 kcal
Author: JB @ The Grateful Girl Cooks!
Ingredients
  • 2 pounds cod fillets (4 pieces)
  • 1 teaspoon chili powder
  • 1/2 teaspoon dried oregano (may substitute dried parsley or dried cilantro-I put a bit of each on the fish)
  • 1/2 teaspoon salt
  • 2 Tablespoons butter
  • 1/4 teaspoon cumin
  • 1 lime , juiced
Instructions
  1. Preheat your oven to 450 degrees. Spray an oven-safe baking pan with non-stick spray (or coat pan with oil).

  2. In a small bowl, combine the chili powder, oregano, and salt. Mix to combine. Sprinkle spices on top of the pieces of cod. Press spices slightly into the fish to adhere. Place the seasoned cod into prepared baking pan. 

  3. Bake at 450 degrees for about 10 minutes, or until fish is done and opaque in color.

  4. While the fish is baking, make the sauce to top the cooked fish. Melt the butter in a small skillet. Add cumin and the juice of one lime. Stir to combine; cook for an additional minute. Remove from heat.

  5. When pieces of cod are finished cooking, remove pieces to individual serving plates. Drizzle the Lime/Cumin/Butter sauce over the top of the pieces of fish. Serve... and enjoy!
Recipe Notes

I think the sauce for this recipe would also taste great on grilled halibut, swordfish, mahi-mahi, or tilapia.

Nutrition Facts
Chili Lime Cumin Cod
Amount Per Serving (1 piece)
Calories 197 Calories from Fat 54
% Daily Value*
Fat 6g9%
Saturated Fat 3g19%
Cholesterol 88mg29%
Sodium 441mg19%
Potassium 728mg21%
Carbohydrates 2g1%
Protein 30g60%
Vitamin A 390IU8%
Vitamin C 6.6mg8%
Calcium 37mg4%
Iron 1mg6%
* Percent Daily Values are based on a 2000 calorie diet.

Here’s one more to pin on your Pinterest boards!Southwest-inspired Chili Lime Cumin Cod is baked, seasoned fish, topped with a lime, cumin & butter sauce, and is ready in less than 15 minutes!


Save

Save

Save

Mom’s Tuna Noodle Casserole

Nothing says “old school comfort food” like Mom’s Tuna Noodle Casserole! This classic dish has been around for years, is delicious, and easy on the budget!Nothing says "old school comfort food" like Mom's Tuna Noodle Casserole! This classic dish has been around for years, is delicious, and easy on the budget!
If my Mom’s Tuna Noodle Casserole isn’t “Old School”, I don’t know what is!  I’ve been sick for a few days, so “comfort food” and EASY were on the menu for one of our dinners. Mom made this for our family as I was growing up. That was back in the 60’s when we were footloose and fancy free kids, without a care in the world. You know- back in the day where we played outside for hours with our buddies, because we didn’t have computers or cell phones to stare at all day inside!

I think my Mom probably made this tuna noodle casserole for us because it was a very economical and tasty way to feed our family of 5, but it also tasted GOOD! Nothing fancy… just yummy food (and the leftovers taste great, also!)

When I made this the other night, my husband’s first words were “Wow… this brings back childhood memories. My Mom used to make tuna noodle casseroles, also!” I guess it must have been what Moms across America cooked back then. Here’s how to prepare this classic dish:

Scroll Down For A Printable Recipe Card At The Bottom Of The Page

How To Make Mom’s Tuna Noodle Casserole

In a large bowl, combine the cream of mushroom soup, sour cream, milk, salt, pepper, garlic powder, and grated Parmesan cheese. Stir to combine.

Mixing up the sauce for the tuna noodle casserole.
Add frozen peas (yes… still frozen!), sliced mushrooms, tuna, and grated cheddar cheese. Fold these in gently to the other ingredients in the bowl..

Tuna, mushrooms, cheddar cheese and peas are added to sauce for tuna noodle casserole.
This is what the tuna noodle casserole ingredients looks like once all ingredients except noodles are folded in. It’s not pretty, but that’s okay!

All ingredients except for noodles are mixed together for tuna noodle casserole.

Cook the Egg Noodles

Cook the egg noodles for 7 minutes in a large pot of boiling water.

Egg noodles for tuna noodle casserole are cooked for 7 minutes.
Drain the egg noodles well once done, then add the drained noodles to the rest of the ingredients. Stir to combine.

Cooked, drained pasta is added to tuna noodle casserole ingredients.
Pour ingredients into a 2 qt. baking dish that is coated with non-stick spray. Spread evenly in pan.

Tuna noodle casserole placed in baking dish, before going into the oven.
Crush some Ritz crackers in a baggie. I like to use a rolling pin to really break them down.

Buttery crackers are crushed to make a topping for tuna noodle casserole.
Bake Mom’s Tuna Noodle Casserole

Spread the crushed cracker crumbs evenly over the top of the casserole, then bake, uncovered at 350 degrees for 40 minutes.

Buttery cracker crumbs are spread on top of tuna noodle casserole before baking.
This is how it looks when it comes out of the oven. Let the casserole sit on a wire rack and cool for a few minutes before cutting into serving pieces.

Mom's Tuna Noodle Casserole after baking. Ready to cut and serve!
After casserole has “firmed” back up for a few minutes as it sits… slice with sharp knife into pieces, and use a spatula to place piece onto individual plates. Grab a fork, and enjoy this delicious, comfort food meal, just how good ol’ MOM used to make it!

Mom's Tuna Noodle Casserole cut into serving size on a plate.

This tuna noodle casserole is easy to prepare, feeds quite a few, is easy on the ol’ budget per serving, and it tastes great! Go figure! If you enjoy dishes that include tuna, you might also enjoy my recipes for Tuna Pasta Salad, “Old School” Tuna Cashew Casserole, or Quick and Easy Open-Faced Tuna Melts.

Hope you enjoy this simple blast from the past! Have a great day, and I hope you will come back again soon. Be sure to check out ALL my recipes in the Recipe Index, located at the top of the page. Have a great day, and come back soon.

Interested In More Recipes?

Thank you for visiting this website. I appreciate you using some of your valuable time to do soIf you’re interested, I publish a newsletter 2 times per month (1st and 15th) with all the latest recipes, and other fun info. I would be honored to have you join our growing list of subscribers, so you never miss a great recipe!
There is a Newsletter subscription box on the top right side (or bottom) of each blog post, depending on the device you use, where you can easily submit your e-mail address (only) to be included in my mailing list.

You Can Also Find Me On Social Media:

Facebook page: The Grateful Girl Cooks!
Pinterest:
The Grateful Girl Cooks!
Instagram:
jbatthegratefulgirlcooks

Author's signatureRecipe Source: My Mom

0 from 0 votes
Mom's Tuna Noodle Casserole
Prep Time
15 mins
Cook Time
40 mins
Total Time
55 mins
 
Nothing says "old school comfort food" like Mom's Tuna Noodle Casserole! This classic dish has been around for years, is delicious, and easy on the budget!
Category: Entree
Cuisine: American
Keyword: tuna noodle casserole
Servings: 8 servings
Calories Per Serving: 316 kcal
Author: JB @ The Grateful Girl Cooks!
Ingredients
  • 6 cups dry egg noodles (9 ounces)
  • 1 can cream of mushroom soup
  • 3/4 cup sour cream
  • 1/2 cup milk
  • 1/2 teaspoon salt
  • 1/4 teaspoon black pepper
  • 1/4 teaspoon garlic powder
  • 1/4 cup grated Parmesan cheese
  • 1 cup frozen peas (un-thawed)
  • 1 can sliced mushrooms (7 ounces)
  • 1 can albacore tuna , drained (6 ounces)
  • 1 cup grated cheddar cheese
  • 10-12 Ritz crackers (or Saltines, if you prefer)
Instructions
  1. Preheat oven to 350 degrees.
  2. In a large bowl, stir together the cream of mushroom soup, sour cream, milk, salt, pepper, garlic powder, and Parmesan cheese. Gently fold in the frozen peas, mushrooms, tuna, and cheddar cheese. Set aside.

  3. Cook egg noodles, according to pkg. instructions (add to boiling water, cook for 7 minutes). When done cooking, drain the noodles, and gently stir them into the rest of the ingredients until thoroughly combined.
  4. Spray a 2 quart baking dish with non-stick spray. Pour in the casserole ingredients; spread evenly. Finely crush Ritz crackers into small crumbs (put them in a baggie and use a rolling pin to crush them). Once crushed, sprinkle crumbs over the top of the casserole.

  5. Bake (uncovered) at 350 degrees for 40 minutes. Remove pan to a wire rack. Let it cool for a few minutes before slicing (letting it cool a bit will let you make better cuts, and make it easier to dish up!) Serve, and enjoy!

Nutrition Facts
Mom's Tuna Noodle Casserole
Amount Per Serving (1 (1/8th of total))
Calories 316 Calories from Fat 108
% Daily Value*
Fat 12g18%
Saturated Fat 6g38%
Cholesterol 64mg21%
Sodium 694mg30%
Potassium 312mg9%
Carbohydrates 32g11%
Fiber 2g8%
Sugar 2g2%
Protein 18g36%
Vitamin A 420IU8%
Vitamin C 7.4mg9%
Calcium 210mg21%
Iron 1.6mg9%
* Percent Daily Values are based on a 2000 calorie diet.

Here’s one more to pin on your Pinterest boards!Nothing says "old school comfort food" like Mom's Tuna Noodle Casserole! This classic dish has been around for years, is delicious, and easy on the budget!


Save

Save

Salmon in Lemon-Butter Herb Sauce

Grilled or pan-seared salmon in lemon-butter herb sauce is a delicious, simple and elegant looking dinner entree.Grilled or pan-seared salmon in a lemon-butter herb sauce is a delicious, simple and elegant looking dinner entree.
My husband and I love salmon. I’ve been preparing salmon the same way for quite a while (creatures of habit, but we like it), but finally decided to branch out, and start trying some new salmon recipes this year. Enter this delicious entree. Seriously delicious.

If I’m telling the truth I would tell you that I had to be on my best behavior not to “sample” the sauce multiple times until it was gone (somebody has to do Quality Control, right?). Yeah. The sauce is pretty amazing… not gonna lie! An extra benefit to making this at home versus ordering something like this at a restaurant is the cost factor. It’s so much less expensive to create this easy, but elegant seafood dish at home! I really like that!

I found the recipe on Pinterest, and decided to give it a try! I slightly modified the recipe as far as cooking the seafood goes… original recipe calls for grilling the salmon fillets. Since it was cold and damp outside (February in the Northwest), I pan-seared the fillets, then topped them with the sauce. Fantastic!

The sauce (with butter, white wine, lemon juice, and herbs) only takes about 10 minutes to pull together, and the fish only takes about 4-5 minutes per side to cook, so all in all, this was a very quick and elegant dish to prepare. I will absolutely make this again. I’m anxious to fire up the ol’ Weber grill and try this recipe with grilled salmon.

Scroll Down For A Printable Recipe Card At The Bottom Of The Page 

Make The Lemon Butter Herb Sauce

Cook white wine, lemon juice and green onions until the liquid has reduced down considerably…

Wine, lemon juice and green onions are cooked for sauce

Add COLD butter, a little at a time, and blend it into the sauce.

Cold butter is blended into sauce in pan

Now add dill, fresh chopped chives, and black pepper to the lemon-butter sauce, and whisk to combine..

Dill, chives and pepper are added to lemon butter sauce

The lemon-butter herb sauce is done! Boy, does it taste amazing!

Lemon butter herb sauce is finished cooking

Prepare The Salmon

Brush boneless skinless fillets on all sides with a lemon juice/olive oil mixture before cooking..

Fish is brushed with lemon juice/olive oil mixture

Place fillets into a hot skillet that has been sprayed with non-stick spray AND has olive oil in it to prevent sticking. Cook the fish on both sides (approx. 4-5 minutes per side), until done, and can be easily flaked with a fork.

Salmon fillets are pan-seared in skillet

Serve The Salmon In Lemon Butter Herb Sauce

Once the fillets are done, carefully put the fillets onto individual serving plates. Spoon the lemon-butter herb sauce over the top of each piece of fish. Serve while hot, and enjoy!

Finished salmon fillet, with lemon herb butter sauce on top

Sure hope you will give this recipe a try. It tastes amazing, and I think you will LOVE it! Thank you for stopping by, and I hope you will come back soon.

Looking for More SALMON Recipes?

You can find ALL my recipes in the Recipe Index, located at the top of the page. I have some wonderful salmon recipes you’ll enjoy, including:

Interested In More Recipes?

Thank you for visiting this website. I appreciate you using some of your valuable time to do soIf you’re interested, I publish a newsletter 2 times per month (1st and 15th) with all the latest recipes, and other fun info. I would be honored to have you join our growing list of subscribers, so you never miss a great recipe!
There is a Newsletter subscription box on the top right side (or bottom) of each blog post, depending on the device you use, where you can easily submit your e-mail address (only) to be included in my mailing list.

You Can Also Find Me On Social Media:

Facebook page: The Grateful Girl Cooks!
Pinterest:
The Grateful Girl Cooks!
Instagram:
jbatthegratefulgirlcooks

Have a great day!

Author's signatureRecipe slightly adapted from: http://www.tablespoon.com/recipes/grilled-salmon-with-lemon-herb-butter-sauce/8a8b4611-8bb4-430b-bf23-6aaddcce21a5?_szp=100295&_szi=23

↓↓ PRINTABLE RECIPE BELOW ↓↓

0 from 0 votes
Salmon in a Lemon-Butter Herb Sauce
Prep Time
15 mins
Cook Time
10 mins
Total Time
25 mins
 

Grilled or pan-seared salmon in a lemon-butter herb sauce is a delicious, simple and elegant looking dinner entree.

Category: Entree
Cuisine: American
Keyword: salmon
Servings: 4 servings
Calories Per Serving: 527 kcal
Author: JB @ The Grateful Girl Cooks!
Ingredients
For Lemon-Butter Herb Sauce:
  • 2 Tablespoons finely chopped green onions (shallots)
  • 1/4 cup dry white wine
  • 3 Tablespoons fresh lemon juice
  • 6 Tablespoons COLD butter
  • 1 Tablespoon dill (dried or fresh), chopped
  • 1 Tablespoon finely chopped chives
  • 1/8 teaspoon pepper
For salmon:
  • 3 Tablespoons olive oil
  • 1 Tablespoons fresh lemon juice
  • salmon (4 boneless, skinless fillets)
  • 1/4 teaspoon salt
  • 1/4 teaspoon pepper
  • 1 Tablespoon butter
Instructions
  1. Prepare the sauce: Place the finely chopped green onions, lemon juice and wine in a small saucepan. Bring to a boil on high heat, then reduce heat to medium and cook for 7-8 minutes, or until liquid has reduced to about 2-3 Tablespoons. Remove from heat. Add butter, 1 Tablespoon at a time, stirring continuously, until all butter has been melted and incorporated into sauce. Add dill, chopped chives and black pepper. Mix to combine. Set sauce aside while you cook the salmon.
  2. To cook salmon:
  3. In a small dish, combine 1 (ONE) Tablespoon of olive oil and 1 Tablespoon of lemon juice. Using a pastry brush, coat all sides of the salmon with this mixture.
  4. Spray a skillet with non-stick spray, then place the other 2 Tablespoons of olive oil into pan. Heat until VERY hot (but not smoking). When skillet is very hot, add the salmon fillets. It should sizzle when you add them to skillet. Cook salmon for about 4 minutes without moving them. After 4 minutes, carefully turn the salmon to the other side and continue cooking. Add 1 Tablespoon butter. As the butter melts, continuously spoon the melted butter onto the salmon as it cooks. Salt and pepper the salmon lightly. In about 3-4 minutes, the salmon should be done. Make sure the salmon is done, and flakes easily (due to differing thicknesses of salmon, you need to keep an eye on the salmon for done-ness).
  5. Reheat lemon-butter sauce if necessary right before the salmon is done.
  6. To serve, place salmon fillet on individual plate, then spoon some of the warm sauce over the top. Enjoy!
Recipe Notes

Salmon can also be grilled outside on a BBQ. Remember to coat it with olive oil and lemon juice mixture before adding it to the grill.

Nutrition Facts
Salmon in a Lemon-Butter Herb Sauce
Amount Per Serving (1 (6 oz. plus sauce))
Calories 527 Calories from Fat 369
% Daily Value*
Fat 41g63%
Saturated Fat 15g94%
Cholesterol 146mg49%
Sodium 396mg17%
Potassium 855mg24%
Carbohydrates 1g0%
Protein 34g68%
Vitamin A 745IU15%
Vitamin C 6.8mg8%
Calcium 25mg3%
Iron 1.4mg8%
* Percent Daily Values are based on a 2000 calorie diet.

Here’s one more to pin on your Pinterest boards!Grilled or pan-seared salmon in a lemon-butter herb sauce is a delicious, simple and elegant looking dinner entree.


Save

Save

Shrimp and Noodles in Spicy Garlic Sauce

Why order take-out when you can make this delicious Asian shrimp and noodles in spicy garlic sauce in under 20 minutes from start to finish?Why order take-out when you can make this delicious Asian shrimp and noodles in spicy garlic sauce in under 20 minutes from start to finish?
Well… it’s been quite a week. I made Shrimp and Noodles in Spicy Garlic Sauce to cap it off.  This delicious shrimp really hit the spot after such a wild week! Work for my husband and myself was CRAZY busy, a family member is facing very serious medical issues, our phone account was breached (someone fraudulently bought an IPhone using our account and shipped it to YEMEN, of all places!). To top it all off, day before yesterday I got a flat tire AND had the keys to our other car with me (oops), so my husband couldn’t come help me.  Some weeks are like that, right?

Oh well.  I am extremely grateful for the nice gentleman named Mark (a kind stranger) who, in absolutely POURING rain (we were sopping wet) helped me get enough air into the tire to enable me to drive a few miles to a tire store, where a lovely an evil bolt was removed and the tire was patched. There really are wonderful people in this big, old world, who still will go out of their way to help others in need.

At least my husband and I were able to end this crazy week with a great dinner last night… Shrimp and Noodles in a Spicy Garlic Sauce really hit the spot… we were tired and hungry by the time Friday night rolled around. My husband had been up working since 3 AM (remember… crazy busy), so in reality, I could have made cereal for dinner and he probably wouldn’t have noticed as he nodded off into the bowl.

We LOVED This Simple Dish!

BUT I made this great recipe instead! EASY, EASY, EASY, quick, and incredibly delicious. Absolutely perfect is the best way I can describe this dish. The shrimp was so flavorful due to a fantastic Asian-inspired garlic sauce, and the ramen noodles helped make the dish very filling!

I found the recipe for the shrimp and sauce on Pinterest,  and decided to cook some ramen noodles to add to it. YUM! Seriously, I think the entire meal took under 20 minutes to make, from start to finish! I sure hope you’ll give this recipe a try. I know you will really LOVE it! Here’s how to make it:

Scroll Down For A Printable Recipe Card At The Bottom Of The Page

For this recipe, you will need some large shrimp that have been rinsed and deveined, but with the tail left on. Set the cleaned shrimp aside until they are needed later.

Rinsed and de-veined shrimp are left with their tails on for this dish.

Make The Spicy Garlic Sauce

The spicy garlic sauce takes just a minute to make. It’s as simple as stirring the ingredients together… really!

A spicy garlic sauce is quickly made by stirring ingredients together in a bowl.

The noodles required for this dish are very easy to find. Yep… you guessed it! You will need one package of good old cheap Ramen noodles, with the sauce packet removed.

A package of Ramen noodles are needed for this recipe, minus the seasoning packet.

Cook the noodles in boiling water for 3 minutes, then drain off all the water.

Ramen noodles are cooked in boiling water for 3 minutes, then drained.

Stir and quickly cook the garlic in olive oil, until fragrant. Be careful NOT to let it burn, or it will become bitter.

Minced garlic is quickly cooked in hot oil before adding other ingredients.

Add The Shrimp

Add the shrimp to the skillet, and cook for just a few minutes, until slightly pink in color and cooked through.

Shrimp is added to the skillet with the cooked garlic and oil.

Now add the garlic sauce and cooked noodles into the skillet with the shrimp. Mix together and cook, until all ingredients are heated through.

Ramen noodles are added to the cooked shrimp in the skillet.

Sprinkle with sliced green onions and sesame seeds. When hot, divide into portions and serve.

The shrimp and noodles in spicy garlic sauce is heated through in the skillet.

Time To Enjoy Some Shrimp And Noodles In Spicy Garlic Sauce

Garnish each serving with a few more sesame seeds and green onion slices. Serve, and enjoy! This shrimp is DELICIOUS!

A serving of shrimp and noodles in spicy garlic sauce on a plate, ready to be enjoyed.

I really hope you will consider trying this recipe for shrimp and noodles in spicy garlic sauce! I’m confident you and those you love will enjoy it. Have a great day!

Looking For More SHRIMP Recipes?

You can find ALL of my recipes in the Recipe Index, located at the top of the page. I have some delicious shrimp recipes for you to enjoy, which include:

Interested In More Recipes?

Thank you for visiting this website. I appreciate you using some of your valuable time to do soIf you’re interested, I publish a newsletter 2 times per month (1st and 15th) with all the latest recipes, and other fun info. I would be honored to have you join our growing list of subscribers, so you never miss a great recipe!

There is a Newsletter subscription box on the top right side (or bottom) of each blog post, depending on the device you use, where you can easily submit your e-mail address (only) to be included in my mailing list.

You Can Also Find Me On Social Media:
Facebook page: The Grateful Girl Cooks!
Pinterest: The Grateful Girl Cooks!
Instagram: jbatthegratefulgirlcooks

Author's signature

Recipe Adapted From: http://appetiteforchina.com/recipes/shrimp-garlic-sauce

↓↓ PRINTABLE RECIPE BELOW ↓↓

0 from 0 votes
Shrimp and Noodles in Spicy Garlic Sauce
Prep Time
15 mins
Cook Time
5 mins
Total Time
20 mins
 

Why order take-out when you can make this delicious Asian shrimp and noodles in spicy garlic sauce in under 20 minutes from start to finish?

Category: Entree
Cuisine: Asian
Keyword: shrimp and noodles
Servings: 2 servings
Calories Per Serving: 565 kcal
Author: JB @ The Grateful Girl Cooks!
Ingredients
  • 3/4 pound uncooked large shrimp , deveined
  • 3 Tablespoons soy sauce
  • 2 Tablespoons chili sauce (I used Mae Ploy)
  • 2 teaspoons sesame oil
  • 2 teaspoons cooking sherry (can also use Chinese rice wine-I used cooking sherry)
  • 1 teaspoon granulated sugar
  • 1 3 ounce package dry ramen noodles (sauce packet removed-don't need it)
  • 2 Tablespoons olive oil
  • 4 cloves garlic , crushed or finely chopped (equals 2 Tablespoons minced garlic)
  • 1 green onion (green and white parts), thinly sliced (for garnish)
  • Sesame seeds (for garnish)
Instructions
  1. Peel the shrimp, but leave the tail intact. (Devein shrimp, if not already done).
  2. Make the sauce: In a little bowl, mix together the soy sauce, chili sauce, sesame oil, cooking sherry (or Chinese rice wine), and granulated sugar until well combined. Set sauce aside.
  3. Bring a small pan of water to a boil on high heat. Add ramen noodles; cook noodles for 3 minutes. Drain noodles. Set aside.
  4. Heat the olive oil on medium-high heat in a large skillet. Add the minced garlic to the hot pan; stir and cook for about 30 seconds (be careful NOT to burn it!).
  5. Add shrimp to skillet. Cook shrimp for about 2 minutes per side, until both sides are pink. Add the sauce mixture and the noodles to the skillet. Mix gently to combine. Cook until heated through (a minute or so). Sprinkle with a bit of the green onions and sesame seeds.
  6. Place shrimp and noodles on individual serving plates. Garnish with additional green onions and sesame seeds. Enjoy!
Recipe Notes

You can also make the shrimp (without the noodles). The original recipe serves 4 (shrimp and sauce only- no noodles). Use 1 1/2 pounds of shrimp, and keep all other ingredient amounts the same.

Nutrition Facts
Shrimp and Noodles in Spicy Garlic Sauce
Amount Per Serving (1 serving)
Calories 565 Calories from Fat 243
% Daily Value*
Fat 27g42%
Saturated Fat 6g38%
Cholesterol 428mg143%
Sodium 3190mg139%
Potassium 334mg10%
Carbohydrates 36g12%
Fiber 2g8%
Sugar 4g4%
Protein 41g82%
Vitamin A 160IU3%
Vitamin C 12.4mg15%
Calcium 270mg27%
Iron 6mg33%
* Percent Daily Values are based on a 2000 calorie diet.

Here’s one more to pin on your Pinterest boards!Why order take-out when you can make this delicious Asian shrimp and noodles in spicy garlic sauce in under 20 minutes from start to finish?


Save

Save

Beer Battered Fish and Chips

Can’t get to England? Why not make your own crunchy beer battered fish and homemade “chips” (french fries) for dinner, in the comfort of your home!Can't get to England? Why not make your own crunchy beer battered fish and homemade "chips" (french fries) for dinner, in the comfort of your own home!
I don’t fry food too much these days as a rule… every couple of months I will make fried chicken to honor our family’s Southern roots, BUT THEN I SAW IT… a recipe on Pinterest for Beer Battered Fish and Chips.

Against all my common sense, I think I heard the recipe calling to me, bringing back memories of a summer I spent in England years ago.

Fish and chips seemed to be available everywhere, and were served wrapped up in paper, and piping hot! I loved buying fish and chips from local vendors in several of the towns I visited. Such a great memory.

Occasionally my husband or I will now order this meal in a restaurant; but the thought of making my own seemed daunting. However, I love to learn and challenge myself to try new things.

But Could I Make Beer Battered Fish And Chips At Home?

I decided to try and make my own replica of British fish and chips. GULP. I crossed my fingers, toes, eyes, and anything else I could cross, and plunged in!

Well- I used thick pieces of frozen cod for this recipe and found it, as well as the batter, to be wonderful! Plus… “chips”? How can ya go wrong with some good “chips”… FRIES???

I enjoyed every single bite of my crispy coated pieces of fish (with Malt Vinegar on them), and loved the delicious “chips” dipped in ketchup. The chips (fries) are cooked twice to get them nice and crispy, and let me tell you… they were tasty!

So there you have it, and I’m really glad I made this recipe that very first time. Yum! The only thing missing was having this meal served, wrapped up in a big piece of greasy paper… but I can live without that! Here’s a peek at the “process” for making this dish:

Scroll Down For A Printable Recipe Card At The Bottom Of The Page

Prepare The Potatoes For Frying

Peel the potatoes, then cut them into sticks for the “chips” (fries). Pat them very dry with paper towels, trying to absorb as much moisture as possible.

Potatoes are peeled, then sliced to make British style "chips"

Cook the fries in HOT oil (350°F.) for about 8 minutes.

Potatoes cook in hot oil for 8 minutes

After cooking the “chips” for about 8 minutes, remove them from the oil with a slotted spoon or spatula. Let these semi-cooked “chips” drain on paper towels while you cook the fish.

Fries are drained after first cooking

Prep The Fish for Frying

Lightly coat all the pieces of fish in a flour/salt/pepper mixture and then set them aside to rest, while you mix the batter.

Fish pieces are coated in seasoned flour

Once the beer batter has been made, dip the flour coated fish pieces in it, one at a time. Fully coat the fish pieces with the batter before frying.

Beer batter is made for the fish

Cook The Beer Battered Fish

Cook the battered fish pieces in HOT oil (350°F) for 7-8 minutes until golden brown and crispy on all sides. It is very important for the oil to be at the temperature before adding the fish.

Cook the beer battered fish for approximately 7-8 minutes, turning the pieces over halfway though the cooking time.

Once done, the batter coating should be golden brown and crispy on all sides. The fish should be fully cooked through.

Beer battered fish pieces are cooked in hot oil

Drain the hot, cooked pieces of fish on layers of paper towels to absorb any excess oil. Reheat the oil back to 350°F. so you can fry the “chips” you set aside earlier a second time.

Beer battered fish drains on paper towel after cooking

Cook The “Chips” (Fries) A Second Time

Put the half-cooked “chips” (fries) back into the 350°F. hot oil (after removing the fish). Cook them for an additional 3-4 minutes, until they’re golden brown and crispy.

The "chips" (french fries) go back into hot oil for 2nd cooking

Time To Eat Some Beer Battered Fish And Chips!

Okay… now the beer battered fish and chips are hot, and ready to gobble up! Grab some Malt Vinegar or tartar sauce to serve with the fish.

Serve this delicious beer battered fish and chips, and enjoy! The fish has a crisp outer coating and is flaky inside, and the “chips” taste amazing, too. They’re so good!

Beer battered fish and chips are now served!

I love experimenting with food in our kitchen. I enjoy getting out of my comfort zone, learning about and trying new recipes for the first time!

Maybe if you’re feeling adventurous too, you will give this fish and chips recipe a try. I highly recommend it!

Thank you for stopping by today, and I invite you to come back soon for more delicious recipes. Take care, and have a great day.

Looking For More FISH Recipes?

You can find ALL of my recipes in the Recipe Index, which is located at the top of the page. I have LOTS of absolutely delicious fish recipes you can check out, including:

Want More Recipes? Get My FREE Newsletter!

I publish a newsletter 2 times per month (1st and 15th) with lots of recipes, tips, etc..
Would you like to join our growing list of subscribers?

There is a Newsletter subscription box on the top right (or bottom) of each blog post, depending on the device you use.
You can submit your e-mail address there, to be added to my mailing list.

Find Me On Social Media:

Facebook page: The Grateful Girl Cooks!
Pinterest:
The Grateful Girl Cooks!
Instagram:
jbatthegratefulgirlcooks

Author's signature

Recipe Source: http://www.lovefoodies.com/british-beer-battered-fish–chips.html

↓↓ PRINTABLE RECIPE BELOW ↓↓

0 from 0 votes
Fish and Chips
Prep Time
20 mins
Cook Time
20 mins
Total Time
40 mins
 
Can't get to England? Why not make your own crunchy beer battered fish and homemade "chips" (french fries) for dinner, in the comfort of your own home!
Category: Entree
Cuisine: British
Keyword: fish and chips
Servings: 2 servings
Calories Per Serving: 901 kcal
Author: JB @ The Grateful Girl Cooks!
Ingredients
For fish:
  • 4 pieces cod (thick pieces-about 1 1/2 inches thick- I used frozen cod pieces)
  • 1 cup all purpose flour
  • Salt and pepper , to season fish
For batter:
  • 1 cup all purpose flour
  • 1 1/2 teaspoons baking powder
  • 7 Tablespoons milk
  • 1/2 Tablespoon olive oil
  • 1 Tablespoon water
  • 6-7 Tablespoons beer (light beer is best). Club soda may be substituted.
For Chips:
  • 2 small to medium potatoes per person (peeled , cut into "finger thickness"
Serve With:
  • Malt Vinegar and/or Tartar Sauce
Instructions
  1. Pat fish filets dry with a paper towel. In a medium sized bowl, whisk together the flour, salt and pepper. Gently dredge the fish in the flour, turning to coat completely. Shake off excess flour; set flour covered filets aside.
  2. Make the batter for the fish: Add all batter ingredients to a medium bowl, except for the beer (or club soda). Whisk to combine. There will be some lumps. That's okay. Set batter aside.
  3. Make the chips: Peel, then cut potatoes into finger thickness. Slice potatoes lengthwise, then into strips. Dry the potatoes as much as you can by patting them dry with paper towels.
  4. Heat oil in large skillet or stock pot until it reaches 350 degrees. (No thermometer? Try dropping a tiny bit of batter into oil... it should really sizzle, and come to the surface!). Carefully put cut potatoes into hot oil. Let them cook for about 8 minutes. Remove potatoes from hot oil (I used a spatula to help remove them). Place hot potatoes onto a baking pan or a wire rack with paper towels underneath, to drain, while you cook the fish. (You will cook the potatoes a 2nd time AFTER the fish has cooked).
  5. Add the beer or club soda to the batter, and gently mix to combine. The batter should have the consistency of slightly thinned yogurt. If it is too thick, add just a touch more beer, and stir.
  6. Heat the oil back up to 350 degrees. While it is heating back up, place parchment paper on baking sheet (to hold the fish after you remove it from the hot oil). If you are cooking for more than two people, see notes section for tip). Place flour covered fish pieces, one at a time, into the batter and fully cover with batter. Let excess batter run off fish back into bowl. Gently put battered fish into 350 degree (HOT) oil. Cook a few pieces at a time. Cook fish for 7-8 minutes, turning once, until golden brown and crispy on both sides. Remove cooked fish to parchment paper lined baking sheet to keep warm while you cook additional fish, then re-cook the "chips".
  7. When done cooking the fish, heat the oil back to 350 degrees. Carefully add the chips. Cook for 3-4 additional minutes, until crispy and hot! Remove chips, drain.
  8. Serve hot pieces of fish, a serving of "chips" on the side, along with some Malt Vinegar and/or tartar sauce. Enjoy!
Recipe Notes

I only cooked enough fish for two people. If you're cooking for more than 2, cook the fish in batches. Keep your oven heated to 300 degrees. As you remove cooked fish from oil, place it on paper-lined baking sheets; keep fish warm in oven until ready to serve.
Calculate about 5 ounces fish per person. Malt vinegar and tartar sauce not included in caloric calculation.

Nutrition Facts
Fish and Chips
Amount Per Serving (2 pieces fish+ fries)
Calories 901 Calories from Fat 63
% Daily Value*
Fat 7g11%
Saturated Fat 1g6%
Cholesterol 148mg49%
Sodium 231mg10%
Potassium 2621mg75%
Carbohydrates 121g40%
Fiber 7g29%
Sugar 3g3%
Protein 79g158%
Vitamin A 240IU5%
Vitamin C 22.8mg28%
Calcium 320mg32%
Iron 12.9mg72%
* Percent Daily Values are based on a 2000 calorie diet.

Here’s one more to pin on your Pinterest boards!Can't get to England? Why not make your own crunchy beer battered fish and homemade "chips" (french fries) for dinner, in the comfort of your own home!


Save

Save

Save

Save

Save

Sweet Ginger Teriyaki Salmon

Teriyaki Salmon is marinated in a ginger, garlic, honey & brown sugar sauce, then baked for 15-30 minutes in this easy, delicious seafood dinner!Salmon is marinated in a teriyaki, ginger, garlic, honey & brown sugar sauce, then baked for 15-30 minutes in this easy to prepare delicious seafood dinner!
Do you enjoy salmon? My husband and I certainly do… and we really enjoyed our dinner a few night’s ago when I made Sweet Ginger Teriyaki Salmon. I found the recipe on Pinterest,  while searching out salmon recipes. I’ve been preparing Pan-Seared Creole Salmon for years and we absolutely LOVE it, but wanted to bust out of my “rut” and try a NEW recipe. Shocking, right?

Anyways, I found this recipe from Monique at Ambitious Kitchen, and gave it a try… I heartily recommend it! The flavor of the salmon was delicious! I served it with a side of garlic quinoa, and my recipe for Sugar Snap Pea Stir Fry, and I gotta be honest, this was an awesome meal. I will definitely be making this dish again!

Scroll Down For A Printable Recipe Card At The Bottom Of The Page

Sweet Ginger Teriyaki Salmon Is EASY To Prepare!

The teriyaki salmon is so easy to prepare. Salmon is marinated in a wonderful ginger teriyaki sauce, then baked (to perfection), garnished with cilantro and sesame seeds and served. I made the sauce early in the day and let the salmon marinade in it all day. In the evening, all I had to do was bake the salmon, sprinkle a garnish on it, and serve it!

Sure hope you will give this a try! I think you’re gonna enjoy some amazing tasting salmon! Here’s how it is prepared: The sauce is really easy (and quick) to make.

Preparing the marinade for the salmon.

Pouring that sweet ginger teriyaki sauce over the piece of salmon… see how easy the prep is so far???

Teriyaki marinade is poured over the salmon to cover.

Salmon has marinated… and now it’s ready to bake!

Now the marinated salmon is ready to bake in the oven.

Time To Bake The Sweet Ginger Teriyaki Salmon!

The teriyaki salmon is baked for 15-20 minutes, and then it is removed from oven. Garnish with sesame seeds and cilantro leaves, then serve. This fish tastes delicious!  See how easy that was?

Sweet Ginger Teriyaki Salmon is served with veggies and quinoa on the side.

I truly hope you enjoy this seafood dish. It truly IS easy to prepare, and is incredibly tasty! If you enjoy seafood, be sure to check out some of my other salmon recipes such as Salmon in a Lemon-Butter Herb Sauce, Orange and Rosemary Glazed Salmon, Cedar Plank Grilled Salmon, or Garlic and Herb Baked Salmon (to name a few).

Thanks for stopping by, and I hope you will come back again soon. Be sure to check out ALL my recipes in the Recipe Index, located at the top of the page. Have a wonderful day.

Interested In More Recipes?

Thank you for visiting this website. I appreciate you using some of your valuable time to do soIf you’re interested, I publish a newsletter 2 times per month (1st and 15th) with all the latest recipes, and other fun info. I would be honored to have you join our growing list of subscribers, so you never miss a great recipe!
There is a Newsletter subscription box on the top right side (or bottom) of each blog post, depending on the device you use, where you can easily submit your e-mail address (only) to be included in my mailing list.

You Can Also Find Me On Social Media:

Facebook page: The Grateful Girl Cooks!
Pinterest:
The Grateful Girl Cooks!
Instagram:
jbatthegratefulgirlcooks

Author's signatureRecipe Adapted From: http://www.ambitiouskitchen.com/2012/07/sesame-ginger-sweet-teriyaki-salmon-with-garlic-quinoa-stir-fry/

↓↓ PRINTABLE RECIPE BELOW ↓↓

0 from 0 votes
Sweet Ginger Teriyaki Salmon
Prep Time
10 mins
Cook Time
18 mins
Marinating Time
1 hr
Total Time
1 hr 28 mins
 

Teriyaki Salmon is marinated in a ginger, garlic, honey & brown sugar sauce, then baked for 15-30 minutes in this easy, delicious seafood dinner!

Category: Entree
Cuisine: Asian
Keyword: teriyaki salmon
Servings: 4 servings
Calories Per Serving: 347 kcal
Author: JB @ The Grateful Girl Cooks!
Ingredients
For The Marinade:
  • 1 cup teriyaki sauce
  • 1 teaspoon freshly grated ginger
  • 4 cloves garlic , minced
  • 3 Tablespoons dark brown sugar
  • 2 Tablespoons honey
  • 1/4 cup olive oil
  • 1 pound boneless , skinless salmon (or 4 salmon "steaks")
For Garnish:
  • 1 Tablespoons sesame seeds
  • 1/4 cup fresh cilantro , chopped
Instructions
  1. In a bowl, mix together the teriyaki sauce, grated ginger, garlic cloves, brown sugar, honey and olive oil, until sugar has dissolved and ingredients are well combined.
  2. Put the piece (or pieces) of salmon in a covered container or a large Ziploc bag. Add the marinade to the container, and coat the salmon on both sides. Refrigerate the salmon for at least 1 hour (I marinated mine all day). Turn the salmon over several times during refrigeration (if using a container).
  3. Preheat your oven to 400 degrees. Spray a baking pan with non-stick cooking spray. Remove the salmon from the marinade and place into cooking pan. (If you are using salmon with the skin ON, then place in baking pan, skin side down.
  4. Bake at 400 degrees for 15-20 minutes. Times will vary, due to different thicknesses of salmon. When done, the salmon should flake easily. (Our salmon took 20 minutes to reach that point) Serve, with a side of rice or quinoa, and a great veggie. Enjoy!
Nutrition Facts
Sweet Ginger Teriyaki Salmon
Amount Per Serving (1 fillet)
Calories 347 Calories from Fat 153
% Daily Value*
Fat 17g26%
Saturated Fat 2g13%
Cholesterol 72mg24%
Sodium 825mg36%
Potassium 493mg14%
Carbohydrates 21g7%
Sugar 19g21%
Protein 25g50%
Vitamin A 100IU2%
Vitamin C 2.6mg3%
Calcium 43mg4%
Iron 1.2mg7%
* Percent Daily Values are based on a 2000 calorie diet.

Here’s one more to pin on your Pinterest boards!Teriyaki Salmon is marinated in a ginger, garlic, honey & brown sugar sauce, then baked for 15-30 minutes in this easy, delicious seafood dinner!

Save

Save

Coconut Shrimp With Sweet Chili-Lime Sauce

Crunchy Coconut Shrimp, are battered, fried large shrimp, served with a sweet chili-lime dipping sauce! They’re a delicious main course or appetizer!Crunchy Coconut Shrimp, are battered, fried large shrimp, served with a sweet chili-lime dipping sauce! They're a delicious main course or appetizer!
Today I am posting an amazing appetizer recipe that our good friend Shari (and her husband Richard) made for my husband and I one evening at their home. These coconut shrimp are quite possibly one of my very favorite appetizers. The sweet chili-lime sauce just makes this dish PERFECT!

Scroll Down For A Printable Recipe Card At The Bottom Of The Page

My Friend Shari

I’ve mentioned before in this blog that Shari is my inspiration for a lot of my cooking projects.  She has encouraged me to dream big, and be fearless in the kitchen.  She inspires me.  I am blessed to call her my friend, and I thank God for our friendship of 17+ years.
 
This is the recipe Shari used, and (with her permission) I am posting a couple pics of the finished product. I took the photos and watched her prepare these step by step, and then I ate these gorgeous shrimp (someone had to do it…I sacrificed for the team)! Shari and her husband Richard did ALL the true work on these scrumptious coconut shrimp.

Our friends Shari and Richard, with the coconut shrimp.

Where The Recipe For These Coconut Shrimp Originated

The original recipe was published in Bon Appetit magazine’s October 2006 issue. It is a fairly straightforward recipe, and an incredibly delicious appetizer. This is the chili sauce (below) used for this recipe, which can usually be found in the Asian section of most grocery stores.

Coconut Shrimp with Sweet Chile-Lime Sauce / The Grateful Girl Cooks!

It’s a fairly easy recipe to make. You mix up the dipping sauce, make the batter, then coat the shrimp with the batter, roll them in a seasoned coconut topping and deep fry until done.

The coconut shrimp are nice and crunchy, and when dipped in the sweet and spicy chili-lime sauce…oh my! What an amazing appetizer! I really hope you will give these yummy coconut shrimp a try. Have a great day!

Looking For More APPETIZER Recipes?

You can find all of my appetizer recipes in the Recipe Index, located at the top of the page. A few favorites include:

Interested In More Recipes?

Thank you for visiting this website. I appreciate you using some of your valuable time to do soIf you’re interested, I publish a newsletter 2 times per month (1st and 15th) with all the latest recipes, and other fun info. I would be honored to have you join our growing list of subscribers, so you never miss a great recipe!
There is a Newsletter subscription box on the top right side (or bottom) of each blog post, depending on the device you use, where you can easily submit your e-mail address (only) to be included in my mailing list.

You Can Also Find Me On Social Media:
Facebook page: The Grateful Girl Cooks!
Pinterest: The Grateful Girl Cooks!
Instagram: jbatthegratefulgirlcooks

Author's signatureRecipe Source: http://www.epicurious.com/recipes/food/views/Coconut-Shrimp-with-Sweet-Chili-Lime-Sauce-236168

0 from 0 votes
Coconut Shrimp With Sweet Chili-Lime Sauce
Prep Time
20 mins
Cook Time
10 mins
Total Time
30 mins
 

Crunchy Coconut Shrimp, are battered, fried large shrimp, served with a sweet chili-lime dipping sauce! They're a delicious main course or appetizer!

Category: Appetizer, Main Dish
Cuisine: American
Keyword: coconut shrimp
Servings: 16
Calories Per Serving: 143 kcal
Author: JB @ The Grateful Girl Cooks!
Ingredients
For the sauce:
  • 3/4 cup Asian sweet chili sauce (I use Mae Ploy)
  • 3 Tablespoons chopped fresh cilantro
  • 2 1/2 Tablespoons fresh lime juice
For the shrimp:
  • 3/4 cup all-purpose flour
  • 1 teaspoon curry powder (preferably Madras style)
  • 3/4 teaspoons baking powder
  • 1/4 teaspoon salt
  • 1 large egg , beaten
  • 1 cup club soda
  • 1/4 cup Vegetable oil (for deep frying)
  • 1 1/2 cups medium shredded unsweetened coconut
  • 16 large shrimp , peeled, deveined, tails left intact
Instructions
  1. Make the sauce: Mix the sweet chili sauce, chopped cilantro, and lime juice in a small serving bowl. Cover and chill (sauce can be made a day ahead).
  2. Make the batter for the shrimp: Whisk the flour, curry powder, baking powder and salt in a medium-sized bowl. Add in the lightly beaten egg and the club soda. Whisk these ingredients together only until the ingredients are incorporated. The batter should still be a bit "lumpy". Set the batter aside and let it "rest" for approximately 15 minutes.
  3. To make the shrimp: While the batter is "resting", pour vegetable oil into a large, heavy saucepan (or an electric skillet with temperature gauge). Use enough oil to come up about halfway up the sides of your pan. Attach a deep-fry thermometer to the saucepan. Heat the oil on medium until it reaches 375 degrees.
  4. Before you cook the shrimp, line a baking sheet with several thicknesses of paper towels (to drain the shrimp once cooked). Spread the coconut out onto a plate. Line up the batter bowl, then the plate of coconut and place them near the pan with the hot oil.

  5. Working with one shrimp at a time (hold the shrimp by the tail!), dip it into the batter. Allow the excess batter to drip back into the bowl, then roll it in the coconut, still holding onto that tail. Cover both sides of shrimp-you may have to use your other hand to scoop some of the coconut onto the shrimp.
  6. Carefully put the shrimp into the 375 degree oil (make sure the oil is at temperature before adding, to ensure a good crunch and browning). Work in batches, cooking 4-5 shrimp at a time. Deep-fry the shrimp about 2- 1/2 minutes (turning halfway through cooking time). Remove the golden brown colored, cooked shrimp to the paper-towel lined baking sheet to drain. **Before you add the next batch of shrimp to the oil, make sure the oil is back to temperature! (this is important!). Serve shrimp hot, with dipping sauce on the side. Enjoy!

Nutrition Facts
Coconut Shrimp With Sweet Chili-Lime Sauce
Amount Per Serving (1 shrimp + sauce)
Calories 143 Calories from Fat 81
% Daily Value*
Fat 9g14%
Saturated Fat 7g44%
Cholesterol 25mg8%
Sodium 216mg9%
Potassium 83mg2%
Carbohydrates 12g4%
Fiber 1g4%
Sugar 6g7%
Protein 2g4%
Vitamin A 20IU0%
Vitamin C 1.1mg1%
Calcium 23mg2%
Iron 0.8mg4%
* Percent Daily Values are based on a 2000 calorie diet.

Here’s one more to pin on your Pinterest boards!Crunchy Coconut Shrimp, are battered, fried large shrimp, served with a sweet chili-lime dipping sauce! They're a delicious main course or appetizer!


Save

Save