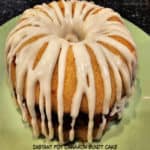
Instant Pot Cinnamon Bundt Cake, swirled with cinnamon sugar and topped with a sweet cream cheese icing is a yummy coffeecake or dessert!

Looking for a delicious recipe to make for breakfast or a snack, using an Instant Pot? I’ve got a good one here for you to check out today!
An Instant Pot Cinnamon Bundt Cake is an easy to prepare, delicious treat! A decadent cinnamon sugar layer is swirled through the batter making it look and taste wonderful, and sweet cream cheese icing tops it off perfectly!
This simple recipe will yield enough for 8 slices and could be enjoyed as a morning coffeecake OR as a snack or dessert, if desired. I found the recipe in one of the Instant Pot cookbooks I own and I’m happy to share it with you today. Here’s how to make an Instant Pot Cinnamon Bundt Cake.
Scroll Down For A Printable Recipe Card At The Bottom Of The Page
Make Cinnamon Sugar and Prepare Bundt Pan
Stir together granulated sugar and ground cinnamon in a small bowl until combined. Set this mixture aside.

For this Instant Pot recipe, you will need a 1-quart bundt pan OR a tube pan that fits inside your Instant Pot. Generously butter the pan all over (shown below).
Set the bundt pan aside while you prepare the bundt cake batter.

Prepare The Bundt Cake Batter
Whisk flour, sugar, baking powder and salt together in a medium-sized bowl until combined. These are the “dry” ingredients for the bundt cake.
In a SEPARATE bowl, whisk together milk, melted (cooled) butter, 2 eggs and vanilla extract. Whisk these ingredients until they are fully combined. These are the “wet” ingredients.


Pour the “wet” ingredients into the bowl with the “dry” ingredients, then whisk or stir until they’ve been fully mixed together. This is the batter for the bundt cake.

Layer And Swirl The Batter and Cinnamon Sugar
Now it’s time to layer the batter with the cinnamon sugar mixture you made earlier. Use a large spoon and place HALF the batter in the buttered bundt pan, spreading it evenly in the pan.
Sprinkle the cinnamon/sugar mixture evenly over the surface of the batter until it has all been distributed.
Using a butter knife or a small spatula, swirl it through the batter in a back-and-forth motion so the cinnamon sugar is decoratively intertwined with the batter (see photo #2 below).


Prepare Instant Pot And Bundt Cake For Cooking
Spoon the remaining half of the batter on top and spread it out, being careful not to mix it with the cinnamon swirl layer below. Now the Instant Pot Cinnamon bundt Cake is ready to be cooked!
Pour 1½ cups of water into the Instant Pot inner pan. Place a trivet into the water on the bottom of the Instant Pot. Carefully lower the bundt cake pan down onto the trivet.

Cook The Cinnamon Bundt Cake
Lock the lid of the Instant Pot in place and flip the Pressure Release knob to SEALING. Set the MANUAL, CAKE or PRESSURE COOK setting to 35 minutes at high pressure.
It usually takes the Instant Pot about 10 minutes or so to reach full pressure inside before it begins cooking at the time selected.
Once the cooking program has finished, let the internal pressure release NATURALLY (do nothing) for 10 minutes. After 10 minutes, flip the Pressure Release knob to VENTING, which will allow all of the remaining steam in the appliance to be released.

When all steam has been released, open the Instant Pot. Carefully lift the bundt cake pan up and out of the Instant Pot, then let the cake cool (still in the pan) on a wire rack for about 5-7 minutes.

Carefully run a butter knife around the inside edges of the pan to separate the cake from the pan. Invert (flip over) the bundt pan onto the wire rack, then lift the pan off of the cake.
If you buttered the pan very well, the cake should slip out with no problem. Immediately turn the cake right side up and let it cool for several minutes before adding the icing.

Glaze And Serve Instant Pot Cinnamon Bundt Cake
While the Instant Pot Cinnamon Bundt Cake cools, make the cream cheese icing to decorate the finished cake. Beat softened cream cheese, powdered sugar and vanilla extract in a small bowl until the icing is smooth and lump-free.
Carefully transfer this icing to a zip lock plastic bag and then seal the bag. When the cake has cooled a bit, cut a small bottom corner off of the Ziplock bag. If the cake is still too hot the icing will melt, so be patient!
Place a piece of parchment paper, wax paper, or foil under the wire rack holding the cake. This will help catch any icing “drips”, making cleanup easier after icing the cake.
Squeeze the bag to move the icing to the cut corner, then apply the icing in a decorative fashion to the surface of the cinnamon bundt cake.

Let the icing firm up a bit, then slice the Instant Pot cinnamon bundt cake into 8 wedges and serve it warm or at room temperature.
You can see in the photo below the lovely cinnamon sugar mixture running through the middle of the slice! YUMMY!

I hope you have the opportunity to make this delicious Instant Pot Cinnamon Bundt Cake! You can serve it as a coffeecake, a snack or a simple dessert, and I sincerely hope you’ll enjoy it as much as we do.
Thank you for stopping by and I invite you to come back again soon for more family-friendly recipes. Take care, may God bless you, and have a wonderful day!
Looking For More INSTANT POT Recipes?
You can find ALL of my recipes in the Recipe Index, which is located at the top of the page. I have a nice variety of Instant Pot recipes to choose from, including:
- Broccoli Cheese Soup
- Instant Pot Cornbread
- Instant Pot Rice Pudding
- Instant Pot Green Beans
- Instant Pot Ground Beef Stroganoff
Want More Recipes? Get My FREE Newsletter!
I publish a newsletter 2 times per month (1st and 15th) with lots of recipes, tips, etc.
Would you like to join our growing list of subscribers?
There is a Newsletter subscription box on the top right (or bottom) of each blog post, depending on the device you use.
You can submit your e-mail address there, to be added to my mailing list.
Find Me On Social Media:
Facebook page: The Grateful Girl Cooks!
Pinterest: The Grateful Girl Cooks!
Instagram: jbatthegratefulgirlcooks

Original recipe source (and highly recommend): “The Ultimate Instant Pot Cookbook”, by Coco Morante, pages 40-41, published by Ten Speed Press in 2018
↓↓ PRINTABLE RECIPE BELOW ↓↓
Instant Pot Cinnamon Bundt Cake, swirled with cinnamon sugar and topped with a sweet cream cheese icing is a yummy coffeecake or dessert!
- 2 Tablespoons granulated sugar
- ¾ teaspoon ground cinnamon
- softened butter (to generously grease bundt pan) AS NEEDED
- 2 cups all-purpose flour
- ⅔ cup granulated sugar
- 2 teaspoons baking powder
- ½ teaspoon kosher salt
- ½ cup butter melted/cooled
- ½ cup low-fat milk (or whole) at room temp.
- 2 teaspoons vanilla extract
- 2 large eggs at room temp.
- ½ cup powdered sugar (confectioner's sugar)
- ¼ cup cream cheese at room temp.
- ½ teaspoon vanilla extract
Stir together granulated sugar and cinnamon in a small bowl until combined. Set mixture aside. Generously butter a 1 qt. bundt pan or tube pan. Set pan aside.
Whisk flour, sugar, baking powder and salt together in a medium-sized bowl until combined ("dry ingredients"). In a SEPARATE bowl, whisk together milk, melted (cooled) butter, eggs and vanilla ("wet ingredients"). Pour "wet" ingredients into the "dry" ingredients, then whisk or stir until the batter is fully combined.
Using a large spoon, place HALF the batter in the buttered bundt pan, spreading it evenly. Sprinkle all the cinnamon/sugar mixture evenly over the batter. Using a butter knife or spatula, swirl it through the batter in a back-and-forth motion so cinnamon sugar is intertwined with the batter. Spoon remaining half of the batter on top; spread it out, being careful not to mix it with the cinnamon swirl layer.
Pour 1½ cups of water into the Instant Pot inner pan, then place a trivet on the bottom. Carefully lower the bundt pan down onto the trivet.
Lock the lid in place and flip the Pressure Release knob to SEALING. Set the MANUAL, CAKE or PRESSURE COOK setting to 35 minutes at high pressure. It usually takes the Instant Pot about 10 minutes to reach full pressure inside before it begins cooking at the time selected. Once cooking program has finished, let the internal pressure release NATURALLY for 10 minutes. After 10 minutes, flip the Pressure Release knob to VENTING, which releases all the remaining steam.
When all steam has been released, open the Instant Pot. Carefully lift hot pan out of the Instant Pot. Let cake cool (still in pan) on a wire rack for 5-7 minutes. Carefully run a butter knife around inside edges of pan. Invert pan onto the wire rack, then lift the pan off of the cake. If you buttered the pan well, the cake should slip out with no problem. Immediately turn cake right side up; let it cool for several minutes before adding icing.
Beat softened cream cheese, powdered sugar and vanilla in small bowl until lump-free and smooth. Spoon icing into a zip lock plastic bag; seal the bag. When cake has cooled a bit, cut a small bottom corner off the ziplock bag. IMPORTANT: If cake is too hot the icing will melt, so be patient! Place parchment paper, wax paper, or foil under wire rack. This helps catch any icing "drips", making cleanup easier. Squeeze bag to move icing to the cut corner, then apply in a decorative fashion to the surface of the cinnamon bundt cake.
Let icing firm up; slice cake into 8 wedges. Serve warm or at room temp. Enjoy!
NOTE: Low-fat milk was used for the caloric calculation. You will also need a small amount of butter to "grease" the bundt pan before filling (as needed).
Here’s one more to pin on your Pinterest boards!


 was handed down to me 45 years ago and has been a delicious family favorite ever since! / The Grateful Girl Cooks!")


 was handed down to me 45 years ago and has been a delicious family favorite ever since! / The Grateful Girl Cooks!")


