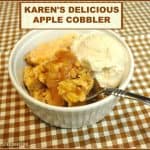
Four ingredients and thirty minutes is all you need to make this EASY and delicious apple cobbler for dessert!
If you’re looking for an EASY dessert that can be made quickly, may I suggest this simple recipe for Karen’s Delicious Apple Cobbler? You only need 4 ingredients and 30 minutes to make this amazing dessert! It’s REALLY quite tasty!
Scroll Down For A Printable Recipe Card At The Bottom Of The Page
Why This Apple Cobbler Is Named After My Friend, Karen
When I was a newlywed 40 years ago, my husband and I moved from Southern California to a small town in Southern Oregon. I was privileged to meet a woman named Karen at the church where my husband was the Music Pastor.
Karen sang in our choir, had an amazing voice, and an even sweeter personality and infectious laugh. She graciously invited us over for meals, became a dear friend, and even let me do our laundry at her home several times… THAT was also a huge gift because it meant I didn’t have to hang out at the local laundromat for hours.
Karen made this apple cobbler for us once (40 years ago), and I loved it. Being a newlywed, and loving to cook, I asked her if she would share her recipe with me. She laughed and told me how incredibly easy it was to make (a big plus!), and gave it to me.
I named the recipe after her and wrote it on the recipe card, so I wouldn’t ever forget who gave it to me. I’ve made this recipe many times over the years, and finally decided to add it to my blog. Karen passed away quite suddenly in 2014, but her sweet spirit, love, zest for life, and memories live on in every person she poured herself into, including ME!
How EASY Is This Apple Cobbler To Make?
Here’s how to make this… it’s so very EASY! Preheat oven to 350° F. Lightly grease a 13×9 pan (or two smaller sized pans) with non-stick spray. Spread fruit pie filling evenly in pan.
 In medium bowl, mix butter, yellow cake mix and chopped nuts until crumbly.


Sprinkle this dry mixture evenly over the apple pie filling. The cobbler is usually made in a 9×13 pan, but this time I made it in a square pan (8×8) and a 9 inch cake pan, so I could give one away to a friend recovering from surgery, yet still have one for our family.

Bake at 350° F. for approximately 30 minutes, or until bubbly and crumb mixture is light golden brown on top. Remove pan to a wire rack and let cool down slightly before serving.

Once cobbler has cooled down a bit, serve up individual portions. This cobbler tastes best served slightly warm, with a big ol’ scoop of vanilla ice cream on top!

This cobbler is so very easy to make, and truly is quite scrumptious!
Do You Enjoy Cobblers And Crisps?
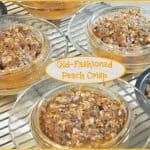
Speaking of cobblers, if you enjoy this type of dessert you might be interested in other cobbler and crisp recipes on this blog. I have quite a few cobbler recipes. Some of them are Strawberry Cobbler, Blackberry Cobbler, or Old-Fashioned Peach Crisp. You might also enjoy learning about the history of cobblers, crisps, pandowdy, etc.

It’s wonderful to have a recipe card for an apple cobbler that is yummy and soooo simple to make, permanently stored in my recipe box (and now on my blog)! With every bite, I am reminded of the sweet friend who gave it to me, and miss her very much! Have a great day, and be sure to check out ALL my recipes in the Recipe Index, located at the top of the page.
Interested In More Recipes?
Thank you for visiting this website. I appreciate you using some of your valuable time to do so. If you’re interested, I publish a newsletter 2 times per month (1st and 15th) with all the latest recipes, and other fun info. I would be honored to have you join our growing list of subscribers, so you never miss a great recipe!
There is a Newsletter subscription box on the top right side (or bottom) of each blog post, depending on the device you use, where you can easily submit your e-mail address (only) to be included in my mailing list.
You Can Also Find Me On Social Media:
Facebook page: The Grateful Girl Cooks!
Pinterest: The Grateful Girl Cooks!
Instagram: jbatthegratefulgirlcooks
 Recipe Source: Karen Cobb Nelson
Four ingredients and thirty minutes is all you need to make this EASY and delicious apple cobbler for dessert!
- 1 can apple pie filling (21 ounces)
- 1 cube butter , at room temperature
- 1 yellow cake mix
- 1 cup walnuts or pecans , chopped
- Non-stick spray
- Preheat oven to 350° F. Lightly grease a 13x9 pan (or two smaller sized pans) with non-stick spray.
- Spread fruit pie filling evenly in pan.
- In medium bowl, mix butter, yellow cake mix and chopped nuts until crumbly. Sprinkle this dry mixture evenly over the apple pie filling.
- Bake at 350° F. for approximately 30 minutes, or until bubbly and crumb mixture is light golden brown on top. Remove pan to a wire rack and let cool down slightly before serving. This cobbler tastes best served slightly warm, with a big ol' scoop of vanilla ice cream on top!
Here’s one more to pin on your Pinterest boards!


, featuring fresh strawberries and a buttery crumb topping, will be a family dessert favorite! / The Grateful Girl Cooks!")


, featuring fresh strawberries and a buttery crumb topping, will be a family dessert favorite! / The Grateful Girl Cooks!")