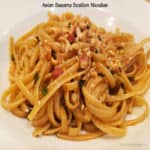
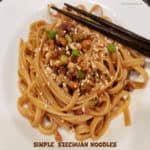
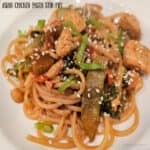
Asian Chicken Pasta Stir-Fry features lots of fresh veggies and noodles cooked in an Asian-inspired sauce. It’s an easy and delicious meal!

Today I want to share an “all-in-one dish” recipe that is a great meal to enjoy, because it has meat, veggies, pasta and sauce all together in one delicious dish!
I came up with this recipe by using some ingredients from a sauce I’ve used before, then included lots of vegetables we enjoy, along with a cooked boneless, skinless chicken breast.
My husband and I really love this meal! It has GREAT flavor (thanks to that yummy sauce) and is very filling. We usually have one serving leftover for another meal. Here’s how to make Asian Chicken Pasta Stir-Fry:
Scroll Down For A Printable Recipe Card At The Bottom Of The Page
Sauté The Chicken First
Cut a large (6-7 oz.) boneless, skinless chicken breast into bite-sized pieces. Heat a teaspoon of vegetable oil in a large skillet on medium heat.
Once the oil is hot (but not smoking), sauté the chicken until it’s fully cooked through and lightly browned on all sides. When done, transfer the chicken to a plate and keep it warm.

Prep And Stir-Fry Vegetables
For this recipe I use chopped broccoli and cauliflower, thinly sliced carrots, green beans and celery, chopped red bell pepper, and sugar snap peas.
I also thinly slice 3 stalks of green onions (the green stem and the white bulb) but set them aside to add after the other veggies are mostly cooked.
The sugar snap peas and red bell pepper, as seen below (from our garden) were frozen, but I added them to the skillet even though they were still slightly frozen.

Heat vegetable oil in a large skillet on medium heat until the oil is hot (but not smoking). Add all the prepped veggies (except for the green onions). Sauté the vegetables for 3-4 minutes, stirring often as they cook.

Now add the sliced green onions and stir well in order to fully combine the vegetables. Continue to cook the combined vegetables for one more minute.

Make The Asian-Inspired Sauce
At this point you will add the ingredients for Asian-inspired sauce directly into the skillet with the vegetables. The sauce will come together quickly and add lots of flavor to the veggies!
Stir in soy sauce, ketchup, apple cider vinegar, honey, sesame oil, Tabasco sauce and red pepper flakes. Add chopped, dry roasted peanuts and white sesame seeds to the veggies.
Stir well, until the vegetables and sauce ingredients are fully combined. Cook, stirring often for about 1-2 minutes, then turn off the heat under the skillet.


Cook Pasta While Veggies Cook!
While the veggies and then the sauce are being cooked, you can cook the pasta, in order to save a bit of time. This is optional, of course, but it does make the recipe take less time to make.
When done cooking the noodles according to package instructions, drain the pasta.

Add Chicken To The Stir-Fry
Add the reserved, cooked chicken pieces to the stir-fry in the skillet and stir well, until the chicken is combined with the veggies and coated with sauce.

Cook the veggies, sauce and chicken on medium heat only until they’re heated through.

Combine Veggies, Chicken and Hot Pasta
Add the cooked and well-drained pasta to the skillet and toss with tongs until the noodles are combined and covered with the sauce. Cook until heated through, then serve immediately.

Serve The Asian Chicken Pasta Stir-Fry
Once fully heated, serve the Asian Chicken Pasta Stir-Fry! Transfer each portion to a serving plate (or bowl). Garnish each serving with additional (reserved) sesame seeds and green onion slices. Serve hot and enjoy!

I hope you have the opportunity to make this scrumptious meal. It has a little bit of everything all in one dish- pasta, chicken, a delicious sauce and lots of vegetables. YUM!
Thank you for stopping by, and I invite you to come back again soon for more family-friendly recipes. Take care, may God bless you, and have a wonderful day.
Looking For More ASIAN-STYLE CHICKEN Recipes?
You can find ALL of my recipes in the Recipe Index, which is located at the top of the page. I have a wonderful variety of Asian-inspired recipes to check out, including:
- Easy Cashew Chicken
- Asian Lemon Chicken Strips
- Sweet Fire Chicken
- Thai Chicken Linguini
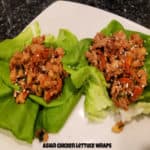
- Asian Chicken Lettuce Wraps
Want More Recipes? Get My FREE Newsletter!
I publish a newsletter 2 times per month (1st and 15th) with lots of recipes, tips, etc.
Would you like to join our growing list of subscribers?
There is a Newsletter subscription box on the top right (or bottom) of each blog post, depending on the device you use.
You can submit your e-mail address there, to be added to my mailing list.
Find Me On Social Media:
Facebook page: The Grateful Girl Cooks!
Pinterest: The Grateful Girl Cooks!
Instagram: jbatthegratefulgirlcooks

↓↓ PRINTABLE RECIPE BELOW ↓↓
Asian Chicken Pasta Stir-Fry features lots of fresh veggies and noodles cooked in an Asian-inspired sauce. It's an easy and delicious meal!
- 7 ounces boneless, skinless chicken breast cut into 1-inch pieces
- 1 teaspoon vegetable oil for cooking chicken
- 6 ounces spaghetti noodles cooked to pkg. directions, drained
- 1 Tablespoon vegetable oil
- 1 cup broccoli florets (bite-size) fresh, if possible
- 1 cup cauliflower florets (bite-size) fresh, if possible
- 1 medium carrot peeled, thinly sliced in rounds
- 10 sugar snap peas fresh or frozen
- 10 green beans fresh, if possible, cut in 2" pieces
- ½ cup celery , thinly sliced
- ¼ cup red bell pepper , chopped
- 3 stems green onions (green and white parts)* *thinly sliced (reserve 1 Tbsp. for garnish)
- 6½ Tablespoons low-sodium soy sauce
- 2½ Tablespoons ketchup
- 1½ Tablespoons apple cider vinegar
- 1 Tablespoon honey
- ¼ teaspoon sesame oil
- ⅛ teaspoon red pepper flakes
- 2 shakes Tabasco sauce
- 3 Tablespoons dry roasted peanuts (chopped)
- 2 Tablespoons white sesame seeds* *reserve ½ tsp. for garnish
Pat chicken dry with paper towels. Cut chicken into 1" pieces. Heat 1 tsp. vegetable oil in large skillet on. When oil is hot (but not smoking), sauté chicken until cooked through. Transfer chicken to a plate; keep warm until added later.
Heat 1 Tbsp. vegetable oil in large skillet on medium heat until oil is hot (but not smoking). Add veggies (except green onions). Sauté veggies 3-4 minutes, stirring often. Add green onions; stir well to combine. Cook vegetables 1 more minute.
Stir in soy sauce, ketchup, apple cider vinegar, honey, sesame oil, Tabasco sauce and red pepper flakes. Add peanuts and sesame seeds. Stir until combined. Cook for 1-2 minutes, stirring often. Remove skillet from heat.
OPTIONAL: Cook the pasta while cooking veggies/sauce to save time. When done cooking noodles according to package instructions, drain the pasta.
Add cooked chicken to the stir-fry in the skillet; stir well, until combined. Cook the veggies, sauce and chicken on medium heat, only until heated through.
Add cooked, drained pasta to the skillet; toss (or stir) until combined and pasta is covered with the sauce. Cook until hot. Serve immediately, garnished with reserved sesame seeds and green onions. Enjoy!
Here’s one more to pin on your Pinterest boards!