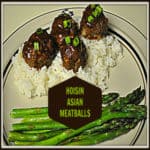
Hoisin Asian Meatballs are made using ground beef, baked not fried, and are covered with an Asian-inspired hoisin glaze. They are a great appetizer or main dish.
I found this recipe for Hoisin Asian Meatballs a couple of years ago on Pinterest and thought I’d give it a try. It didn’t disappoint!
The ground beef meatballs are easy to make. To make it even easier, they are cooked in the oven, so they are baked, not fried. The baked hoisin asian meatballs are then coated with a wonderful sweet and mildly spicy Asian-inspired Hoisin glaze before serving.
Scroll Down For A Printable Recipe Card At The Bottom Of The Page
What Is Hoisin Sauce?
Hoisin sauce is a commonly used Asian glaze for meat or as an addition to a stir-fry dish… think “Chinese BBQ Sauce”… a bit sweet and a bit spicy. It is commonly made from soybeans, peppers, garlic and sugar. This sauce is widely used in Chinese cooking. When used in this recipe as a base and combined with a few other Asian-inspired ingredients, creates a pretty tasty sauce for the meatballs.
Hoisin sauce is commonly found in most grocery stores in the Asian foods section. It is also very easy to make at home. I’ve done it, and posted the recipe for hoisin sauce here.
How To Make Hoisin Asian Meatballs
This recipe could not be any easier! Basically, you mix up the meatball ingredients, roll into meatballs, then bake them for about 15 minutes. While the meatballs bake, mix up the sauce. Once the meatballs come out of the oven, you simply drizzle each of the meatballs with the hoisin sauce mix, then serve.
See how easy it is to make hoisin Asian meatballs? About 15 minutes total for the prep time, and 12-15 minutes to bake. That’s it!!
How Many Meatballs Does This Recipe Make?
The recipe yields approximately 18 one and a half inch meatballs. Because of the short cooking time, they can easily be ready to serve in 30 minutes, which is an added bonus, right? Right!
Hoisin Asian meatballs can be used solely as individual appetizers. Just stick a fancy toothpick into each one, and serve them on a pretty platter. You can also serve them as a main course (which is how I served them), paired with some rice and a vegetable.

Hope you will give these yummy Hoisin Asian Meatballs a try… I think you will like them! I know we did! Thanks for stopping by, and I hope you will come back soon. Have a great day.
Looking For More Meatball Recipes?
There are several other meatball recipes, using ground beef on this website! They include:
- Hawaiian Meatballs and Rice
- Mom’s Swedish Meatballs and Rice
- Meatballs Stroganoff
- Easy Meatballs For Spaghetti
- BBQ Glazed Cheese & Spinach Meatballs
Interested In More Recipes?
Thank you for visiting this website. I appreciate you using some of your valuable time to do so. If you’re interested, I publish a newsletter 2 times per month (1st and 15th) with all the latest recipes, and other fun info. I would be honored to have you join our growing list of subscribers, so you never miss a great recipe!
There is a Newsletter subscription box on the top right side (or bottom) of each blog post, depending on the device you use, where you can easily submit your e-mail address (only) to be included in my mailing list.
You Can Also Find Me On Social Media:
Facebook page: The Grateful Girl Cooks!
Pinterest: The Grateful Girl Cooks!
Instagram: jbatthegratefulgirlcooks
 Original Recipe Source: http://damndelicious.net/2012/12/16/hoisin-asian-meatballs-sundaysupper/
↓↓ PRINTABLE RECIPE BELOW ↓↓
- 1 pound ground beef
- 1 teaspoon sesame oil
- 1/2 cup Panko bread crumbs
- 1/4 teaspoon ground ginger
- 1 large egg
- 2 cloves garlic , finely minced
- 4 green onions , thinly sliced (stem and bulb), divided (3 for meatballs, 1 for garnish)
- Sesame seeds , for garnish
- 1/4 cup Hoisin sauce (found in ethnic section at grocery store)
- 2 Tablespoons rice vinegar
- 1 Tablespoon soy sauce
- 1/2 teaspoon sesame oil
- 2 cloves garlic , finely minced
- 1/2 teaspoon ground ginger
- Before making meatballs, preheat your oven to 400 degrees. Place a sheet of parchment paper onto a large baking sheet.
- Prepare the meatballs: Mix the ground beef, sesame oil, Panko bread crumbs, ginger, egg, garlic and green onion together in a large bowl. Make sure the ingredients are fully incorporated together. Once combined, use your (clean) hands to form the meat mixture into approximately 18 one and a half inch wide meatballs.
- As each meatball is formed, place it on the parchment-lined baking sheet. Bake the meatballs at 400 degrees for 12-15 minutes (meatballs should be browned and cooked through).
- Prepare hoisin glaze while meatballs are baking: Mix the glaze ingredients (hoisin sauce, rice vinegar, soy sauce, sesame oil, ginger and garlic) in a small bowl until fully combined.
- As soon as meatballs are done, drizzle hoisin glaze over the top of each meatball, garnish with reserved green onions and sesame seeds and serve while hot.
If serving as appetizer, insert toothpicks or small skewers into each meatball on serving tray. If serving as main dish, serve it along with rice and a vegetable. ENJOY!
Here’s one more to pin on your Pinterest boards!


, with chicken breasts, broccoli, and an amazing Asian inspired stir fry sauce! / The Grateful Girl Cooks!")


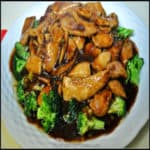
, with chicken breasts, broccoli, and an amazing Asian inspired stir fry sauce! / The Grateful Girl Cooks!")


