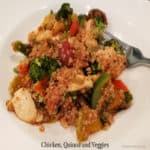
Chicken, Quinoa and Veggies is a nutritious, tasty dish with chicken, zucchini, broccoli, bell pepper, garlic, cherry tomatoes and quinoa!

If you’re looking for a way to add more vegetables to your meals, or to eat a bit more “healthy” dishes, may I suggest this recipe for Chicken, Quinoa and Veggies?
This yummy meal is made all in one big skillet, and is really simple to prepare! Plus… did I mention that is is a very “healthy” meal? Oh, I did? Okay!
Chicken, Quinoa and Veggies has it all- flavor, color, protein, texture, and “good for you” veggies like broccoli, zucchini, garlic, tomatoes, and bell peppers! Here’s how to make this delicious meal.
Scroll Down For A Printable Recipe Card At The Bottom Of The Page
By the Way- What IS Quinoa?

Quinoa (this is the “short” version) is basically a small seed from a specific plant that has been stripped of it’s outer coating and then can be cooked. This “superfood” originated in South America many, many years ago, and has become widely touted for its nutritional benefits.
Quinoa is gluten-free, high in protein, contains minerals such as iron, magnesium and zinc, and has dietary fiber! It is typically cooked in liquid to become edible and expands in size as it cooks.
You can typically find quinoa with the rice or beans in a grocery store, or in the Health Food section. It has become very popular in the United States, as well as other parts of the world.
First – Cook The Veggies And Chicken
Heat olive oil in a large skillet on Medium heat. Add minced garlic to the hot oil, and stirring often, cook for about 30 seconds (don’t burn the garlic!).

Stir in boneless chicken breast (cubed), and chopped bell peppers. Cook, stirring occasionally for 5 minutes, to cook the chicken and bell pepper.
NOTE: I use a variety of colored bell peppers (green, red and yellow), but if you don’t have a variety of colors available, use a green bell pepper for flavoring this dish.
Season the chicken and peppers with salt, black pepper, and onion powder, then stir to combine. NOTE: The chicken may not be fully cooked through at this stage, but will finish cooking as the dish progresses.


Add Water And Quinoa
Measure the quinoa and water into the skillet, then stir to combine. Bring the liquid to a boil on Medium-High heat, then put a lid on the skillet and reduce the heat to Medium-Low.
Cook for 10-12 minutes, keeping the lid on the skillet. There will probably still be a small amount of liquid in the pan when done.

Time To Add More Veggies!
Stir the quarter-sliced zucchini and the broccoli pieces into the skillet of chicken and quinoa until combined. Place a lid on the skillet and cook on Medium-Low heat for 13-15 minutes.
When done, the remaining liquid should be fully absorbed into the quinoa, and the zucchini and broccoli should be fork-tender.

The last step is to add the halved cherry tomatoes to the skillet. Give them a gentle stir to incorporate them into the dish, then remove the pan from the heat source, and serve.
NOTE: I used multi-colored cherry tomatoes (more COLOR!), because we grew them in our garden. If you have them, use them, but good ol’ red cherry tomatoes are perfect!

Serve The Chicken, Quinoa And Veggies
This recipe (as written) will yield two generous main dish servings. Transfer the chicken, quinoa and veggies to individual serving bowls or plates, and dig in while it is hot!
I’m confident you’re going to be surprised by how filling this meal is! Enjoy those healthy veggies bringing their color, texture and flavor to this dish. YUM!


I really hope you enjoy this nutritious, flavorful (and veggie packed) dish! Chicken, Quinoa and Veggies is very filling, bursting with great tasting vegetables, and it is simple to prepare!
Thanks for stopping by, and I invite you to come back again soon for more family-friendly recipes. Take care, may God bless you, and have a GREAT day!
Looking For More CHICKEN Recipes?
You can find ALL of my recipes in the Recipe Index, which is located at the top of the page. I have LOTS of fantastic tasting chicken recipes to choose from, including:
Want More Recipes? Get My FREE Newsletter!
I publish a newsletter 2 times per month (1st and 15th) with lots of recipes, tips, etc..
Would you like to join our growing list of subscribers?
There is a Newsletter subscription box on the top right (or bottom) of each blog post, depending on the device you use.
You can submit your e-mail address there, to be added to my mailing list.
Find Me On Social Media:
Facebook page: The Grateful Girl Cooks!
Pinterest: The Grateful Girl Cooks!
Instagram: jbatthegratefulgirlcooks

Recipe Adapted From: The book “Food Meets Faith”, by Isabel D. Price / New Life Promise, page 75, published by Live Smart Solutions, LLC, in 2019
↓↓ PRINTABLE RECIPE BELOW ↓↓
Chicken, Quinoa and Veggies is a nutritious, tasty dish with chicken, zucchini, broccoli, bell pepper, garlic, cherry tomatoes and quinoa!
- 2 teaspoons olive oil
- 2 cloves garlic minced
- ½ medium green bell pepper (or color combo) chopped
- 8 ounces boneless, skinless chicken breast =½ pound, cut in bite-sized pieces
- ½ teaspoon salt
- ¼ teaspoon ground black pepper
- ¼ teaspoon onion powder
- ¼ cup uncooked quinoa
- ⅓ cup water
- ½ cup fresh, chopped broccoli cut in bite-sized pieces
- ½ medium zucchini sliced and quartered
- ½ cup cherry tomatoes sliced in half
Heat olive oil in large skillet on Medium heat. Add garlic: cook, stirring often for 30 seconds (don't burn garlic!).
Stir in chicken cubes, and bell peppers. Cook, stirring occasionally, for 5 minutes. Season with salt, pepper, and onion powder; stir to combine. NOTE: Chicken may not be fully cooked, but will finish cooking later.
Add quinoa and water to skillet; stir to combine. Bring liquid to a boil on Medium-High heat. Put a lid on the skillet; reduce heat to Medium-Low. Cook for 10-12 minutes, keeping skillet covered. There might still be small amount of liquid in skillet when done.
Add zucchini and broccoli; stir to combine. Place lid on skillet; cook on Medium-Low 13-15 minutes. When done, remaining liquid should be absorbed into quinoa, and zucchini and broccoli should be fork-tender.
Gently stir in halved cherry tomatoes. Give them a gentle stir to incorporate into the dish. Remove skillet from heat source. Serve hot, and enjoy!
Here’s one more to pin on your Pinterest boards!