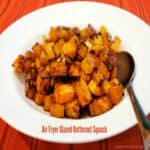
Category: Air Fryer Recipes

Air Fryer Chicken Breasts

Simple spices and butter provide wonderful flavor for these easy air fryer chicken breasts! Use your air fryer to make this tasty main dish quickly!

This past summer I received a Cosori air fryer for my birthday. It’s fun to cook foods with hot air, and with only a minimum amount of oil! I’ve been having fun with it ever since, trying out recipes for both main dishes, muffins, side dishes and desserts!

I’ve already posted a few delicious air fryer recipes, including:

Last month I made air fryer chicken breasts.  I knew I wanted to experiment with our family favorite sauce we use for grilling chicken breasts outside, but wanted to re-create it using my air fryer! Guess what? It turned out fabulous, so I want to share the recipe for this EASY dish.

Scroll Down For A Printable Recipe Card At the Bottom Of The Page

Make The Basting Sauce For The Chicken Breasts

The basting sauce recipe for the chicken breasts came from my Mom. It was how we ate our grilled chicken while growing up. We use it all summer long when we grill chicken on our BBQ, and have used the same recipe for almost 50 years. I thought it would be a perfect seasoning for these air fryer chicken breasts! And it WAS!

To make the sauce, combine the seasonings (garlic powder, celery salt, seasoning salt and coarse black pepper) with melted butter. Stir, until fully combined. Easy, right?

Sauce for chicken is made with combining melted butter and a few common spices.

Brush the sauce over 1 side of the boneless, skinless chicken breasts.

Seasoning sauce is brushed over one side of the chicken breasts.

Ready To Cook Air Fryer Chicken Breasts!

Preheat your air fryer to 370° (this usually takes about 3-4 minutes). TIP: To save time, preheat the air fryer while making the sauce and basting the chicken.

Place the chicken breasts, with the sauce side down in the basket of the preheated air fryer. Now brush the remaining sauce over the top of the chicken.

The chicken is placed in preheated air fryer, and other side is basted with sauce.

Cook the chicken breasts in the air fryer for 4 minutes, and then pause the air fryer and flip the chicken to the other side. Continue cooking for 4-5 additional minutes, or until chicken is golden brown, cooked through and is at a safe internal temperature of 165° F.

Your cooking time may vary a little bit, due to two factors: the size and weight of the chicken breasts you are using, and the ambient temps with air fryers. Because air fryer temperatures can vary, make sure to check the chicken while cooking to make sure you know when it is done.

The photo below shows the chicken breasts about halfway through the cooking time. You can see that the pieces are already beginning to brown.

Halfway through cooking time, air fryer chicken breasts are turning golden brown.

When the air fryer chicken breasts are finished cooking, carefully remove them from the hot basket, and serve immediately! BOOM! See how easy that was?

Now it’s time to enjoy one of the air fryer chicken breasts with some home canned green beans, and some orzo with Parmesan on the side. YUM! It was a good dinner!

Air fryer chicken breasts were served with orzo and green beans.

The air fryer chicken breasts were fully cooked and juicy inside, had a bit of a browned, crunchy crust on them, and had GREAT flavor! They were soooo good!

One of the air fryer chicken breasts in a close up photo.

If you have an air fryer, then I hope you will enjoy this quick and easy chicken recipe! Have a great day, friends! Why not look for ways throughout the day to be an encourager, because there are LOTS of hurting, lonely people around. Won’t you join me in trying to make a difference? Have a great day.

Looking For More CHICKEN Recipes?

You can find all of my chicken recipes in the Recipe Index, located at the top of the page. I have lots of them… including:

Interested In More Recipes?

Thank you for visiting this website. I appreciate you using some of your valuable time to do soIf you’re interested, I publish a newsletter 2 times per month (1st and 15th) with all the latest recipes, and other fun info. I would be honored to have you join our growing list of subscribers, so you never miss a great recipe!
There is a Newsletter subscription box on the top right side (or bottom) of each blog post, depending on the device you use, where you can easily submit your e-mail address (only) to be included in my mailing list.

You Can Also Find Me On Social Media:
Facebook page: The Grateful Girl Cooks!
Pinterest: The Grateful Girl Cooks!
Instagram: jbatthegratefulgirlcooks

Author's signature

Recipe source: my brain, and my mom’s recipe for basting sauce

0 from 0 votes
Air Fryer Chicken Breasts
Prep Time
5 mins
Cook Time
8 mins
Total Time
13 mins
 

Simple spices and butter provide wonderful flavor for these easy air fryer chicken breasts! Use your air fryer to make this tasty main dish quickly!

Category: Entree, Main Course
Cuisine: American
Keyword: air fryer chicken breasts
Servings: 2
Calories Per Serving: 295 kcal
Author: JB @ The Grateful Girl Cooks!
Ingredients
  • 12 ounces chicken breasts
  • 2 Tablespoons butter , melted
  • teaspoon garlic powder
  • teaspoon celery salt
  • teaspoon seasoning salt
  • teaspoon coarse ground black pepper
Instructions
  1. Preheat your air fryer to 370° (this usually takes about 4-5 minutes). TIP: To save time, mix the sauce and baste the chicken while the air fryer preheats.

  2. Combine garlic powder, celery salt, seasoning salt and coarse black pepper in a small bowl with the melted butter. Stir, until fully combined.

  3. Brush half of the sauce over 1 side of the boneless, skinless chicken breasts. When air fryer is at temperature, place chicken breasts, sauce side down in the basket of the air fryer. Brush remaining sauce over the top of the chicken.

  4. Cook at 370° F. for 4 minutes; pause the air fryer and turn chicken to the other side. Continue cooking for 4-5 more minutes, or until chicken is golden brown, cooked through and has an internal temperature of 165° F. When done, remove chicken, serve, and enjoy!

    NOTE: Your cooking time may vary, due to two factors: the size and weight of the chicken breasts you are using, and the ambient temps with air fryers. Because air fryer temperatures can vary, be sure to check the chicken while cooking to make sure you know when it is done.

Nutrition Facts
Air Fryer Chicken Breasts
Amount Per Serving (1 chicken breast)
Calories 295 Calories from Fat 144
% Daily Value*
Fat 16g25%
Saturated Fat 8g50%
Cholesterol 139mg46%
Sodium 588mg26%
Potassium 629mg18%
Carbohydrates 1g0%
Sugar 1g1%
Protein 36g72%
Vitamin A 401IU8%
Vitamin C 2mg2%
Calcium 9mg1%
Iron 1mg6%
* Percent Daily Values are based on a 2000 calorie diet.

Here’s one more to pin on your Pinterest boards!Simple spices and butter provide wonderful flavor for these easy air fryer chicken breasts! Use your air fryer to make this tasty main dish quickly!

Blackberry Air Fryer Handpies

Make six delicious, glazed blackberry air fryer handpies in about 20 minutes total! They’re easy to make, with purchased or homemade pie crust dough!
Make six delicious, glazed blackberry air fryer handpies in about 20 minutes total! They're easy to make, with purchased or homemade pie crust dough!

Do you like “fried” handpies? I sure do! When I was growing up, my grandma would come and live with us for a few months at a time. I have great memories of seeing her frying fruit pies (apricot, peach, berry, etc) in hot oil in a large skillet. Boy, they sure tasted great when Grandma made them!

I’ve made apricot mini-fried pies (now that I’m all grown up), and always enjoy those, because they remind me of her. Now that I own an air fryer (a birthday gift!), I am longing to create different recipes for air fried “fried pies” (without the oil!).

A couple months ago I decided to try my hand at making blackberry air fryer handpies. I used my standard blackberry pie filling (but cut the recipe in half), and my homemade pie dough (you can use store bought) to make these treats. Guess what? They taste fantastic, so I want to share the easy recipe here on the ol’ blog. Here’s how to make ’em:

Scroll Down For A Printable Recipe Card At The Bottom Of The Page

Prepare The Blackberry Filling

Place the blackberries, sugar, flour and cinnamon in a medium sized bowl. NOTE: If you will be using frozen blackberries, please let them thaw first, and then drain off any accumulated juice before adding the other ingredients.

Stir gently, until these ingredients are combined. This is the filling for your blackberry air fryer handpies. See how easy that was? Set the bowl aside while you cut out the pie dough circles.

Blackberries, flour, cinnamon and sugar are combined in a medium sized bowl.Once mixed, the fruit filling is ready to make the blackberry handpies.

Cutting Out The Pie Crust Dough

Roll out the pie crust dough (mine shown below is homemade) into a circle shape, large enough for at least a 9″ pie. If using a purchased pie dough crust, you may need to roll it out a bit more, so you have enough dough for 6 handpies!

Cut the dough into six 5″ circles. You can use a wide mug or glass, or a mini pie tin (like I used) to cut the shape. Collect any leftover scraps of dough, then roll them out again to get enough dough for 6 handpies.

Pie dough is rolled out before cutting into circle shapes for handpies.The pie dough is cut into 6 circles for the blackberry handpies.

Fill The Blackberry Handpies

Place a heaping Tablespoonful of the blackberry filling into the center of the dough circles. Be careful not to overfill, or the filling will ooze out! I speak from experience! *cough, cough*

Also, be sure to leave some empty dough around all the circle. Do NOT spread the filling out to the edges, because you need to fold the dough over the blackberry filling, and seal the edges.

A spoonful of blackberry pie filling is placed onto each pie dough circle.

Anyways… pull the dough up and over the blackberry filling to the other edge of the pie dough. Use the tines of a fork (the backside) and press down on the edges of the handpie to seal the two crusts together. Make sure they are sealed together well, so the pies don’t open up while they are cooking.

You can see where some of the filling juiced out of a couple of the handpies when I crimped the edges.. No big deal, it just looks nicer if they don’t look like they are part of a murder scene! Just sayin’.

Dough is folded over the pie filling, and edges are crimped to seal.

Brush the beaten egg over the entire top surface of the dough. This helps the crust to brown nicely while cooking in the air fryer.

A beaten egg is brushed over the handpies before cooking.

Time To Cook Some Blackberry Air Fryer Handpies!

Preheat your air fryer to 370°F. This will take a few minutes. Once pre-heated, carefully place the handpies into the basket. I was able to get all 6 of them into the basket at the same time, but you can cook them in batches, if your air fryer is smaller.

Cook the blackberry air fryer handpies at 370°F for 7-8 minutes. Check them at the 7 minute mark, since air fryer temps can vary greatly with different machines. When the dough is nicely golden brown and crispy on the outside, they are done.

Carefully remove them from the air fryer once done, and transfer them to a wire rack (with wax paper of aluminum foil UNDER the rack. The wax paper or foil will help catch any drips when you brush on the glaze.

Blackberry air fryer handpies are golden brown once fully cooked.

Glaze The Blackberry Air Fryer Handpies

While the handpies cool down just a bit, mix the powdered sugar with drops of water in a small bowl, to make a fairly thin glaze.

Once the blackberry handpies have cooled a bit, use a pastry brush to brush the glaze all over the top of the pastry. When the glaze has hardened, the handpies are ready to serve!

A glaze is made with water and powdered sugar.

The blackberry handpies are brushed with the glaze, and then are ready to eat!

Here’s a peek inside one of the blackberry air fryer handpies.  See that yummy looking blackberry filling inside? Go on… take a big bite… you know you want to, right?

A peek at the inside of one of the handpies, after cooking.

Hope you will consider trying this recipe! I really love my fairly new air fryer, and these mini handpies were absolutely delicious! Have a great day.

Looking For More AIR FRYER Recipes?

You can find all of my recipes in the Recipe Index, located at the top of the page. I have some delicious air fryer recipes you might enjoy, including:

Interested In More Recipes?

Thank you for visiting this website. I appreciate you using some of your valuable time to do soIf you’re interested, I publish a newsletter 2 times per month (1st and 15th) with all the latest recipes, and other fun info. I would be honored to have you join our growing list of subscribers, so you never miss a great recipe!
There is a Newsletter subscription box on the top right side (or bottom) of each blog post, depending on the device you use, where you can easily submit your e-mail address (only) to be included in my mailing list.

You Can Also Find Me On Social Media:
Facebook page: The Grateful Girl Cooks!
Pinterest: The Grateful Girl Cooks!
Instagram: jbatthegratefulgirlcooks

Author's signature


0 from 0 votes
Blackberry Air Fryer Handpies
Prep Time
15 mins
Cook Time
7 mins
Total Time
22 mins
 

Make six delicious, glazed blackberry air fryer handpies in about 20 minutes total! They're easy to make, with purchased or homemade pie crust dough!

Category: Desssert
Cuisine: American
Keyword: blackberry air fryer handpies
Servings: 6
Calories Per Serving: 322 kcal
Author: JB @ The Grateful Girl Cooks!
Ingredients
  • 2 cups blackberries
  • ½ cup granulated sugar
  • Tablespoons all purpose flour
  • teaspoon ground cinnamon
  • 1 pie crust (unbaked) homemade or store bought
  • 1 egg beaten
For Icing:
  • ½ cup powdered sugar
  • 3-4 drops water
Instructions
  1. Place blackberries, sugar, flour and cinnamon in a medium sized bowl. Stir gently, until ingredients are combined. Set bowl aside. NOTE: If using frozen blackberries, thaw first, and then drain off any accumulated juice before adding other ingredients.

  2. Roll pie crust dough into a circle shape, large enough for a 9" pie. If using a purchased pie dough crust, you might need to roll it out more, so you have enough dough for 6 handpies! Cut dough into six 5" circles. Collect leftover scraps of dough, then roll them out again to get enough dough for 6 handpies.

  3. Place a heaping Tablespoonful of blackberry filling into center of each circle. Don't overfill the handpies, or the filling will leak out! Be sure to leave a dough edge around the circle. Do NOT spread the filling out to the edge.

  4. Pull the dough (gently) up and over the blackberry filling to the other edge of the dough. Use the tines of a fork (the backside) and press down on the edges of the handpie to crimp and seal the two crusts together. Make sure they are sealed together well, so the pies don't open up while they are cooking. Brush beaten egg over the top of the handpies. This helps the crust to brown nicely while cooking in the air fryer.

  5. Preheat air fryer to 370°F. Once pre-heated, carefully place handpies into basket. You can cook them in batches, if necessary. Cook handpies at 370°F for 7-8 minutes. Check them at the 7 minute mark, as temperatures can vary with air fryers. When handpies are golden brown and crispy on the outside, they are done. Carefully remove them from air fryer, and transfer to a wire rack.

  6. While the handpies cool, mix the powdered sugar with drops of water in a small bowl, to make a fairly thin glaze. Once handpies have cooled a bit, use a pastry brush to brush the glaze all over the top. When glaze hardens, the handpies are ready to serve! Enjoy!

Nutrition Facts
Blackberry Air Fryer Handpies
Amount Per Serving (1 g)
Calories 322 Calories from Fat 108
% Daily Value*
Fat 12g18%
Saturated Fat 3g19%
Cholesterol 27mg9%
Sodium 144mg6%
Potassium 122mg3%
Carbohydrates 51g17%
Fiber 3g13%
Sugar 29g32%
Protein 4g8%
Vitamin A 142IU3%
Vitamin C 10mg12%
Calcium 26mg3%
Iron 1mg6%
* Percent Daily Values are based on a 2000 calorie diet.

Here’s one more to pin on your Pinterest boards!Make six delicious, glazed blackberry air fryer handpies in about 20 minutes total! They're easy to make, with purchased or homemade pie crust dough!

Air Fryer Chicken Parmesan

Air Fryer Chicken Parmesan is a quick and easy way to make this classic Italian dish (cooks in 10 minutes)! Tender inside, & crispy on the outside.

Several months ago I purchased an air fryer (Cosori), using a gift card I received from my family. I’ve sure had fun trying out and experimenting with using this time saving (and calorie cutting) small appliance!

This recipe for an air fryer chicken parmesan is one of my experiments that tastes absolutely fantastic! The dish is delicious, and the cooking time is only 10 minutes! How can you beat that? I wanted to share the recipe for this simple dish with you today. I tweaked one of my own recipes and came up with this one, because it turned out pretty great!

Scroll Down For A Printable Recipe Card At The Bottom Of The Page

Prepare The Chicken Breasts For Cooking

Place a chicken breast between 2 pieces of plastic wrap. Use a meat mallet (flat side), to pound the breast in order to flatten it (this helps chicken to cook faster). When done, repeat process with the other chicken breast. Lightly season each piece of chicken with salt and pepper.

Boneless, skinless chicken breasts are flattened with a meat mallet before cooking.

Prepare The Chicken Parmesan For Cooking

Preheat your air fryer to 400° F.  While the air fryer is preheating, beat a large egg in a small bowl, and coat each of the chicken breasts in it, covering both sides. Let any excess egg mixture drip back into the bowl.

Place the chicken breasts, one at a time, into a small bowl filled with a bread crumb and Parmesan cheese mixture. Dredge the chicken through the bread crumbs, covering both sides of the breast. I used my homemade bread crumbs for this recipe!

Repeat with the other piece of chicken. You can also use your hands to press additional crumbs onto the chicken. You want all pieces for the air fryer chicken parmesan well-covered!

Each chicken breast is covered with a beaten egg mixture.Egg covered chicken breasts are dredged in bread crumbs before cooking.

Cooking The Air Fryer Chicken Parmesan

Once the air fryer is preheated, quickly remove the basket, and gently lay each of the chicken breasts in the basket, leaving some space between each piece. Cook the chicken parmesan for 5 minutes, then turn the chicken over to the other side. You can already see after 5 minutes, how golden brown and crispy the chicken is!

Bread crumb coated chicken breasts cook in an air fryer for 5 minutes.Chicken breasts are flipped over, after cooking in an air fryer for 5 minutes.

Quickly spread the marinara sauce over each piece of chicken. Top the sauce with grated Parmesan cheese, and then add the mozzarella cheese! You can use a whole slice of mozzarella for each piece OR you can thinly slice string cheese pieces to fit. I ended up using 2 string cheeses, thinly sliced, when I made this the first time and took photos.

Place the basket back into the air fryer, and continue to cook at 400° F. for 5 more minutes. When done, the chicken will be nice and crispy, and all that glorious cheese on top should be well-melted and bubbly!

Air fryer chicken parmesan is topped with sauce, Parmesan and mozzarella cheeses.

Time To Eat The Air Fryer Chicken Parmesan

This is what the air fryer chicken parmesan looked like when it was done. Just look at that melted, gooey cheese on top!

The cheese has melted over the air fryer cooked chicken parmesan, and is ready to serve!

Carefully remove the chicken parmesan from the air fryer, serve, and enjoy! This dish goes especially well with a little pasta on the side! The chicken is moist and tender on the inside, crisp on the outside, and tastes wonderful!

Two pieces of air fryer chicken parmesan on a plate, ready to eat!

Hope you have the opportunity to try this wonderful classic Italian air fryer chicken parmesan! We really enjoyed it, and trust you will, too! If you prefer a traditionally cooked chicken parmesan, I hope you will check out my recipe for Mom’s Chicken Parmigiana. It tastes amazing, as well!

Looking For More AIR FRYER Recipes?

You can find all of my recipes in the Recipe Index, located at the top of the page. I have quite a few air fryer recipes you might enjoy, including:

Interested In More Recipes?

Thank you for visiting this website. I appreciate you using some of your valuable time to do soIf you’re interested, I publish a newsletter 2 times per month (1st and 15th) with all the latest recipes, and other fun info. I would be honored to have you join our growing list of subscribers, so you never miss a great recipe!
There is a Newsletter subscription box on the top right side (or bottom) of each blog post, depending on the device you use, where you can easily submit your e-mail address (only) to be included in my mailing list.

You Can Also Find Me On Social Media:
Facebook page: The Grateful Girl Cooks!
Pinterest: The Grateful Girl Cooks!
Instagram: jbatthegratefulgirlcooks

Author's signature

0 from 0 votes
Air Fryer Chicken Parmesan
Prep Time
10 mins
Cook Time
10 mins
Total Time
20 mins
 

Air Fryer Chicken Parmesan is a quick and easy way to make this classic Italian dish (cooks in 10 minutes)! Tender inside, & crispy on the outside.

Category: Main Course
Cuisine: Italian
Keyword: air fryer chicken parmesan
Servings: 2
Calories Per Serving: 325 kcal
Author: JB @ The Grateful Girl Cooks!
Ingredients
  • 2 chicken breasts (boneless, skinless)
  • 1 pinch salt and pepper
  • 1 large egg , beaten
  • ½ cup breadcrumbs
  • 2 Tablespoons grated Parmesan cheese
  • 2 Tablespoons marinara sauce
  • 2 Tablespoons grated Parmesan cheese
  • 2 slices mozzarella cheese (or 2 pieces string cheese, cut into strips)
Instructions
  1. Place a chicken breast between 2 pieces of plastic wrap. Use a meat mallet (flat side), to pound the breast, to flatten it (this helps chicken to cook faster). When done, repeat process with the other chicken breast. Lightly season chicken with salt and pepper.

  2. Preheat air fryer to 400° F.  While it preheats, beat egg in a small bowl; coat each of the chicken breasts in it (one at a time), covering both sides. Let excess egg drip back into the bowl. Mix bread crumbs and 2 T. Parmesan cheese in a separate small bowl. Dredge egg-coated chicken through the bread crumbs, covering both sides. Repeat for remaining chicken, making sure all pieces are well-covered!

  3. Once air fryer is preheated, remove basket, and place each chicken breast in the basket, leaving a space between each piece. Cook the chicken at 400° F. for 5 minutes, then pause machine. Turn chicken over to the other side. Spread marinara sauce over top of each piece of chicken. Top the sauce with grated Parmesan cheese, and then finish with mozzarella cheese! Place the basket back into air fryer, and continue to cook chicken at 400° F. for 5 more minutes. When done, the chicken will be cooked through, nice and crispy, and all that glorious cheese on top should be well-melted and bubbly! Serve hot, and enjoy!

Nutrition Facts
Air Fryer Chicken Parmesan
Amount Per Serving (1 g)
Calories 325 Calories from Fat 90
% Daily Value*
Fat 10g15%
Saturated Fat 4g25%
Cholesterol 187mg62%
Sodium 626mg27%
Potassium 560mg16%
Carbohydrates 21g7%
Fiber 1g4%
Sugar 3g3%
Protein 35g70%
Vitamin A 338IU7%
Vitamin C 2mg2%
Calcium 190mg19%
Iron 2mg11%
* Percent Daily Values are based on a 2000 calorie diet.

Here’s one more to pin on your Pinterest boards!Air Fryer Chicken Parmesan is a quick and easy way to make this classic Italian dish (cooks in 10 minutes)! Tender inside, & crispy on the outside.

Air Fryer Chicken Chimichangas

Enjoy delicious, easy to make air fryer chicken chimichangas, with chicken, salsa, black beans & cheese! They cook in 10 minutes, using an air fryer!

I came up with this delicious recipe for air fryer chicken chimichangas while experimenting with our Cosori air fryer. I bought it using some gift cards I was given this summer, and have been having fun trying recipes using it, ever since!

NOTE: If you don’t have an air fryer, see my note at the bottom of the page for baking directions.

The first time I tried making chimichangas, it did NOT go well! I cooked them too long in the air fryer, and they came out ultra crispy, and hard as bricks! NO GOOD! Needless to say, I kept experimenting, until I got it right with this version, so I want to share it with you.

The chimichangas are very filling, and are stuffed with shredded chicken (homemade or rotisserie), black beans, jack cheese, spices and salsa, mixed with sour cream (or plain Greek yogurt).

Scroll Down for A Printable Recipe Card At The Bottom Of The Page

Prepare The Chimichanga Filling

Stir the shredded cooked chicken, grated jack cheese, salsa, black beans, spices, and sour cream (or plain Greek yogurt) together, in a large bowl. Season the chicken to taste with salt and pepper, and then stir until the ingredients are fully combined.

Shredded chicken, beans, cheese, sour cream and seasonings are mixed together for chimichangas.

Filling The Tortillas

Fill the chimichangas one at a time, by spraying one side of a flour tortilla with non-stick cooking spray. Lay the sprayed side DOWN on a flat surface, and spoon the chicken chimichanga filling down the middle of the tortilla.

Roll the tortilla TIGHTLY around the filling, tucking in the edges, if desired. You MUST roll these tightly, so they don’t unroll during the air frying. Place them seam side DOWN, and repeat process for the remaining tortillas.

Chimichanga filling is placed in middle of a flour tortilla, and then tightly rolled up.

Here are all eight of the air fryer chimichangas, ready to be cooked. Once they are filled and rolled, the cooking oil sprayed side is now on the outside. This cooking spray is what will help the tortillas to crisp up in the air fryer.

Eight rolled chicken chimichangas on pan are ready to cook.

Cook The Chimichangas

Preheat your air fryer to 370° F. This usually takes about 5 minutes. Place 4 chimichangas (seam side down) into the basket of the air fryer.

Cook the air fryer chicken chimichangas in two batches, because you don’t want to overcrowd them.

Let the chimichangas cook for 9-10 minutes, or until they are lightly browned and crispy on the outside. I recommend checking them at 8 minutes, because temps can vary quite a bit in these appliances.

The chimichangas are crispy and browned when done cooking.

Serve The Air Fryer Chicken Chimichangas

Once they are done (to your liking, color-wise), they’re ready to serve! Carefully remove the chimichangas from the air fryer, and add the remaining ones to the basket to cook them, too!

Place the the air fryer chicken chimichangas on individual plates, when you’re ready to eat. Garnish them with some salsa and a dollop of sour cream, for added color and flavor!

Salsa and sour cream garnish one of the air fryer chicken chimichangas.A chimichanga is served, topped with salsa and sour cream, and a side salad.

I sincerely hope that you enjoy these air fryer chicken chimichangas! We’ve had them several times already, and really love them! They are at their best when served immediately (while really crispy), but can be reheated in the air fryer or in a microwave.

NOTE: If you do not own an air fryer, you can still make these! Prepare the chimichangas exactly as written. Bake the chimichangas in a preheated 400° F. oven for about 20-25 minutes, until they are golden brown. Garnish and serve!

Looking For More Mexican Food Recipes?

You can find all of my Mexican food recipes in the Recipe Index, located at the top of the page. Several you might enjoy include:

Interested In More Recipes?

Thank you for visiting this website. I appreciate you using some of your valuable time to do soIf you’re interested, I publish a newsletter 2 times per month (1st and 15th) with all the latest recipes, and other fun info. I would be honored to have you join our growing list of subscribers, so you never miss a great recipe!
There is a Newsletter subscription box on the top right side (or bottom) of each blog post, depending on the device you use, where you can easily submit your e-mail address (only) to be included in my mailing list.

You Can Also Find Me On Social Media:
Facebook page: The Grateful Girl Cooks!
Pinterest: The Grateful Girl Cooks!
Instagram: jbatthegratefulgirlcooks

Author's signature

0 from 0 votes
Air Fryer Chicken Chimichangas
Prep Time
15 mins
Cook Time
10 mins
Total Time
25 mins
 

Enjoy delicious, easy to make air fryer chicken chimichangas, with chicken, salsa, black beans & cheese! They cook in 10 minutes, using an air fryer!

Category: Main Course
Cuisine: Mexican
Keyword: air fryer chicken chimichangas
Servings: 8
Calories Per Serving: 225 kcal
Author: JB @ The Grateful Girl Cooks!
Ingredients
  • cups cooked, shredded chicken breast
  • 1 cup canned black beans , rinsed and drained
  • cups jack cheese, shredded
  • cup salsa
  • cup light sour cream OR plain Greek yogurt
  • ½ teaspoon chili powder
  • ½ teaspoon ground cumin
  • salt/pepper, to taste
  • 8 medium flour tortillas
Instructions
  1. Stir shredded cooked chicken, grated jack cheese, salsa, black beans, chili powder, cumin, and sour cream (or plain Greek yogurt) together in a large bowl. Season filling to taste with salt and pepper, and then stir until ingredients are fully combined.

  2. Fill chimichangas one at a time, by spraying one side of flour tortilla with non-stick cooking spray. Lay sprayed side DOWN on a flat surface, and spoon chimichanga filling down the middle of the tortilla. Roll tortilla TIGHTLY around filling, tucking in edges, if desired. You MUST roll these tightly, so they don't unroll during the air frying. Place seam side DOWN, and repeat process for remaining tortillas.

  3. Preheat air fryer to 370° F. This takes about 5 minutes. Place 4 chimichangas (seam side down) into the basket of the air fryer. Cook the chimichangas in 2 batches, because you don't want to overcrowd them. Cook for 9-10 minutes, or until they are lightly browned and crispy on the outside. I recommend checking them at 8 minutes, because temps can vary in these appliances.

  4. When done, carefully remove chimichangas from the air fryer, and add remaining ones to the basket to cook them, too! To serve, place chimichangas on individual plates. Garnish with some salsa and a dollop of sour cream, for added color and flavor! Enjoy!

Nutrition Facts
Air Fryer Chicken Chimichangas
Amount Per Serving (1 chimichanga)
Calories 225 Calories from Fat 81
% Daily Value*
Fat 9g14%
Saturated Fat 5g31%
Cholesterol 37mg12%
Sodium 501mg22%
Potassium 282mg8%
Carbohydrates 21g7%
Fiber 2g8%
Sugar 2g2%
Protein 15g30%
Vitamin A 265IU5%
Vitamin C 1mg1%
Calcium 189mg19%
Iron 2mg11%
* Percent Daily Values are based on a 2000 calorie diet.

Here’s one more to pin on your Pinterest boards!Enjoy delicious, easy to make air fryer chicken chimichangas, with chicken, salsa, black beans & cheese! They cook in 10 minutes, using an air fryer!