Take it from me- someone who used to despise meatloaf. This is Really GOOD Meatloaf, especially with the BBQ flavored sauce on top! It’s a cinch to make!
I Have A Sordid History With Meatloaf
I hated meatloaf as a kid. Really, really hated it. My mom coated it with ketchup. Then I married a guy (almost 38 years ago) who happened to LIKE meatloaf (the horror of it all!).
Several years after we married, I found this recipe in a church cookbook, and because I loved him, I cooked it for him. Guess what? It is REALLY GOOD MEATLOAF!
I actually found a meatloaf (and amazing BBQ sauce) that I LOVE! And that, my friends, is why I have given it such a dubious recipe name. End of story.
Seriously, this meatloaf IS really good, and completely EASY and inexpensive to make, which is always a plus in my book! Here’s what you do:
Scroll Down For A Printable Recipe Card At The Bottom Of The Page
How To Make Really Good Meatloaf
In a large bowl, combine the ingredients for the meatloaf. It is always interesting to me that one of the seasonings used for this meatloaf is POULTRY SEASONING. What? On BEEF?
Yep, you got that right. Poultry seasoning contains sage, rosemary, basil, celery seed, oregano, marjoram and thyme, so you can see how those spices add to the flavor of this yummy meatloaf.
Mix all the ingredients for the meatloaf together. That wasn’t too hard, was it? Trust me, the whole meatloaf only takes about 10 minutes prep time!

Place a piece of parchment paper on a baking sheet and form the meat mixture into a loaf shape on top of the parchment.

Make The Sauce
Place the meatloaf into a 350°F. oven for 30 minutes. While it bakes, prepare the sauce that will eventually go on top of the meatloaf. Mix the sauce, and it’s ready (told you this was EASY).


After the meatloaf has cooked for 30 minutes, remove it from the oven and quickly spoon the sauce all over the top and sides of the meatloaf.
Once the meatloaf is covered with the sauce, place it back in the oven and continue cooking for another 30 minutes.


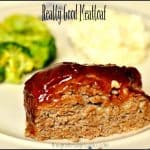
Really Good Meatloaf Is Baked And Ready To Serve
Once the meatloaf is done cooking (after the additional 30 minutes of cooking time), remove it from the oven. Let it sit for just a couple of minutes before slicing.

Cut the meat into slices (either 4 or 6, depending on the thickness of the serving size you want). Here’s a peek at the inside of the finished dish. Ooh, that sauce is so good.

My husband and I usually eat this dish with a side of mashed potatoes and a fresh steamed or baked veggie. That’s it!
Slice yourself a piece and enjoy the delicious sauce and wonderful tasting beef dish! EASY, EASY, EASY… and it tastes quite good, too. Sure hope you’ll give this recipe a try!
If you enjoy meatloaf, be sure to try my recipes for TexMex Turkey Meatloaf and Cheesy Italian Meatloaf. Both are delicious meals you will enjoy, as well.

I’ve been making this dish for over 20 years now, and we really enjoy it. That HAS to be some sort of a Christmas miracle (wink, wink)! I’m confident you will enjoy this simple, delicious and really GOOD meatloaf.
Thanks for stopping by, and I invite you to come back again soon for more family-friendly recipes. Take care, may God bless you, and have a wonderful day.
Looking For More GROUND BEEF Recipes?
You can ALL of my recipes in the Recipe Index, which is located at the top of the page. I have lots of ground beef recipes to choose from, including:
- Swedish Meatballs and Rice
- Hawaiian Meatballs
- Easy Meatballs For Spaghetti
- Mom’s Old-Fashioned Chili
- Moroccan Meatball Couscous Soup
Want More Recipes? Get My FREE Newsletter!
I publish a newsletter 2 times per month (1st and 15th) with lots of recipes, tips, etc.
Would you like to join our growing list of subscribers?
There is a Newsletter subscription box on the top right (or bottom) of each blog post, depending on the device you use.
You can submit your e-mail address there, to be added to my mailing list.
Find Me On Social Media:
Facebook page: The Grateful Girl Cooks!
Pinterest: The Grateful Girl Cooks!
Instagram: jbatthegratefulgirlcooks
 Recipe Source: Mrs. Gordon Rasmussen, Monte Vista Chapel Ladies Cookbook
↓↓ PRINTABLE RECIPE BELOW ↓↓
- 2/3 cup dry bread crumbs or crushed crackers (I prefer bread crumbs)
- 1 cup milk
- 1 1/2 pounds ground beef
- 2 eggs
- 1/4 cup chopped brown onion
- 1 teaspoon salt
- 1/4 teaspoon black pepper
- 1 teaspoon poultry seasoning (YES... poultry seasoning!)
- 3 Tablespoons brown sugar
- 1/4 cup ketchup
- 1/4 teaspoon ground nutmeg
- 1 teaspoon dry mustard powder
- Mix all meatloaf ingredients together in a large mixing bowl.
Place a piece of parchment paper on a baking sheet (with edges). Place the meat mixture onto the middle of the parchment paper and shape into a loaf.
- Bake at 350 degrees for 30 minutes. While it is baking, mix up the sauce ingredients in a small bowl.
- After 30 minutes, remove meatloaf from oven; spread the sauce completely over the top and sides of the loaf. Put the meatloaf back into the oven and continue baking for an additional 30 minutes. (Meatloaf will cook for a total of 60 minutes).
- When done, remove from oven, slice and serve (4-6 servings, depending on portion size). Enjoy!
Caloric calculation is based on a total of 6 servings.
Here’s one more to pin on your Pinterest boards!


